98648-015-03
Installation Instructions
Sartorius PMA.World | PMA.NetModel PMA 7501-000G | PMA 7501-000GL
Electronic Paint-mixing Scales
Страница 1: ...98648 015 03 Installation Instructions Sartorius PMA World PMA Net Model PMA 7501 000G PMA 7501 000GL Electronic Paint mixing Scales...
Страница 2: ...paint mixing applications 8 c key Clear and REC key for paint mixing applications 9 L key ENTER and MEM key for paint mixing applications 10 Graphic display 11 Weighing pan 12 Interfaces D Sub plug 9...
Страница 3: ...in stand alone mode or using the application software e g paint manu facturers paint mixing applications installed on your PC Communication is carried out via the data interface If required Sartorius...
Страница 4: ...amage or injuries that occur when using cables not supplied by Sartorius When connecting the scale to the power supply the laws valid in your country must be observed If you should have any questions...
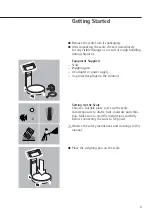
Страница 5: ...d Scale Weighing pan AC adapter or power supply 2 protective plugs in the column Setting Up the Scale Choose a suitable place to set up the scale Avoid exposure to drafts heat moisture and vibra tion...
Страница 6: ...ng or if the plug design differs from your local standard contact your Sartorius office or dealer Use only gen uine Sartorius AC adapters The use of AC adapters from other manufacturers even if these...
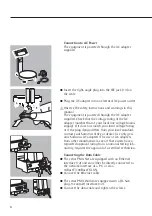
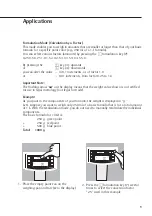
Страница 7: ...omponents until the desired weight of your formula is reached Remove the filled paint can from the weighing pan Never use a hammer to close the lid of a paint can while it is still on the weighing pan...
Страница 8: ...symbol appears in this case g Pour in additional components until the desired weight of your formula is reached Remove the filled paint can from the weighing pan Important Note If you zero the displa...
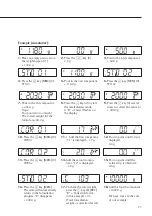
Страница 9: ...ortant Note The flashing arrow n on the display means that the weight value shown is not verified for use in legal metrology not legal for trade Example As you pour in the components of your formula t...
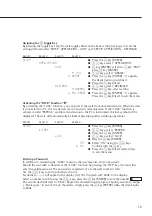
Страница 10: ...the S key 4 When you then press the L key MEM 9 the scale will automatically calculate and display the amounts of paint in g to add for each of the other components that you already poured in This mod...
Страница 11: ...the y key 4 several times to correct the value to 200 0 g 10 Press the L key MEM 9 COR 01 11 1 Add the first component C1 is displayed 1 7 g 12 Pour in paint until 0 0 g is displayed 0 0 g 13 Press th...
Страница 12: ...onnection to AC power and before each calibration adjustment allow the scale to warm up for approx 30 min Hold down the U key 5 for 2 sec When 5000 is displayed release the key Center the calibration...
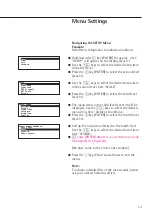
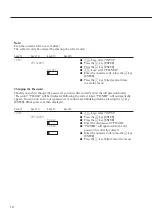
Страница 13: ...e RS keys to select the desired menu item here Ambient Conditions Press the L key ENTER to select the fourth level Level 4 Call up the menu item desired in the fourth level Use the RS keys to select t...
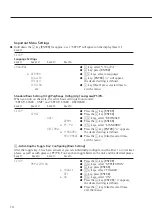
Страница 14: ...ER SCALE Press the L key ENTER UNIT RS keys select DECIMALS GRAMS Press the L key ENTER o PT PD RS keys select STANDARD DECIMALS Press the L key ENTER o appears o STANDARD the desired setting is defin...
Страница 15: ...sion to the PC is interrupted the lock symbol will be displayed The scale will automatically be locked preventing other weighing operations Level 1 Level 2 Level 3 Level 4 SETUP Press the L key ENTER...
Страница 16: ...e password you must first correctly enter the old password under Password PW OLD will be displayed Following the correct input PW NEW will automatically appear You can now enter a new password or conf...
Страница 17: ...s to select YES o NO Press the L key ENTER o will appear the new code is set Press the c key Clear several times to exit the menu Setting Codes Under the setting CODES the menu items are displayed in...
Страница 18: ...ea changes constantly Too much vibration or the Access the menu to select scale is exposed to draft the appropriate code to adapt the scale to the particular weighing environment refer to Menu Setting...
Страница 19: ...from AC power unplug the AC adapter power supply from the wall outlet mains supply Lock the equipment in a secure place to ensure that it cannot be used for the time being Safe operation of the PMA i...
Страница 20: ...no Sartorius affiliates subsidiaries dealers or distributors are located please contact your local authorities or a com mercial disposal operator Prior to disposal and or scrapping of the equipment an...
Страница 21: ...rface PMA Net RJ 45 10Base T 100Base TX Factory setting IP Address 192 168 140 016 Gateway 192 168 140 001 Subnet mask 255 255 255 000 Port 21554 Specifications Model PMA7501 000G 000GL Weighing range...
Страница 22: ...rement con trol and laboratory use EMC requirements Part 1 General requirements Defined immunity Industrial areas continuous un moni tored operation to interference see Installation Instructions Limit...
Страница 23: ...23...
Страница 24: ...ingen Germany All rights reserved No part of this publication may be reprinted or translated in any form or by any means without the prior written permission of Sartorius AG The status of the informat...