background image

24 


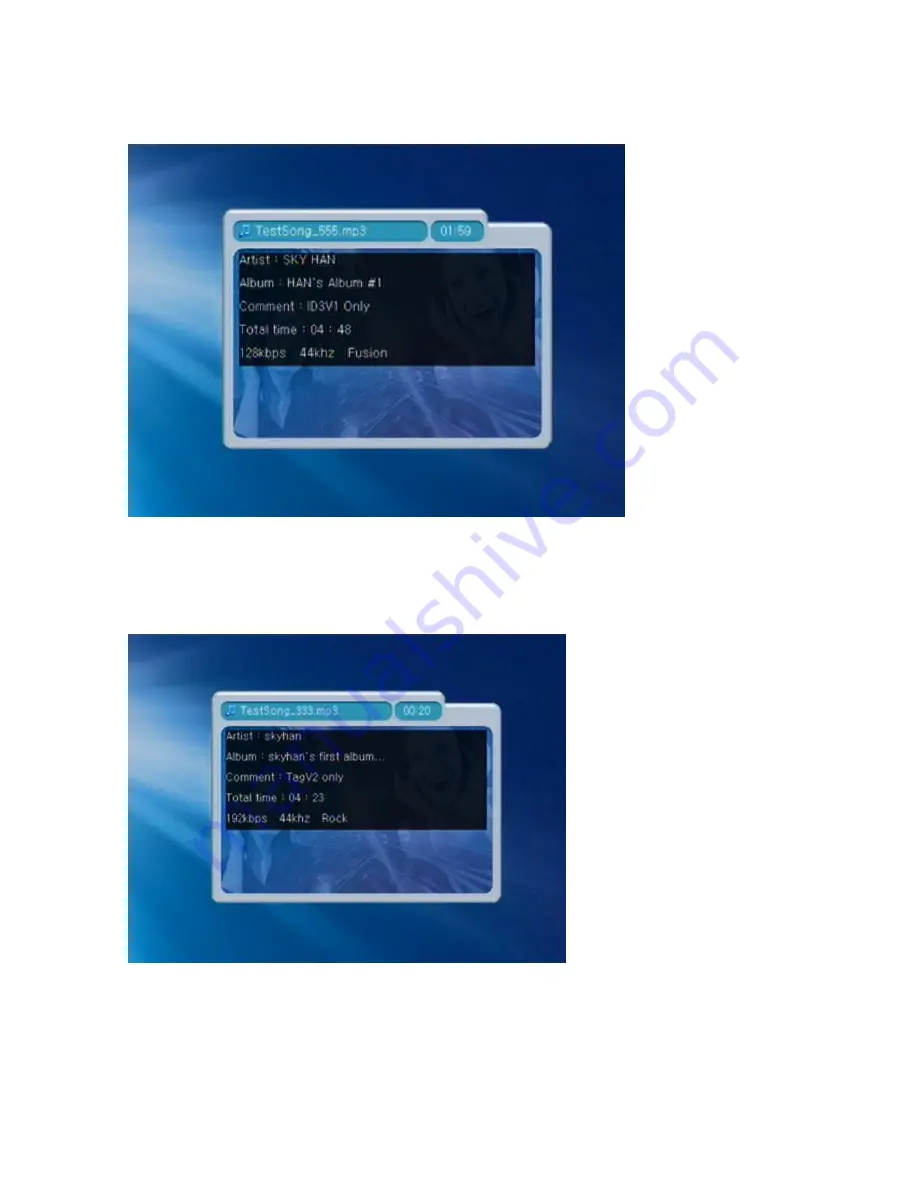
 MP3, WMA, OGG, WAV playback information is supplied(support 2.06 version) 

-


Bitrate, Sampling frequency, total playback time is supplied on listening to music. 

-


Push “INFO” key to see the information. 

-


OGG playback time information may different with the real time 

** In WAV, file information marks only total playtime, bit rate and sampling frequency


 Photo slide show is supplied on playback the music (support 2.06 version) 

-


Photo slide show is available on listening to music. 

-


To define the slide show folder, push “MENU” key on playback music then “Picture” key to define 

the folder. 

Содержание DVP-370

Страница 1: ...it please read this manual thoroughly and retain it for future reference z Due to the static Miss use inferior product your data could be damaged z Handle with care when you use your valuable data z P...

Страница 2: ...SB2 0 external storage device 3 Analog 2ch stereo digital 5 1ch Coaxial Optical FM stereo audio Option supported 4 Easy firmware upgradeable 3 Check supplied Accessories 1 DVP 370 unit 2 Remote contro...

Страница 3: ...Xvid DAT MPG VOB ISO IFO Music MP3 WMA OGG WAV Photo JPEG Support File format Caption smi srt sub Main chipset EM8511 Sigma design Video output Composite S Video HD Component support progressive outp...

Страница 4: ...h Use to select the option from menu 5 UP DOWN Use to adjust subtitle position Use to select the option from menu 6 OK Press OK to start movie Use to move to the menu during movie playback 7 LED Displ...

Страница 5: ...device suddenly stopped working please turn on and turn off the power or disconnect the power cord and reconnect it 2 Power switch The power button on remote control DVP 370 will not work while the po...

Страница 6: ...rt For USB connection to PC 10 Ext IR Connect the external IR receiver Option 11 FM Connect the FM Antenna Option 8 How to input HDD 1 Detach front case 2 Detach Fixture 3 Assemble HDD to fixture bott...

Страница 7: ...e to HDD with Power cable At this time please make sure that red cable of No 40 ribbon cable would be No 1 pin please double check 5 Slide in attached HDD and fixture to guide 6 Close front case and s...

Страница 8: ...Now you may use the drive Caution 1 If you use a new HDD to AivX you should FDISK and FORMAT Please refer to the Installation CD at MANUAL FDISK FORMAT format English pdf 2 When you make a partition p...

Страница 9: ...use the drive Caution 1 If you put a new HDD into AivX you should FDISK and FORMAT Please refer to the Installation CD at MANUAL FDISK FORMAT format English pdf 2 When you make a partition please mak...

Страница 10: ...10 4 Turn on the power switch on rear side of DVP 370 and then turn on the power button on remote control or DVP 370 5 Connect stereo audio cable indicated by white red to audio input on TV...

Страница 11: ...onnect two sound cables 3 Connect 5 1ch audio receiver to AivX using coaxial cable or optical cable to enjoy full surround sound Caution To hear the DTS sound you should connect 5 1ch receiver or deco...

Страница 12: ...3 Connect provided antenna to FM transmitter jack on AivX 4 Turn on your TV and set it to video input mode 5 Turn on the power switch on rear side of DVP 370 and then turn on the power button on remot...

Страница 13: ...e 10 5 Using Component video and stereo sound When you connect AivX to HDTV please use provided component cable 1 Connect AC power cable to an outlet 2 Connect AivX to HDTV using component cable Conne...

Страница 14: ...onnect component cable indicated by red green blue to component video input on TV 3 Connect AivX to 5 1ch receiver or decoder using coaxial or optical cable Caution To hear the DTS sound you should co...

Страница 15: ...cable to TV as shown below 2 Connect AC power cable to an outlet 3 Turn on your TV and set it to Component mode 4 Turn on the power switch on rear side of DVP 370 and then turn on the power button on...

Страница 16: ...ing AivX volume you should adjust radio sound volume If it makes noise you should adjust AivX volume 10 9 How to connect AivX to portable Car TV or In Dash TV To set up AivX in your car please make su...

Страница 17: ...wer switch on rear side of DVP 370 and then turn on the power button on remote control or DVP 370 5 Turn on your Car TV and set it to AV mode 6 Press T O button on remote control in order to fix suita...

Страница 18: ...18 1 How to use remote control Setup 2 dual audio...

Страница 19: ...OK key to select Playback movie files 1 AT File Browser screen using key to select a target among Movie Music Photo all If you select all you may see all the files 2 Select a file using key 3 Play fi...

Страница 20: ...SO IFO VOB ISO file format from ripping DVD is supported at the file browser in movie General data file which is compressed ISO is not supported on the AivX 12 2 Watching Movie Please refer to below s...

Страница 21: ...ss shows letterbox Pan scan and normal screen Letterbox is not using vertical side of screen to show full screen on TV Pan Scan is to cut horizontal line of screen to show full vertical side SCROLL Sc...

Страница 22: ...ack ground which is provided by AivX will be used Caution 1 Set the resolution as 720 x 480 If you apply higher resolution basic screen will be played 2 If you play with music button from remote contr...

Страница 23: ...below on searching MENU close the window then return to the menu OK playback the file STOP move to upper folder II purse or playback the music move file list to next page move file list to previous pa...

Страница 24: ...formation OGG playback time information may different with the real time In WAV file information marks only total playtime bit rate and sampling frequency Photo slide show is supplied on playback the...

Страница 25: ...he sliding interval time To disappear the file information from the screen push S T key twice If you want to see the song information again push S T once more then they are shown up Repeat Random key...

Страница 26: ...Slide Be able to set sliding time by 1 3 5 7 9 sec Screen rotating Screen rotating 90 180 degree Slide Function Slide time interval make set 1 3 5 7 9 secs we recommend you set the time interval over...

Страница 27: ...m Play List screen using key 2 Select and press movie file using key 3 To play press or OK key Changing Play order 1 At Play List screen select Play order using key 2 Select movie file to play using k...

Страница 28: ...ay List using key 3 Press OK key to add on to Play List check mark And Press ok again and then Play List will be deleted Delete 1 Select Remove from Play List using key 2 Select delete file from Play...

Страница 29: ...ct detailed setup list 6 Press OK key to check or not check upon clicking 12 6 Video setup HDTV TV Form This category is to select what kind of TV Caution If this setup is not completed you may not se...

Страница 30: ...VI file Once you select 0 key on playback avi file Then the audio is changed when the file format is set dual audio FM transmission Option Set up to listen sound through FM radio If you use FM transmi...

Страница 31: ...age as you wish Firmware upgrade Using for firmware upgrade A new firmware version indicate version update update bin of HDD Present firmware version is a present version using the AivX system now How...

Страница 32: ...de will be processed If you want to firmware upgrade cancel then in No location press OK key Caution Do not turn off while firmware upgrade It may cause serious system malfunction 12 Automatically pow...

Страница 33: ......

Отзывы: