


6.5
Camera/Lens Installation
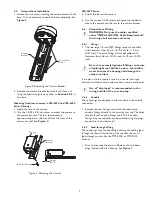
1. Loosen the two screws holding the camera bracket to the
base. It is not necessary to remove them completely. See
Figure 3.
Figure 3: Removing the Camera Bracket
2. Remove the camera bracket from the base. If you are
using the feed-through feature, refer to Section 6.8.3 at
this time.
Mounting fixed lens cameras in VSE-2300 and VSE-2400
Series Housings.
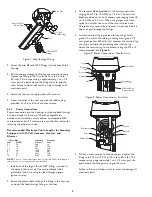
1. Attach the lens to the camera.
2. Use the 1/4-20 x 3/8-inch screw to mount the camera to
the camera bracket. The lens should extend
approximately 6 mm (0.25-inch) from the front of the
camera bracket. See Figure 4.
Figure 4: Attaching the Camera
7
Loosen These
Screws
Camera
Bracket
Camera
Camera
Bracket
1/4-20 x 3/8 Screw
6.4 mm
0.25 in
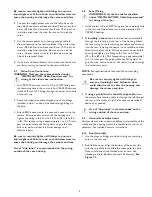
VSE-2400 Series:
3. Attach the lens to the camera.
4. Use the various 1/4-20 screws and spacers provided to
mount the camera and the lens to the camera bracket.
6.6
Camera/Lens Wiring
WARNING: Only use the cables specified
under "INSTALLATION, Cable Requirements"
for wiring of all cameras and lenses.
6.6.1
Fittings
1. The two large 1/2-inch NPT fittings accept round cable
with diameters from 4.3 mm (0.17-inch) to 11.9 mm
(0.47-inch). The small fittings will accept cables with
diameters from 4.6 mm (0.181-inch) to 7.9 mm (0.312-
inch).
Be sure to securely tighten all fittings to ensure
a liquid-tight seal. Failure to do so could allow
water to enter the housing and damage the
camera and lens.
If a sealant is to be used, be sure it is a neutral cure type.
Sealants that release acetic acid may harm camera electronics.
Use of "drip loops" is recommended on the
wiring outside of the rear end cap.
6.6.2
Conduit
These housings are designed to allow conduit to be directly
connected.
1. Remove the rear fittings and attach the conduit and
conduit fittings directly to the housing rear cap. The holes
accept 1/2-inch conduit fittings and PG 13.5 conduit
fittings. Any unused holes can be covered using the plugs
provided in the hardware kit.
6.6.3
Feed-through Wiring
These housings have the capability of having the cabling feed
through the foot of the housing. This requires the use of
feed-through mounts like the MTS-2000, or MTS-2030
J-mount.
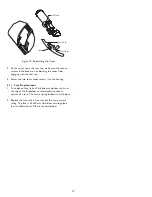
1. Prior to mounting the camera. Remove the two dome
plugs located inside the housing. See Figure 7.


