background image

22

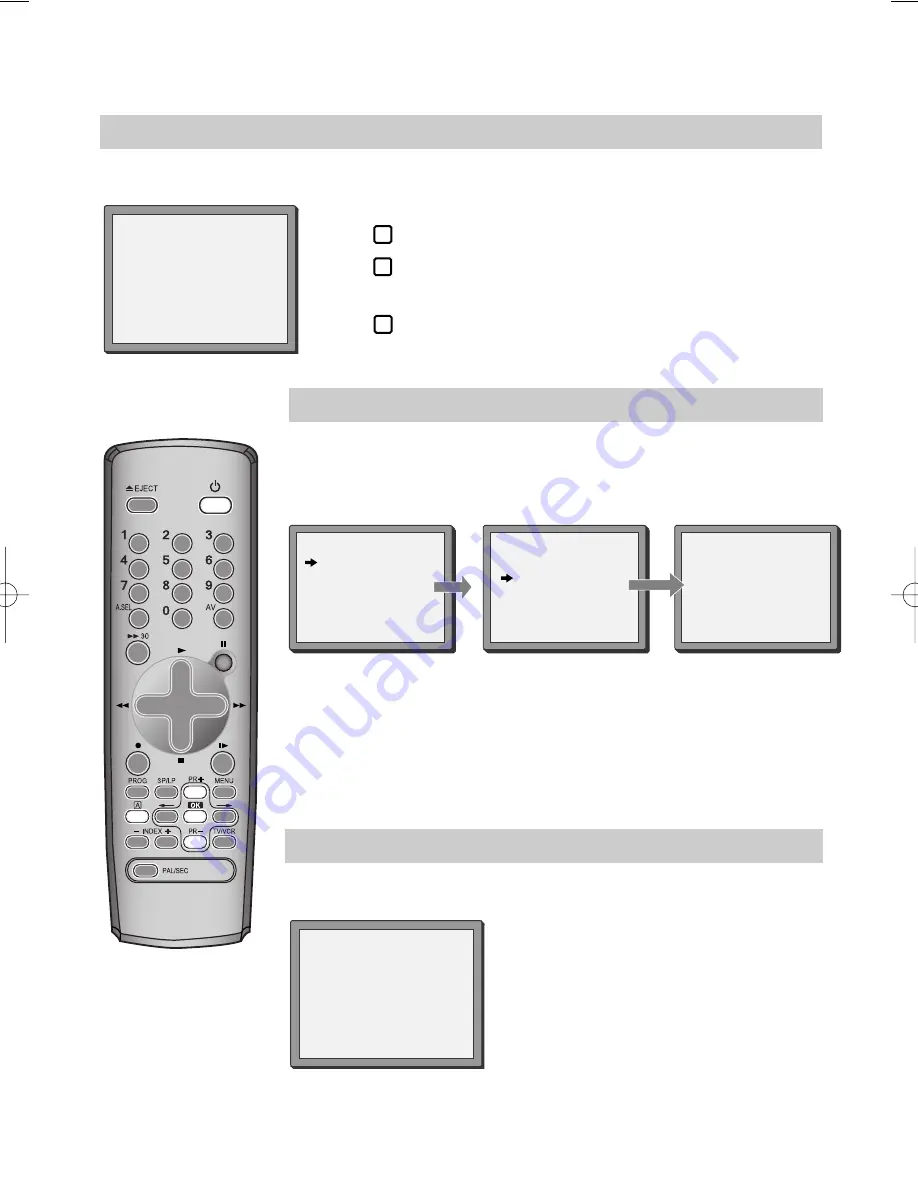
Clock and counter display

The counter counts in real time from when you load the cassette. This does not have to be at the beginning

of the cassette. The counter does not count unrecorded parts of the cassette.

If you rewind the cassette, the counter will count backwards, if you rewind beyond the zero position, the

counter counts in negative values for example,  – 0:01:15.

This display will only appear when there is a cassette in the video.

STOP   SP            PR01   P-01

14:00  08/05  

STEREO  ON

Press 

once to display the time and date.

Press 

twice to display the counter time and how long is

left to the end of the cassette.

Press 

three times to clear the screen.

A

A

A

Remaining time and cassette length

Choose ‘Tape Remain’ by pressing 

OK

Press 

PR+

or 

PR-

to select the length of your current cassette.

Press 

OK

to confirm. The display will show how long is left to the

end of the cassette.
This will be displayed for several seconds only.

Finding the counter zero position

Press 

MENU

and choose ‘Tape Control’ by

pressing 

PR+

and then 

OK

.

Choose ‘Go to Zero’ by pressing

PR-

and

then 

OK

.

The video will wind to the position 0:00:00
and stop.

REW    SP                   
GO TO ZERO

0:02:13

TAPE CONTROL

TAPE REMAIN

E-240  01:27

TAPE REMAIN
GO TO ZERO
COUNTER  RESET

E-180
E-240
E-300

PR+/-:SELECT
OK:CONFIRM    MENU:END

PR+/-:SELECT
OK:CONFIRM    MENU:END

This display will only appear when there is a cassette in the video.

Press 

MENU

and choose ‘Tape Control’ by pressing 

PR+

and then 

OK

This display will only appear when there is a cassette in the video.

These buttons are used
on the following three
pages.

DVYT7E34D-RJ/O+RJ/H 


2006.5.23 

2:42 

PM 


˘

`

22

Содержание VHR-VK920A

Страница 1: ...VIDEORECORDER VHR VK920A INSTRUCTION MANUAL Please read this manual carefully before connecting your VCR and operating it for the first time Keep the manual in a safe place for future reference PAL ...

Страница 2: ...hich can seriously damage the video and cassettes Wait around two hours to allow it to reach room temperature Make sure the video is placed at least 10cm apart from other home appliances or obstacles to get sufficient ventilation This apparatus shall not be exposed to dripping or splashing and no objects filled with liquids such as vases shall be placed on top of the video Put the video on a stead...

Страница 3: ...l tuning 9 Station names 10 Sorting programme locations Clearing programme locations 11 Front panel controls 12 Playing cassettes Play 13 Still Variable picture search Variable slow motion Finding new recordings index scan 14 CM skip commercial skip Auto Repeat Child lock 15 OSD On Screen Display On Off 16 Recording cassettes Simple recording 17 Recording cassettes One touch recording OTR 18 Norma...

Страница 4: ... equipment from the mains supply ANT OUT ANT IN AUDIO AUDIO VIDEO OUT IN L L R R Television Aerial The type of aerial you should use depends on local interference and how far you are from the transmitter You should contact a local retailer if you have any questions about your aerial Back view of your VCR This lead is supplied in your accessory kit 200V 240V 50 60 Hz If you have connected your vide...

Страница 5: ... the TV if available This connection will provide best picture and sound quality Ask your dealer for an appropriate cable if you do not have one Without a RCA cable you need to follow the steps described under If you are not using a RCA cable See page 4 Make sure the rating of the household mains supply matches the rating shown on the back of the video Now plug in the mains lead The display of the...

Страница 6: ... the TV then press MENU button on your video s remote control and confirm MAIN MENU screen appears if not tune the TV again Once you have found the picture of above two cases follow the instructions within your television manual to store this new channel into a programme location Call the video s MAIN MENU choose VCR SETUP then RF OUTPUT SET Type in the free channel Store and exit If the quality o...

Страница 7: ...d set the machine to record Switch your video to play back at the position you want copying to start TV other VCR ANT OUT ANT IN AUDIO AUDIO VIDEO OUT IN L L R R Other VCR Decoder for Pay TV Camcorder Video Player Assembling For the best results the source cassette from which you are recording should already be playing back when you start recording Should you wish to assemble your own film from ca...

Страница 8: ...ch tunes in all the stations you can receive in your country and sorts them in a common order for example P 01 on programme 1 P 02 on programme 2 and so on See page 10 and page 11 if you need to change any of the automatic settings You should finish the auto search before you go to page 10 or page 11 In case of the auto search is not able to receive some CH s you can receive the CH using the manua...

Страница 9: ...wice then OK Select RF Output Set Up by pressing PR twice then OK Change the channel number using buttons 0 9 Press OK to confirm Press MENU to end Option 3 Buy a RCA cable from your local electrical shop Connect the RCA cable as shown on page 3 diagram 2 If you want to change the RF output in the future due to new broadcasting stations or equipment and so on press and hold the OK button on the re...

Страница 10: ...RECT OK CONFIRM MENU END TIME 11 41 DATE 08 05 2006 MON Setting time and date 1 2 Once the CLOCK SET display is on the screen move to the position you want to change by pressing or Use the number buttons 0 to 9 on the remote control to enter the correct time and date Press OK to confirm the settings and press MENU to end CLOCK SET 0 9 SETUP HOUR CORRECT MENU END TIME DATE ...

Страница 11: ...ENU END MANUAL SET PR01 P 01 PR08 P 08 PR02 P 02 PR09 P 09 PR03 P 03 PR10 P 10 PR04 P 04 PR11 P 11 PR05 P 05 PR12 PR06 P 06 PR13 PR07 P 07 PR14 PR SELECT OK CONFIRM MENU END 2 3 4 5 These buttons are used on the following two pages MANUAL SET PR UP DOWN SELECT OK CONFIRM MENU END PR 04 RECEPTION AERIAL AUTOSEARCH CH__ FINE TUNING NAME ____ MANUAL SET PR UP DOWN SELECT OK CONFIRM MENU END PR 03 REC...

Страница 12: ...he PR buttons move to the next letter with the buttons Press OK to confirm and MENU to end 2 3 4 MANUAL SET PR01 P 01 PR08 P 08 PR02 P 02 PR09 P 09 PR03 P 03 PR10 P 10 PR04 P 04 PR11 P 11 PR05 P 05 PR12 PR06 P 06 PR13 PR07 P 07 PR14 PR SELECT OK CONFIRM MENU END MANUAL SET PR UP DOWN 0 1 CHANGE CREATE OK CONFIRM MENU END PR 01 RECEPTION AERIAL AUTOSEARCH CH01 FINE TUNING NAME ____ MANUAL SET PR SE...

Страница 13: ...03 P 03 PR10 P 10 PR04 P 04 PR11 P 11 PR05 P 05 PR12 PR06 P 06 PR13 PR07 P 07 PR14 Clearing programme locations Clearing programme locations allows you to erase any stored programmes you no longer want 1 Press MENU Choose PR Preset by pressing PR then OK Choose PR Erase by pressing PR twice and then OK Press PR or PR to select the station you want to clear Press and hold to watch the picture 2 PR ...

Страница 14: ...s pause record still playback playback start playback stop rewinding fast forwarding a cassette from stop or picture search backwards forwards from playback mode number buttons to select programmes stations or to type in numbers the menu controls programme station selection PR to select the sound output Front panel controls The following buttons are on the front of your video Play stand by power o...

Страница 15: ...ack will start automatically When you are playing tapes of poor quality or tapes which have been recorded on another machine you can use the PR or PR buttons while the cassette is playing to reduce horizontal interferences stripes Playing NTSC tapes on PAL TV If you play cassettes which have been recorded on the NTSC colour system as used in the USA you can watch the pictures on most PAL TVs On ol...

Страница 16: ...n speed in six steps Press to switch back to normal playback After approximately five minutes on still the cassette will automatically switch to normal playback If the still picture is jumping you can steady it by using the PR and PR button Finding new recordings index scan The video index search system allows you to find the beginning of any recording you have made on your video Your video automa...

Страница 17: ... This video repeatedly plays the tape from beginning to end To release this mode press any mode operation button such as PLAY FF REW or STOP Child lock Press the button for about 5 seconds No buttons of front panel can be operated now and LOCK INDICATOR SAFE will be displayed momentarily on LED display Keep your remote control in a safe place To release child lock press any button of the remote co...

Страница 18: ...function is changed at the front display or remote control the change will be displayed on the screen Press MENU Choose VCR SETUP And press OK Choose OSD ON OFF If you want OSD OFF mode press PR and press OK OSD characters will not be displayed in the normal picture at the start of each mode change 1 2 3 MAIN MENU TIMER PROGRAM PR PRESET VCR SETUP TAPE CONTROL PR SELECT OK CONFIRM MENU END Though ...

Страница 19: ...rding Press to stop your recording Press PR or PR to choose the station you want to record Press SP LP if you wish to double the length of the cassette s recording time For example on an E 240 cassette you can record for up to four hours when SP is displayed or up to eight hours when LP is displayed STOP SP PR01 ARD STEREO ON VCR VCR VCR These buttons are used on the following two pages ...

Страница 20: ...ording One touch recording OTR VCR Press PR or PR to choose the station you want to record Every time you press the recording time will increase by 30 minutes It is possible to record for up to 10 hours if there is enough room on the cassette To cancel OTR press and hold the STOP button for about five seconds until the video stops recording If you want to record from other equipment that is connec...

Страница 21: ...RAM ONCE PR Use PR if you want to choose the AV channel or 0 to 9 for other channels Start time Use buttons 0 to 9 to enter the start time End time Use buttons 0 to 9 to enter the end time Start date Use buttons 0 to 9 to enter the date Tape Speed Use PR if you want to choose LP see page 17 If you want to change any of the details Move to the details you want to change using the and buttons Change...

Страница 22: ...the timer to start recording a second programme before the first programme has finished If you don t adjust the times the video will record the first programme completely then start to record the second one If there is not enough free space for the recording on the cassette the video will automatically switch to LP to double the recording time left on the cassette The recorder will eject cassettes...

Страница 23: ...tom line of the screen Press OK Remember to load a cassette and switch the video off by pressing TIMER PROGRAM PR START END DATE 01 18 10 20 30 12 05 03 21 20 22 20 13 05 PR SELECT OK CONFIRM MENU END TIMER PROGRAM ONCE PR 03 START TIME 21 20 END TIME 22 20 START DATE 13 05 SAT TAPE SPEED SP 0 ERASE CORRECT MENU END TIMER PROGRAM PR START END DATE 01 18 10 20 30 12 05 03 21 20 22 20 13 05 PR SELEC...

Страница 24: ... cassette length Choose Tape Remain by pressing OK Press PR or PR to select the length of your current cassette Press OK to confirm The display will show how long is left to the end of the cassette This will be displayed for several seconds only Finding the counter zero position Press MENU and choose Tape Control by pressing PR and then OK Choose Go to Zero by pressing PR and then OK The video wil...

Страница 25: ...d computer monitors Always rewind cassettes to the beginning when you have finished using them Stand cassettes up with the full spool at the bottom Always keep cassettes in their cases You can protect your precious recordings from being recorded over by breaking off the safety tab on the side of the cassette some cassettes have a slide When you have removed the tab your video will eject the casset...

Страница 26: ...tand by when no station is received for more than five minutes Language Select Press MENU Select VCR SETUP by pressing PR twice then press OK Choose LANGUAGE SET by pressing PR then press OK Use PR or PR to select the wanted language and press OK Press MENU to confirm LANGUAGE SET ENGLISH DEUTSCH ITALIANO ESPAÑOL FRANÇAIS NEDERLANDS SVENSKA SUOMI PR SELECT OK CONFIRM MENU END ...

Страница 27: ...ormance is being broadcast As well as the normal mono sound track of VHS video recorders your video has a high quality hi fi sound system This means you can enjoy the following Films with excellent stereo sound Films of full length concerts in high quality stereo Films with impressive surround sound using extra surround sound equipment VHS cassettes with hi fi stereo sound and also VHS cassette wi...

Страница 28: ...play and long play Hi Fi Frequency response 20 Hz to 20 KHz Dynamic range 80dB Signal to Noise Ratio 60dB General Temperature range 5 C to 35 C Humidity range 80 Timer 8 events 1 month Index Aerial 2 6 Bilingual 13 25 Cassette length 22 Channel 6 7 9 11 Child lock 15 CM Skip 15 Condensation Precautions Counter 22 Location number 6 7 11 LP long play 17 19 Mains 2 26 Mesecam 13 NTSC 13 OSD ON OFF 16...

Страница 29: ...cting the TV and video TV VCR button is not available for this set The television will not change channel when the video is turned on If the television will not change channel while the video is on check whether a scart lead has been connected See page 3 option 2 If a scart lead has been connected you need to press the TV VCR button on the video remote control When the small VCR symbol appears on ...

Страница 30: ...t the video and press OK B The video is now tuning all the television stations available in your area C If Clock Set appears on the TV screen please enter the time and date Use the number buttons 0 to 9 on the remote control Press OK to confirm D When Manual Set appears on the TV screen press MENU to end F Your video is now set up If you want to change station names or the programmes they are stor...

Страница 31: ...29 MEMO ...

Страница 32: ...P N 97P95600D0 1E 06 06 SANYO Electric Co Ltd Printed in Korea ...

Отзывы: