

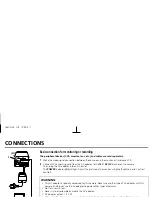


CONNECTIONS
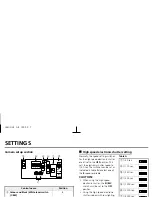
Basic connection for monitoring or recording
The peripheral devices (VCR, monitor, lens, etc.) and cables are sold separately.
1
Make the video signal connection between the camera and the monitor or time lapse VCR.
2
Connect DC connecting cord from the AC adaptor to the
12 V DC IN
terminal on the camera.
Then, plug the AC adaptor into an AC outlet.
The
POWER
indicator
(A)
will light. Adjust the picture on the monitor using the Brightness and Contrast
controls.
WARNING:
•
This AC adaptor is specially conceived for this camera. Never use another type of AC adaptor with this
camera, and do not use this AC adaptor to power other types of cameras.
•
Not for use with toys.
•
Never try to disassemble or modify the AC adaptor.
•
AC adaptor output: 15 V DC
•
When installing the camera, use metal brackets to fix the AC adaptor. Then attach it firmly using a
metal strap.
Coaxial cable type and maximum length
•
Cable type RG-59U (3C-2V), 250 m maximum.
•
Cable type RG-6U (5C-2V), 500 m maximum.
•
Cable type RG-11U (7C-2V), 600 m maximum.
CAUTION:
•
The RG-59U type cable should not be run through electrical conduits or through the air.
•
Using CCTV/Video-grade coaxial cable.
(Video signal connections)
: VIDEO IN
: VIDEO OUT
(A)
1
L53U2/XE GB 1999, 9, 7
English
9


