background image

– 8 –

1-4. CP2 STROBE CIRCUIT DESCRIPTION

1. Charging Circuit

When UNREG power is supplied to the charge circuit and the
CHG signal from microprocessor becomes High (3.3 V), the
charging circuit starts operating and the main electorolytic
capacitor is charged with high-voltage direct current.
However, when the CHG signal is Low (0 V), the charging
circuit does not operate.

1-1. Charge switch

When the CHG signal switches to Hi, IC541 starts charging
operation.

1-2. Power supply filter

C5401 constitutes the power supply filter. They smooth out
ripples in the current which accompany the switching of the
oscillation transformer.

1-3. Oscillation circuit

This circuit generates an AC voltage (pulse) in order to in-
crease the UNREG power supply voltage when drops in cur-
rent occur. This circuit generates a drive pulse with a frequency
of approximately 200-300 kHz, and drive the oscillation trans-
former. When the SW 3.2 V signal is input, the peak current
during oscillation changes.

1-4. Oscillation transformer

The low-voltage alternating current which is generated by the
oscillation control circuit is converted to a high-voltage alter-
nating current by the oscillation transformer.

1-5. Rectifier circuit

The high-voltage alternating current which is generated at
the secondary side of T5401 is rectified to produce a high-
voltage direct current and is accumulated at electrolytic ca-
pacitor C5412.

1-6. Charge monitoring circuit

The functions programmed in the IC541 monitor oscillations
and estimate the charging voltage. If the voltage exceeds the
rated value, charging automatically stops. Then, the
ZCHG_DONE signal is changed to Lo output and a "charging
stopped" signal is sent to the microcomputer.

2. Light Emission Circuit

When FLCLT signal is input from the ASIC, the stroboscope
emits light.

2-1. Emission control circuit

When the FLCLT signal is input to the emission control cir-
cuit, Q5402 switches on and preparation is made to the light
emitting. Moreover, when a FLCLT signal becomes Lo, the
stroboscope stops emitting light.

2-2. Trigger  circuit

The Q5402 is turned ON by the FLCLT signal and light emis-
sion preparation is preformed. Simultaneously, high voltage
pulses of several kV are emitted from the trigger coil and ap-
plied to the light emitter.

2-3. Light emitting element

When the high-voltage pulse form the trigger circuit is ap-
plied to the light emitting part, currnet flows to the light emit-
ting element and light is emitted.

Beware of electric shocks.

Содержание VAR-G8EX

Страница 1: ...t Code 168 056 01 U S A Canada Korea Taiwan VPC CA6EXOR Product Code 168 056 02 Europe U K South America China Australia Hong Kong Russia Middle East Africa General Korea Taiwan RoHS This product does not contain any hazardous substances prohibited by the RoHS Directive WARNING You are requested to use RoHS compliant parts for maintenance or repair You are requested to use lead free solder This pr...

Страница 2: ...0 C 662 F or less for chip compo nents to 380 C 716 F for lead wires and similar and to 420 C 788 F when installing and removing shield plates The tip of the soldering iron should have a C cut shape or a driver shape so that it can contact the circuit board as flat or in a line as much as possible Solder Use solder with the metal content and composition ratio by weight given in the table below Do ...

Страница 3: ... 24 4 7 8 9 11 5 6 10 14 V1 V3A V3B V1S V2 V3L V3R V4 Vertical register transfer clock Vertical register transfer clock Signal output 6 0 V 0 V 12 V Aprox 12 V Vertical register transfer clock VO V5L V5R V6 6 0 V 0 V 6 0 V 0 V GND Reset gate clock GND Circuit power DC 12 V GND 0 V 4 5 V 7 8 V ØRG 13 16 12 15 VDD DC Protection transister bias 6 0 V PT DC HL H1 Horizontal register transfer clock Sub...

Страница 4: ...nto a 14 bit signal and is then input to ASIC IC101 The gain of the VGA amplifier is con trolled by pin A2 B3 and C4 serial signal which is output from ASIC IC101 1 3 32 33 31 30 37 38 35 36 34 42 43 44 39 40 41 4 26 13 14 12 11 SUBCNT VDC CH1 V1 V6 V4 V5R V5L V3R V3L V1S CH5 V5 CH3 CH4 V3 CH2 GND VH OV3B OV3A OV5B OV5A Level conversion 29 V2 2 SUB Level conversion Level conversion Level conversio...

Страница 5: ...a At this time correction of the lens distortion which is a characteristic of wide angle lenses is carried out After AWB and γ processing are carried out a matrix is generated and aperture correction is carried out for the Y signal and the data is then compressed by JPEG and is then written to card memory SD card When the data is to be output to an external device it is taken data from the memory ...

Страница 6: ...om the ASIC IC101 are used to drive FOCUS A FOCUS A FOCUS B and FOCUS B by the motor driver IC951 and are then used to microstep drive the stepping motor for focusing operation Detection of the standard focusing positions is carried out by means of the photointerruptor F_SENSE inside the lens block 4 2 Zoom drive The 16 bit serial data signals LENS_SD and LENS_CK and LENS_EN which are output from ...

Страница 7: ...ined by internal fixing of IC501 all output is turned off The control signal P ON are recontrolled to restore output 3 Analog System Power Output 12 V A is output Feedback for the 12 V A is provided to the switching controller Pin 3 of IC501 so that PWM control can be carried out 4 Analog 6 V Power Output 6 V A is output Feedback for the 6 V A is provided to the swiching controller Pin 31 of IC501...

Страница 8: ...ing current by the oscillation transformer 1 5 Rectifier circuit The high voltage alternating current which is generated at the secondary side of T5401 is rectified to produce a high voltage direct current and is accumulated at electrolytic ca pacitor C5412 1 6 Charge monitoring circuit The functions programmed in the IC541 monitor oscillations and estimate the charging voltage If the voltage exce...

Страница 9: ... I I O I I O O O I I Outline Serial data clock SD card detection L detection Backup battery charge control L charge Strobo condensor charge done detection L detection Hot line request Test mode L test mode VDD Red LED H lighting Green LED H lighting LCD backlight control H ON Lens driver standard clock output System reset output L reset USB detection L detection AV JACK detection L detection Comma...

Страница 10: ...t Specification 63 64 53 Sub clock 32 768 KHz 54 XCIN I VDD 59 ASIC SO I Serial data input VDD1 ASIC SI O Serial data output 61 62 RESET I Reset input L reset NOT USED O TH_TEMP I Camera temperature detection analog input 51 KEY_POWER I Key input POWER L input 52 KEY_2ND I Key input 2nd SHUTTER L input 55 XCOUT O Sub clock 32 768 KHz 56 VSS1 GND 57 XIN I Main clock 4 MHz 58 XOUT O Main clock 4 MHz...

Страница 11: ...tch is turned off so that the camera can start up again When the battery is removed the 8 bit micro processor operates in sleep mode using the backup battery At this time the 8 bit microprocessor only carries out clock counting and waits in standby for the battery to be attached again When a switch is operated the 8 bit microprocessor supplies power to the system as required The 8 bit microprocess...

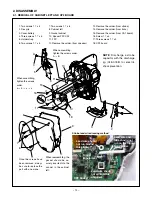
Страница 12: ...hen assembling tighten the screws order A B When assembling tighten the screws order a b c d Once the screws have been removed always be sure to replace the part with a new one When reassembling the gasket should be se curely inserted into the cannel in the cabinet left 13 Remove the solder from strobo 14 Remove the solder from trans 15 Remove the solder from CA1 board 16 Screw 1 7 x 4 17 Three sc...

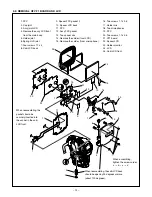
Страница 13: ...screws order a b c d 9 Spacer FPC gasket 2 10 Spacer LCD back 11 FPC 12 Assy FPC gasket 13 Two spacer mic 14 Remove the solder from LCD 15 Remove the solder from microphone 16 Two screws 1 7 x 3 5 17 Holder mic 18 Two microphones 19 FPC 20 Two screws 1 7 x 3 5 21 VF1 board 22 Spacer LCD 23 Holder monitor 24 LCD 25 Cabi LCD front When reassembling the gasket should be securely inserted into the can...

Страница 14: ...tighten the screws order A B C When assembling tighten the screws order A B When assembling tighten the screws order a b c 8 Screw 1 7 x 4 9 Two screws 1 7 x 4 10 Holder CP2 11 CP1 board 12 Screw 1 7 x 4 13 Holder CP1 14 Spring lock batt When reassembling the CP1 board be careful not to let the chip touch against the cabinet right 15 Spring batt eject 16 Terminal batt 17 Dec cabi right 18 Lever lo...

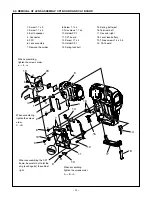
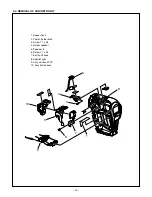
Страница 15: ...6 7 8 9 10 2 4 REMOVAL OF CABINET RIGHT 1 Spacer flash 2 Compl holder flash 3 Screw 1 7 x 2 5 4 Holder speaker 5 Speaker 8 6 Screw 1 7 x 2 5 7 Earth unit back 8 Cabinet right 9 Assy unit back FPC 10 Assy button back ...

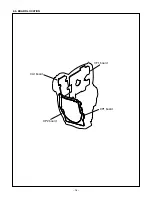
Страница 16: ... 16 2 5 BOARD LOCATION CP2 board VF1 board CA1 board CP1 board ...

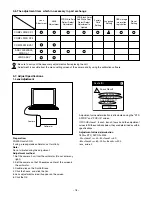
Страница 17: ...It is used after adjusting the chroma meter VJ8 0192 adjust color temperature to 3100 20 K and luminosity to 900 20 cd m2 Be careful of handling the lump and its circumference are high temperature during use and after power off for a while 5 Computer screen during adjustment 3 5 Connecting the camera to the computer This camera requires a DC adaptor sold separately in order to use an AC adaptor 1 ...

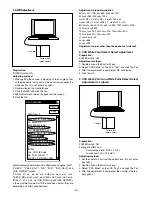
Страница 18: ...conditions below they are determined as within specifications Adjustment value determination 1800 STD_AFPOS 2000 40 focus1 40 50 focus2 50 60 focus3 60 200 focus4 200 lens_error 0 Camera Collimator 3 6 The adjustment item which in necessary in part exchange DscCalDi x OK Focus Result STD_AFPOS 1905 FOCUS 4 6 17 77 ADJ_PZPOS 11 LENS_ERR 0 COMPL PWB CP 1 Lens Adjustment AWB Adjustment CCD White Poin...

Страница 19: ... 220 100 s3 220 100 s4 220 100 s5 220 s1 s2 s3 s4 s5 0 g 255 0 o 255 Adjustment values other than the above are irrelevant 3 CCD White Point Defect Detect Adjustment Preparation POWER switch ON Adjustment method 1 Double click on the DscCalDi exe 2 Select CCD Defect on the LCD Test and click the Yes 3 After the adjustment is completed OK will display 4 Click the OK 4 CCD Black Point And White Poin...

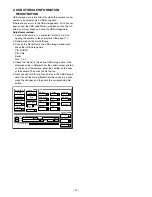
Страница 20: ...mera s LCD monitor Choose the CARD READER and press the SET button 3 Double click on the DscCalDi exe 4 Click the Firmware 5 Choose the fimware file to use for overwriting and click the Yes 6 Update is starting The message will appear and choose OK 7 After the update is complete disconnect the USB cable and turn the camera s power off Note Do not turn off the camera s power while the firmware is b...

Страница 21: ...USB storage data VID SANYO PID CA6 Serial Rev 1 00 4 Check the Serial in the above USB storage data If the displayed value is different from the serial number printed on the base of the camera enter the number on the base of the camera Then click the Set button 5 Next check VID PID and Rev entries in the USB storage data If any of them are different from the values in 3 above make the changes and ...

Страница 22: ...ER BUTTON IC301 44 52 KEY INPUT CHECK UNIT SW IC501 18 29 P ON PA ON IC511 1 PA ON3 CHECK IC101 IC301 PWA BLOCK SERIAL COMMUNICATION CHECK IC301 CP1 DMA BLOCK CHECK CP1 DMA BLOCK TAKING INOPERATIVE NO HIGH LOW LOW LOW NO NO LOW YES HIGH HIGH HIGH YES YES YES HIGH OK NO LOW NG NO PICTURE MAIN CLOCK FOR SYSTEM OPERATION NO OPERATION IF ABSENT CHECK X1102 OSCILLATOR IC101 W1 XOUT CHECK OSCILLATION IC...

Страница 23: ...Russian Spanish Simplified_Chinese Traditional_Chinese 2 645 086 6500 DISC CD ROM SSP 817 U2 N S P APPRICATION SOFTWARE 3 645 063 5816 BATTERY RECHARGE LI ION OR 645 089 8990 BATTERY RECHARGE LI ION 4 645 083 6787 CORD POWER 1 2MK EXPECT VPC CA60R ONLY 4 645 083 6794 CORD POWER 1 9MK VPC CA6OR ONLY 5 645 086 7972 BATTERY CHARGER 6 645 087 1825 CABLE DSC A V 7 645 087 1818 CABLE DSC USB 9053 636 09...

Страница 24: ...I LCD BACK J2 SV VPC CA6EX ONLY 18 636 096 5317 HOLDER JOINT SX817 J 19 636 096 9728 SPRING HLD JOINT SX817 20 636 099 6700 SPACER MIC2 SX817 J 21 636 099 6717 SPACER MIC SX817 J 22 645 090 2567 MICROPHONE 23 636 099 6724 SPACER HOLDER MIC SX817 J 24 636 096 5188 HOLDER MIC SX817 J 25 636 099 0562 SPACER LCD BACK SX817 J 26 636 099 5024 SPACER FPC GASKET2 SX817J 27 636 096 5010 COMPL PWB VF 1 28 6...

Страница 25: ...1 SX817 J PARTS LIST 1 102 101 102 101 103 105 103 3 1 2 4 5 6 7 8 9 10 11 104 104 12 103 13 15 16 14 22 22 21 21 20 20 106 17 106 32 33 34 35 38 36 106 18 19 107 107 107 107 37 28 26 30 27 26 24 23 23 25 31 29 28 ...

Страница 26: ...817 20 636 096 8516 SPACER FPC CA1 SX817 J 21 636 097 4456 SPACER CA1 SX817 J 22 636 098 8750 ASSY WIRE CA1 CP2 SX817 23 636 099 0579 ASSY CABI RIGHT SV EXPECT VPC CA6EX 23 636 099 9220 ASSY CABI R SX817 J2 SV VPC CA6EX ONLY 24 636 096 5522 SPRING BATT EJECT SX817 J 25 636 096 5492 TERMINAL BATT SX817 J 26 636 096 8455 SPACER LENS RIGHT SX817 J 27 636 099 7233 SPACER MOVIE BUTTON SX817 28 636 096 ...

Страница 27: ...2 7 Cabinet 2 SX817 J PARTS LIST 2 1 1 105 2 3 4 5 6 7 8 9 10 11 12 13 104 109 109 108 108 105 15 20 21 22 14 16 17 18 19 23 33 34 35 36 37 38 39 24 25 26 27 28 29 30 31 32 105 105 105 ...

Страница 28: ...0 15U K 25V N S P C9065 303 155 1800 CERAMIC 0 01U K 25V N S P C9066 303 276 1307 CERAMIC 1000P K 50V N S P C9067 303 276 1307 CERAMIC 1000P K 50V N S P C9068 303 338 0309 CERAMIC 0 1U K 10V N S P C9069 303 314 6400 CERAMIC 7P D 50V N S P C9070 303 314 6509 CERAMIC 7P D 50V N S P RESISTORS R9001 301 225 1804 MT GLAZE 47 JA 1 16W N S P R9002 301 240 9502 MT GLAZE 820 JA 1 16W N S P R9003 301 235 14...

Страница 29: ...0309 CERAMIC 0 1U K 10V C9712 303 294 6100 CERAMIC 100P J 50V C9714 303 381 8109 CERAMIC 1U K 6 3V C9716 303 338 0309 CERAMIC 0 1U K 10V C9717 303 279 5005 CERAMIC 4700P K 25V C9718 303 282 5108 CERAMIC 470P K 50V C9719 303 276 1307 CERAMIC 1000P K 50V C9720 303 338 0309 CERAMIC 0 1U K 10V C9721 303 338 0309 CERAMIC 0 1U K 10V C9722 303 381 8109 CERAMIC 1U K 6 3V RESISTORPACKS RB101 945 028 0710 R...

Страница 30: ...3 322 1008 CERAMIC 0 1U Z 16V C3004 303 322 1008 CERAMIC 0 1U Z 16V C3005 303 338 0309 CERAMIC 0 1U K 10V C3006 303 381 8109 CERAMIC 1U K 6 3V C3007 303 381 8109 CERAMIC 1U K 6 3V C3008 303 276 1901 CERAMIC 22P J 50V C3009 303 381 8109 CERAMIC 1U K 6 3V C3010 303 276 1307 CERAMIC 1000P K 50V C3011 303 338 0309 CERAMIC 0 1U K 10V C3013 303 381 8109 CERAMIC 1U K 6 3V C3014 303 317 2300 CERAMIC 20P J...

Страница 31: ...LAZE 100K JD 1 8W R5403 301 224 8804 MT GLAZE 100 JA 1 16W R5404 301 263 2108 MT GLAZE 5 1K DC 1 16W R5405 301 267 1008 MT GLAZE 6 2K DC 1 16W R5422 302 079 0203 MT GLAZE 220K JKG 1 8W R5424 301 224 9009 MT GLAZE 10K JA 1 16W FUSES F5001 323 031 1700 FUSE 32V 2A F5002 323 031 1700 FUSE 32V 2A F5003 323 031 1809 FUSE 32V 2 5A F5004 323 031 1809 FUSE 32V 2 5A CONNECTORS CN301 645 084 2580 SOCKET FPC...

Страница 32: ...Jul 06 SANYO Electric Co Ltd Osaka Japan ...

Отзывы: