background image

28

BEFORE OPERATION

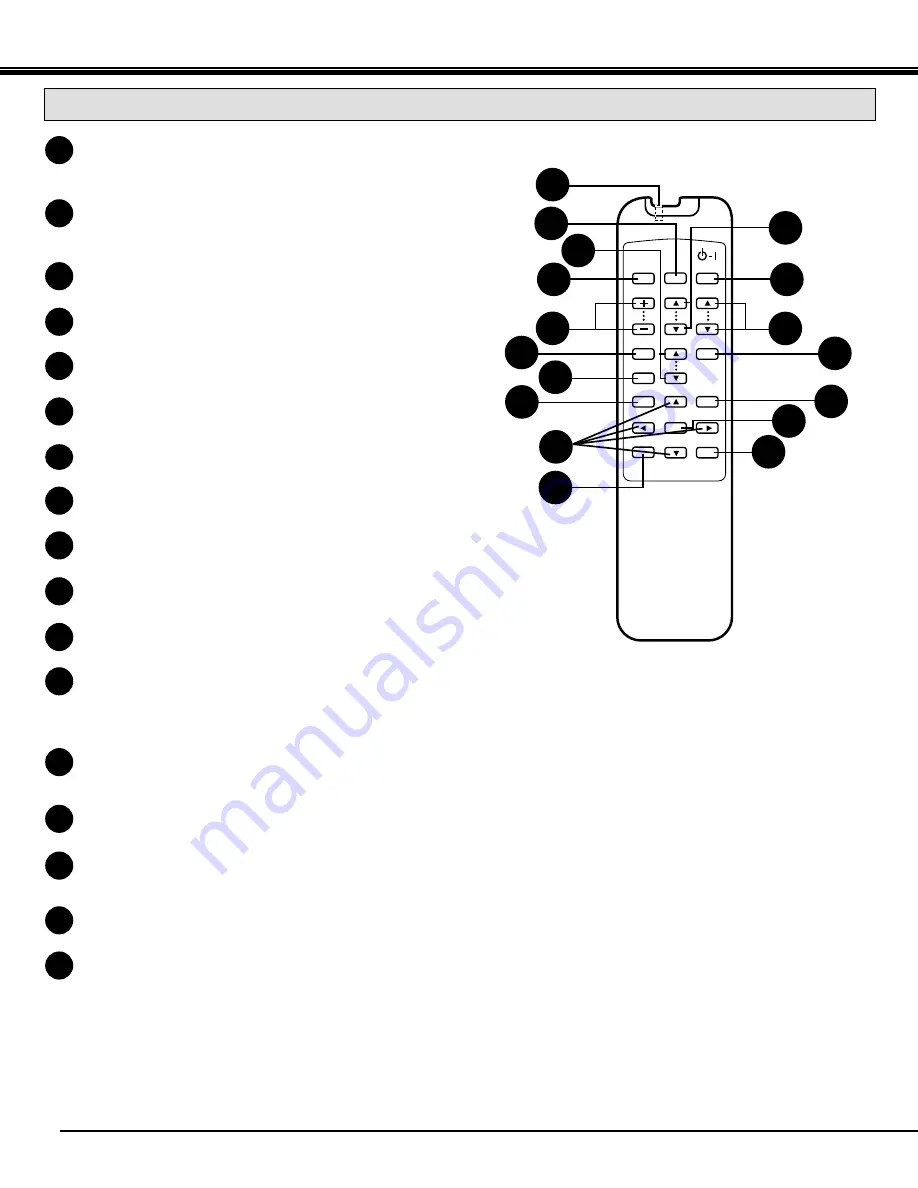
WIRED REMOTE JACK
When using the wired remote control, connect the remote
cable to this jack.

COMPUTER SELECT BUTTON
Used to select computer mode.
(Computer 1 or Computer 2 Input)

VIDEO SELECT BUTTON
Used to select video mode. (Video 1 or Video 2 Input)

POWER ON/OFF BUTTON
Used to turn projector on or off.

VOLUME BUTTONS
Used to adjust volume.

ZOOM BUTTONS
Used to operate power zoom lens.

FOCUS BUTTONS
Used to operate power focus system.

SOUND MUTE BUTTON
Used to mute sound.

LENS SHIFT BUTTONS
Used to operate power lens shift.

P-TIMER BUTTON
Used to operate the P-TIMER function.

AUTO IMAGE BUTTON
Used to operate the AUTO IMAGE adjustment.

MENU BUTTON
This button will activate the MENU operation.
Use this button, the POINT UP/DOWN/LEFT/RIGHT buttons and the SELECT button to make adjustments to the
projector's setting in MENU operation.

POINT UP/DOWN/LEFT/RIGHT BUTTONS
To select an item on the MENU that you want to adjust. To select an item, move the arrow by pressing these buttons
(UP, DOWN, LEFT or RIGHT).

FREEZE/NO SHOW BUTTON
Used to freeze on-screen image or change the screen into black image.

SELECT BUTTON
This button has different functions depending on when used. This button is used to execute the item selected, to
increase or decrease the values in certain items such as CONTRAST or BRIGHTNESS.

DIGITAL ZOOM BUTTON
Use to select digital zoom function.

NORMAL BUTTON
Used to reset to normal picture adjustment preset by factory.

COMPUTER

VOLUME

ZOOM

FOCUS

P-TIMER

MUTE LENS SHIFT

NO SHOW

AUTO IMAGE

MENU

FREEZE/

NORMAL

SELECT

ON-OFF

1

2

4

5

6

7

8

12

11

14

9

15

14

17

VIDEO

3

10

13

16

D.ZOOM

1

2

3

4

5

6

7

8

9

10

11

12

13

14

15

16

WIRELESS/WIRED REMOTE CONTROL UNIT

17

Содержание PLC-EF12B

Страница 1: ...Owner s Manual PLC EF12N 12NL Multimedia Projector MODEL ...

Страница 2: ...RECAUTIONS WARNING TO REDUCE THE RISK OF FIRE OR ELECTRIC SHOCK DO NOT EXPOSE THIS APPLIANCE TO RAIN OR MOISTURE This projector produces intense light from the projection lens Do not stare directly into the lens as possible Eye damage could result Be especially careful that children do not stare directly into the beam This projector should be set in the way indicated If not it may result in a fire...

Страница 3: ...cabinet slots as they may touch dangerous voltage points or short out parts that could result in a fire or electric shock Never spill liquid of any kind on the projector This projector should be operated only from the type of power source indicated on the marking label If you are not sure of the type of power supplied consult your authorized dealer or local power company Do not overload wall outle...

Страница 4: ...e cord should be suitably prepared and the correct plug fitted See Over WARNING A PLUG WITH BARED FLEXIBLE CORD IS HAZARDOUS IF ENGAGED IN A LIVE SOCKET OUTLET The Wires in this mains lead are coloured in accordance with the following code Green and yellow Earth Blue Neutral Brown Live As the colours of the wires in the mains lead of this apparatus may not correspond with the coloured markings ide...

Страница 5: ...SELECTING COLOR SYSTEM 45 PICTURE IMAGE ADJUSTMENT 46 NORMAL FUNCTION 47 PICTURE SCREEN ADJUSTMENT 47 SETTING MENU 48 SETTING LANGUAGE 49 OPERATING WIRELESS MOUSE 50 MAINTENANCE 51 TEMPERATURE WARNING INDICATOR 51 AIR FILTER CARE AND CLEANING 51 LAMP REPLACEMENT 52 CLEANING THE PROJECTION LENS 53 TROUBLESHOOTING 53 TECHNICAL SPECIFICATIONS 55 BASIC OPERATION 32 TURNING ON OFF THE PROJECTOR 32 TO T...

Страница 6: ... magnifies the image up to 16 times allowing you to focus on crucial information at a presentation Power Management Power Management function is provided to reduce power consumption while the projector is not in use This Power Management function operates to turn the Projection Lamp off when the projector detects signal interruption and any button is not pressed over 5 minutes The Projection Lamp ...

Страница 7: ...inet near to the exhaust vent area and especially screws and metallic parts These parts will become hot while the projector is used This projector detects the internal temperature and automatically controls the operating power of the Cooling Fans LAMP COVER AIR INTAKE VENT PROJECTION LENS SPEAKERS INFRARED REMOTE RECEIVER REMOVABLE LENS COVER POWER CORD CONNECTOR EXHAUST VENT MAIN ON OFF SWITCH IN...

Страница 8: ...urning the projector on Refer to pages 13 22 for connection CONNECTING THE AC POWER CORD Connect the AC Power Cord supplied to the projector The AC outlet must be near this equipment and must be easily accessible To the POWER CORD CONNECTOR on the projector Projector side AC Outlet side Ground NOTE ON THE POWER CORD The AC Power Cord must meet the requirement of the country where you use the proje...

Страница 9: ... figure below as an example when positioning the projector to the screen The projector should be placed in a room with limited light Picture quality will be directly affected by lightning conditions Minimum Zoom Maximum Zoom DISTANCE Screen Size Max Zoom Min Zoom Distance 40 4 9 1 5 m 100 77 13 1 4 0 m 150 115 20 6 1 m 300 231 40 12 2 m 400 308 53 8 16 4 m THIS PROJECTOR SHOULD BE SET IN THE WAY I...

Страница 10: ...arrying case Do not transport the projector by using a courier or transport service in an unsuitable transport case This may cause damage to the projector To transport the projector through a courier or transport service consult your dealer and best case should be applied Use the carry handle when moving the projector Replace the lens cover and rotate the adjustable feet fully clockwise ...

Страница 11: ...ctor AUDIO MONITOR OUTPUT JACKS R and L Used to connect an audio input from audio equipment to the projector CONTROL PORT 1 CONNECTOR Used to connect a mouse cable to the projector CONTROL PORT 2 CONNECTOR Used to connect a mouse cable to the projector USB PORT 1 CONNECTOR Used to connect a computer to the projector USB PORT 2 CONNECTOR Used to connect a computer to the projector SERIAL PORT TERMI...

Страница 12: ...VHS video source to the projector AUDIO INPUT JACKS 1 R and L Used to connect an audio source to the projector VIDEO INPUT JACKS 2 BNC TYPE x 3 Used to connect a video source to the projector S VIDEO INPUT JACK 2 Used to connect a S VHS video source to the projector 14 15 16 17 18 AUDIO INPUT JACKS 2 R and L Used to connect an audio source to the projector VIDEO MONITOR OUTPUT JACKS BNC TYPE x 3 P...

Страница 13: ...d Green Blue Horiz Sync and Vert Sync on the projector Connect the computer to these jacks using the BNC cables not provided Connect audio outputs from your computer to these jacks using the audio cable not provided When the computer is operated by projector s remote control unit connect three different type of cables provided between projector control port and computer mouse port or serial port 1...

Страница 14: ...rminal outputs Computer 1 input information An external monitor can be connected to the HDB15 pin VGA terminal on the projector Connect the monitor to this terminal using the VGA cable not provided R x D T x D Ground 1 2 3 4 5 6 7 8 9 SERIAL PORT DB9 PIN TERMINAL USB PORT Pin No Signal 1 Red input 2 Green input 3 Blue input 4 Sense 2 5 Ground Horiz sync 6 Ground Red 7 Ground Green 8 Ground Blue Pi...

Страница 15: ...15 CONNECTING THE PROJECTOR USB 1 AUDIO 1 R ...

Страница 16: ...MPUTER DIGITAL INPUT CONNECTION CONNECTING THE PROJECTOR USB 1 AUDIO 1 R ANALOG ANALOG RGB COMPUTER OUT COMPUTER IN 2 COMPUTER IN 1 R G B H V L MONO MONO CONTROL PORT 1 USB 2 R C JACK SERIAL PORT AUDIO 2 AUDIO OUT R L R L CONTROL PORT 2 DIGITAL ...

Страница 17: ...17 USB 1 AUDIO 1 R ANALOG ANALOG RGB COMPUTER OUT COMPUTER IN 2 COMPUTER IN 1 R G B H V L MONO MONO CONTROL PORT 1 USB 2 R C JACK SERIAL PORT AUDIO 2 AUDIO OUT R L R L CONTROL PORT 2 DIGITAL ...

Страница 18: ...VIDED R L R L Speaker L Speaker R Amp L R R L AUDIO INPUT SPEAKER OUT COMPUTER AUDIO OUTPUT COMPUTER AUDIO INPUT 1 CONTROL PORT OUTPUT 1 COMPUTER AUDIO OUTPUT SERIAL PORT CABLE NOT PROVIDED COMPUTER INPUT 1 DIGITAL DIGITAL FLAT PANEL CABLE PROVIDED CONNECTING AN IBM COMPATIBLE LAPTOP COMPUTER DIGITAL INPUT CONNECTION GRAPHIC ACCELERATOR PC CARD DIGITAL OUTPUT ANALOG OUTPUT INSTALL PLUG INTO PC CAR...

Страница 19: ...IDED SERIAL PORT OUTPUT COMPUTER INPUT 1 ANALOG CONNECTING A MACINTOSH DESKTOP COMPUTER VGA CABLE PROVIDED COMPUTER AUDIO OUTPUT MONITOR OUTPUT ON 2 3 4 5 6 1 ON OFF VGA MAC ADAPTER SW1 SW6 Set the dip switches as shown in the table below depending on the RESOLUTION MODE that you want to use before you turn on the projector and computer ADB PORT INPUT ADB PORT INPUT SW1 ON OFF OFF ON RESOLUTION MO...

Страница 20: ...NECTING A MACINTOSH POWERBOOK COMPUTER NOTE The Macintosh PowerBook requires the use of the PowerBook Video Adapter shipped with the PowerBook SERIAL PORT OUTPUT L ON 2 3 4 5 6 1 ON OFF VGA MAC ADAPTER SW1 SW6 Set the dip switches as shown in the table below depending on the RESOLUTION MODE that you want to use before you turn on the projector and computer SW1 ON OFF OFF ON RESOLUTION MODE 13 MODE...

Страница 21: ...e video monitor output jacks If you select program source Computer 1 or Computer 2 the video signal connected to the Video 1 video input jack will be available at the video monitor output jacks Use BNC cable for connection The Video monitor output includes an extra video input jack marked S VIDEO to allow connection to an S VHS format VCR that has separate Y C video signals The S VIDEO jack has pr...

Страница 22: ... AUDIO OUTPUT S VIDEO OUTPUT S VIDEO INPUT SPEAKERS AUDIO AMP Video Camera Y OUTPUT BNC VIDEO OUTPUT BNC C OUTPUT BNC Cb B Y OUTPUT BNC Cr R Y OUTPUT BNC Y INPUT BNC VIDEO INPUT BNC C INPUT BNC Cb B Y INPUT BNC Cr R Y INPUT BNC CONNECTING THE VIDEO EQUIPMENT NOTE When connecting the cable the power cords of both the projector and the external equipment should be disconnected from AC outlet Turn th...

Страница 23: ...U MODE AUTO IMAGE NORMAL SELECT VOLUME ZOOM FOCUS LENS SHIFT ON OFF 5 6 9 7 12 11 10 13 14 8 15 TOP CONTROLS FRONT INDICATORS FRONT INDICATORS TOP CONTROLS READY LAMP LAMP REPLACE WARNING TEMP 1 2 3 4 CONTROLS AND INDICATORS ...

Страница 24: ...Used to turn the projector on or off MODE BUTTON Used to select source Computer 1 Computer 2 Video 1 or Video 2 Input AUTO IMAGE BUTTON Used to operate the AUTO IMAGE adjustment MENU BUTTON This button will activate the MENU operation Use this button the POINT UP DOWN LEFT RIGHT buttons and the SELECT button to make adjustments to the projector s setting in MENU operation NORMAL BUTTON Used to res...

Страница 25: ...GE MUTE VOLUME COMPUTER FOCUS ZOOM ON OFF FREEZE NO SHOW LENS SHIFT NORMAL 1 2 3 4 5 6 9 7 12 11 10 13 14 8 VIDEO CURSOR D ZOOM LASER 15 17 18 16 19 This remote control unit is not only able to operate the projector but also usable as a wireless mouse for a PC One pointing pad and two click buttons are used for wireless mouse operation Wireless mouse is usable when PC mouse pointer is displayed on...

Страница 26: ...actory POINTING PAD POINT UP DOWN LEFT RIGHT BUTTON When in use as a remote for the projector To select an item on the MENU that you want to adjust To select an item move the arrow by pressing the pad upward downward leftward or rightward Used to operate power zoom lens power focus system or power lens shift by pressing the pad either upward or downward When in use as a wireless mouse Used to move...

Страница 27: ...ward the projector Receiver window whenever pressing the buttons Maximum operating range for the remote control is about 16 4 5m and 60 front and rear of the projector 16 4 5 m To insure safe operation please observe the following precautions Use 2 AA type alkaline batteries Change two batteries at the same time Do not use a new battery with a used battery Avoid contact with water Do not drop the ...

Страница 28: ...WN LEFT RIGHT buttons and the SELECT button to make adjustments to the projector s setting in MENU operation POINT UP DOWN LEFT RIGHT BUTTONS To select an item on the MENU that you want to adjust To select an item move the arrow by pressing these buttons UP DOWN LEFT or RIGHT FREEZE NO SHOW BUTTON Used to freeze on screen image or change the screen into black image SELECT BUTTON This button has di...

Страница 29: ...29 BEFORE OPERATION ...

Страница 30: ...ough the ON SCREEN MENU Refer to the following pages to operate each adjustment in the ON SCREEN MENU 1 MOVING THE POINTER 2 SELECT THE ITEM Move the pointer see the NOTE below by pressing POINT button s on the TOP CONTROL or on the REMOTE CONTROL Select the item by pressing SELECT REAR CLICK button OPERATING ON SCREEN MENU NOTE Pointer is the icon on the ON SCREEN Menu to select the item See the ...

Страница 31: ...MAGE MENU Used to adjust Fine sync Total dots and Picture Position automatically Refer to P41 MENU BAR IN COMPUTER MODE Press MENU BUTTON while in Computer mode SYSTEM MENU Used to select a color system of the selected video source Refer to P45 IMAGE MENU Used to adjust the picture image Color Tint White Balance Contrast Brightness Sharpness Refer to P46 SCREEN MENU Used to set the size of the ima...

Страница 32: ...not be turned on The READY indicator will light green again and the projector may be turned on by pressing the POWER ON OFF button To power down completely turn the MAIN ON OFF switch located on the side of the projector to the OFF position TURNING ON OFF THE PROJECTOR BASIC OPERATION When the TEMPERATURE WARNING indicator flashes red the projector is automatically turned off Wait at least 5 minut...

Страница 33: ... Press the ZOOM or button to obtain your desired picture size For a larger picture press and for a smaller picture press Use Wireless remote control unit Press the ZOOM button and press POINT UP DOWN button s to obtain your desired picture size The Zoom display will be displayed on the screen for a few seconds For a larger picture press UP and for a smaller picture press DOWN FOCUS ADJUSTMENT ZOOM...

Страница 34: ... Press the P TIMER button on the remote control unit The timer display 00 00 appears on the screen and the timer starts to count the time 00 00 to 59 59 Press again the P TIMER button to stop the timer Then press the P TIMER button to cancel the P TIMER function Press the AUTO IMAGE button on the projector or on the remote control unit The item s indicated ON in the AUTO IMAGE ADJUSTMENT are adjus...

Страница 35: ...LICK button To decrease the volume point the arrow to and then press the SELECT REAR CLICK button To cut off the audio sound point the arrow to Mute and then press the SELECT REAR CLICK button The Mute display is changed On from Off and the sound is cut off To restore the sound to its previous volume level set the Mute to Off Press the POINT DOWN button and a red arrow icon will appear Move the ar...

Страница 36: ...ems on this dialog box can be selected Close the SYSTEM Menu Press the MENU button and the ON SCREEN MENU will appear Press the POINT LEFT RIGHT buttons to select SYSTEM and press the SELECT REAR CLICK button Another dialog box COMPUTER SYSTEM Menu will appear Press the POINT DOWN button and a red arrow icon will appear Move the arrow to the system that you want to set and then press SELECT REAR C...

Страница 37: ...rom all computers with the above mentioned V H Frequency and less than 220 MHz of Dot Clock COMPATIBLE COMPUTER SPECIFICATIONS SXGA1 SXGA2 SXGA3 SXGA4 SXGA5 SXGA6 SXGA7 SXGA8 SXGA9 SXGA10 SXGA11 SXGA12 SXGA13 SXGA14 SXGA15 SXGA16 SXGA17 SXGA18 SXGA19 SXGA20 MAC21 MAC MAC UXGA1 UXGA2 UXGA3 UXGA4 RGB RGB HDTV720p HDTV1035i HDTV1080i 64 20 62 50 63 90 63 34 63 74 71 69 81 13 ...

Страница 38: ...NU will appear Press the POINT RIGHT LEFT button to select PC ADJUST and press the SELECT REAR CLICK button Another dialog box Where to reserve Menu will appear In this dialog box you can store the parameter into the area from Mode 1 to Mode 8 When memorizing the new computer parameter select the Mode with the message Free by pressing the POINT UP DOWN button and the SELECT REAR CLICK button To ch...

Страница 39: ...ar s try this adjustment Clamp Adjustment of the area displayed with this projector Select the resolution at the Display area dialog box or adjust the number at the column of H or V to match the resolution of the image Display area Adjustment of the horizontal height or vertical width of the image Horizontal Scale Vertical Scale Each of the keys operates as follow Press the SELECT REAR CLICK butto...

Страница 40: ...or and press SELECT REAR CLICK button Recalls the data previously adjusted Reset Stores the adjusted data in the memory Stored Closes the PICTURE IMAGE ADJUSTMENT Menu Quit Move the arrow to the color that you want to adjust Point to to lighten the color and select to deepen the color From 0 to 63 Each of the keys operates as follow Fine sync Total dots White balance Red Green Blue Contrast Bright...

Страница 41: ... on the Projector or on the Remote Control Unit 3 NOTE This menu cannot be operated when the incoming signal is digital or RGB HDTV720p HDTV1035i or HDTV1080i is selected on the SYSTEM MENU P36 and 37 The Fine sync Total dots and Picture Position of some computers may not be fully adjusted with the Auto Image Adjustment In that case manual adjustment is required to make fine image Refer to page 40...

Страница 42: ... The PICTURE POSITION dialog box will appear 1 2 Select the arrow to the direction described as or that you want to adjust by pressing the POINT UP DOWN LEFT RIGHT buttons and then press the SELECT REAR CLICK button Select the arrow to the direction described as or and then press the SELECT REAR CLICK button Each of the keys operates as follow Recalls the setting data previously set Reset Stores t...

Страница 43: ...Panning function can work only when the image is larger than the screen size To cancel Digital Zoom mode press any button except SELECT REAR CLICK FRONT CLICK or POINT button To adjust the image to 1280 x 1024 press NORMAL button To make the image into its original size select True in the dialog box When the original image size is larger than the screen size 1280 x 1024 the image can be panned by ...

Страница 44: ...EO button on the remote control unit to select Video 1 Video 2 Input The Video 1 or Video 2 display will appear on the screen for a few seconds MODE button Computer 1 Computer 2 Video 1 Video 2 MENU OPERATION Press the MENU button and the ON SCREEN MENU will appear Press the POINT LEFT RIGHT buttons to select Computer and press the SELECT REAR CLICK button Another dialog box VIDEO MODE Menu will a...

Страница 45: ...ICK button 1 2 The projector automatically detects the incoming Video system and adjusts itself to optimize its performance When the Video System is PAL M or PAL N select the system manually If the projector cannot reproduce the proper video image it is necessary to select a specific broadcast signal format among PAL SECAM NTSC NTSC 4 43 PAL M and PAL N Move the arrow to the Mode and press the SEL...

Страница 46: ... to increase contrast From 0 to 63 Point to button to darken the image and select to brighten the image From 0 to 63 Recalls the data previously adjusted Reset Stores the data in the memory Stored Closes the PICTURE IMAGE ADJUSTMENT Menu Quit Point to button to soften the image and select to sharpen the image From 0 to 31 Color Tint Contrast Brightness Sharpness Move the arrow to the color that yo...

Страница 47: ...rable image size Press the MENU button and the ON SCREEN MENU will appear Press the POINT LEFT RIGHT buttons to select SCREEN and press the SELECT REAR CLICK button Another dialog box PICTURE SCREEN ADJUSTMENT DISPLAY will appear Press the POINT DOWN button and a red arrow icon will appear Move the arrow to the screen size that you want to set and then press the SELECT REAR CLICK button 1 2 Normal...

Страница 48: ... function operates to turn the Projection Lamp off when the input signal is interrupted and the projector is not operated over 5 minutes This function operates as follows 1 When the signal is interrupted No signal and the counting down 5 minutes display appears 2 When the Projection Lamp turned off the READY indicator turns off The Cooling Fans operate for 90 seconds after the Projection Lamp is t...

Страница 49: ...rates properly To return to the normal code Mode 1 operate both projector and Remote Control in the ways above again USB Projector mode Select when controlling the projector with the computer NOTE Before you control the projector by computer install USB driver optionally sold parts and set up the computer following instruction in the USB driver package Contact your authorized dealer This Projector...

Страница 50: ...hat the mouse port of the computer connected to Control Port is activated OPERATING WIRELESS MOUSE When controlling the pointer of the computer operate the Wireless Mouse with POINT button SELECT REAR CLICK button and FRONT CLICK button on the Wireless Remote Control Unit Used to move the pointer The pointer is moved corresponding with the direction you are pressing POINT button This button has th...

Страница 51: ...t from the air filter by following instructions in the Air Filter Care and Cleaning section below 3 If temperature warning indicator remains on after performing the checks listed above cooling fan internal circuits may be malfunctioning Request service from an authorized dealer or service station MAINTENANCE TEMPERATURE WARNING INDICATOR AIR FILTER CARE AND CLEANING The removable air filter preven...

Страница 52: ...LACEMENT INDICATOR LAMP ASSEMBLY HANDLE LAMP COVER LAMP REPLACEMENT WHEN THE PROJECTION LAMP OF THIS PROJECTOR DRAWS TO AN END THE LAMP REPLACEMENT INDICATOR LIGHTS YELLOW AND THE WARNING MESSAGE LAMP REPLACEMENT APPEARS AS THE RIGHT FIGURE WHEN THE WARNING MESSAGE IS DISPLAYED THE PROJECTION LAMP SHOULD BE REPLACED To terminate the warning message Replace the Projection Lamp and reset the LAMP RE...

Страница 53: ...n event leave the projector OFF and wait until condensation disappears Before calling your dealer or service station for assistance check the matters below once again 1 Make sure you have connected the projector to your equipment as described in section CONNECTING THE PROJECTOR on pages 11 22 2 Check cable connections Verify that all computer video and power cords are properly connected 3 Verify t...

Страница 54: ...ween the projector and the computer Check the mouse setting on your computer Turn on the projector before you turn on the computer Wireless mouse function does not work Try these Solutions SERVICE WARNING High voltages are used to operate this projector Do not attempt to open the cabinet You can often correct operating problems yourself If the projector fails to work properly see TROUBLESHOOTING s...

Страница 55: ...75 7 mm 97 5 mm Motor zoom and focus 760 mm on 100 screen 4 9 1 5 m 80 7 24 6 m 440 watt type BNC Type Video Y C Cb B Y Cr R Y x 2 sets RCA Type Audio R and L x 2 sets and DIN 4 pin S Video x 2 sets RCA Type R and L x 2 sets Computer Output Jack Computer Audio Output Jack HDB 15 pin Terminal RCA Type R and L x 1 set BNC Type Video Y C Cb B Y Cr R Y x 1 set and DIN 4 pin S Video x 1 set RCA Type R ...

Страница 56: ...SANYO Electric Co Ltd Printed in Japan Part No 610 289 9474 1AA6P1P2638 P6VAC ...

Отзывы: