background image

18

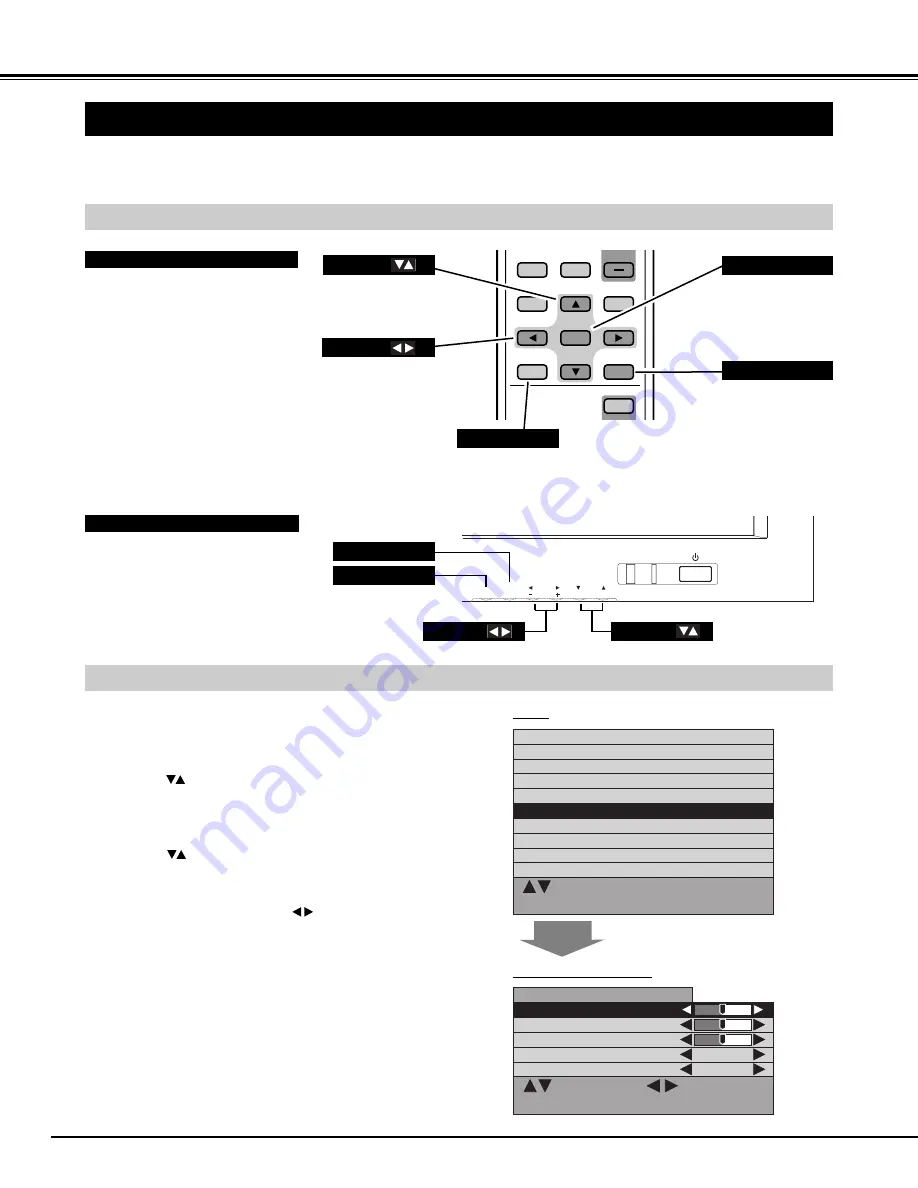
BUTTONS OF ON-SCREEN MENU OPERATION

FLOW OF ON-SCREEN MENU OPERATION

You can control and adjust this Plasma Monitor through ON-SCREEN MENU.  Refer to the following pages to operate each
adjustment on ON-SCREEN MENU.

Used to execute
the selected
menu.

OPERATING ON-SCREEN MENU

Used to display
O N - S C R E E N
MENU.

Contrast

            :  Select          OK      :   OK
MENU        :  Return   STATUS      :   Exit

Brightness
Color
Tint
Sharpness

Sound

Screen  adjust
PC  mode  adjustment
Setup  menu
Information

            :  Select                     :   Adjust
MENU        :  Return   STATUS      :   Exit

Sound

Treble

0

Bass

0

Balance

0

BBE

Off

Surround

Off

MUTE

WIDE

OFF TIMER

PICTURE

STATUS

MOVE UP

MOVE DOWN

OK

ON

POWER

MENU

BEFORE OPERATION

REMOTE CONTROL UNIT

MENU

   OK
INPUT

VOLUME

FRONT CONTROL

MENU

CURSOR 

CURSOR 

OK

MENU

STATUS

"Sound" MENU (example)

MENU

OK

CURSOR  

CURSOR  

Press MENU button and ON-SCREEN MENU will
appear.  

1

Press 

buttons to select the menu that you want to

adjust, and then press OK button. The selected menu will
appear.

2

Press 

buttons to select the item that you want to

adjust.

3

Adjust the item by pressing 

buttons.

4

Used to close ON-SCREEN
MENU.

Press STATUS button to close ON-SCREEN MENU.

5

Used to select
the item to adjust.

Used to set or
adjust the menu
data. 

Содержание PDP-32H1W

Страница 1: ...Owner s Manual PDP 32H1W Multimedia Plasma Monitor MODEL ...

Страница 2: ...HE RISK OF FIRE OR ELECTRIC SHOCK DO NOT EXPOSE THIS APPLIANCE TO RAIN OR MOISTURE This Plasma Monitor should be set in the way indicated If not it may result in a fire hazard Take appropriate space on the top sides and rear of the Plasma Monitor cabinet for allowing air circulation and cooling the Plasma Monitor Minimum distance should be taken If the Plasma Monitor is to be built into a compartm...

Страница 3: ...ch dangerous voltage points or short out parts that could result in a fire or electric shock Never spill liquid of any kind on the Plasma Monitor This Plasma Monitor should be operated only from the type of power source indicated on the marking label If you are not sure of the type of power supplied consult your authorized dealer or local power company Do not overload wall outlets and extension co...

Страница 4: ...efeat this safety feature Should you be unable to insert the plug into the outlet contact your electrician GROUND THE SOCKET OUTLET SHOULD BE INSTALLED NEAR THE EQUIPMENT AND EASILY ACCESSIBLE AC POWER CORD REQUIREMENT Declaration of Conformity Model Number PDP 32H1W Trade Name Sanyo Responsible party SANYO Manufacturing Corporation Address 3333 Sanyo Road Forrest City AR 72335 Telephone No 870 63...

Страница 5: ...ECTING VIDEO SYSTEM 33 SCREEN SAVER FUNCTION 34 SETTING MENU 35 CLEANING THE PLASMA MONITOR 36 TROUBLESHOOTING 37 FUNCTIONS OF PRODUCT SAFETY FEATURES 38 INFORMATION MENU 39 TECHNICAL SPECIFICATIONS 40 BASIC OPERATION 20 TRADEMARKS Apple Macintosh and PowerBook are trademarks or registered trademarks of Apple Computer Inc IBM and PS 2 are trademarks or registered trademarks of International Busine...

Страница 6: ...ter output signals quickly There is no need for complicated manual adjustment of frequency and other settings Input Terminals D SUB RGB input for PC Up to XGA Component input for DVD S Video Video for VCR Dynamic AI Automatic Image control RS232C Terminal Slim design Do not bump or scratch the panel surface as this causes flaws on the surface of the screen Do not display one non movement still pic...

Страница 7: ...P27 Used to turn Plasma Monitor on or off P20 POWER INDICATOR MENU OK INPUT VOLUME PLASMA DISPLAY PANEL Used to set and adjust the menu data on On Screen Menu P18 CURSOR BUTTON OK BUTTON Used to execute the selected menu on On Screen Menu P18 Used to select the menu on On Screen Menu P18 CURSOR BUTTON FRONT CONTROLS Light in green when power is on Light in red when power is off with Remote Control...

Страница 8: ...his Plasma Monitor Optional Stand or Mounting Bracket is needed Those optional units are not included within this Monitor Set Your Sales dealer can advice you of best optional unit for using Plasma Monitor Contact your sales dealer for detail NOTES ON USING PLASMA MONITOR This Plasma Monitor can be installed in two ways normal horizontal and vertical DO NOT INSTALL UNSPECIFIED DIRECTION OR COOLING...

Страница 9: ...nce is not used CONNECTING AC POWER CORD Connect AC Power Cord supplied to Plasma Monitor The AC outlet must be near this equipment and must be easily accessible NOTE ON THE POWER CORD The AC Power Cord must meet the requirement of the country where you use the Plasma Monitor Confirm the AC plug type with the chart below and the proper AC Power Cord must be used If the supplied AC Power Cord does ...

Страница 10: ...each arm Through installation work handling with more than two people is recommended When holding moving or lifting the Plasma Monitor hold the Monitor s body Do not handle it by holding the attached accessory parts the Speakers otherwise damage could be result Provide space that enough larger than the screen size The surface must be flat and maintained with soft material cloth or blanket for prot...

Страница 11: ...o the figure on pages 13 to 15 and connect properly RS 232C WIRED R C HEADPHONE SIDE When using Remote Control Unit as Wired Remote Control Connect Remote Control Unit to this jack with Remote Control Cable supplied Refer to page 17 WIRED R C JACK Connect Headphone stereo HEADPHONE JACK When controlling this Plasma Monitor by computer connect your computer to this terminal RS 232C TERMINAL ...

Страница 12: ...pe COMPONENT RGB INPUT JACKS Connect computer outputs to this terminals Refer to P15 RGB D SUB AUDIO R L Stereo Mini Jack PC INPUT TERMINALS Connect video and audio outputs from video equipment Refer to P13 S VIDEO Mini DIN 4 type VIDEO RCA type AUDIO R and L MONO RCA type VIDEO1 INPUT JACKS MONITOR OUTPUT JACKS Connect video and audio outputs from video equipment Refer to P13 S VIDEO Mini DIN 4 t...

Страница 13: ...RCA x 3 S VIDEO Cable Audio Cable RCA x 2 NOTE When connecting Plasma Monitor AC Power Cords of both Plasma Monitor and external equipment should be disconnected from AC outlet BNC RCA Adapter supplied External Audio Equipment R L S VIDEO VIDEO R L Composite Video and Audio Output Audio Cable RCA x 2 VIDEO and AUDIO R L MONO Video Cable RCA x 1 Composite Video and Audio Input S VIDEO S VIDEO Outpu...

Страница 14: ...ction Cables are not supplied with this Plasma Monitor Video Cable RCA x 3 or BNC x 3 Audio Cable RCA x 2 NOTE When connecting Plasma Monitor AC Power Cords of both Plasma Monitor and external equipment should be disconnected from AC outlet Audio Output R L Y Component video output equipment such as DVD player or high definition TV source Audio Cable RCA x 2 Component Video Output Video Cable BNC ...

Страница 15: ...apter in the case of connecting Macintosh computer Audio Cables RCA x 2 or Mini Plug Mini Plug R L Those Cables and Adapter are not supplied with Plasma Monitor NOTE When connecting the cable AC Power Cords of both Plasma Monitor and external equipment should be disconnected from AC outlet Turn Plasma Monitor and peripheral equipment on before your computer is switched on Use either PC IN Terminal...

Страница 16: ...ATING RANGE Point Remote Control toward Plasma Monitor Remote Receiver whenever pressing the buttons Maximum operating range for Remote Control is about 16 4 5m and 60 in front of Plasma Monitor Remote Control Unit can be used as either Wired or Wireless Used to select video inputs AV 1 and AV 2 P22 VIDEO BUTTON Used to select computer or analog RGB inputs P22 PC RGB BUTTON Used to select wide scr...

Страница 17: ...nsure safe operation please observe the following precautions Use 2 AA UM3 or R06 type alkaline batteries Replace two batteries at the same time Do not use a new battery with a used battery Avoid contact with water or liquid Do not expose Remote Control Unit to moisture or heat Do not drop Remote Control Unit If batteries have leaked on Remote Control Unit carefully wipe the case clean and load ne...

Страница 18: ...US Exit Sound Treble 0 Bass 0 Balance 0 BBE Off Surround Off MUTE WIDE OFFTIMER PICTURE STATUS MOVE UP MOVE DOWN OK ON POWER MENU BEFORE OPERATION REMOTE CONTROL UNIT MENU OK INPUT VOLUME FRONT CONTROL MENU CURSOR CURSOR OK MENU STATUS Sound MENU example MENU OK CURSOR CURSOR Press MENU button and ON SCREEN MENU will appear 1 Press buttons to select the menu that you want to adjust and then press ...

Страница 19: ... Auto Color temperature Normal No operation shut off timer Off Video format Auto Reset Setup Start mode Off ECO mode Off Child lock Off Dynamic AI On Screen saver On Language English Select Adjust MENU Return STATUS Exit Contrast 63 Select Adjust MENU Return STATUS Exit Brightness 31 Select Adjust MENU Return STATUS Exit Color 31 Select Adjust MENU Return STATUS Exit Tint 0 Select Adjust MENU Retu...

Страница 20: ...Monitor to turn ON POWER indicator will light up green when Plasma Monitor is ON Press MAIN ON OFF switch again to turn OFF 3 NOTE When you are operating POWER ON OFF button on Remote Control Unit turn the Plasma Monitor ON with MAIN ON OFF switch on the Plasma Monitor first This is the master switch of the Plasma Monitor Remote Control Unit does not work if this switch is OFF POWER indicator ligh...

Страница 21: ... ON OFF VOLUME PC RGB COMPONENT OFFTIMER PICTURE MOVE UP VIDEO OFF TIMER button The OFF TIMER can be set to turn the power off after 30 60 90 or 120 minutes Pressing the OFF TIMER button on the Remote Control Unit until desired time is displayed TO CHECK THE REMAINING TIME To check the remaining time of OFF TIMER set press OFF TIMER button once The remaining time displayed for few seconds When you...

Страница 22: ... CONNECTING TO COMPUTER on Page 15 PC RGB1 FRONT CONTROL OPERATION Choose either input mode by pressing INPUT button on Plasma Monitor s Front Control AV1 VIDEO1 AV2 VIDEO2 Component RGB1 RGB2 PC COMPONENT button PC RGB button NOTE By pressing the STATUS button on Remote Control Unit Video source and OFF TIMER s remaining time if OFF TIMER is set will be displayed for 5 seconds NOTE RGB 1 input is...

Страница 23: ...e tone User preset picture adjustment in IMAGE ADJUST Menu P24 Natural Cinema High contrast picture level preset on this Plasma Monitor Dynamic Memory Cinema Memory IN PC RGB MODE Graphic Standard Select image level among Graphic Memory Text and Standard by pressing PICTURE button on the Remote Control Unit User preset picture adjustment in IMAGE ADJUST Menu P24 Select this mode when watching text...

Страница 24: ...olor Press button or button to obtain proper color From 31 to 32 Tint Select Adjust MENU Return STATUS Exit Brightness 31 Select Adjust MENU Return STATUS Exit Color 31 Select Adjust MENU Return STATUS Exit Tint 0 Press MENU button and ON SCREEN MENU will appear 1 2 Press buttons to select the item that you want to adjust and then press OK button The level of selected item is displayed 3 Adjust ea...

Страница 25: ... picture 4 3 aspect picture with black bar on top and bottom edges with wide video aspect of 16 9 screen Zoom Provides real 4 3 image on 16 9 screen Normal Provides image to fit width of screen by expanding both sides of image This function is suitable to enjoy a normal video signal 4 3 aspect ratio with wide video aspect ratio of 16 9 screen Natural wide Select screen size among Natural wide Zoom...

Страница 26: ...usted only when wide image mode is Natural wide Zoom and Zoom Caption IN Adjustment data is memorized in each wide image mode NOTE Horizontal can be adjusted only when wide image mode is Natural wide Screen Adjust MENU UP DOWN PICTURE To move up down the image vertically press the MOVE UP MOVE DOWN buttons NOTE Up down picture function can work only when the input signal mode is AV1 VIDEO1 AV2 VID...

Страница 27: ... that you want to adjust and make adjustment by pressing buttons 3 Treble Select Adjust MENU Return STATUS Exit Sound Treble 0 Bass 0 Balance 0 BBE Off Surround Off Sound MENU Bass Adjusts the balance of the left and right channels From 32 to 32 Balance Set On to provide BBE ON sound and set Bass to provide BBE Mach 3 Bass ON sound BBE Press button to decrease low frequency sound and button to inc...

Страница 28: ...be tuned follow in message will be displayed When Plasma Monitor cannot recognize connected signal that PC system provides in the message Out of scan range is displayed on screen There is no signal input from computer Make sure the connection of computer and Plasma Monitor is set correctly Out of scan range No signal REMOTE CONTROL OPERATION Select PC or RGB1 by pressing PC RGB button on Remote Co...

Страница 29: ...the Auto setup function 1 If the picture is not displayed fully on the screen 2 When a contrast pictures such as an outdoor scene is displayed on the screen It depends on signal and computer s configuration Auto setup function cannot be operated properly In this case adjust Clock Phase and Position manually Adjust each level by pressing buttons 4 Clock Adjust when Vertical noise lines are observed...

Страница 30: ...ed for a certain period of time This function can be used when using the Plasma Monitor with a computer conforming to the VESA DPMS standard To activate power save computer setup is also needed Refer to Computer Operation manual Adjust MENU Return STATUS Exit PC mode adjustment Power save Yes Information Indicate the input signal information Information 1024 x 768 FH 58 03kHz FV 72 00 Hz PC mode a...

Страница 31: ...600 37 88 60 32 XGA 1024 x 768 60 31 74 92 SVGA 800 x 600 48 08 72 19 SVGA 800 x 600 37 90 61 03 SVGA 800 x 600 34 50 55 38 SVGA 800 x 600 38 00 60 51 SVGA 800 x 600 38 60 60 31 SVGA 800 x 600 32 70 51 09 MAC 16 832 x 624 49 72 74 55 MAC 19 1024 x 768 60 24 75 08 MAC 1960 1024 x 768 48 22 59 31 XGA 1024 x 768 60 02 75 03 XGA 1024 x 768 XGA 1024 x 768 XGA 1024 x 768 XGA 1024 x 768 48 50 60 02 44 00...

Страница 32: ...n the connection of 21 PIN video signals is on RGB2 should be selected by pressing PC RGB button on Remote Control Unit AV1 AV2 COMPONENT INPUT Select Component by pressing COMPONENT button on Remote Control Unit Component FRONT CONTROL OPERATION Select AV1 VIDEO1 AV2 VIDEO2 RGB2 or Component by pressing INPUT button on Front Controls RGB2 ...

Страница 33: ...s to select Setup menu and then press OK button Setup menu will appear 2 Press buttons to select Color system 3 Press buttons and select Color system 4 Press MENU button and ON SCREEN MENU will appear 1 Press buttons to select Setup menu and then press OK button Setup menu will appear 2 Press buttons to select Video format 3 Press buttons and select Video format 4 Select Select MENU Return STATUS ...

Страница 34: ...buttons to select Setup menu and then press OK button Setup menu will appear 2 1 2 PICTURE ROTATION Press buttons to select Screen saver and then press buttons Screen saver menu will appear 3 In the Screen saver menu Pic rotation On press buttons to select Cycle time and press buttons to select desired cycle time Cycle time 15 Min 30 Min 60 Min Press buttons to select Dot and press buttons to sele...

Страница 35: ...ey cannot be inadvertently changed With Child lock On Plasma Monitor s front control buttons except MAIN ON OFF switch and MENU button will be locked Locked items in the menu will be displayed in gray Remote Control buttons can be operated under Child lock On ECO mode This function is used to reduce the power consumption of the Plasma Monitor Press buttons to select ECO1 or ECO2 ECO1 is less power...

Страница 36: ... in the memory can be reset to factory settings 1 Press button Reset menu will appear 2 Press buttons to select On and then press OK button All adjustments in the memory is reset to factory settings Return to factory settings Select OK OK MENU Return STATUS Exit Reset Off On CLEANING THE PLASMA MONITOR Be sure to disconnect the AC Power cord from AC outlet before cleaning the Plasma Monitor Clean ...

Страница 37: ...the Remote Control Unit Maximum operating range is 16 4 5m Is direct sunlight or strong artificial light shining on the Plasma Monitor s Infrared Remote Receiver Eliminate the light by closing curtains pointing the light in a different direction etc Problem Try these Solutions No image Check the connection between the computer or video equipment and Plasma Monitor When turning Plasma Monitor on it...

Страница 38: ...Self Diagnose function activates Refer to P39 FUNCTIONS OF PRODUCT SAFETY FEATURES When the temperature of inside the Plasma Monitor becomes high the cooling fans start operating automatically and cooling down the Plasma Monitor Fan s running speed is changed according to the temperature of inside the Plasma Monitor When the Plasma Monitor has cooled down fans stop operating When above message is ...

Страница 39: ...AL TEMPERATURE MONITOR When this message is displayed the internal temperature of Plasma monitor exceeds normal After displaying this message for 10 seconds Plasma Monitor will be turned off automatically When Plasma Monitor cooling down to normal Plasma Monitor can be turned on again by pressing POWER button If this message is displayed often contact sales dealer where you purchased the Plasma Mo...

Страница 40: ... B VD HD BNC type AUDIO R and L RCA type PC IN RGB D SUB 15pin AUDIO R L Stereo Mini jack RS232C IN RS232C D SUB 9pin WIRED RC IN Stereo Mini Jack MONITOR OUT VIDEO RCA type AUDIO R and L RCA type HEADPHONE OUT Stereo Mini Jack EXT SP OUT R and L 8W 8 Ω Push type POWER SUPPLY AC 100 120V 50 60 Hz DIMENSION W x H x D 1018 x 564 x 122 mm 40 7 x 22 5 x 4 8 WEIGHT NET 32 7 kg 72 1 lbs Regulations FCC ...

Страница 41: ...ainst risk of fire casualty and electrical hazards 829 32 6 829 32 6 517 20 4 122 4 8 101 4 0 Size in mm inch The products listed below are optionally supplied When ordering these products give name and Type No to sales dealer OPTIONS Floor stand KA TD H10W Side rack KA TD R100 Tilt mount unit KA TI H10 Wall mount unit KA WA H10WV Ceiling mount unit KA CH H10 MEASUREMENT ...

Страница 42: ...C60 OPERATION VOLUME UP POWER ON OFF POWER OFF POWER ON VOLUME DOWN MUTE INPUT Input signal select INPUT VIDEO VIDEO1 VIDEO2 Wide mode Normal INPUT COMPONENT COMPONENT WIDE Wide mode select INPUT PC RGB PC RGB Wide mode Natural wide Wide mode Zoom Wide mode Zoom Caption IN Wide mode Full Screen Saver White pattern On PICTURE Screen Saver Rotation Off Screen Saver Rotation On Screen Saver White pat...

Страница 43: ...Sense 2 Blue Input Ground Red Ground Green Ground Blue 1 5 2 4 3 6 7 8 No Connect Horiz sync Ground Vert sync Sense 1 Sense 0 Vert sync Reserved 9 13 10 12 11 14 15 Pin Configuration MAC ADAPTER NOT SUPPLIED Set Slide Switches as shown in the table below depending on RESOLUTION MODE that you want to use before you turn on Plasma Monitor and computer ON 1 DIP ON OFF 2 3 4 5 6 13 MODE 640 x 480 16 M...

Страница 44: ... LIEU OF ALL OTHER WARRANTIES OF MERCHANTABILITY OR FITNESS FOR A PARTICULAR PURPOSE OBLIGATIONS For one year from the date of purchase Sanyo Manufacturing Corporation warrants this product to be free from defects in material and workmanship under normal use and conditions Should replacement be necessary under this warranty for any reason due to manufacturing defect or malfunction during the first...

Отзывы: