3-2 LMU-TK18AG2TC
Disassembling the major components
(1) Cabinet
1.Unscrew to secure the cabinet (10-position)
2.Pull the cabinet upward to remove it
(2) LCD Panel and Touch Panel
1.Unscrew to secure the bracket for Touch Panel (8-position) and remove the brackets
2.Unscrew to secure the LCD Panel (4-position)
3.Pull the Touch Panel and LCD Panel up
and pull two connectors out from inverter unit
4.Disconnect two cables from the Main PCB
5.Unscrew to secure the earth terminal (1-position)
6.Disconnect the cable on the Touch Controller PCB
(3) Main PCB
1.Pull a RGB signal cable out
2.Unscrew to secure the Main PCB (7-position)
3.Disconnect the cables on the Main PCB (8-position)
/ Two connectors from LCD Panel
/ One connector from the Switch PCB
/ One connector from the VR PCB
/ One connector from the DC-IN PCB
/ Two connectors from the Inverter PCB on LCD
/ One connector from the Touch Controller PCB
4.Unscrew to secure the bracket for RGB connector (2-position)
(4) Driver PCB
1.Unscrew to secure the Driver PCB (2-position)
2.Disconnect the cable from the Inverter PCB
3.Disconnect the cable from the DC-IN PCB
(5) Touch Controller PCB
1.Unscrew to secure the Touch Controller PCB (2-position)
2.Disconnect a serial cable
(6) Serial Cable (Connector and Cable with bracket)
1.Unscrew to secure the bracket for serial cable (2-position)
(7) Connector PCB
1.Unscrew to secure the Connector PCB (2-position)
2.Disconnect the cable from the Main PCB
(8) VR PCB
1.Unscrew to secure the VR PCB (2-position)
2.Disconnect the cable from the Main PCB
(9) DC-IN PCB
1.Unscrew to secure the DC-IN PCB (2-position)
2.Disconnect three cables, one from power switch, one from Driver PCB and
one from the Main PCB
(10) Power Switch
1.Remove the power switch, while pressing the hook of the power switch
- 7 -
Содержание LMU-TK18AG2
Страница 1: ......
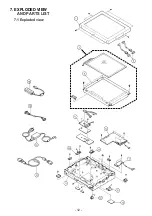
Страница 13: ...7 EXPLODED VIEW AND PARTS LIST 7 1 Exploded view 12 ...


