background image

First Time Configuration/Basic Operations

Turning the TV on or off 

Note:

 If the TV does not receive a broadcast signal for several minutes, the TV goes into 

standby mode. 

To turn the TV on or off:

Plug the power cord into an AC power outlet.  Press 

Power Switch

 on the TV.

If no picture appears while the indicator lights up, the set is in standby mode. 

Press

 POWER


 to turn on the TV.  

Press


 button again to turn off the TV and put the TV in standby mode.

To cut off the power completely, press 

Power Switch

 on the TV.  

Warning:

 When the TV is in standby mode, power is still flowing into the TV. For the sake of 

energy saving and safety issue, please press 

Power Switch

 to completely cut off the power.   

After  you  turn  off  the  TV,  you  should  wait  at  least  5  seconds  (the  power  indicator  goes 
out)before you turn it on again.   

1

2

3

INPUT 

13

Power Switch 

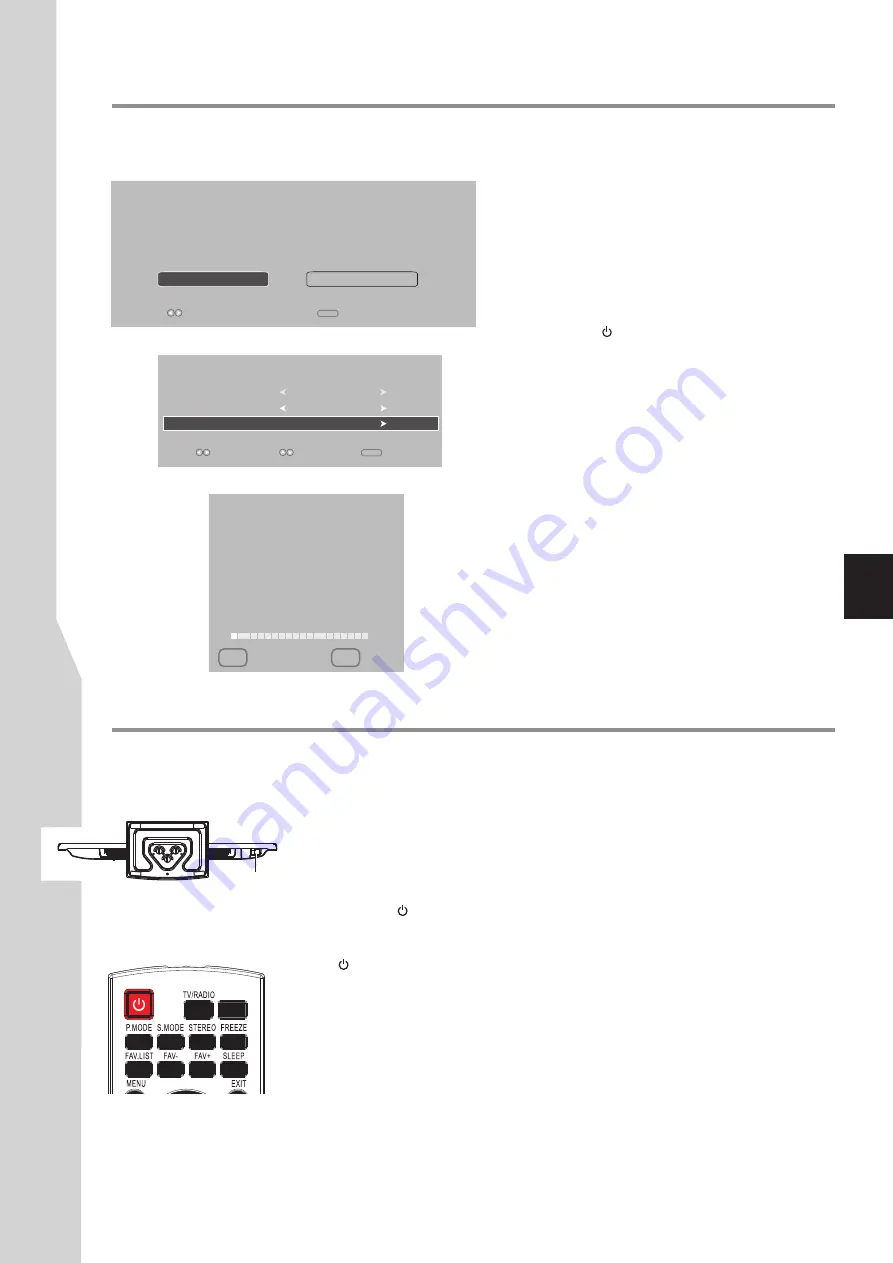
Turning on your TV for the first time 

Make sure that you have inserted the batteries in the 

remote control, have connected your antenna to the 
TV, and have connected the AC power. 

Press the 

Power Switch

 on the TV. 

Press 

POWER


  to  turn  on  the  TV.  After  a  few 

seconds the 

Energy Save Mode

 screen opens.

Press 

3

or

4

  to  select

  Standard/Energy  Save

  or


Store/Dynamic

, press 

OK

 to confirm. (For normal 

home use, please select 

Standard/Energy Save

.)

Now  the 

Installation  Guide 

screen  appears  with 

Country  Selection

  highlighted.  Press 

3

or

4

  to 

select 

Australia 

or

 New Zealand

Press 

6


or 

5

  to  highlight 

Channel  Tuning

,  then 

press 

OK 

to  begin  the  auto  tuning  for  all  available 

ATV/DTV  channels.  It  may  take  several  minutes, 
please wait until it is finished. 

During  searching,  the  screen  will  display  a  report 
about found stations.  

When  complete,  it  will  go  to  digital  programme 
position one. Now channel list has been created and 
you can start to watch TV. 

1

2

3

The first time you use the TV, you need to configure 
your TV: 

Installation Guide

OSD Language

English

Channel Tuning

Select 

To use this TV for displaying in a store, please select [Store/Dynamic].
[Standard/Energy Save] mode is recommended for normal home use.

Energy Save Mode

Store/Dynamic

Standard/Energy Save

OK

OK

 Exit

EXIT 

To configure your TV: 

4

5

Country Selection 

Australia 

Select

Move

6

Channel Tuning

ATV                :      2  Programme(s)
DTV                :       0  Programme(s)

Radio             :       0  Programme(s)

2 %...    76.25 MHz             (ATV)

EXIT    Exit                           MENU   Skip 

Содержание LED-22XR11F

Страница 1: ...INSTRUCTION MANUAL LED 22XR11F LED LCD TV Before connecting operating or adjusting this product please read the manual completely Please keep this manual for future reference ...

Страница 2: ...tions 13 Memorizing the Channels 17 Programme Edit 18 Adjusting the Picture Adjusting the Sound Adjusting the Computer Image Setting Hotel Mode Troubleshooting 37 Specifications 38 Appendix Installing the Stand 39 21 22 Adjusting Basic Settings 23 Setting Clock Timer 24 Setting Child and Rating Locks 26 Teletext Subtitle 28 29 Using MUSIC Player Using USB Multi Media Player 30 ...

Страница 3: ...n Ensuring the television is not overhanging the edge of the supporting furniture Not placing the television on tall furniture for example cupboards or bookcases without anchoring both the furniture and the television to a suitable support Not standing the televisions on cloth or other materials placed between the television and supporting furniture Educating children about the dangers of climbing...

Страница 4: ...r electric shock 9 Entering of objects and liquids Never insert an object into the product through vents or openings High voltages are present in the product and inserting an object can cause electric shock and or short internal parts For the same reason do not spill water or liquid on the product 10 Servicing Refer all servicing to qualified service personnel Servicing is required when the appara...

Страница 5: ...ry cloth Unplug this product from the wall outlet before cleaning Do not use liquid cleaners or aerosol cleaners Use a damp cloth for cleaning 20 Ventilation Do not block any ventilation openings Install in accordance with the manufacturer instructions The vents and other openings in the cabinet are designed for ventilation Do not cover or block these vents and openings since insufficient ventilat...

Страница 6: ...a minimum viewing level B Do not display the fixed image for extended periods of time C Turn the power off when not in actual use Important Information Regarding Use of Video Games Computers Captions or Other Fixed Image Displays To clean this unit wipe with a soft dry cloth If the surfaces are extremely dirty use a soft cloth dipped in a soap and water solution or a weak detergent solution Use ey...

Страница 7: ...OL 3 4 5 6 7 Note Buttons on the TV control panel CH VOL MENU INPUT POWER are touch buttons First touch of the button will illuminate it Second touch will fulfill its function Be sure button presses must be quickly done before the illumination disappears 8 10 RS 232 HDMI USB S PDIF L R D Sub MUSIC AUDIO RF COMPONENT IN P B P R Y VIDEO AV IN PC IN ARC 1 USB port Connect a USB device to this port 2 ...

Страница 8: ...n several times to display the upper then the lower part of the screen and then return to the normal size teletext page Teletext Index Press this button to view the main index page Teletext Mix Teletext Update Teletext 14 TV Radio Switches between TV and Radio mode DTV only 15 INPUT Displays input source menu 16 STEREO Selects bilingual stereo or mono ATV only or audio track DTV only 17 FREEZE To ...

Страница 9: ...e and symbols in the battery compartment 2 Replace the cover 3 Selecting a location You should select a location for the TV Where direct light does not reflect on the screen That has indirect and soft lighting Where the TV has access to an antenna or cable TV connection Where the TV has access to a power outlet Note Watching TV in total darkness or with a reflection on the screen may cause eyestra...

Страница 10: ...on of the external device may be different depending on your model Refer to the operating manual of the external device as well Cautions Before Connecting 10 Power Connection Connect the power cable to the AC IN socket on the back of the TV then connect the other end to a power outlet Note This product should be operated only from the type of power source indicated on the marking label Always unpl...

Страница 11: ... press INPUT button The Input Source menu opens 2 Press 5 or6 to select Component then press OK to confirm 3 Turn on your external device and set it to the correct mode See the device s user guide for more information To play from the component video device Connecting an HDMI device Connect the HDMI cable between the HDMI jack on the TV and HDMI output jack on the device Note If your device has an...

Страница 12: ...ton The Input Source menu opens 2 Press 5 or 6 to select D SUB then press OK to confirm 3 Turn on your computer and adjust the display properties as required To play video from the computer Connect a D Sub cable between the D Sub jack on the computer and the D Sub input jack on the unit Connect an Audio cable between the AUDIO output on the computer and AUDIO input jack on the unit 12 Note The MUS...

Страница 13: ...itch on the TV Press POWER to turn on the TV After a few seconds the Energy Save Mode screen opens Press 3 or4 to select Standard Energy Save or Store Dynamic press OK to confirm For normal home use please select Standard Energy Save Now the Installation Guide screen appears with Country Selection highlighted Press 3 or4 to select Australia or New Zealand Press 6 or 5 to highlight Channel Tuning t...

Страница 14: ...to cycle among the favorite channels To go to the previous channel viewed press RECALL Select Move DTV AV HDMI Input Source ATV Component USB Music 0 Analogue programme selection Be sure to select ATV through the Input Source menu See the above steps for source selection Press CH or CH to go to the next or previous channel The skipped channels can not be selected Press the number buttons to direct...

Страница 15: ...the EPG In the EPG window as shown on the left current channels now and upcoming program s information will be displayed To use EPG 2 At upper screen the channel number name is shown you can use 3 or4 to select a channel whose information you want to know At the lower screen this selected channel s now and future programme events are listed Use 5 or 6 to navigate among the programme events and pre...

Страница 16: ...Sleep Timer Time Zone Off NSW ACT GMT 10 Off Off Off Set Password Block Programme Parental Guidance No Block Lock System Off Restore Factory Default Allow Update Off Hearing Impaired Off S PDIF Output AUTO Press MENU to call up the OSD main menu The screen will now display PICTURE menu Press 3 or4 one or more times to select menu press 6 to access PICTURE SOUND TIME OPTION LOCK CHANNEL menu can be...

Страница 17: ...ital only 1 2 3 4 ATV Manual Tuning Programme Edit Auto Tuning DTV Manual Tuning This feature is available for service engineers or can be used for direct channel entry if the multiplex channel is known Press 3 or4 button to select your desired multiplex number If the selected channel has no signal NO SIGNAL will appear In CHANNEL menu press 6 or5 to select DTV Manual Tuning then press4 or OK to a...

Страница 18: ...Press RED button to save your settings Adding or changing a channel label analogue only If a channel is not already labeled you can label the channel to make it easier to identify You can also relabel a channel that is already labeled Auto Tuning DTV Manual Tuning ATV Manual Tuning Programme Edit 4 Within the programme list press 6 or5 to select a channel you want to label press GREEN button to st...

Страница 19: ...gramme Edit Reorder rearrange channels analogue only ATV channels can be arranged in your favourite order Auto Tuning DTV Manual Tuning ATV Manual Tuning Programme Edit 1 Navigate to the CHANNEL menu press 5 or6 to select Programme Edit press 4 or OK to open the Programme Edit menu 2 Use 6 or5 to select a channel you want to move 3 Press YELLOW button and the highlight will be enlarged in the list...

Страница 20: ...nd them unless you perform a new channel search 1 Navigate to the CHANNEL menu press 5 or6 to select Programme Edit press 4 or OK to open the Programme Edit menu 2 Press 6 or5 to select your unwanted channel press RED button and a delete symbol appears alongside the selected channel in the list Press RED button again to confirm the deleting and this channel is deleted Use 6 or5 to select other unw...

Страница 21: ...mode for extended period of time as to protect the screen Auto Selects the correct aspect ratio automatically Zoom1 Enlarges the picture vertically The top and bottom may be cropped Zoom2 Enlarges picture both horizontally and vertically The edges may be cropped 1 1 pixel mapping Displays an input source without scaling it This option is available when native resolution is 1920x1080 and input reso...

Страница 22: ...lect 3 Visual Impairment Volume 10 On Mode Press 6 or 5 to scroll the menu Stereo and Bilingual transmissions For ATV programmes If stereo or dual language broadcasts are transmitted the word Stereo or Dual will appear on the screen each time you change channels disappearing after a few seconds If the broadcast is not in stereo the word Mono will appear Stereo Press STEREO button to select Stereo ...

Страница 23: ...s Dolby Digital or PCM to the digital audio output jack S PDIF providing it is being broadcast PCM Select this when a 2ch digital stereo amplifier is connected to the TV When you select a Dolby Digital or MPEG audio track the sound is converted to the PCM 2ch format and output Audio Preference digital only Selects the audio track to output You can select MPEG or Dolby Digital MPEG If the programme...

Страница 24: ... Off Off Time On Time Off Clock 01 Jan 2011 15 30 Time Zone NSW ACT GMT 10 Activate On Close Hour 00 Minute 00 Off 1 Press MENU Press 3 or4 to display TIME menu press 6 to access 2 Press 5 or6 to select Off Time press 4 or OK to access its setting menu 3 Now the Activate item is highlighted automatically press 3 or4 to select On to turn on the function To cancel the function select Off 4 After Act...

Страница 25: ...details of the on timer by using 3 or4 to make selections Hour Minute Sets the desired time to turn on the TV Volume Sets the volume level for the On Timer program Input Sets the input source to be viewed when the TV turns on Channel Sets the channel that will be tuned when the TV turns on 5 When finished use 5 or6 to select Close item and press OK to close the sub menu Press EXIT button to close ...

Страница 26: ...prevents your children from viewing any channels which you do not want them to watch To use lock feature you have to enable the Lock System 1 Navigate to the Lock menu and input the correct password to access 2 Now the Lock System item will be highlighted automatically Use 3 or4 to select On to enable the lock system 3 Use 5 or6 to highlight Block Programme item press 4 or OK to access 4 Now the B...

Страница 27: ...hen start system update 1 Navigate to the Lock menu and input the correct password to access 2 Press 5 or6 to select the Allow Update item press 4 or OK to access its setting menu 3 5 When finished use 5 or6 to select Close and press OK to close the sub menu To exit press EXIT button Now the Activate item is highlighted automatically press 3 or4 to select On to enable the function To cancel select...

Страница 28: ...page acquisition Reveal button Press the button to reveal the concealed information such as games solutions Press the button again to hide the information Size button Press this button several times to display the upper then the lower part of the screen and then return to the normal size teletext page Index button In teletext mode press this button to display the index page Mix button Update butto...

Страница 29: ... Press OK to Save Panel Lock 100 Off Off RF Auto Off 1 Press INPUT button The Input Source menu opens 2 Press number buttons 5 8 2 to access the Hotel Mode screen Be sure to quickly input the numbers while the Input Source menu is still visible 3 Within the menu press 6 or 5 to highlight an option press 3 or 4 to adjust the option You can select 4 Press OK to save the setting Press EXIT to exit th...

Страница 30: ...ur USB device Please use English to name your files Otherwise the file names can not be shown correctly Certain types of USB device may not be compatible with this TV Using USB multi media player 30 USB multi media interface introduction 1 2 Connect your USB device Select USB mode through the Input Source menu the USB multi media interface main menu will appear automatically MUSIC Selects to playb...

Страница 31: ...n the highlighted folder or press to start slide show from current photo file Below we will take it as an example that your desire photo files are contained in a folder Just highlight this folder and press OK and the Photo Viewer Index appears which displays thumbnail images of the files stored inside this folder 2 3 The following describes how to use the Photo Viewer Index 4 Return Photo To retur...

Страница 32: ...y 90 degree upon every press Zoom in zoom out the photo image Pan left right up down You can use Pan only when the photo is magnified using ZOOM After you highlight this icon and press OK a symbol appears at the screen s bottom right corner now you can press to pan around the photo 5 6 3 4 Media 2 Playing Music With the USB music player you can Play compatible music in MP3 WMA or AAC format Mark m...

Страница 33: ...3 08 mp3 1 1 C Music 02 mp3 03 mp3 04 mp3 00 mp3 Return Up Folder 01 mp3 09 mp3 Skip to specific point by input time 33 Play pause Also you can directly press on the remote control for play pause or Fast reverse fast forward Also you can directly press on the remote for fast reverse fast forward Repeat mode selection Highlight this icon press OK one or more times to select Repeat 1 repeat to play ...

Страница 34: ...ark movie files so you can just playback those movie files use 5 6 3 4 to highlight this movie file then press OK A check mark appears on it press OK again to cancel the mark Repeat this way to create your favourite movie list then movie playback will go among these files 4 During movie playback you can make use of Movie Menu Bar to perform many functions To call out and operate the Movie Menu Bar...

Страница 35: ... 3 4 Speed down Highlight this icon repeatedly press OK to speed down the playback among 2x 4x 8x 16x choice Press to resume playback speed Slow motion Highlight this icon repeatedly press OK for slow motion Skip to specific point by input time Highlight this icon press OK to call out Input search time screen use number buttons to input time use to move the cursor then highlight OK and press OK bu...

Страница 36: ...oot highlight Return and press OK To go back to upper level folder highlight Up Folder and press OK To start play from your desired file highlight this file then press To mark specific files so you can just play those files use 5 6 3 4 to highlight this text file then press OK A check mark appears on it press OK again to cancel the mark Repeat this way to create your specific text list then text p...

Страница 37: ... communication equipment e g infrared cordless headphones is used near the TV Move the infrared communication equipment away from the TV until the noise is eliminated General Problem Possible Solutions One or some channels can t be displayed These channels may be set skipped You may cancel the skip setting through Programme Edit sub menu or select them with 0 9 number buttons These channels may be...

Страница 38: ...1 COMPONENT in 1 D Sub in 1 HDMI in 1 with ARC RS 232 1 Headphone 1 SPDIF coaxial out 1 USB port 1 MUSIC port 1 shared with PC IN AUDIO 38 Digital TV system Australia Compliant Standard DVB T 7 MHz Bandwidth Video Decoding MP ML MP HL Audio Decoding Dolby Digital MPEG Ⅱ Ⅰ Audio Sampling Rate 32 44 1 48 kHz New Zealand Compliant Standard DVB T 8 MHz Bandwidth Video Decoding H 264 AVC MPEG 2 MP ML A...

Страница 39: ...ace your TV screen face down on a cushioned clean surface to protect the screen from damages and scratches 2 Secure the stand to the TV with the three provided screws If the stand is provided please read these instructions thoroughly before attempting this installation NOTE The appearance of this product in these illustrations may differ from your actual product and is for comparative purposes onl...

Страница 40: ...5944039270 Ver 1 0 ...

Отзывы: