Sanyo LCD-22VT10DVD Скачать руководство пользователя страница 21

English   

- 19 -

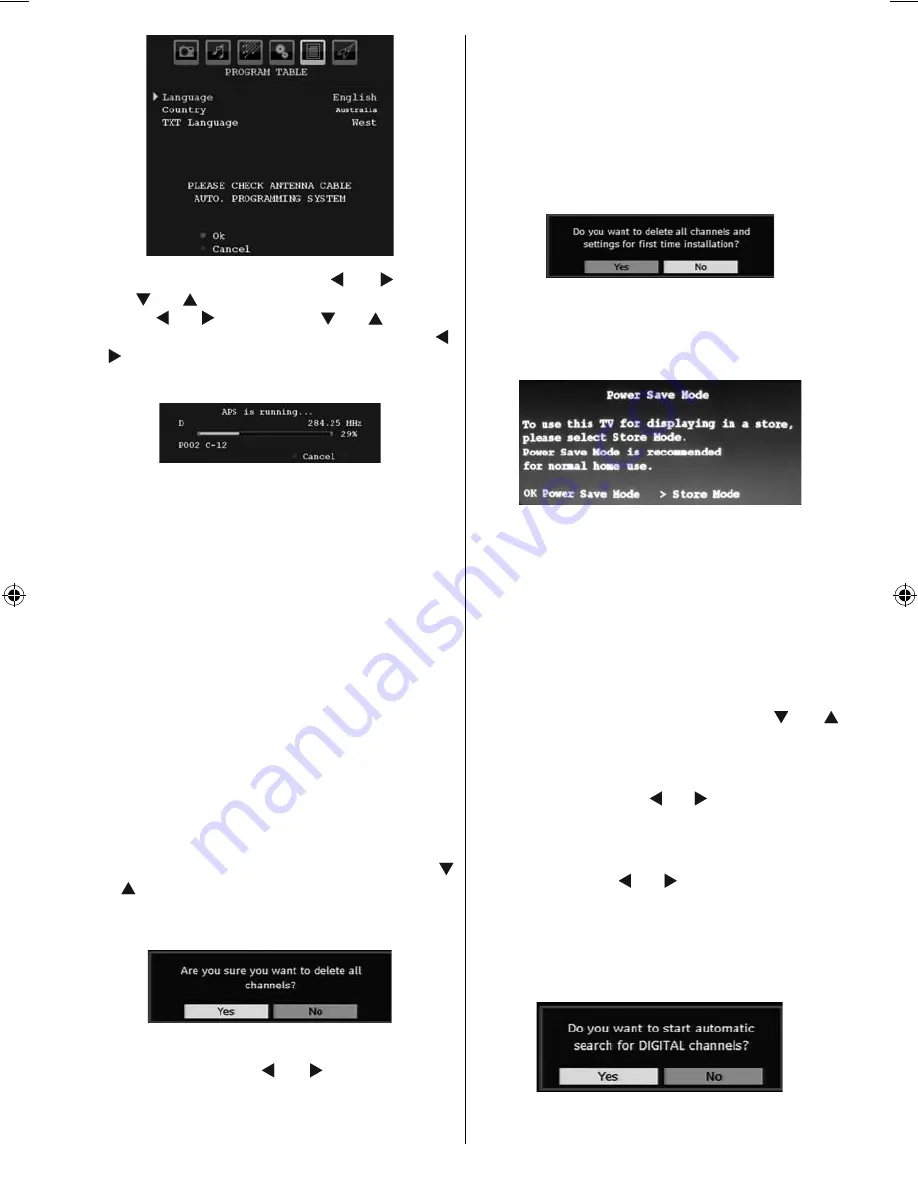
Set Language item by pressing  “ ” or “ ” button. 
Press “

” or “

” button to highlight Country item and 

then use “ ” or “ ” to set. Press “

” or “

” button to 

highlight TXT Language. Select a region by using “ ” 
or “ ”  button. When fi nished, press OK or RED button 
to continue. To cancel, press the BLUE button.

After 

APS

 is fi nalized, the programme table will appear 

on the screen. In the programme table you will see 
the programme numbers and names assigned to the 
programmes.

Manual Search

In Manual Search, the number of the multiplex is entered 
manually and only that multiplex is searched for the 
channels. For every valid channel number, signal level 
and signal quality  are shown on the screen.

In both manual and auto search any existing channel 
in the database is not re-stored to avoid redundant 
duplicates of that channel.

Frequency Search 

Enter the desired frequency. When fi nished, press OK 
button, and the TV wili start frequency search. 

Clear Service List (*)

(*) This setting is visible only when the Country option 
is set to Denmark, Sweden, Norway or Finland.

Use this setting to clear channels stored. Press  “
” or “

” button to select Clear Service List and then 

press 

OK

. The following OSD will be displayed on 

the screen:

Press 

OK

 to cancel. 

Select 

Yes

 by pressing “ ” or “ ” button and press 

OK

 to delete all of the channels.

First Time Installation

The user can use this item to load default settings, 
which were loaded to the receiver at the factory. 

To install factory settings, highlight “

First Time 

Installation

” menu item and press 

OK

 button, then 

you will be asked whether or not to delete the settings. 
Selecting “

Yes

” by pressing 

OK

 button while the “

Yes

” 

is highlighted, will delete the existing channel table.

After factory settings are loaded, “

First Time 

Installation

” menu will be displayed.

Turn off the TV via remote control, unplug the power 
cord, plug the power cord and turn on the TV again.

Press OK button to activate power save mode. Press 
Right button to activate Store Mode.

You can save energy by selecting power save mode 
option.

If you select Store Mode, the following OSD will be 
displayed after every standby on/off.

Picture and Backlight preferences will be changed 
when you activate Power Save Mode.

The menu which is displayed for language selection 
appears on the screen at fi rst. By using  “

” or “

” 

buttons, select the desired language option, and press 

OK

 button to activate. 

After then, “First time installation” OSD will appear on 
the screen. By pressing “ ” or “ ” buttons, select the 

Country

 you want to set and press 

OK

 button (* only 

for EU countries).

Next, active antenna mode selection OSD will appear 
on the screen. Use “ ” or “ ” to set and press 

OK

 to 

continue. See the section, “Initial Settings” for more 
information.

After active antenna mode option is selected, a 
message asking for automatic search appears on 
the screen:

01_MB37_[GB]_(01_TV)_22890W_1900UK_IDTV_BRONZE13_10065805_5017xxxx.indd   19

01_MB37_[GB]_(01_TV)_22890W_1900UK_IDTV_BRONZE13_10065805_5017xxxx.indd   19

16.08.2010   10:09:43

16.08.2010   10:09:43

Содержание LCD-22VT10DVD

Страница 1: ...INSTRUCTION MANUAL LCD 22VT10DVD C LCD TV WITH DVD PLAYER Before connecting operating or adjusting this product please read the manual completely Please keep this manual for future reference ...

Страница 2: ...horing both the furniture and the television to a suitable support Not standing the televisions on cloth or other materials placed between the television and supporting furniture Educating children about the dangers of climbing on furniture to reach the television or its controls IMPORTANT INFORMATION be avoided by taking simple precautions such as potentially hazardous due to falling Many injurie...

Страница 3: ... the Remote Control 10 Initial Settings 11 Information Banner 12 Electronic Programme Guide EPG 12 Programme Options 13 Analogue Teletext 13 Widescreen 13 Digital TV Menu System 13 Channel List 13 Navigating the Entire Channel List 13 Moving the channels in the channel list 14 Deleting the Channels in the Channel List 14 Renaming channels 14 Adding Locks to Channels 14 Setting Favourites 14 Progra...

Страница 4: ...ck AVL Automatic Volume Limiting When no valid signal is detected after 5 minutes the TV switches itself automatically to standby mode PLL Frequency Search PC input Plug Play for Windows 98 ME 2000 XP Vista Audio line out Game Mode Accessories MENU INFO EPG FAV PRESETS SUBTITLE RETURN SOURCE SLEEP SCREEN LANG Remote Controller Batteries 2 X AAA Instruction Book RCA Adapter Introduction Thank you f...

Страница 5: ...ure that no open flame sources such as lighted candles are placed on top of the TV Batteries should not be exposed to excessive heat such as sunshine fire or the like Lightning In case of storm and lightning or when going on holiday disconnect the power cord from the wall outlet Replacement Parts When replacement parts are required make sure that the service technician has used replacement parts w...

Страница 6: ...ve your TV in standby or operating mode when you leave your house When you use the wall mount kit optional with the LCD TV we would definitely recommend to plug all your cables into the back of the LCD before mounting to the wall ...

Страница 7: ...d Sound menu Change channel list in 16 DTV mode Green Picture Subtitle on off in DTV mode 17 Yellow Feature Current language in DTV 18 mode Menu on off 19 Blue Install menu Selects DVB T or DVB C 20 channels in DTV mode OK Channel list in DTV mode Hold in TXT 21 mode Cursor right Subpage in TXT mode 22 Cursor down Page down in TXT mode 23 Volume up 24 Volume down 25 Mute 26 Teletext Mix 27 Subtitl...

Страница 8: ...onent Video Inputs YpBPr 2 are used for connecting component video You can connect the component video and audio sockets with a device that has component output Connect the component video cables between the COMPONENT VIDEO INPUTS on on the TV and the component video outputs of your device While connecting be sure that the letters on your TV Y Pb Pr correspond with your device s connectors PC YPbP...

Страница 9: ...h as a High Definition Satellite Receiver or DVD Player These devices must be connected via the HDMI sockets or Component Socket These sockets can accept either 480i 480p 576p 576i 720p 1080i 1080p signals No sound connection is needed for an HDMI to HDMI connection Viewing the Connections Side Connectors CI Slot is used for inserting a CI card A CI card allows you to view all the 1 channels that ...

Страница 10: ...ce itself SIDE VIEW USB MEMORY USB Memory Connection Plug your USB device to the USB input of the TV IMPORTANT The TV supports only FAT32 disk formatting NTFS format is not supported Connecting the LCD TV to a PC For displaying your computer s screen image on your LCD TV you can connect your computer to the TV set Power off both computer and display before making any connections Use 15 pin D sub d...

Страница 11: ... connect external speakers use an audio cable Do not reverse theAUDIO LEFT andAUDIO RIGHT jacks Turn on the LCD TV and external speaker set after all connections are made Refer to your speaker set s manual for further queries For connecting a to a device that has SPDIF support use an appropriate SPDIF cable to enable sound connection You should also set SPDIF Out option in the Sound menu as On Ext...

Страница 12: ...e option from the main menu by using or button Use then or button to highlight an input and press button to select Note You can mark desired source options by pressing the OK button Therefore when SOURCE button is pressed only the marked source options will be available except for the TV source Basic Operations You can operate your TV using both the remote control and onset buttons Operation with ...

Страница 13: ...y in the OSD Bypressingthe or buttonshighlightthelanguage you want to set and press OK button You can get information about the menu usage by pressing INFO button Press INFO button again to exit the help menu After then First time installation OSD will appear on the screen By pressing or buttons select the country you want to set and press OK button Note Country selection will not be available for...

Страница 14: ...nel using the P or P button or numeric buttons the TV displays the broadcast picture along with an information banner at the bottom of the screen This will remain on the screen for approximately a few seconds The information banner can also be displayed by pressing the INFO button at any time while watching the TV Pressing INFO button again removes the banner If the selected channel is locked you ...

Страница 15: ...g With digital terrestrial broadcasting DVB T in addition to digital teletext broadcasting together with the normal broadcasting there are also channels with just digital teletext broadcasting The aspect ratio picture shape when watching a channel with just digital teletext broadcasting is the same as the aspect ratio of the picture viewed previously When you press the TELETEXT button again the di...

Страница 16: ...n the message below appears on the screen Renaming channels To rename a specific channel the channel must be highlighted via pressing or buttons and then highlight the Edit Name item by pressing or buttons Press OK button to activate rename feature Now pressing or buttons moves to the previous next character Pressing or buttons toggles the current character i e b character becomes a on and c on Pr...

Страница 17: ...red Change Delete permits or prohibits any modifications for other users You can save the adjustments by pressing the GREEN key or cancel the process by pressing the RED button You can edit the list via GREEN key and delete with the RED button Common Interface Press MENU button to display the main menu and use the or buttons to highlight the Common Interface line and press OK button It is required...

Страница 18: ...utton to enter Parental Control menu A dialog box asking for the lock key is displayed There is only one key which is set to 0000 initially Enter lock key If wrong lock key is entered the WRONG PIN message will be displayed on the screen and the TV returns to the previous menu If the PIN is correct the Parental Control menu including following items will be displayed Maturity Lock If you set Count...

Страница 19: ...ns Use the or buttons to set the Dolby Digital as On or Off If the channel that you are watching supports Dolby Digital and Dolby Digital Plus you can turn this setting on Hard of Hearing Use or button to select Hard of Hearing and then press or button to set this setting as On or Off If the broadcaster enables any special signal concerning the audio you can set this setting as On to receive such ...

Страница 20: ...ttons to highlight the menu item that will be adjusted and then press or button to set Audio Language is used for selecting the soundtrack of a channels Primary settings are the first priority when multiple choices are available on a broadcast Secondary settings are the alternatives when the first options are not available Guide Language If the received EPG data includes the selected guide languag...

Страница 21: ...st Time Installation The user can use this item to load default settings which were loaded to the receiver at the factory To install factory settings highlight First Time Installation menu item and press OK button then you will be asked whether or not to delete the settings Selecting Yes by pressing OK button while the Yes is highlighted will delete the existing channel table After factory setting...

Страница 22: ...irst plug the USB device out and power off on the TV set Plug the USB device again Press OK to browse MENU to quit Playing Audio Files Play This OK Plays the selected file Play GREEN Play all media files in the folder starting with the selected one Pause Resume YELLOW button Pauses or resumes playback Stop RED Stop the playing file Previous Next Jumps to previous or next file to play Shuffle INFO ...

Страница 23: ...C signal Colour Temp Press or button to select Colour Temp Press or to choose from one of these options Cool Normal and Warm Note Setting Cool option gives white colours a slight blue stress Setting Warm option gives white colours a slight red stress For normal colours select Normal option Noise Reduction If the broadcast signal is weak and the picture is noisy use Noise Reduction setting to reduc...

Страница 24: ... is set to on Headphone sub menu options are described below Volume Press or button to select Volume Press button to increase headphone volume level Press button to decrease headphone volume level Headphone volume level can be adjusted between 0 and 63 Sound Mode Press or button to select Sound Mode Using or button you can select Mono Stereo Dual I or Dual II mode only if the selected channel supp...

Страница 25: ...ss Up or Down button to select Power save mode You can set Power save mode as On or off by pressing Left or Right button When power save mode is activated picture mode will be set to Natural and Backlight setting will be Minimum These settings will not available to be changed If you select Power Save Mode as Off picture mode will be set to Dynamic and Backlight setting will be Maximum Then you can...

Страница 26: ...esired frequency using the numeric buttons while Search item is highlighted Store Press or button to select Store Press or OK button to store the settings Stored will be displayed on the screen Install Menu in AV Modes The following screen appears in the install menu when the TV is in AV modes Note that limited options will be available Switch to TV mode for viewing complete version of the Install...

Страница 27: ...ed Whenever you press the BLUE button APS function stops and Program Table appears on the screen If you wait until the end of APS Program Table will be displayed with the programmes found and located Source Menu Press or button and select the sixth icon Then press or OK button Source menu appears on the screen In source menu highlight a source by pressing or button and switch to that mode by press...

Страница 28: ...ation is displayed on the screen when a new programme is entered or INFO button is pressed Mute Function Press button to disable sound Mute indicator will be displayed in the upper side of the screen To cancel mute there are two alternatives the first one is pressing the button and the second one is increasing the volume level Picture Mode Selection By pressing PRESETS button you can change Pictur...

Страница 29: ... RETURN Index Selects the teletext index page Subcode Pages Selects subcode pages if available when the teletext is activated INFO Reveal Shows hidden information e g solutions of games OK Hold Holds a text page when convenient Press again to resume SCREEN Expand Press once to enlarge top half of the page press again to enlarge the bottom half of the page Press again to revert back to normal size ...

Страница 30: ...icture or teletext unrecognisable Check if you have entered the correct frequency Please retune the channels The picture quality may degrade when two peripherals are connected to the TV at the same time In such a case disconnect one of the peripherals No Picture Is the aerial connected properly Are the plugs connected tightly to the aerial socket Is the aerial cable damaged Are suitable plugs used...

Страница 31: ...VESA 20 1280 1024 60 64 0 VESA 21 1280 1024 75 80 0 VESA 22 1600 1200 60 75 0 VESA Note Your PC may not work correctly with some resolution modes which are listed above because of unexpected causes When you confront with such a problem please try switching your PC to different resolution modes Appendix B AV and HDMI Signal Compatibility Input Signal Types Source Supported Signals Available EXT 1 S...

Страница 32: ...te 8K 48KHz mp3 MPEG 1 2 Layer 1 2 3 MP3 Sample Rate 8K 48KHz Bit Rate 32K 320Kbps Photo jpg Baseline JPEG WxH 14592x12288 Up to 179 Mega pixel Support format 444 440 422 420 Grayscale Progressive JPEG Up to 4 Mega pixel Support format 444 440 422 420 Grayscale External Subtitles srt Support Text File Format but do not support Picture File Format smi Note Necessary bitrates for some video types ar...

Страница 33: ...ide display DIMENSIONS mm DxLxH With foot 117 x 532 x 376 Weight Kg 5 6 DxLxH Without foot 60 x 532 x 347 Weight Kg 5 4 Digital Reception DVB T Transmission Standards DVB T MPEG2 DVB T MPEG4 HD i DEMODULATION Symbol rate COFDM with 2K 8K FFT mode Modulation 16 QAM 64 QAM FEC for all DVB modes automatically found ii VIDEO H 264 MPEG 4 part 10 main and high profile level 4 1 MPEG 2 MP HL video decod...

Страница 34: ...40 Features General Properties DVD CD CD R CD RW MP3 JPEG MPEG DivX playback NTSC PAL playback according to disc content Multi Audio up to 8 support According to disc content Multi Subtitle up to 32 support According to disc content Multi Angle up to 9 support According to disc content 8 level parental control Fast forward and rewind in 5 different speeds 2x 4x 8x 16x 32x Slow motion playback in 4...

Страница 35: ...any substance like glue remove before using it Do not expose the disc to direct sunlight or heat sources such as hot air ducts or leave it in a car parked in direct sunlight as the temperature can rise quickly and damage the disc After playing store the disc in its case On cleaning Before playing clean the disc with a cleaning cloth Wipe the disc from the center out Do not use solvents such as ben...

Страница 36: ...ia the remote control While playing a file you should press STOP button three times to eject Overview of the Remote Control Standby 1 Numeric buttons 2 Return back 3 Language selection Set language 4 Display time DVD menu 5 Clear 6 Stop 7 No function 8 Rapid Reverse 9 Rapid advance 10 Info 11 Zoom 12 Repeat 13 Root 14 Menu 15 Title 16 OK Select 17 Navigation Buttons 18 Subtitle 19 Angle 20 Search ...

Страница 37: ...r mode selection during playback Press repeatedly to switch between modes LANG Audio language X X MENU Displays TV menu OK SELECT Enter View Play REPEAT Displays repeat options RETURN Returns back to the previous menu if available ROOT Goes back to the root folder if available SEARCH MODE Direct selection of scenes or time Selects the desired file Selects the desired file SUBTITLE Subtitle on off ...

Страница 38: ...ected not supported by the 7 disc the subtitle language will automatically be set to the disc s priority language Usually a circulation will happen while switching 8 to another language that is you can cancel the subtitle by pressing this button a number of times until Subtitle Off appears on the screen When the power is turned on or the disc is 9 removed the language heard is the one selected at ...

Страница 39: ...ing The picture quality is poor DVD Make sure the DVD disc surface is not damaged Scratch fingerprint etc Clean the DVD disc and try again See instructions described in Notes on Discs to clean your disc properly Ensure that the DVD disc is in the drawer with the label uppermost A damp DVD disc or condensation may effect the equipment Wait for 1 to 2 hours in Stand by to dry the equipment Disc does...

Страница 40: ...hin discs are adhered to each other there is the potential to achieve double sided play sometime in the future for even longer duration play Subtitles These are printed lines appearing at the bottom of the screen which translate or transcribe the dialogue They are recorded on the DVD discs Time Number This indicates the playtime which has elapsed from the start of a disc or a title It can be used ...

Страница 41: ...x P layin g Tim e 74 m in 20 m in S ing le sid ed 240 m in D o u b le sid ed 480 m in S ing le side d 80 m in D o u b le sid ed 160 m in C h aracteristic s D V D co n ta in s ex cellen t so u n d a n d vid eo du e to D olby D igital and M P E G 2 S ystem Vario u s screen and au dio fu nctio n s ca n b e easily selected throu gh th e on scr een m enu A n LP is record ed as an an alo g sig n al w it...

Страница 42: ...0 422 420 Grayscale External Subtitles srt Support Text File Format but do not support Picture File Format smi sub ssa ass Note It is not guaranteed that all DivX formats are supported Specifications Types of Discs Supported DVD SS SL 4 7 DVD 5 SS DL 4 7 DVD 9 DS SL 4 7 DVD 10 DS DL 4 7 DVD 18 CD DA CD R CD RW MP 3 JPEG Video Type MPEG 2 Video Standard Decoding MPEG 1 supported Full Screen Video D...

Страница 43: ...5944035970 Ver 1 0 SANYO Electric Co Ltd 50174377 ...

Отзывы: