background image

7

PREPARATION

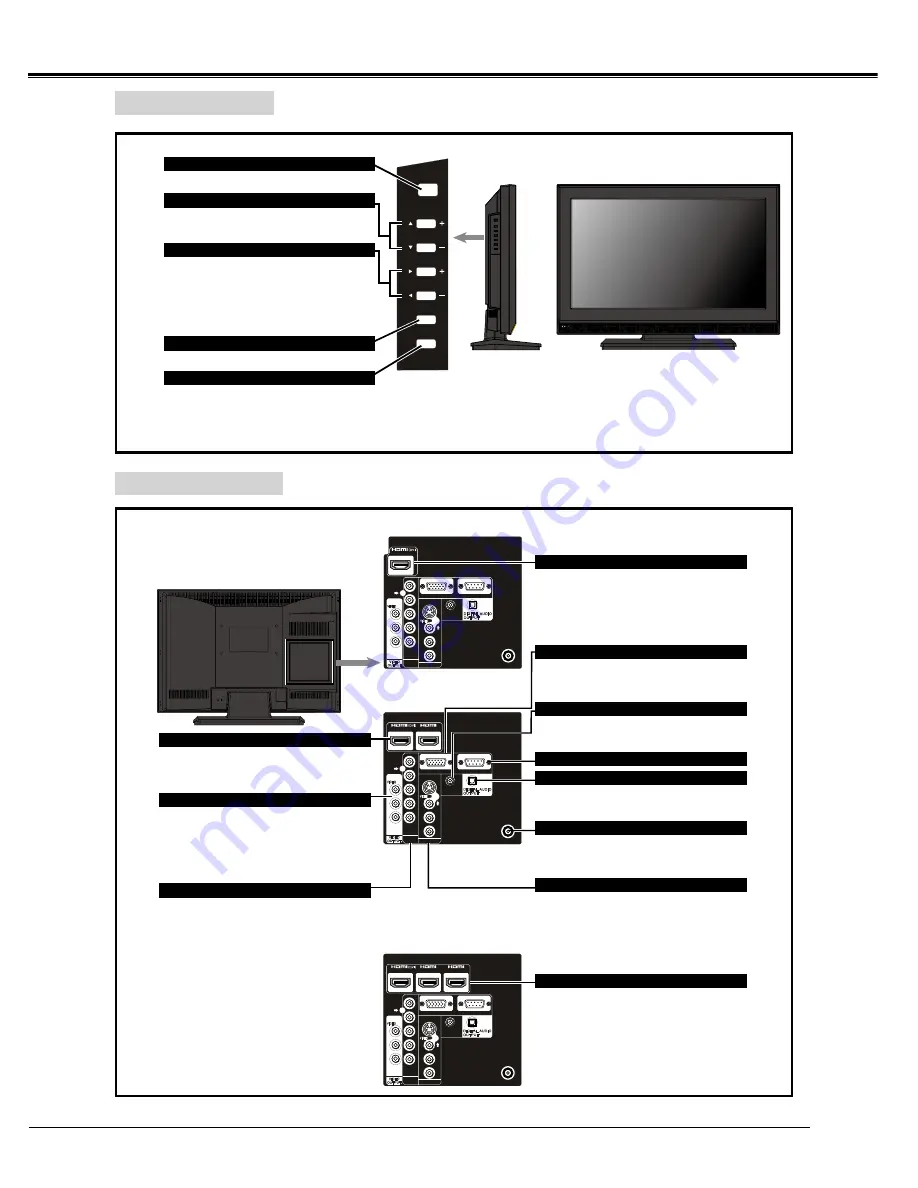
SIDE CONTROLS

(Each button on the control panel has the same function with its counterpart on the remote control.)

POWER

CHANNEL

VOLUME

MENU

INPUT

OK

>PC<

BACK TERMINALS

INPUT1

DVI

VIDEO3

INPUT VIDEO1 INPUT

PC INPUT

RS232 INPUT

PC AUDIO

INPUT

L

R

L

R

Pr

Pb

Y

R

VIDEO

DIGITAL AUDIO

OUTPUT

ANT

L

VIDEO

OUTPUT

S-VIDEO

VIDEO

VIDEO3

INPUT VIDEO1 INPUT

PC INPUT

RS232 INPUT

ANT

S-VIDEO

L

R

Pr

Pb

Y

INPUT1

DVI

INPUT2

VIDEO

L

R

PC AUDIO

INPUT

DIGITAL AUDIO

OUTPUT

VIDEO

OUTPUT

VIDEO3

INPUT VIDEO1 INPUT

VIDEO

OUTPUT

PC INPUT

RS232 INPUT

ANT

S-VIDEO

R

L

R

Pr

Pb

Y

INPUT1

DVI

INPUT2

INPUT3

VIDEO

L

VIDEO

L

R

PC AUDIO

INPUT

DIGITAL AUDIO

OUTPUT

VIDEO

L

R

POWER ON/OFF button

CHANNEL UP/DOWN buttons

VOLUME UP/DOWN buttons

MENU button

INPUT MODE button

Used to turn the LCD TV ON or OFF.

Used to Change channels.

Used to select items.

Used to adjust the volume.

Used to adjust the value of the 

selected item on On-Screen Menu.

Used to execute the seleted menu on 

On-Screen menu.

Open or Close the On-Screen Menu.

Used to select input source:DTV, AV1, 

AV2, AV3, HDMI 1, HDMI 2, HDMI 3, 

PC, ATV.

HDMI Input Terminal

Connect all kinds of HDMI output equioment 

to this terminal.

• HDMI Cable

PC Audio Input Terminal

RS-232 Input Terminal

DIGITAL AUDIO OUTPUT Terminal

Aerial Jack

VIDEO Input Terminal

HDMI Input Terminal

VIDEO Output Terminal

Video Input Terminal

PC Input Terminal

Connect all kinds of HDMI output 

equioment to this terminal.

• HDMI Cable

Connect computer outputs to these terminals

• RGB (D-SUB)

HDMI Input Terminal

Connect all kinds of HDMI output equioment 

to this terminal.

• HDMI Cable

Connect video and audio output from video 

equipment.

• Video (RCA type)

• Audio L and R (RCA type)

• S-Video (mini Din 4 type)

Connect computer outputs to these terminals

• Audio (L/R)

Connect the cable with a plug from aerial jack 

to the aerial socket on the cabinetback.

Connect video and audio output from 

video equipment.

• DVD component (RCA type)

• Audio L and R (RCA type)

Connect a television, video recorder 

or external audio amplifier to these 

jacks.

• Video (RCA type)

• Audio L and R (RCA type)

19”

26”

32”/42”

For exsample : 26”

Содержание LCD-19E30A

Страница 1: ...Owner s Manual LCD TV MODEL LCD 19E30A LCD 26E30A LCD 32E30A LCD 42E30FA ...

Страница 2: ...distances must be maintained Do not cover the ventilation slot on the LCD TV Heat build up can reduce the service life of your LCD TV and can also be dangerous If the LCD TV is not to be used for an extended time unplug the LCD TV from the power outlet READ AND KEEP THIS OW NER S MANUAL FOR LATER USE Caution In Installing Handle the LC D TV carefully w hen installing it and do not drop Locate set ...

Страница 3: ...y touch dangerous voltage points or short out parts that could result in a fire or electric shock Never spill liquid of any kind on the LCD TV Do not place item s such as vases containing liquid on top of the LCD TV Do not install the LCD TV near the ventilation duct of air conditioning equipment This LCD TV should be operated only from the type of power source indicated on the marking label If yo...

Страница 4: ... SOUND SYSTEM 16 COLOUR SYSTEM 16 DISPLAY 16 VOLUME CONTROL 17 ECO 17 VIRTUAL SURROUND 17 STILL 17 STEREO MONO 17 ASPECT RATIO 18 TIMMER SETTING 19 SPORTS 19 TEXT TV 19 TEXT CANCEL 20 TEXT INDEX 20 TEXT SUBCODE 20 TEXT SIZE 20 TEXT HOLD 20 TEXT RED 20 TEXT GREEN 20 TEXT YELLOW 20 TEXT BLUE 20 MENU OPERATION TV AV mode 21 TUNING THE TV FOR THE FIRST TIME 21 PICTURE 22 AUDIO 25 SETUP 27 TIMER FUNCTI...

Страница 5: ...ram see page 19 Colorful World Dynamic picture and sound performance setting Default setting Green Field Suitable setting for Football Golf program etc Snow World Suitable setting for Skiing Ice Skating program etc Water World Suitable le setting for Swimming Diving program etc Indoor Sport Suitable setting for Basketball Boxing program etc Ƈ Ƈ Ƈ Ŷ Ŷ Ŷ Ŷ Ŷ Feature Auto ECO Automatically adjust by ...

Страница 6: ... not bump or scratch the panel surface as this causes flaws on the surface of the screen There may be some tiny black points and or blight points on the SCREEN These points are normal Panel Indicator Side Controls IR Light Sensor LED For exsample 26 For exsample 26 For exsample 26 ...

Страница 7: ... the seleted menu on On Screen menu Open or Close the On Screen Menu Used to select input source DTV AV1 AV2 AV3 HDMI 1 HDMI 2 HDMI 3 PC ATV HDMI Input Terminal Connect all kinds of HDMI output equioment to this terminal HDMI Cable PC Audio Input Terminal RS 232 Input Terminal DIGITAL AUDIO OUTPUT Terminal Aerial Jack VIDEO Input Terminal HDMI Input Terminal VIDEO Output Terminal Video Input Termi...

Страница 8: ...ce station if you are notsure of the type of power being supplied Connect the LCD TV with all peripheral equipment before turning the LCD TV on CAUTION For safety unplug AC power cord when the LCD TV is not in use Cable used for connection This Outdoor Aerial cable is not supplied with this LCD TV Aerial Cable NOTE For all aerial circuit problems please consult your local dealer To the AC Outlet 1...

Страница 9: ...V and peripheral equipment on before your computer is switched on NOTE You can connect the DVI source to HDMI input terminal by using the DVI to HDM I converter and you just can watch image but without sound VIDEO3 INPUT VIDEO1 INPUT PC INPUT RS232 INPUT ANT S VIDEO L R L R Pr Pb Y INPUT1 DVI INPUT2 VIDEO VIDEO L R PC AUDIO INPUT DIGITAL AUDIO OUTPUT VIDEO OUTPUT IBM compatible computers or Macint...

Страница 10: ...ONNECTING LCD TV NOTE When connecting the cable AC Power Cords of both LCD TV and external equipment should be disconnected from AC outlet HDMI cable HDMI Output HDMI Input Video cable RCA x1 Audio cable RCA x2 External Audio Equipment Audio Amplifier Audio Speaker stereo External Monitor Composite Video and Audio Output AV OUT Note Video RCA output is for TV AV or S VIDEO only DVD RCA x3 Audio ca...

Страница 11: ...UB POWER OFF POWER ON EPG TXT REVEAL TXT INDEX TXT SIZE CS 90283U FAV LIST STILL Note In different mode some buttons have different functions POWER ON OFF INFO TXT REVEAL NUMBER KEY MUTE INPUT TXT TV A B SPORTS ECO VOLUME POWER OFF CHANNEL FAV LIST POWER ON OK GUIDE PROGRAM KEY BACK TXT HOLD TXT CNL TXT BLUE TXT YELLOW MENU TXT INDEX TXT SIZE TXT SUB TXT RED TST GREEN ...

Страница 12: ...nside the battery compartment 3 Close the battery compartment cover To insure safe operation please observe the following precautions Use 2 AAA alkaline batteries Replace two batteries at the same time Do not use a new battery with a used battery Avoid contacting with water or liquid Do not expose the Remote Control or Batteries to moisture or heat such as sunshine fire or the like Do not drop the...

Страница 13: ...ion Full Search Quick Search Manual Search Channel List Fav Group 1 BACK DTV Menu AUDIO Confirm Return Navigate Cancel MENU OK BACK MTS Dual Selectable Sound Bass Boost Virtal Surround Auto DTV Menu PICTURE Picture Mode Color Temp Aspect Ratio Backlight DNR Auto Conrrast Enhancement Picture Mode On Dynamic Contrast Brightness Color Sharpness Tint Confirm Return Navigate Cancel MENU OK BACK 50 50 5...

Страница 14: ...e Cancel MENU OK Reset to default AV Connection BACK DTV Menu PICTURE Picture Mode Color Temp Aspect Ratio Backlight VGA Set Contrast Brightness Color Confirm Return Navigate Cancel MENU OK BACK 50 50 50 DTV Menu SETUP Menu Language English Confirm Return Navigate Cancel MENU OK Language BACK DTV Menu PICTURE Picture Mode Color Temp Aspect Ratio Backlight VGA Set Contrast Brightness Color Confirm ...

Страница 15: ...TV by pressing INPUT button on Remote Control or on Side Controls CHANNEL SELECTION There are 256 channels can be selected on the LCD TV DIRECT SELECTION For direct access to program using the 0 9 numeric button 1 For selection of channel position 0 9 Example For channel position 8 press the 8 button 2 For selection of channel position 10 99 For channel position 25 press the DIGIT button to displa...

Страница 16: ... channel 2 previously If you press button channel 2 will appear immediately SOUND SYSTEM Press SOUND SYSTEM button repeatedly to select D K I B G or Auto until the best sound effect is reached COLOUR SYSTEM Press COLOUR SYSTEM button then you can see display DISPLAY Press DISPLAY button on Remote Control to display the status of LCD TV Press again to remove the display ATV DTV ...

Страница 17: ...d effect in your family Press Menu button on Remote Control to set Virtual Surround On or Virtual Surround OFF Select this mode for user to call out the preset sound adjustment in SOUND menu STILL Press TXT HOLD button to switch the still function On or Off When in PIP mode still function can still main picture To cancel Still function Press TXT HOLD button or PIP button to cancel the function or ...

Страница 18: ...all sides panel format films video tapes this setting will eliminate or reduce the black bars at all sides of the screen by zooming in and selecting the image without distortion 4 3 Use this setting to view a true 4 3 broadcast SUPER LIVE 1 This setting will enlarge a 4 3 image to fit the screen by stretching the image horizontally and vertically holding better proportions at the centre of the ima...

Страница 19: ...Emphaszie blue sky and blue ocean with high contraast with deep black Sound Emphasize the sound of waves INDOOR SPORT Picture Emphasize red and skin color and clarify the figures in the dark stadium Sound Emphasize surrounded cherrs and sound of bumping bodies Clear voice of an announcer SPORT button TEXT TV Press TXT TV button to select teletext Press again will display 79 PRGH 79 ĺ 7 7 PRGH ĺ 0 ...

Страница 20: ...ton and the TEXT INDEX button it will become the normal mode and a page will be requested If HOLD ON OFF is performed during the top half enlargement m ode it will still at the top half enlargement mode AHOLD symbol display If HOLD ON OFF is performed during the bottom half enlargement mode it will still at the bottom half enlargement m ode AHOLD symbol not display TEXT HOLD Press TEXT HOLD button...

Страница 21: ...erating at optimal energy efficiency select ECO mode during initial activation ECO mode is recommended for normal home use Energy Saving Mode The factory default settings of this television meet ENERGY SAVING requirements Changing Picture Settings may increase energy consumption possibly beyond the limits required for ENERGY SAVING qualification To return to ECO mode settings select Standard pictu...

Страница 22: ...r Brightness darker lighter Color paler deeper Sharpness softer sharper Tint reddish greenish Note The Tint may only be adjust on a tape which has been recorded and played back on an NTSC VCR In the PC input mode page xx Sharpness mode is not available Color Temperature You can change the tone of the picture by selecting from three preset color temperatures Cool Normal or Warm URP WKH 3LFWXUH SUHV...

Страница 23: ...ark scenes URP WKH 3 785 SUHVV Ÿź EXWWRQV WR VHOHFW DFNOLJKW WKHQ press 3UHVV ŻŹ EXWWRQV WR VHOHFW 2II RU 2Q If you want to adjust Backlight manually turn Active Backlight RQWURO WR 2II WKHQ SUHVV ź 3UHVVŻŹ EXWWRQV WR DGMXVW WKH VHWWLQJV DV UHTXLUHG DNR If the receiving signal is weak and the picture is blurry the picture may be improved whe using this function URP WKH 3 785 SUHVV Ÿź EXWWRQV WR VH...

Страница 24: ...lected When the input signal format is 480i and 576i signals 3UHVV 0 18 EXWWRQ WKHQ SUHVVŻŹ EXWWRQV WR GLVSOD WKH PICTURE menu then press 3UHVV ŸźEXWWRQV WR VHOHFW LQHPD 0RGH DQG ZLOO GLVSOD 3 785 PHQX 3UHVV Ÿź EXWWRQV WR VHOHFW WKHQ SUHVV 3UHVV ŻŹ EXWWRQV WR WXUQ 2Q RU 2II Note When a DVD movie with subtitle is playing back this mode may not work correctly Cinema Mode only support to VIDEO 1 VIDE...

Страница 25: ...st For User mode adjust URP WKH 8 2 SUHVV Ÿź WR VHOHFW DVV RRVW WKHQ SUHVV 3UHVV ŻŹ WR VHOHFW 2II RZ 0LG DQG LJK Note The Bass Boost effect is active only when the sound outputs from the speaker Vitual Surround For User mode adjust The Virtual Surround is especially useful if you want to setting up virtual surround for TV URP WKH 6RXQG SUHVV Ÿź WR VHOHFW 9LUWXDO 6XUURXQG WKHQ SUHVV 3UHVV ŻŹ WR VHO...

Страница 26: ...l MENU OK BACK MTS Dual Selectable Sound Bass Boost Virtal Surround Auto ATV Menu AUDIO MTS Confirm Return Navigate Cancel MENU OK BACK MTS Dual Selectable Sound Bass Boost Virtal Surround Auto Dual 1 or Dual 2 mode analog TV only You can hear only Dual 1 or Dual 2 sound selected whenever bilingual programs are received 3UHVV 0 18 EXWWRQ WKHQ SUHVVŻŹ EXWWRQV WR GLVSOD WKH SOUND menu then press 3UH...

Страница 27: ...ll Search in progress The channel number will show 1 69 DTV Channels will display searched channel and name information Radio Channels will display searched channel and name information Full Search will show scan of DTV Channels Radio Channels list When the search is complete the TV will auto matically tune to the lowest logical channel number Note After the Full Search the TV may have scanned ide...

Страница 28: ...28 MENU OPERATION TV AV mode ...

Страница 29: ...29 MENU OPERATION TV AV mode ...

Страница 30: ...30 MENU OPERATION TV AV mode ...

Страница 31: ...źEXWWRQV WR VHOHFW KDQQHO LVW Press to display the Channel List 3UHVV ŸźEXWWRQ WR VHOHFW WKH SURJUDP SRVLWLRQ RX ZDQW WR arrange 3UHVV Ź EXWWRQ WR GLVSOD WKH EUHDNGRZQ PHQX 3UHVV ŸźEXWWRQ WR VHOHFW DQ LWHP WKHQ SUHVV to select the item as shown below Add to Fav 1 Add selected channel to Favorite group 1 Add to Fav 2 Add selected channel to Favorite group 2 Add to Fav 3 Add selected channel to Favo...

Страница 32: ...rrange the preset channels with the Manual Adjust function so that you can tune into desired channels Press MENU EXWWRQ DQG ŻŹEXWWRQ WR VHOHFW WKH 6 783 Press DQG SUHVV ŸźEXWWRQ WR VHOHFW XWR 7XQLQJ Press a confirmation screen will appear indicating that This will do auto tuning Are you sure Press to start the automatic search The search will begin for all available stations This slide bar will mo...

Страница 33: ... Label Confirm Return Navigate Cancel MENU OK BACK Language Country Region Auto Tuning Manual Adjust Channel List Groupe Fav 1 Groupe Fav 2 Manual Fine Tune PAL OK to Add This Channel Channel List Analog TV only URP WKH 6 783 SUHVV ŸźEXWWRQ WR VHOHFW KDQQHO LVW Press and to display the Channle List 3UHVVŸźEXWWRQ WR VHOHFW WKH SURJUDP SRVLWLRQ RX ZDQW WR arrange 3UHVV ŹEXWWRQ WR GLVSOD WKH UHDNGRZQ...

Страница 34: ... being viewed The contains the following information Current Channel Number and Name Received program video format Current time Subtitle closed caption availability indicated by CC Dolby Digital ausio track availability indicated by Dolby D Now and Next Program Names Parental Guidance code PG MA G R etc Audio setting Signal Strength MENU OPERATION TV AV mode ...

Страница 35: ...QV WR DGMXVW WR VHWWLQJV DV UHTXLUHG Automatically Adjusting the picture position PC only Adjustment to the position of the picture may be made to suit your viewing preferences URP WKH 9 6HW SUHVV Ÿź EXWWRQV WR VHOHFW XWR GMXVW Press Ź button then TV starts adjusting the picture position Note For the details please refer to PICTURE on page xx 1 2 3 Ŷ 1 2 3 4 1 2 SCREEN MENU Menu PICTURE VGA Set Pi...

Страница 36: ... select TIMER and will display TIMER menu 3UHVV Ÿź EXWWRQV WR VHOHFW WKH LWHP GHVLUHG 3UHVV ŻŹ EXWWRQV WR DGMXVW YDOXH Press BACK button to return to the previous menu Note For the details please refer to TIMER on page xx 1 2 3 SCREEN MENU FUNCTION Press MENU EXWWRQ DQG WKH PDLQ PHQX ZLOO DSSHDU 3UHVV ŻŹ buttons to select FUNCTION and will display FUNCTION menu 3UHVV Ÿź EXWWRQV WR VHOHFW WKH LWHP ...

Страница 37: ...is likely to be dam aged if it is not maintained properly Do not use hard objects like a hard cloth or paper Do not use solvents or abrasions CAUTION Do not use benzene thinner or any volatile substances to clean the LCD TV These chemicals may damage the cabinet finish FUNCTION OF PRODUCT SAFETY FEATURE For protecting product safety protection feature provided inside LCD TV Refer to the following ...

Страница 38: ...t in a different direction etc No image Check the connection between the external equipment and LCD TV When turning LCD TV on it takes a few seconds to display the image Check the system that you select is corresponding with the external equipment or the video equipment Make sure the temperature is not out of the Operating Temperature 0 C 40 C Turn off power then turn on again re start LCD TV No s...

Страница 39: ...80 View able Angle L 3 19 Horizontal Vertical 176 26 Horizontal Vertical 176 32 Horizontal Vertical 178 42 Horizontal Vertical 178 Brightness 19 250 cd m2 26 450 cd m2 32 450 cd m2 42 500 cd m2 Contrast 19 1000 26 2500 32 3000 42 1400 Voltage 100 240VAC 50 60Hz 10 Colour System PAL NTSC NTSC4 43 NTSC 3 58 SECAM D K I M B G Channel Coverage Low band 45 25 to 144 00MHz Mid band 145 00 to 424 00MHz H...

Страница 40: ...19 1 1 26 1 1 32 1 1 42 1 1 Dimensions Including Stand 19 463 4 W X 350 3 H X 167 9 D 26 667 6 W X 210 4 H X 493 9 D 32 801 6 W X 210 4 H X 570 4 D 42 1022 8 W X 697 4 H X 250 2 D Net Weight Including Stand 19 3 8 Kg 26 7 9 Kg 32 11 Kg 42 16 8 Kg Operating Environment Operating Temperature Operating 5 C to 35 C Operating Humidity 0 to 90 Storage Temperature 0 C to 40 C Storage Humidity 0 to 90 non...

Страница 41: ...0 70 086 31 469 25 175 2 VESA 640x480 60 31 47 25 18 3 VESA 640x480 72 37 86 31 5 640x480 75 37 5 31 5 800x600 60 37 87 40 800x600 72 48 07 50 800x600 75 46 87 49 5 1024x768 60 48 36 65 1024x768 70 56 47 75 1024x768 75 60 02 78 75 1280x768 60 47 39 68 25 1280x768 60 47 77 79 5 1280x768 75 60 28 102 25 1280x1024 60 63 98 108 4 VESA 1280x1024 75 79 97 135 5 1360x768 60 015 47 712 85 5 APPENDIX 1 Red...

Страница 42: ...HDMI 1 Video Timing Chart No Signal mode Horizontal Frequency KHz Dot clock Frequency MHz Signal name Resolution Vertical Frequency Hz 1 VGA 640x480 59 94 31 47 25 18 2 576i 720 1440 x576 50 15 63 27 3 480i 720 1440 x480 59 94 15 73 27 4 576P 720x576 50 31 25 27 5 480P 720x480 59 94 31 47 27 6 1080i 50 1920x1080 50 28 13 74 25 7 1080i 60 1920x1080 60 33 75 74 25 8 720P 50 1280x720 50 37 5 74 25 9 ...

Страница 43: ...down on a flatsurface place where maintained with soft materials such as a blanket for protecting the display screen 2 Pull the stand base out from the cabinet after push 6 hooks A 3 screwdriver remove screws from stand mounting inserts B before installing stand base For wall mounting Uninstalling Stand Base 26 32 42 1 Place the LCD TV screen facing down on a flatsurface place where maintained wit...

Страница 44: ...to a wall mounting Kit NOTE Wall Mounting kit is not supplied Size VESA standard interface 19 100 x 100 mm 26 100 x 200 mm 32 200 x 200 mm 42 200 x 400 mm Mounting screws measurements Size Mounting Screws Distance between TV and wall A 19 M4 Diameter Length 13mm min 16mm max 65 mm min 26 32 42 M6 Diameter Length 13mm min 16mm max 60mm min ...

Страница 45: ...46 Note ...

Страница 46: ...47 Note ...

Страница 47: ...Part No HDJKTA3200I SANYO Electronics CO Ltd ...

Отзывы: