background image

17

Small

Medium

Large

PIP operation

MENU

LOCAT

2-Win

SIZE

STATUS

WIDE

ON-OFF

OK

F

PIP

Turning ON/OFF PIP mode

To turn PIP mode on, press PIP ON-OFF button on Remote Control Unit.
To turn PIP mode off, press PIP ON-OFF button again.  

PIP ON-OFF

button

SIZE

button

LOCAT

button

2-WIN

button

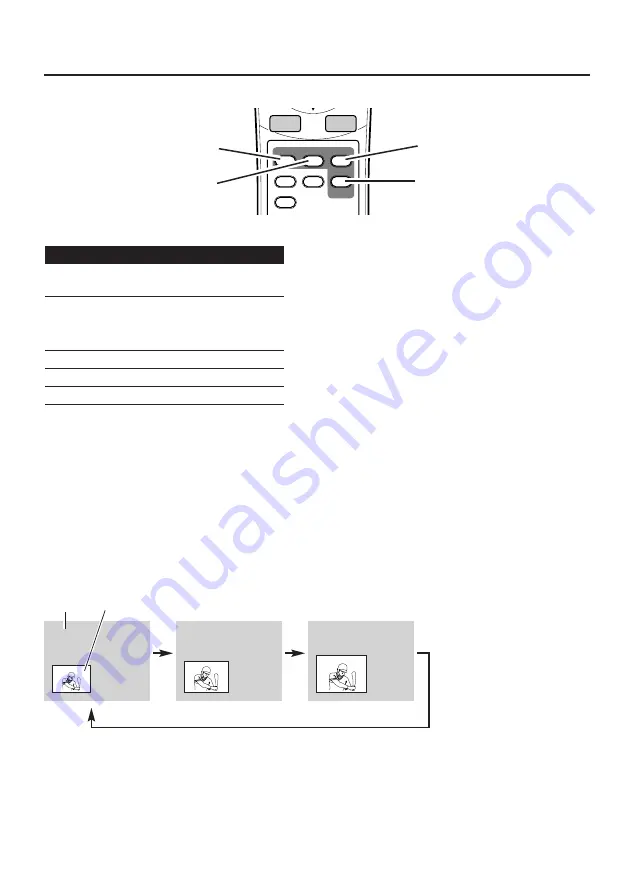
Selecting PIP screen size

While PIP mode is on, press SIZE button on Remote Control Unit  to select PIP screen size.
NOTE:
This function cannot be operated in "PC", "RGB" or "Component" mode and the picture size is fixed to
"Large".

In PIP operation, use these buttons shown below :

Available input modes for each window are below :

main window

sub window

PC

S-VIDEO
VIDEO

S-VIDEO

PC

RGB

Component-VIDEO

RGB

S-VIDEO

Component-VIDEO

S-VIDEO

VIDEO

PC

sub

main

NOTE : 

● 

The sound is available only from main window.

By pressing INPUT button, you can change input mode for sub window.

Image level select is applied to both windows.

Содержание KA-IF01RGB

Страница 1: ...AUDIO L R V H HV COMPONENT RGB CV IN R Cr Pr B Cb Pb G CV Y S VIDEO Interface Board MODEL KA IF01RGB 1AA6P1P4055 IDKDB Owner s manual Installation and Operation Printed in Japan ...

Страница 2: ...enough larger than the screen size The surface must be flat and maintained with soft material cloth or blanket for protecting the screen surface Before placing the Plasma Monitor Screen facing down make sure there is no object under the screen Leaving any object may cause damage on the screen surface Before installing the interface board AC Power Cord of Plasma Monitor should be disconnected from ...

Страница 3: ... 3 Installation 1 3 2 Insert the board into the option terminal and slide it in all the way 2 Display with Stand 1 NOTE When you are using the Plasma Display without Stand you need to place the Plasma Display screen facing down on a flat surface place where maintained with soft materials such as a blanket for protecting the display screen ...

Страница 4: ... described in this manual are available only with the Interface Board Any information not contained in this manual will be found in the owner s manual of your Plasma Monitor Operating Instruction of Plasma Monitor ...

Страница 5: ...ute the selected menu on ON SCREEN MENU OK BUTTON Used to display current status and to close ON SCREEN MENU STATUS BUTTON F button This button is inactive POINT VOLUME BUTTONS Used to select input source P10 INPUT BUTTON BACK BUTTON Used to go back to the previous menu 2 Win BUTTON Used to show 2 window screen P18 SIZE BUTTON Used to select PIP screen size P17 ON OFF BUTTON Used to turn PIP mode ...

Страница 6: ...Refer to P7 S VIDEO Mini DIN 4 type Audio outputs from video equipment Refer to P7 9 AUDIO R and L RCA type Connect analog RGB signal outputs or component video outputs to these jacks Connect analog RGB signal outputs to R G B H and V jacks Refer to P7 9 Connect component video outputs to Pr Y and Pb jacks Refer to P8 Connect video output to CV Jack Refer to P7 RGB COMPONENT CV BNC type COMPONENT ...

Страница 7: ...t VIDEO S VIDEO COMPONENT RGB CV IN V H HV R B Cr Pr Cb Pb Y L R S VIDEO G CV AUDIO L R S VIDEO S VIDEO Output Audio Output Video Source example Video Disk Player Video Cassette Recorder S VIDEO Cable Audio Cable RCA x 2 NOTE When connecting Plasma Monitor AC Power Cords of both Plasma Monitor and external equipment should be disconnected from AC outlet S VIDEO VIDEO CV VIDEO Output VIDEO Cable ...

Страница 8: ...upplied Component Video Source example Component video output equipment such as DVD Player or high definition TV source DVD Player Cables used for connection Cables are not supplied with this board Video Cable RCA x 3 or BNC x 3 Audio Cable RCA x 2 NOTE We recommend you to use a cable shorter than 3m NOTE When connecting Plasma Monitor AC Power Cords of both Plasma Monitor and external equipment s...

Страница 9: ...S 232C Audio Output Mini Plug Video Cable BNC x 5 Audio Output Computers another example IBM compatible computers or Macintosh computers VGA SVGA XGA SXGA VGA Cable Desktop type Laptop type MAC Adapter Set the slide switches according to the chart in the owner s manual of your Plasma Monitor NOTE When connecting the cable AC Power Cords of both Plasma Monitor and external equipment should be disco...

Страница 10: ...connections refer to pages 7 9 Selecting input source ON OFF INPUT V O L U M E V O L U M E BACK PICTURE MUTE INPUT button NOTE By pressing STATUS button on Remote Control Unit Input source present time and ECO mode indication E if ECO mode is ECO1 or ECO2 will be displayed for 5 seconds VOLUME OK INPUT MENU PC VIDEO Component VIDEO RGB S VIDEO ...

Страница 11: ...when watching graphic image Graphic Standard Graphic ON OFF INPUT V O L U M E V O L U M E BACK PICTURE MUTE PICTURE button Normal picture level preset on this Plasma Monitor Picture level adjusted for the picture with fine tone User preset picture adjustment in Image level adjustment P12 Standard Cinema High contrast picture level preset on this Plasma Monitor Dynamic Memory In PC or RGB mode In C...

Страница 12: ...hich you wish to select Press 7 8 button to obtain a better balance of the contrast When this function is ON it produces a more vivid image according to the image condition Fleshtone Color temperature Gamma Press 7 button to decrease contrast and 8 button to increase contrast Press 7 button to adjust image darker and 8 button to adjust brighter Contrast Brightness Press 7 button to lighter color a...

Страница 13: ...iformly This function can be used for enjoying a letter box mode picture 4 3 aspect picture with black bar on top and bottom edges with wide video aspect of 16 9 screen Zoom Provides real 4 3 image on 16 9 screen Normal Provides image to fit width of screen by expanding both sides of image This function is suitable to enjoy a normal video signal 4 3 aspect ratio with wide video aspect ratio of 16 ...

Страница 14: ...justment of horizontal expand proportion on both sides of image Horizontal Adjustment of height of image Vertical 5 Press ed buttons to select Move and adjust the vertical position of the screen image by pressing ed buttons Adjustment of vertical position of image Move NOTE Wide image adjustment can be adjusted only when wide image mode is Natural wide Zoom or Zoom Caption IN Move can be adjusted ...

Страница 15: ...Cinema auto On BACK Back Select MENU Exit This functions automatically detects the telecine processed signal and converts it to an progressive signal So you can enjoy the image in near original quality telecine process Convert film to video Film is shot at 24 frames per second while conventional video displays 30 frames per second To make up for this difference in timing the telecine process force...

Страница 16: ...lor system and adjusts itself to optimize its performance PAL SECAM NTSC3 58 NTSC4 43 PAL M PAL N If Plasma Monitor cannot reproduce proper video image it is necessary to select a specific broadcast signal format among PAL SECAM NTSC 3 58 NTSC 4 43 PAL M and PAL N Color system ECO mode System setup Child lock DVI Language DVI setup Color system Eco mode Child lock No operation shut off timer Scree...

Страница 17: ... button on Remote Control Unit to select PIP screen size NOTE This function cannot be operated in PC RGB or Component mode and the picture size is fixed to Large In PIP operation use these buttons shown below Available input modes for each window are below main window sub window PC S VIDEO VIDEO S VIDEO PC RGB Component VIDEO RGB S VIDEO Component VIDEO S VIDEO VIDEO PC sub main NOTE The sound is ...

Страница 18: ...ndow Full In 2 window screen Each window s aspect ratio and size cannot be adjusted LOCAT WIDE SIZE and PIP ON OFF buttons on Remote Control Unit are unavailable sub main Selecting PIP screen location While PIP mode is on press LOCAT button on Remote Control Unit to select PIP screen location Lower left Upper left Upper right Lower right ...

Страница 19: ... select Wide mode Normal WIDE Wide mode select Wide mode Natural wide Wide mode Zoom Wide mode Zoom Caption IN Wide mode Full PICTURE COMMAND ASCII INTERFACE Protocol Stop bit Baud rate Parity Data length Flow control RS 232C 2 bits 9600 bps 8 bits COMMAND OPERATION HEX ASCII 43h 30h 30h 0Dh 0Ah C 0 0 CR LF EXAMPLE POWER ON C00 FUNCTION CODE END CODE Appendix C73 C77 C78 C74 Input mode Component V...

Страница 20: ...20 ...

Отзывы: