background image

1

ÍNDICE

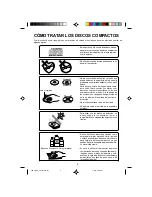
CÓMO TRATAR LOS DISCOS COMPACTOS ......................................................................................... 2
PANTALLA DIGITAL ................................................................................................................................. 3
FRONTAL EXTRAÍBLE ............................................................................................................................ 4
FUNCIONAMIENTO BÁSICO .................................................................................................................. 5
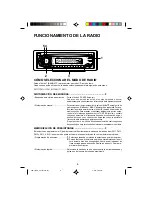
FUNCIONAMIENTO DE LA RADIO ......................................................................................................... 8
FUNCIONAMIENTO DEL REPRODUCTOR DE DISCOS COMPACTOS ............................................ 10
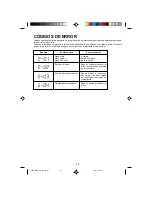
CÓDIGOS DE ERROR ........................................................................................................................... 12
INSTRUCCIONES DE MANTENIMIENTO Y SEGURIDAD ................................................................... 13
RESOLUCIÓN DE POSIBLES PROBLEMAS ....................................................................................... 14
ACCESORIOS DE MONTAJE ................................................................................................................ 15
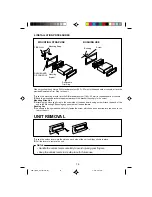
INSTALACIÓN ........................................................................................................................................ 15
CÓMO EXTRAER EL EQUIPO .............................................................................................................. 16
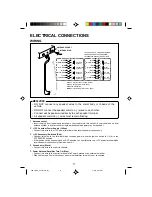
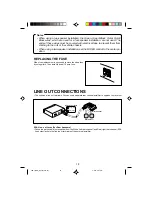
CONEXIONES ........................................................................................................................................ 17
CONEXIONES EXTERNAS ................................................................................................................... 18

PRECAUCIÓN

• Este equipo se ha diseñado para que funcione únicamente en sistemas eléctricos de corriente continua de

12 V con toma a tierra NEGATIVA.

• Si tiene que cambiar el fusible, utilice únicamente uno que tenga el amperaje indicado (10 A), nunca mayor.

Si el fusible se funde a menudo, inspeccione minuciosamente todas las conexiones eléctricas para detec-
tar posibles cortocircuitos y haga que le revisen el regulador de tensión del vehículo.

• Evite montarlo en lugares que queden expuestos a la luz del sol directa o al aire caliente que sale de la

calefacción.

• No deje que el equipo se moje ni lo exponga a la humedad.
• Para no estropear el equipo, no introduzca nunca por la ranura ningún objeto que no sea un disco compac-

to.

• Si tiene que arreglar el equipo, llévelo siempre a un servicio técnico cualificado. Acuda siempre a un

distribuidor oficial de equipos de sonido para coches SANYO en caso de reparación.

• El uso de los mandos o la realización de ajustes o procedimientos que no estén explicados en este manual

puede provocar una exposición peligrosa a la radiación.

• Cualquier cambio o alteración del aparato no autorizados expresamente por SANYO puede prohibir al

usuario la utilización del equipo.

 FXD-770GD_Sbody(P01-18)

3/7/01, 5:50 PM

1

Содержание FXD-770GD

Страница 1: ...SO Mounting with Removable Trim Ring AUD LO DX LOUD VOL BAND ATP CD PWR MUTE REL FM AM RECEIVER FXD 770GD 40W X 4 TUN TRK RPT SHF DISP LOUD ST LOCBASS MANU TRE SCAN SHF RPT FRONT PRESET TRACK L R R F CD AMII FMIII SANYO Electric Co Ltd Printed in Singapore Issue date 03 01 288F0150 FXD 770GD_Cover English 3 7 01 5 56 PM 1 ...

Страница 2: ...r any short circuits and have your car s voltage regulator checked also Do not install the unit where it will be exposed to direct sunlight or hot air discharged from the car heater Do not expose the unit to water or moisture To avoid damaging the unit never insert anything other than a compact disc into the disc slot This unit should not be adjusted or repaired by anyone except qualified service ...

Страница 3: ...conventional discs such as heart shaped octagonal discs etc The player could be damaged Benzene Thinner Cleaning spray Never use chemicals such as record clean ing sprays antistatic sprays or fluids ben zene or thinner to clean compact discs These chemicals will permanently damage the plastic surface of the disc When not using the disc player for extended periods of time remove the compact disc an...

Страница 4: ...r Audio Control Selected Mode Audio Position Shuffle Play Repeat Play Scan Disc IN AM Bands FM Bands Loudness CD Mode Preset No Track No Mute Volume Audio Control Level Indicator FM Stereo Local DX BASS TREBLE Tuning Indicator CD running indicator Radio Preset Channel Number Track Number Manual Tuning FXD 770GD_Ebody P01 18 3 7 01 5 57 PM 3 ...

Страница 5: ...or the unit malfunctions press the reset button with the point of a sharp object such as a ball point pen Note The unit will not operate if it is installed incorrectly CAUTION Do not attempt to remove the panel in a manner other than that described above When installing the panel do not force it into the unit Do not touch the connection terminals of the panel or the unit It may cause poor contact ...

Страница 6: ...ay will revert to clock indication VOLUME LEVEL CONTROL 6 Press the VOL buttons 6 to adjust the volume level VOL Volume up VOL Volume down MUTING THE SOUND 1 Press the PWR MUTE button 1 while the receiver is on While muting the sound the MUTE indicator on the display is blinking To restore the previous volume level press PWR MUTE button again SWITCHING THE DISPLAY 10 Each time you press the DISP b...

Страница 7: ...he signals at which the radio will stop during Automatic Tuning Press the LO DX LOUD button 9 for more than 2 seconds to select the Local LO setting and only the strongest local stations will be received The LOC indicator appears in the display window Pressing again for 2 seconds will select the Distant setting and the radio will stop at a wider range of signals including weaker more distant stati...

Страница 8: ... THE SOUND STAGE 3 Press the appropriate Preset buttons 3 to call the desired sound stage during the BALANCE FADER adjustment mode The Preset buttons are factory set to the following conditions P 1 For the left seat R2 R4 P 2 For the front seat 0 R4 P 3 For the right seat L2 R4 P 4 For the rear seat 0 F4 P 5 For all the seat 0 0 Each time you press the preset buttons in the BALANCE FADER adjustmen...

Страница 9: ...tions press the button for more than 0 5 seconds To quickly scan up or down in frequency press and hold the TUN TRK or button Release the button when the display approaches the desired frequency then press and release the button repeatedly until the desired frequency is dis played After 4 seconds of completing Manual Tuning the tuning control will revert to the Automatic Tuning mode STORING PRESET...

Страница 10: ...esired band then press one of the six preset buttons Note This function is available for FM 3 and AM 2 SCAN OPERATION 4 1 Press the BAND ATP button to select the desired band 2 Press the button 4 The system will select and receive each station for 8 seconds 3 To stop scanning and retain the station currently selected press the button again PRESET SCAN OPERATION 5 This function scans each of the pr...

Страница 11: ...hed on while a disc is loaded play resumes from the point at which play was stopped When the entire disc has played the unit returns to the first track and play resumes The CD player continues playing the disc until the BAND ATP button is pressed or the disc is ejected SKIPPING TRACKS 4 Press the TUN TRK button 4 to skip to the beginning of the next track Press the TUN TRK button 4 to skip to the ...

Страница 12: ...ncel this mode press the Preset 5 RPT button 6 again SHUFFLE MODE 7 This function plays the tracks on a CD in random order Press the Preset 4 SHF button 7 to begin shuffle play The SHF indicator appears in the display window Press the button 4 to select another random track To cancel this mode press the Preset 4 SHF button 7 again SCAN MODE PLAYING THE BEGINNING OF EACH TRACK 8 This function plays...

Страница 13: ... If the error persists contact your nearest dealer Message Remedy Clean the disc Replace the disc Check the disc Try ejecting and re inserting un der normal temperature condi tions Under normal temperature con ditions eject and insert clean undamaged disc properly Eject and re insert Cause Dirty disc Scratched disc Up side down Focus error Data and focus error Mechanical problem FXD 770GD_Ebody P0...

Страница 14: ...f this occurs wait for the road surface to improve before using the CD player Safety For safer driving keep the volume at a moderate level to enable you to hear outside sounds such as emergency vehicle sirens Cleaning the unit Clean the unit with a soft dry cloth Stains should be removed by wiping the surfaces with a soft cloth immersed in lukewarm water and wrung dry Never use strong chemicals or...

Страница 15: ...ectrical noise The road surface is rough The unit is not mounted se curely The disc is defective The disc is dirty The antenna cable is not con nected The signal are weak Turn up the volume control Check the 12V and ground con nections Switch the ignition to the ON or ACC position Replace the fuse with another 10A fuse Eject the disc then insert it again Wait for the road surface to im prove befor...

Страница 16: ...e unit as level as possible If the unit must be mounted at an angle due to the design of the vehicle make sure the unit does not tilt by more than 30 max 30 Mounting Bracket Half Sleeve 1 Bushing Screw 1 Mounting Strap and Screws 1 Locking Screw 1 Removable Trim Ring 1 Unlock Levers 2 FXD 770GD_Ebody P01 18 3 7 01 5 57 PM 15 ...

Страница 17: ...de of the dash board using screw Attach the back of the unit to the Mounting Strap using support stem bolt and hardware Bushing Use 3 As shown in the figure above securely fasten the screw which has been inserted into the bush to the rear of the unit UNIT REMOVAL 1 Insert the unlock levers into the slots on each side of the unit until they click into place 2 Pull the levers to remove the unit Note...

Страница 18: ...ch speaker terminal All speaker common wires must remain floating 1 Antenna socket Insert the plug from the antenna installed in your vehicle into this socket If your vehicle has a dual antenna system a dual antenna to single antenna cable adaptor may be required 2 12V Constant Power Supply Yellow Connect this wire to the 12V power terminal which receives power continuously 3 12V Accessory Switche...

Страница 19: ...on REPLACING THE FUSE When fuse replacement is necessary remove the blown fuse by using pliers Then install the new 10 amp fuse LINE OUT CONNECTIONS The unit has a line out terminals You can use a separate rear channel amplifier to upgrade your system External Amplifier Rear Speaker White Left Red Right RCA Line out Jacks RCA Line out Jacks For Rear Speakers Connect a patch cable not supplied from...

Страница 20: ...cos compactos Montaje ISO con embellecedor extraíble AUD LO DX LOUD VOL BAND ATP CD PWR MUTE REL FM AM RECEIVER FXD 770GD 40W X 4 TUN TRK RPT SHF DISP LOUD ST LOCBASS MANU TRE SCAN SHF RPT FRONT PRESET TRACK L R R F CD AMII FMIII SANYO Electric Co Ltd Printed in Singapore Issue date 03 01 288F0160 FXD 770GD_Cover Spanish 3 7 01 5 52 PM 1 ...

Страница 21: ...conexiones eléctricas para detec tar posibles cortocircuitos y haga que le revisen el regulador de tensión del vehículo Evite montarlo en lugares que queden expuestos a la luz del sol directa o al aire caliente que sale de la calefacción No deje que el equipo se moje ni lo exponga a la humedad Para no estropear el equipo no introduzca nunca por la ranura ningún objeto que no sea un disco compac to...

Страница 22: ...ñar el reproductor Benceno Disolvente Spray limpiador Nunca utilice substancias químicas como sprays para limpiar discos de vinilo líquidos o sprays antiestáticos benceno o disolvente para limpiar los discos compactos ya que pueden dañar la superficie de plástico del dis co irreversiblemente Si no va a utilizar el reproductor de discos compactos durante un período de tiempo pro longado saque el di...

Страница 23: ...toria Reproducción repetida Exploración Indicador de disco Nº de banda AM Nº de banda FM Loudness Modo CD Nº de presintonía Nº de pista Silenciador Indicador de volumen nivel de control del sonido Emisora FM estéreo Local Distante Graves Agudos Indicador de sintoni zación Indicador de funciona miento del CD Número de canal de presintonía nú mero de pista Sintonización manual FXD 770GD_Sbody P01 18...

Страница 24: ...PO Si se acciona el botón de reinicialización el microprocesador del equipo anulará los cambios y volverá a los valores de fábrica Si la pantalla no muestra bien la información o el equipo no funciona bien pulse el botón de reinicialización con un objeto puntiagudo como por ejemplo la punta de un bolígrafo Nota El equipo no funcionará si no se instala correctamente PRECAUCIÓN Siga el procedimiento...

Страница 25: ... CONTROL DEL NIVEL DE VOLUMEN 6 Pulse el botón 6 VOL hasta encontrar el nivel de volumen deseado VOL aumenta el volumen VOL disminuye el volumen SILENCIADOR DE SONIDO EN CASO DE LLAMADA 1 Pulse el botón 1 PWR MUTE con el equipo encendido Mientras esté activado el silenciador parpadeará en pantalla el indicador Para volver a oír el sonido al mismo volumen de antes pulse de nuevo el botón PWR MUTE C...

Страница 26: ...d de la señal captada por la radio en modo de búsqueda automática Pulse el botón 9 LO DX LOUD durante más de 2 segundos para seleccionar el modo LO para que el equipo sólo se detenga en las emisoras con mayor intensidad de señal las locales En pantalla aparecerá el indicador LOC Pulse de nuevo el botón durante dos segundos para seleccionar el modo DX el equipo buscará además emisoras de distinta i...

Страница 27: ...izada CÓMO SELECCIONAR LA POSICIÓN DE AUDICIÓN 3 En modo de ajuste de balance y fáder pulse el botón de presintonía 3 en el que esté memorizada la posición Los botones de presintonía vienen configurados de fábrica del siguiente modo P 1 Asiento del conductor R2 R4 P 2 Asientos delanteros 0 R4 P 3 Asiento del pasajero L2 R4 P 4 Asientos posteriores 0 F4 P 5 Todos los asientos 0 0 Cada vez que pulse...

Страница 28: ...damente por las emiso ras del dial mantenga pulsado el botón TUN TRK o y suéltelo cuando se aproxime a la frecuencia deseada a continuación pulse y suelte el botón en una u otra dirección hasta que vea en la pantalla la frecuencia de la emisora que quiera escuchar El equipo volverá a modo de búsqueda automática cuatro segundos después de que haya terminado de sintonizar manualmente la emisora MEMO...

Страница 29: ...nía Nota Esta función sólo se puede utilizar con las bandas FM 3 y AM 2 EXPLORACIÓN DE EMISORAS 4 1 Seleccione la banda pulsando el botón BAND ATP 2 Pulse el botón 4 El equipo se detendrá en cada emisora que encuentre durante 8 segundos 3 Para detener la exploración cuando escuche una emisora que le guste sólo tiene que volver a pulsar el botón EXPLORACIÓN DE PRESINTONÍAS MEMORIZADAS 5 Esta explor...

Страница 30: ...o CD Si cambia a modo CD y el equipo tiene un disco compacto introducido la reproducción continuará a partir del punto en que se detuvo Si se había reproducido el disco entero la reproducción empezará a partir de la primera pista El CD seguirá sonando hasta que se pulse el botón BAND ATP o el botón de expulsión CÓMO OMITIR DETERMINADAS PISTAS 4 Pulse el botón 4 TUN TRK para ir al inicio de la sigu...

Страница 31: ...botón para cancelar esta función REPRODUCCIÓN ALEATORIA 7 Esta función hace que el equipo reproduzca todas las piezas del disco compacto sin seguir ningún orden concreto Pulse el botón 4 SHF de presintonías 7 para activar la reproducción aleatoria En la pantalla aparecerá el mensaje SHF Pulse el botón 4 para que el equipo seleccione aleatoriamente otra pista Pulse el botón 4 SHF de presintonías 7 ...

Страница 32: ...ngase en contacto con el distribuidor más cercano Mensaje Recomendación Límpielo Ponga otro disco Dele la vuelta Saque y vuelva a introducir el disco en condiciones normales de temperatura Saque el disco e introduzca uno limpio y en buen estado en condiciones normales de temperatura Saque y vuelva a introducir el disco Posible causa Disco sucio Disco rayado Disco del revés Error de enfoque Error d...

Страница 33: ... poner en marcha el CD Seguridad Para que la conducción resulte segura modere siempre el volumen para poder oír los sonidos externos como por ejemplo la sirena de los servicios de emergencia Limpieza del equipo Limpie el equipo con un paño suave y seco Si está manchado límpielo con un paño sumergido en agua tibia y bien escurrido No utilice nunca sustancias químicas ni disolventes ya que podrían e...

Страница 34: ... duce es muy irregular El equipo no ha quedado bien sujeto en la instalación El disco está defectuoso El disco está sucio No se ha conectado el cable de la antena La señal es débil Aumente el volumen Compruebe las conexiones de los cables de 12 V y de la toma a tierra Ponga la llave de contacto en po sición ON o ACC Cambie el fusible por otro de 10 A Expulse el disco y vuelva a in sertarlo Espere ...

Страница 35: ...tal que le sea posible Si la unidad se instala en ángulo debido al diseño del vehículo asegúrese de que la unidad no esté inclinada en más de 30 máximo 30º Carcasa media estructura 1 Arandela y perno 1 Banda metálica perforada y tornillos 1 Tornillo de bloqueo 1 Embellecedor extraíble 1 Llaves 2 FXD 770GD_Sbody P01 18 3 7 01 5 50 PM 15 ...

Страница 36: ...los Sujete la parte trasera del equipo con el fijador y los accesorios Montaje con arandela 3 Como se muestra en la ilustración superior apriete firmemente el tornillo de la arandela que sujeta la parte posterior del equipo CÓMO EXTRAER EL EQUIPO 1 Introduzca una llave de desbloqueo a cada lado del equipo hasta que queden encajadas se oirá un chasquido 2 Tire de las llaves para sacar el equipo Not...

Страница 37: ...tavoz al terminal correspondiente Aísle de tierra todos los cables de altavoz del mismo polo 1 Toma de la antena Introduzca en esta toma la clavija de la antena del vehículo Si el vehículo está dotado de un sistema de doble antena es posible que tenga que utilizar un adaptador de antena doble a antena simple 2 Alimentación de corriente continua 12 V Amarillo Conecte este cable al terminal que reci...

Страница 38: ...alica tes Sustituya siempre el fusible por uno de 10 amperios CONEXIONES EXTERNAS El equipo dispone de terminales de salida Si desea que el sistema de sonido sea más potente puede emplear un amplificador independiente para el canal trasero Amplificador externo Altavoces traseros Blanco izq Rojo der Tomas de salida RCA Tomas de salida RCA para los altavoces traseros Conecte mediante un cable de con...

Отзывы: