background image

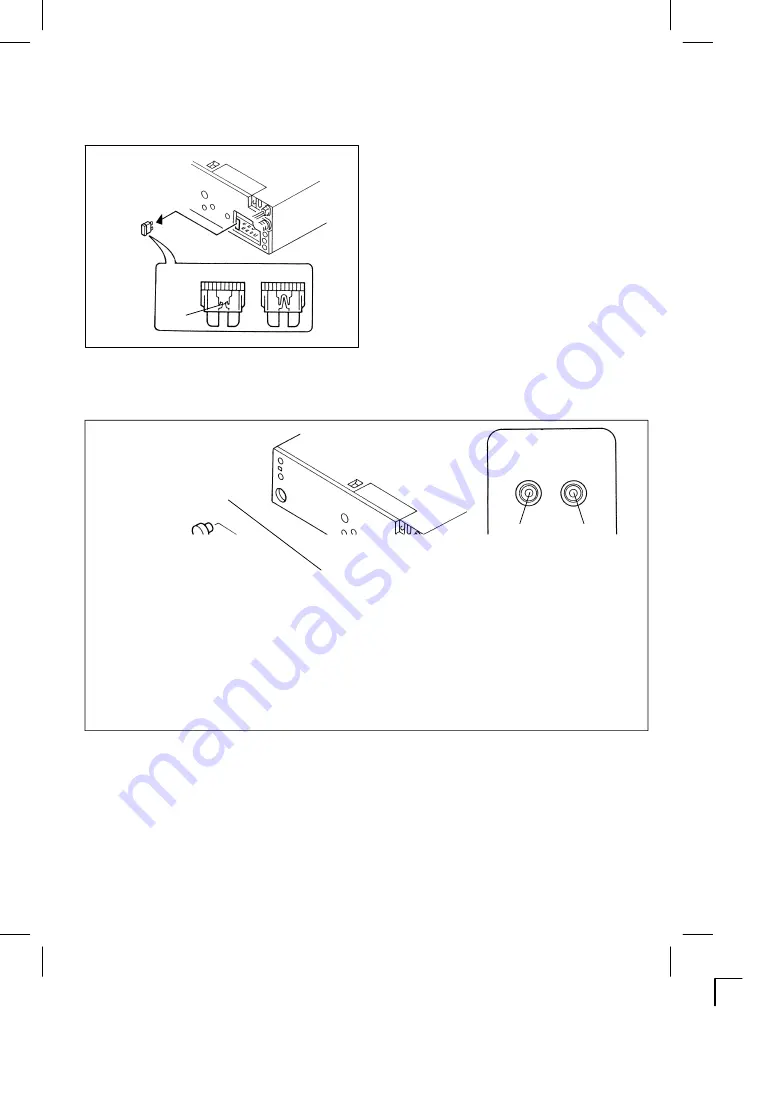
NG

OK

Burnt

Fuse 15 A

-ā28ā-

Notes

S

When using a twoĆspeaker installation, the Green, Green/Black, Violet, Violet/Black wires, which

are used for a fourĆspeaker installation, are not used. The ends of these wires must be covered

with electrical tape to prevent them from shorting to the unit or the vehicle chassis.

S

When using a twoĆspeaker installation, set

the FADER control to the center position.

S

When fuse replacement is necessary reĆ

move the blown fuse by using pliers. Then

install the new 15 amp. fuse.

LINE OUT/CD CHANGER CONNECTIONS

S

The unit has a builtĆin CD changer controller and line output terminals. You can use a compatible Sanyo CD

changer and a separate rear channel amplifier toupgrade your system.

CD Changer DIN Socket

RCA LineĆout Jacks

White

(Left)

Red

(Right)

CD Changer

External

Amplifier

Rear Speaker

CD Changer DIN Socket

S

Connect the 8Ćpin DIN cable, which is supplied with the AX-300, AX-500 or other compatible Sanyo CD

changer, to the DIN socket on the back of the unit.

RCA LineĆout Jacks (For Rear Speakers)

S

Connect a patch cable (not supplied) from the White (left rear channel) and Red (right rear channel) RCA

line output jacks to the line input terminals of the external amplifier.

Содержание FXCD-1100 - Radio / CD

Страница 1: ...Design Full Panel Detachable FM Stereo AM Receiver Auto Reverse Cassette Player Compact Disc Player with CD Changer Controller ISO Mounting with Removable Trim Ring English OPERATING INSTRUCTIONS ă1Ɂ30 Español LIBRITO DE INSTRUCCIONES 31Ɂ59 GB E ...

Страница 2: ...21605 Plummer Street Chatsworth CA91311 1ED6P10A16300 Rev 0 Printed in Malaysia ...

Страница 3: ...n altered defaced or removed This warranty shall not apply to the cabinet or cosmetic parts knobs or routine maintenance This warranty does not apply to uncrating setup installation removal of the product for repair or reinstallation of the product after repair This warranty does not apply to repairs or replacements necessitated by any cause beyond the control of SFC including but not limited to a...

Страница 4: ... may result in hazardousradiationexposure S ChangesormodificationsnotexpresslyapprovedbySanyomayvoidtheuser sauthoritytooperatethisequipĆ ment S For CD player section This device complies with Part 15 of the FCC Rules Operation is subject to the following two conditions 1 Thisdevicemaynotcauseharmfulinterference and 2 thisdevicemustacceptanyinterferencereceived includinginterference that may cause...

Страница 5: ...ace of the disc glossy side with a soft cloth Wipe in a straight motion from the inside to the outside of the disc Unlike conventional records thecompactdischasnogroovesto collectdust and debris Small dust particles will have no effect on reproduction quality S Donot insert a disc which is cracked into the unit S Do not apply paper or write anything on the surface of the disc S To prevent warping ...

Страница 6: ......

Страница 7: ...ontrolLevelIndicator RadioFrequency Time CD Track Number CDĆCH Track Number Error Code Number Audio Control Selected Mode FM Stereo AM Band Dolby noise reduction manufactured under license from Dolby Laboratories Licensing Corporation Dolby and the double D symbol are trademarks of Dolby Laboratories Licensing Corporation SAFETY CERTIFICATION This Compact Disc Player is made and tested to meet exa...

Страница 8: ... of the panel into the unit until it clicks Note The unit will not operate if it is installed incorrectly With the door opened do not attempt to remove or replace the front panel CAUTION SECURITY Toavoidtheftorlossofthefrontpanel youcaninactiĆ vatethereleaseknobbyinstallingthescrewprovided as shown S Do not attempt to remove the panel in a manner other than that described above S When installing t...

Страница 9: ... 3 Press the SELECT button to select the audio functions as shown in the table below Turn the jog dial to adjust the selected function bass treble balance fade or volume Note While no other mode is displayed the jog dial adjusts the volume MODE Jog Dial Operation MODE Turned left Turned right VOL volume Decreased Increased bAS bass Decreased Increased TRE treble Decreased Increased bAL balance Shi...

Страница 10: ...s the CD CD CH button to switch from radio or tape mode to CD player or CD changer mode If a CD changer is connected Pressing the button will change the mode as follows 1 When a CD is loaded in the CD player and a CD changer is not connected Radio Tape CD player CD player pause 2 When a CD is not loaded in the CD player and a CD changer is connected Radio Tape CD changer CD changer pause 3 When a ...

Страница 11: ... for less than 0 5 seconds To select lower frequency stations press the button for less than 0 5 seconds To quickly scan up or down in frequency press and hold the or button Release thebuttonwhenthedisplayapproachesthedesiredfrequency thenpressandrelease the button repeatedly until the desired frequency is displayed STORING PRESET STATIONS 3 The preset buttons can be used to store 6 stations in ea...

Страница 12: ...esiredATPpreset Each time the ATP button is pressed the next ATP preset is selected If a total of six stations cannot be preset will be displayed forthe emptychannels S To scan programmed stations See PRESETĆSCANĆBUTTON OPERATION Notes S If no station can be received appears in the display S If fewer than 6 stations can be received the system will memorize as many stations as possible then select ...

Страница 13: ...nd may easily break CAUTION SELECTING TAPE MODE Insertingacassetteintothetapeslotasstatedabovewillstartthetapeplayer Ifradio CDplayerorCDchanger is in operation with a tape loaded press button to switch to tape mode If a CD changer is connected SWITCHING THE TAPE DIRECTION 4 Press BUTTON S Whenthe tape reaches the end of one side the unit will automatically switch to the opposite side of the tape ...

Страница 14: ...The blank space before the current selection counts as one blank space 4 To cancel AMSS mode press button again Notes S If AMSS detects 15 seconds of blank space it will automatically advance the tape to the next selection S AMSS may not operate properly if S A tape was recorded at low level S A tape has long silent intervals S A tape is a live recording DOLBY B NOISE REDUCTION BUTTON 8 To play ba...

Страница 15: ...out the first 10 seconds of each selection Press SCN during play to start scan operation To cancel scan press SCN again Notes RPT SCN may not operate properly if S A tape was recorded at a low level S A tape has long silent intervals S A tape is a live recording ...

Страница 16: ...mage to both of the discs and the unit CAUTION SWITCHING TO CD MODE 4 Press the CD button to switch from radio tape or CD changer mode to CD player mode Pressing the button willchangethemodeasexplainedinsection CDPLAYERORCDCHANGERSELECTIONBUTTON CD CD CH in page 8 WhentheCDmodeisswitchedonwhileadiscisloaded playresumesfromthepointatwhichplaywasstopped When the entire disc has played the unit retur...

Страница 17: ... play was stopped S If the vehicle ignition is turned off then on again S If the power is switched off then on again with the ON OFF button Note REPEAT MODE 8 Press the RPT button to play the current track repeatedly To cancel this mode press the RPT button again or eject the CD If a disc is already loaded under the following conditions repeat play will resume S If the vehicle ignition is switched...

Страница 18: ...nning of the track currently playing Press the TRACK button twice to skip to the beginning of the previous track Press and hold the TRACK or button for more than 2 seconds to search quickly with sound in the forward or reverse direction When the button is released the CD resumes normal play SHUFFLE MODE 6 This function plays the tracks on one CD or all CDs in the magazine in random order S Shuffle...

Страница 19: ...unction plays the first 10 seconds of each track or disc sequentially S Playing the beginning of tracks Press the SCN button to play the first 10 seconds of each track on Track Scan the current disc in order S Playing the beginning of discs Press the SCN button for more than 2 seconds to play the first 10 Disc Scan seconds of each disc in the magazine To cancel the track scan or disc scan mode pre...

Страница 20: ...ontact the place of purchase CD Changer If a problem should occur while operating the connected CD changer one of the following error signs may be displayed Error Sign Cause Remedy E01 Abnormal mechanism function Contact the place of purchase E07 The disc was inserted incorrectly Insert the disc properly The disc is dirty Clean the disc The disc is defective Use another disc There is condensation ...

Страница 21: ...press the DISP button for more than 2 seconds The time display blinks To adjust the minute press the button To adjust the hour press the button To advance the time rapidly hold the or button continuously Press DISP button again to start the clock CLOCK RESET 1 4 Press DISP button for more than 2 seconds and the time display blinks While blinking press preset button 6 to skip to the nearest halfĆho...

Страница 22: ... and be interrupted This will not cause any damage to the disc or the player If this occurs wait for the road surface to improve before using the CD player S Safety Forsaferdriving keep the volume ata moderate level to enable you to hearoutside sounds such as emergenĆ cy vehicle sirens S Cleaning the unit Cleanthe unitwith a soft dry cloth Stains should be removed by wiping the surfaces with a sof...

Страница 23: ...icrocomputer has been affected by electrical Eject the disc or tape then insert it again p p y j Play y noise Turn the power off and then on again The sound from the CD player skips The road surface is rough Wait for the road surface to improve before playing a disc p y p The unit is not mounted securely Install the unit securely Be sure to use the rear strap if the vehicle does not provide suppor...

Страница 24: ...ting Bracket Half Sleeve x 1 Rear Strap Brace x 1 Screw M5 x 14 x 2 INSTALLATION SET REMOVAL Hex bolt M8 x 6 x 4 Mounting Grommet x 1 Mounting Screw M5 x 1 Screw M2 x 6 x 2 SECURITY OF FRONT PANEL Removable Trim Ring x 1 Unlock Levers 2 ...

Страница 25: ...ed at an angle due to the design of the vehicle make sure the unit does not tilt by more than 30 2 ISO MOUNTING WITH REMOVABLE TRIM RING When mounting the unit into a DINĆstandard cutout 182 53 mm in the dashboard or console attach the provided Removable Trim Ring to the unit AUDIO UNIT DASHBOARD OR CONSOLE REMOVABLE TRIM RING 53 mm 182 mm ...

Страница 26: ...o the DIN standard cutout 182 53 mm in the dashboard or console 2 Bend the mounting bracket stopper outward until the bracket fits snugly in the cutout If the rear strap is used 3 Push the unit into the mounting bracket until it locks in place 4 Secure the rear strap to the audio unit and vehicle dashboard If the mounting screw is used 3 Install the supplied mounting screw M5 in the audio unit Cov...

Страница 27: ...he mounting holes in the unit chassis T or N is engraved next to each mounting hole Use T holes for Toyota vehicles and N holes for Nissan vehicles Screw Screw TOYOTA NISSAN MountingBracket CAUTION ONLY USE M8 x 6 SCREW INĆ CLUDED WITH THIS UNIT AS ILLUSTRATED ABOVE USE OF ANY OTHER SCREW OR HARDWARE MAY RESULT DAMAGE TO HEAD UNIT ...

Страница 28: ... opened 2 Remove the front panel by pressing down the release knob 3 Insert the unlock levers into the slots as illustrated in A The jagged side of the key should face outward Note 4 Slide both keys outward as illustrated in B and pull to remove the audio unit as illustrated in C ...

Страница 29: ...ket S Insert the plug fromthe antenna installed in yourvehicle into this socket Ifyourvehiclehasadualantenna system a dual antenna to single antenna cable adaptor may be required 2 12V Constant Power Supply Yellow S Connect this wire to the 12V power terminal which receives power continuously S Connect to location drawing 10 A amperage or more 3 12VAccessory Switched Red S Connectthis wire to the ...

Страница 30: ...use LINE OUT CD CHANGER CONNECTIONS S The unit has a builtĆin CD changer controller and line output terminals You can use a compatible Sanyo CD changer and a separate rear channel amplifier to upgrade your system CD Changer DIN Socket RCA LineĆout Jacks White Left Red Right CD Changer External Amplifier Rear Speaker CD Changer DIN Socket S Connect the 8Ćpin DIN cable which is supplied with the AX ...

Страница 31: ...ensitivity S N 20dB 20µV I F Rejection 80dB Image Rejection 75dB S N Ratio 50dB Antenna Impedance 75Ω TAPE SECTION Wow Flutter 0 1 S N Ratio Normal 52dB S N Ratio with Dolby 62dB Separation 50dB Frequency Response 50Hz 15kHz CD SECTION Disc size 5 Channels 2Ćchannel stereo Sampling frequency 44 1kHz D A converter Twin 1 bit Pickup Optical 3Ćbeam semiconductor laser Output filter Active Frequency r...

Страница 32: ...er 45W 4CH 15 0 V Load Impedance 4Ω GENERAL Operating Voltage 12V 10 5Ċ15 0 V Operating Current Maximum 13A IMPORTANT INFORMATION Because its products are subject to continuous improvement SANYO reserves the right to modify prodĆ uct designs and specifications without notice and without incurring any obligation ...

Страница 33: ...osqueaquíseespecificanpueĆ den tener como resultado una exposición peligrosa a radiaciones S LoscambiosomodificacionesnoaprobadosexpresamenteporSanyopuedeninvalidarlaautoridaddelusuaĆ rio para operar este equipo S Apartado del reproductor de CD Este dispositivo cumple el Apartado 15 de las normas FCC Su funcionamiento está sujeto a las siguientes condiciones 1 Este dispositivo no debe provocar int...

Страница 34: ...producción del disco usando un paño suave Limpie siempre desde dentro hacia afuera en un movimiento continuo Al contrario de los discos convencionales el disco comĆ pacto no tiene surcos donde se acumulen polvoyresiduos LaspartículasdepolvopeĆ queñas no afectan la calidad de reproducĆ ción S No introduzca en el aparato ningún disco que esté rajado S No pegue papeles ni escriba nada sobre la superf...

Страница 35: ...prolongadodetiempo saqueel disĆ cocompactoyguárdeloenelestucheplástiĆ co correspondiente Con ello protegerá el disco del polvo y del sol Bencina Disolvente Spray limpiador S CDs de modos mezclados Este producto sólo reproduce pistas de CDs de modos mezclados La pista inicial tiene datos que no son de audio y por lo tanto no produce ningún sonido La reproducción comenzará desde la pista siguiente L...

Страница 36: ...by Indicador del nivel de control de volumen audio Frecuencia de radio Hora Número de pista de CD Número de pista de CDĆCH Mensajas de error Modo seleccionado de control de audio Estéreo FM Banda AM Dolby NR reducción de interferencias se fabrica bajo licencia de Dolby Laboratories Licensing Corporation Dolby y el símbolo de doble D son marcas registradas de Dolby Laboratories Licensing Corporatio...

Страница 37: ...uierda hasta que se oiga un clic Nota El aparato no funcionará si no se instala correctaĆ mente No intente extraer ni cambiar la cáratula con la puerta abierta ATENCIÓN SEGURIDAD Paraevitarcualquierroboopérdidadelpanelfrontal puedeinhabilitar la perilla de liberación instalando el tornillo tal como se muestra S No intente extraer el panel de un modo distinto al que se ha descrito anteriormente S C...

Страница 38: ...L para seleccionar las funciones de audio que se muestran en la tabla siguiente Gire la muesca cuadrada para ajustar la función seleccionada bajos agudos balance desvanecido o voluĆ men Nota Mientras no se visualice otro modo la muesca cuadrada ajusta el volumen Funcionamientode la muesca Modo Girado hacia la izquierda Girado hacia la derecha VOL volumen Disminución Aumento bAS bajos Disminución A...

Страница 39: ...CH para cambiar de modo de radio a modo de cinta areproductordeCDocambiador de CD Si se ha conectado un cambiador de CD Pulsando el botón se cambiará de modo de la siguiente manera 1 Cuando hay un CD cargado en el reproductor de CD y no hay un cambiador de CD conectado Radio Cinta Reproductor de CD Pausa de reproductor de CD 2 Cuando no hay un CD cargado en el reproductor de CD y hay un cambiador ...

Страница 40: ... el botón durante menos de 0 5 segundos Paraseleccionar emisoras de frecuencia m s baja pulse el botón durante menos de 0 5 segundos Si desea pasar rápidamente a frecuencias mayores o menores pulse el botón o respectivamente y manténgalo apretado Suelte el botón cuando la frecuencia visualizada estpróxima a la que usted busca a contiĆ nuaciónpulse ysueltebrevementeelbotónhastavisualizarlafrecuenci...

Страница 41: ...sa el botón ATP se selecĆ ciona la siguiente función prefijada Si no pueden prefijarĆ se las seis emisoras los canales vacíos se indican en la pantalla mediante S Para rastrear emisoras programadas Consultelasección FuncionamientodelbotónderastreodeemiĆ soras de emisoras prefijadas Notas S Si puede recibirse la emisora aparecerá en el indicador display S Si sólo pueden recibirse menos de 6 emisora...

Страница 42: ...INTA La inserción de una casete en la ranura para cintas tal como se ha indicado en el apartado anterior pondrá en marcha el reproductor de cintas Si la radio reproductor de CD o cambiador de CD está funcionando con una cinta cargada pulse el botón para pasar al modo de reproducción de cintas Si se ha conectado un cambiador de CD CAMBIO DE LA DIRECCIÓN DE LA CINTA 4 Pulse el botón S Cuando la cint...

Страница 43: ...al cuenta como un espacio en blanco 4 Para cancelar el modo AMSS vuelva a pulsar el botón Notas S Si AMSS detecta 15 segundos en un espacio en blanco automáticamente hará avanĆ zar la cinta a la siguiente selección Se visualizará BS FF S AMSS no funcionará correctamente si S Si se ha grabado la cinta con un nivel de volumen bajo S Si en la cinta hay intervalos de silencio demasiado largos S Si la ...

Страница 44: ...ección Pulse SCN durante la reproducción para iniciar la operación de exploración Para cancelar la exploración vuelva a pulsar SCN Notas Es posible que RPT SCN no funcionen correctamente si S El nivel de grabación de la cinta es bajo S La cinta contiene amplios intervalos de silencio S La cinta es una grabación en directo ...

Страница 45: ...disco pues los discos y el aparato podrían resultar dañados ATENCIÓN CAMBIAR AL MODO CD 4 PulseelbutonCD paracambiardelmododeradio demododecintaocambiadordeCD almododereproducĆ tor de CD Pulsandoel botón cambiará de modo de la manera detallada en la sección BOTÓN DE SELECCIÓN DE REĆ PRODUCTOR DE CD O CAMBIADOR DE CD CD CD CH en la página 37 SiseconectaelmodoCDconundiscoenlabandeja lareproducciónse...

Страница 46: ...tacto del vehiculo y se vuelve a conectar S Si se desactiva el reproductor y se vuelve a activar con el botón ON OFF Nota MODALIDAD DE REPETICIÓN 8 Pulse el botón RPT para reproducir repetidamente la pista actual Para cancelar este modo vuelva a pulsar el botón RPT o expulse el CD Si hay un disco dentro de la unidad en las siguientes condiciones la reproduccion repetiĆ da se reanudará S Si se desc...

Страница 47: ... que se est reproduciendo Pulse el botón TRACK dos veces para ir al principio de la pista anterior Pulsey mantenga pulsado el botón TRACK o durante m s de 2 segundos para hacer una búsqueda r pida con sonido en dirección hacia adelante o hacia atr s respectivamente Al soltar el botón el CD reanuda la reproducción normal MODALIDAD ALEATORIA 6 Esta función reproduce las pistas de un CD o de todos lo...

Страница 48: ...duce los primeros 10 segundos de cada pista o disco por orden S Reproducción del principio de las pistas Pulse el botón SCN para reproducir secuencialmente los Exploración de pistas 10 primeros segundos de cada pista del disco actual S Reproducción del principio de los discos Pulse el botón SCN durante m s de 2 segundos para gun Exploración de discos reproducir los 10 primeros segundos de cada dis...

Страница 49: ...tacto con el establecimiento de compra Del cambiador de CD Si se produjera alguna anomal í a durante el funcionamiento del cambiador de CD conectado podría aparecer algunode los mensajes de error siguientes Mensaje de error Causa Solución E01 Error de mecanismo anormal Póngase en contacto con el estableciĆ miento de compra E07 El disco no se ha insertado bien Insértelo correctamente El disco está ...

Страница 50: ...mo La visualización de la hora parpadeará Para ajustar los minutos pulse el botón Para ajustar la hora pulse el botón Para hacer que la hora avance r pidamente mantenga pulsado el botón o Vuelva a pulsar el botón DISP para poner en marcha el reloj REPOSICIONAMIENTO DEL RELOJ CLOCK RESET 1 4 Pulse el botón DISP durante 2 segundos como mínimo La visualización de la hora parpadeará En ese moĆ mento p...

Страница 51: ...del sonido en el CD Esto no causará ningún daño al disco ni al tocadiscos Si se produjeran dichos saltos espere hasta que mejore la carretera S Seguridad Para conducirseguro mantenga el volumen a un nivel moderado que le permita oir los sonidos exteriores taĆ les como las sirenas de vehículos de emergencia S Limpieza del aparato Limpie el aparato con un paño suave y seco Para quitar las manchas us...

Страница 52: ...l microcomputador está siendo afectado por el Extraiga el disco de cinta y vuélvalo a insertar correctamente Eject Load Play siendo afectado por el ruido vuélvalo a insertar Apague y encienda el aparato otra vez El sonido del tocadiscos salta La carretera está en mal estado Espere a que mejore la carretera El aparato no está fijo Instale la unidad firmemente Asegúrese de utilizar la cinta posterio...

Страница 53: ...ctor x 1 Banda posterior Llave x 1 Tornillo M5 x 14 x 2 INSTALACIÓN JUEGO DE DESMONTAJE arandelaaislante x 1 tornillo para montaje x 1 Tornillo M2 6 2 SEGURIDAD DEL PANEL FRONTAL Marco de adorno removible x 1 horquillasdedesbloqueo x 2 Tornillo hexagonal M8 6 4 ...

Страница 54: ...ángulo de inclinación no sobrepase los 30 2 MONTAJE ISO CON MARCO DE ADORNO REMOVIBLE Cuando se monte la unidad en un recept culo est ndar DIN 182ɟ53 mm en el salpicadero o en la consola instaleelmarcodeadornoremovibleenlaunidad Elmarcodeadornoremovibleseinstalamediantelosorificios y las patillas de bloqueo que hay en la parte inferior del marco 53 mm 182 mm TABLERO DE INSTRUĆ MENTOS O CONSOLA APA...

Страница 55: ...de instrumentos o de la consola 2 Doblelos topes del bastidor de montaje hacia afuera hasta que el bastidor quede encajado exactamente en la abertura Si se utiliza la banda posterior 3 Coloque la unidad en el soporte de montaje hasta que quede perfectamente encajada 4 Introduzca el aparato de radio en el bastidor de montaje hasta que esté correctamente colocado y fijo Si se utiliza el tornillo de ...

Страница 56: ... letras T o N figuran inscritas junto a cada orificio Utilice los orificios T para los vehículos Toyota y los orificios N para los vehículos Nissan Tornillo Tornillo Soporte de montaje TOYOTA NISSAN ATENCIÓN UTILICE ÚNICAMENTE UN TORNILLO DEL TIPO M8 6 INCLUIDO CON ESTA UNIDAD TAL COMO SE ILUSTRA MÁS ARRIBA EL USO DE OTRO TIPO DE TORNILLO O DE HARDWARE PUEDE ORIGINAR DAÑOS EN EL CABEZAL DE LA UNID...

Страница 57: ... panel delantero presionando la perilla de liberación 3 Inserte las palancas de desbloqueo en las ranuras tal cual lo indicado en A Nota El lado dentado de la llave debe quedar hacia afuera 4 Desliceambas llaves hacia afuera tal cual lo indicado en B y tire para desmontar el aparato de audio talcual lo indicado en C ...

Страница 58: ...es comunes de altavoces deben tenerunalongitud holgada 1 Enchufe de la antena S Inserte la clavija de la antena instalada en su vehículo en este enchufe 2 Alimentación constante de corriente 12 V Amarillo S Conecte este cable al borne de alimentación de 12 V que recibe corriente continuamente S Conéctelo a una ubicación con amperaje de 10 A o más 3 12 V Accesory Conmutado Rojo S Conecte este cable...

Страница 59: ...OR DE CD S La unidad tiene un controlador incorporado de cambiador de CD y tiene terminales para salida de línea Se puedeusarun cambiadordeCDcompatibleconelmodelodeSanyoyunamplificadordecanalposteriorsepaĆ rado para ampliar el sistema Cambiador de CD Toma DIN para cambiador de CD AmplificaĆ dor externo Altavocestraseros Jacks de salida RCA Blanco izda Rojo dcha Toma DIN para el cambiador de CD S C...

Страница 60: ...0µV Rechazo de I F 80dB Rechazo de imagen 75dB Relación S R 50dB Impedancia de la antena 75Ω SECCIÓN DE LA CINTA Movimiento lateral y fluctuación 0 1 Relación S R normal 52 dB Relación S R con Dolby 62 dB Separación 50 dB Respuesta de frecuencia 50 Hz 15 kHz APARTADO DEL CD Tamaño del disco 5 pulgadas Canales 2 canales estereos Frecuencia de muestreo 44 1kHz Convertidor D A Doble 1 bit Lector Láse...

Страница 61: ...4CH 15 0 V Impedancia de carga 4Ω GENERAL Voltaje de funcionamiento 12 V 10 5X15 0 V Corriente máxima de funcionamiento 13 A INFORMACIÓN IMPORTANTE Dado que sus productos están sujetos a mejoras continuas SANYO se reserva el derecho de modificar las especificaciones y los diseños de los productos sin previo aviso y sin incuĆ rrir por ello en ninguna obligación ...

Отзывы: