background image

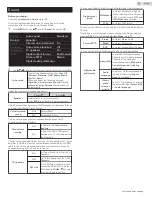
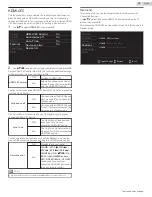
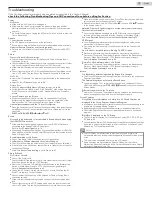
Setting your Location to Home

You can set the 

Location

 of your TV to 

Home

 or 

Retail

. Choosing 

Home

gives you full flexibility to change predefined settings for Picture and

Sound.

1

Use 

H


I

 to Select 

Location

, then press 

OK

.

- -

Home

Software upgrade

E-sticker

Location

Child lock

PC settings

Caption settings

USB

Language

Features

Setup

Sound

Picture

HDMI-CEC

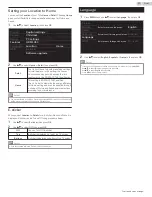
2

Use 

H


I

 to select 

Home

 or 

Retail

, then press 

OK

.

Retail

The Unit will be set up with predefined settings

for retail displays. In this setting, the Power

Consumption may possibly exceed the limit
requirement of the ENERGY STAR

N

 qualification.

Home

This setting is ENERGY STAR

N

 qualified.

The Unit is set to maximize the energy efficiency

for Home setting and it can be adjusted through

a choice of Picture and Sound quality selections

according to your preference.

Note(s)

You must set 

Home

 in the Menu. Otherwise, personalized Picture and Sound Settings will

Not Be Memorized after the Unit goes into Standby Mode.

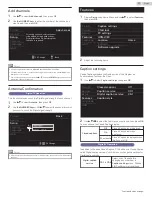
E-sticker

When you set 

Location

 to 

Retail

 store, E-sticker (Electronic Sticker) is

displayed. E-sticker can be Turned Off using procedure below.

1

Use 

H


I

 to select 

E-sticker

, then press 

OK

.

2

Use 

H


I

 to select 

Off

, then press 

OK

.

Off

You can Turn Off E-sticker.

Top

E-sticker is displayed on top of the TV screen.

Bottom

E-sticker is displayed on bottom of the TV screen.

Note(s)

If you set 

Location

 to 

Home

, E-sticker will not be displayed.

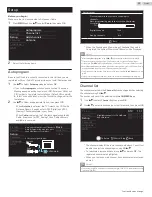
Language

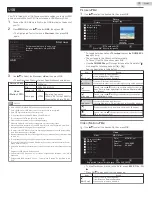
1

Press 

MENU

 and use 

H


I

 to select 

Language

, then press 

OK

.

Français

Español

English

Sélectionnez la langue du menu.

Seleccione el idioma para el menú.

Select your menu language.

USB

Language

Features

Setup

Sound

Picture

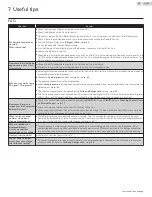
2

Use 

H


I

 to select 

English

Español

 or 

Français

, then press 

OK

.

Note(s)

If you need the English menu instead of the Spanish or French menu’s, press 

MENU

.

Use 

H


I

 to select 

Idioma

 or 

Langue

, then press 

OK

.

Use 

H


I

 to select 

English

 then press 

OK

.

Press 

MENU

 to Exit the Main menu.

29

.

English

Continued on next page.

Содержание FW32D06F

Страница 1: ...urther contents go to Para obtener una Copia Electronica detallada de este Manual o mucho mayor contenido visite ES Necesita ayuda Llame por favor sin costo al 1 866 212 0436 ó visite nuestro Sitio Web en ES Besoin d aide Appelez notre numéro gratuit à 1 866 212 0436 ou visitez notre Site Web à l adresse FR FR Pour obtenir une Copie Electronique plus detaillee de ce Manuel ou pour aller encore plu...

Страница 2: ...ion 13 Composite Analog Video Connection 13 Digital Audio Output Connection 13 PC Connection 14 USB Memory Stick 14 Initial Setup 15 4 Use your TV 16 Switching on your TV and putting it in Standby mode 16 Adjusting Volume 16 Switching Channels 16 Watching Channels from an External Device 17 Changing Picture and Sound Settings 17 Sleep Timer 17 Freeze Mode 17 Switching Audio Mode 17 Changing Pix Sh...

Страница 3: ...safe and enjoyable As you enjoy your television please note that all televisions new and old must be supported on proper stands or installed according to the manufacturer s recommendations Televisions that are inappropriately situated on dressers bookcases shelves desks speakers chests carts etc may fall over resulting in injury TUNE IN TO SAFETY ALWAYS follow the manufacturer s recommendations fo...

Страница 4: ... such as radiators heat registers stoves or other apparatus including heat registers stoves or other apparatus including amplifiers that produce heat amplifiers that produce heat 9 9 Do not defeat the safety purpose of the polarized or Do not defeat the safety purpose of the polarized or grounding type plug A polarized plug has two blades grounding type plug A polarized plug has two blades with on...

Страница 5: ... interfer ence to radio or television reception which can be deter mined by turning the equipment off and on the user is encouraged to try to correct the interference by one or more of the following measures Reorient or relocate the receiving antenna Increase the separation between the equipment and the receiver Connect the equipment into an outlet on a circuit different from that to which the rec...

Страница 6: ...on is provided Make sure to leave a space of 4 inches 10cm or more around this apparatus Press to turn the Unit on and go into Standby mode To completely turn off the Unit you must unplug the AC power cord Disconnect the AC plug to shut the Unit off when trouble is found or not in use The AC plug shall remain readily available AC plug Never use a gas duster on this TV The gas trapped inside of thi...

Страница 7: ...nected to your TV HDMI Input HDMI DVI Input If your Video Device has a DVI Output jack use an HDMI DVI Conversion Cable to connect the Unit Component Video Input PC Input Input from a Computer AV Input Audio and Video Input from an External Device USB terminal ThePicture JPEG andVideo MotionJPEG filesstoredonaUSBMemoryStickcanbeplayed back on this Unit Digital Audio Output Digital Audio Supporting...

Страница 8: ... the Unit To remove the base from this Unit unscrew the Phillips head screws by the reverse procedure Be careful not to drop the base when you remove it Managing cables Route your Antenna cable and all other cables through the cable management tie at the back of the TV The holder helps keep your cables tidy and easily manageable 1 Attach the cable management tie as illustrated below 2 Pass cables ...

Страница 9: ... i 0 9 NUMBER keys Used to enter a Channel Program number DOT Use with 0 9 to select Digital channels For example to enter 2 1 press PREV CH Returns to the previously viewed Channel CH H I Selects a Channel in the Memorized Channel Ring Low to High or High to Low j PIC SOUND MODE Optimizes Picture and Sound quality k FREEZE Freezes Screen image for 5 minutes l PIX SHAPE A Adjusts the Picture size ...

Страница 10: ...teVideo VIDEO Inputjack s for VIDEO Composite Video Input VIDEO jack is a shared jack with Component Video Input Y jack j Analog Audio L R Input jacks Connect Analog Audio Signals from HDMI DVI Analog Audio L R jacks Signal Component Video Analog Audio L R jacks Signal Composite Video Analog Audio L R jacks Signal PC Connection Analog Audio L R jacks Signal from Stereo Mini 3 5mm Plug Audio Cable ...

Страница 11: ...cable RF cable OUT OUT OUT Audio L R Video cables IN IN IN Cable RF cable RF cable RF cable RF cable Audio L R Video Audio L R Video cables cables RF cable RF cable IN IN OUT OUT IN IN IN Set top Box OUT OUT OUT OUT Audio L R Video cables Audio L R Video cables IN IN IN Blu ray Disc DVD Recorder Note s If you have any question about the DTV s Antenna visit www antennaweb org for further informatio...

Страница 12: ... Definition Digital Video and multi channel Digital Audio through a single cable HD game console or Blu ray Disc DVD Player or Set top Box HDMI cable HDMI cable HDMI cable OUT IN IN IN HDMI DVI Connection This Unit can be connected to your Device that has a DVI Terminal Use an HDMI DVI Conversion Cable for this Connection and it requires Audio Cable for Analog Audio signal as well IN IN IN Audio L...

Страница 13: ...put jack green connect Audio Cables to the Audio L R Input jacks When the Audio is monaural then only connect to the Audio L Input jack OUT DVD Player Audio L R Video cables Audio L R Video Audio L R Video cables cables IN IN IN Audio L R Video cables Note s With this Unit yellow cable must be connected to Y green jack on the Component Video Input jacks Whenever you connect to the Composite Video ...

Страница 14: ... the AC Power Cord and use the built in battery of your Portable Laptop PC Use an HDMI cable with the HDMI logo a certified HDMI cable High Speed HDMI cable is recommended for the Better compatibility The Unit accepts 480i 480p 720p 1080i and 1080p Video signals HDMI DVI Connection requires separate Audio Connections as well and the Audio signals are Output as Analog L R Audio DVI does not display...

Страница 15: ...cy for home setting and it can be adjusted through a choice of Picture and Sound quality according to your preference Use this setting to remove the E sticker if visible on the display L p 29 You must set Home in step 4 Otherwise Picture and Sound settings you adjusted will not be memorized after the Unit goes into Standby mode When the Initial setup is completed the Lowest Memorized Channel with ...

Страница 16: ...OL H I to recover the original sound Switching Channels TV Remote Control To select Channels by using CHI H or CH Press CH I Down H Up on the Side of the Unit or press CH on the Remote Control To select Channels by using the NUMBER keys DigitalTV Operation For Digital channels press a number followed by a dot and the corresponding sub channel number When selecting Digital channel 11 1 Be sure to p...

Страница 17: ...es Eco Eco TV settings for low Power Consumption Music Optimized for Music Playback News Controls Picture Tone and Sets the Anchor s Voice at a comfortable volume level Sleep Timer Sleep Timer can set the Unit to go into Standby mode after an incremental period of time Press SLEEP Repeatedly to change the amount of time increases the time by 30 minutes up to 120 minutes Press SLEEP Once to call up...

Страница 18: ...on and it requires a Stereo Mini 3 5mm Plug Audio Cable for Analog Audio signal as well Refer to 16 9 Video Signal on this page if the PC has an HDMI Output Normal Proportionately stretched picture Sidebars appear on both edges of the screen Full Stretched out of proportion to fill the screen Unscaled Original size TV Screen information You can display the currently selected channel or other infor...

Страница 19: ...K to determine the setting Adjusting the Picture Mode or customize the Picture quality as your preference Adjusting the Sound Mode Equalizer and some other Sound functions Scanning the Channels available in your area and see what the Antenna Signal levels are Adjusting the Closed Caption Parental Guide and some other useful functions You can choose English Spanish or French as your On screen Langu...

Страница 20: ...can set a Particular Picture Quality using Advanced settings On Normal Gamma Dynamic contrast Black stretch Noise reduction Color alignment USB Language Features Setup Sound Picture On Auto Gamma2 On On On BMR 120 Film mode Ambient light sensor Color alignment Color temperature mode to set the picture color temperature to Personal Cool Normal or Warm When you adjust the following settings Personal...

Страница 21: ... Audio Output from the Unit s speakers or not If your amplifier is HDMI link function compatible and connected by an HDMI cable to this Unit some sound operations such as volume up can be changed by using this Unit s Remote Control TV speakers On to Output Sound from the Unit s Speakers Off No Output Sound from the Unit s Speakers CEC Link to Control Audio Output from your connected HDMI CEC Compl...

Страница 22: ...se wait while the system is scanning for Autoprogram When the Scanning and Memorizing of Available Channels is Completed the Lowest Memorized Channel will be Displayed Note s After setting Autoprogram using CH H I skips unavailable channels Automatically If you are not receiving a signal from your Cable service contact the Cable provider If you press B or MENU during Autoprogram the Setup of TV ch...

Страница 23: ...log channel or External Input you cannot confirm the Antenna condition Features 1 Display Setup using Home Menu and use H I to select Features then press OK Home Software upgrade E sticker Location Child lock PC settings Caption settings USB Language Features Setup Sound Picture HDMI CEC 2 Adjust the following items Caption settings Closed Captions displays the Audio portion of the Program as Supe...

Страница 24: ...may not be controlled by this Unit s Menu options if you are watching television through a Set top Box In which case you will need to use the Menu options on the External Set top Box to control Closed Captions The Captions do not always use correct Spelling and Grammar Not all TV Programs and product Commercials include Closed Captions information Refer to your area TV Program Listings for the TV ...

Страница 25: ... E Automatically To Block any inappropriate programs set your limits in US movie ratings lock US TV ratings lock and Region ratings lock The Child Lock setting will be retained after a Power failure or after the Power is removed for longer than 10 seconds except the PIN code reverts to 0000 Child and Ratings Lock L p 25 Region ratings lock and Clear region ratings lock will be available when the U...

Страница 26: ...for children under 14 R Restricted under 17 Requires Accompanying Parent or Adult Guardian NC 17 No One under 17 Admitted X TV MA Mature Audience Only To set the Sub ratings displayed in the right column As for TV Y7 TV PG TV 14 or TV MA you can further set the Sub ratings to Block Specific Elements within programs To set the Sub ratings follow the step below Use H I J K to select the desired rati...

Страница 27: ...t PIN code Enter PIN code again in Confirm PIN entry field Back PIN Code Confirm PIN Enter PIN USB Language Features Setup Sound Picture Note s Make sure to enter a PIN code and the confirm PIN code must be exactly the same If they are different the space is cleared to reenter the New PIN code When a Power failure occurs the PIN code will be erased and Unit returns to the default PIN code 0000 If ...

Страница 28: ...hen the Unit goes into Standby mode This Unit will Turn On when the Power On Signal is sent from your connected HDMI CEC device Auto TV on Off This Unit stays in Standby mode even if you Turn On your connected HDMI CEC device On This Unit Turns On Automatically when you Turn On your connected HDMI CEC device You can operate some functions such as Disc Playback or call up the menu of the connected ...

Страница 29: ... personalized Picture and Sound Settings will Not Be Memorized after the Unit goes into Standby Mode E sticker When you set Location to Retail store E sticker Electronic Sticker is displayed E sticker can be Turned Off using procedure below 1 Use H I to select E sticker then press OK 2 Use H I to select Off then press OK Off You can Turn Off E sticker Top E sticker is displayed on top of the TV sc...

Страница 30: ...ot Supported Only a Motion JPEG file with an avi extension is supported An extension mov is Not Supported During Motion JPEG Playback Pause Forward and Reverse Do Not Work on this Unit Picture JPEG 1 Use H I to select the desired file then press OK 1 2 3 4 Press OK key to play pause Thumbnails Image5 jpg Image4 jpg Image3 jpg Image2 jpg Image1 jpg Image1 jpg Picture Picture 1024 768 2009 04 02 17 ...

Страница 31: ...ted to your TV and Download the Latest Software Upgrade file to your PC 1 On your PC open a web browser and go to sanyo av com support download 2 Enter the model number in the Type the Model Number field 3 Click the desired Software to be Downloaded Decompress the ZIP file 4 Copy the Upgrade file to the Empty root directory on the clean formatted USB Memory Stick Starting the Software Upgrade Warn...

Страница 32: ... Lock setting L p 25 The Unit requires some kind of Antenna Input An indoor Antenna Digital or VHF UHF an External Antenna Digital or VHF UHF or an RF Coaxial Cable from your wall Cable or Set top Box needs to be plugged into the Unit How come there is no image from the Connected External Devices Check if the correct Input mode is selected by pressing SOURCE or using CH H I Refer to Watching Chann...

Страница 33: ...trength if DTV channel check signal strength Refer to Antenna confirmation L p 23 Unplug the AC Power Cord and wait for about 1 minute then Plug the AC Power Cord and turn On the Unit again Check whether the Connection of the Antenna or Cable or Set top Box is connected correctly Make sure that the selected Input mode is connected to the working Input jack Check if your computer is NOT in sleep mo...

Страница 34: ...op Box Blu ray DVD Recorder or Digital television over a single cable HDTV High Definition TV Ultimate Digital format that produces high resolution and high picture quality PIN code A stored 4 digit number that allows access to Parental control features SAP Secondary Audio Program Second Audio channel delivered separately from the Main Audio channel This Audio channel is used as an alternate in bi...

Страница 35: ...trial DTV ATSC VHF 2 13 UHF 14 69 Each Channel has e g 2 1 2 9 3 1 3 9 etc Terrestrial Analog NTSC VHF 2 13 UHF 14 69 CATV Analog NTSC 2 13 A W W 1 W 94 Analog W 1 W 84 A 5 A 1 5A Tuning System Channel Frequency Synthesized Tuning System Channel Access Direct Access Number Keyboard Programmable Scan Channel up down and PREV CH Previous Channel Connectivity Component Video Input Y Pb Pr 1 Supportin...

Страница 36: ...llation of programs data or other information is not covered under this Limited Warranty This warranty does not apply a to damage caused by accident abuse misuse neglect misapplication or non supplied product b to damage caused by service performed by anyone other than company approved Authorized Service Location c to a product or a part that has been modified without written company permission or...

Страница 37: ...A5GREUH A5GR0UH ...
Отзывы: