


— 10 —
SERVICE HINTS
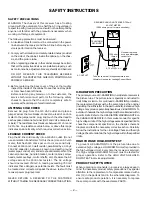
POWER FAILURE DETECTOR
This unit is equipped with a Power Failure Detector function included in the CPU which checks for an abnormal condition in
the chassis power supplies, including the power supply derived from the Horizontal Output Transformer.
If, while the power is on, a failure is caused by any of the following that results in a low voltage supply, the CPU will turn the
unit off in 1.5 seconds to prevent unnecessary damage:
•
Failure within the power supply circuits.
•
A short circuit in the load side from the supply.
•
Stoppage of the Horizontal Output Oscillator caused by the X-Radiation protection Hold-Down Circuit.
If, while the power is off, the power is switched on and any of these failures remains uncorrected, the CPU will shut off the
power within 3 seconds.
Check the following if the unit is turned off by the power failure detector.
1. Disconnect the AC power cord (120V AC line) for at least 10 seconds.
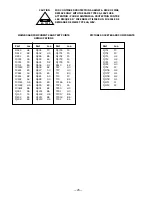
2. Connect a DC Voltmeter to the following TEST POINTS.
3. Press the Power key and check for the proper voltage supplies.
4. If any of these voltages is low, the power failure detector should turn the unit off within 3 seconds.
5. Check all circuits listed above.
Note: This unit is equipped with a Power Surge Protection feature included in the CPU. If power failure occurs three times
within 15 minutes, the CPU will automatically stop functioning to help prevent secondary damage. (TV will not turn on
by pressing the power key.) To reset the operating programs within the CPU, disconnect the AC power cord for at least
10 seconds.
SERVICE ADJUSTMENTS (Continued)
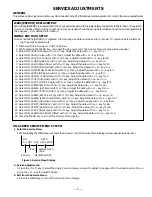
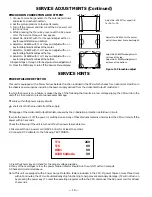
PINCUSHION CORRECTION ADJUSTMENT
1. Connect a color-bar generator to the antenna terminals
and select a crosshatch pattern.
2. Set the picture controls to the Sports levels.
3. Turn off the receiver and disconnect the AC power cord
(AC 120V line).
4. While pressing the Menu key, reconnect the AC power
cord. The Service Menu will now appear.
5. Select No. 49 EWT with
▲
or
▼
key and adjust with + or –
key for equal tilt at top and bottom.
6. Select No. 48 EWA with
▲
or
▼
key and adjust with + or –
key for straight vertical lines at the center.
7. Select No. 50 EWP with
▲
or
▼
key and adjust with + or –
key for straight vertical lines at the top.
8. Select No. 51 EWB with
▲
or
▼
key and adjust with + or –
key for straight vertical lines at the bottom.
9. Repeat steps 5 through 8 for best pincushion adjustment.
10. Press the MENU key to turn off the Service Menu display.
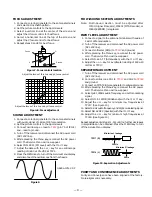
Adjust No. 49 EWT for equal tilt:
Ta=Tb, Tc=Td.
Adjust No. 48 EWA for the center
part of the vertical line to be straight.
Adjust No. 50 EWP for straight verti-
cal lines at the top.
Adjust No. 51 EWB for straight verti-
cal lines at the bottom.
Ta
Tc
Tb
Td
EWP
EWB
Figure 11. Pincushion adjust


