background image

9

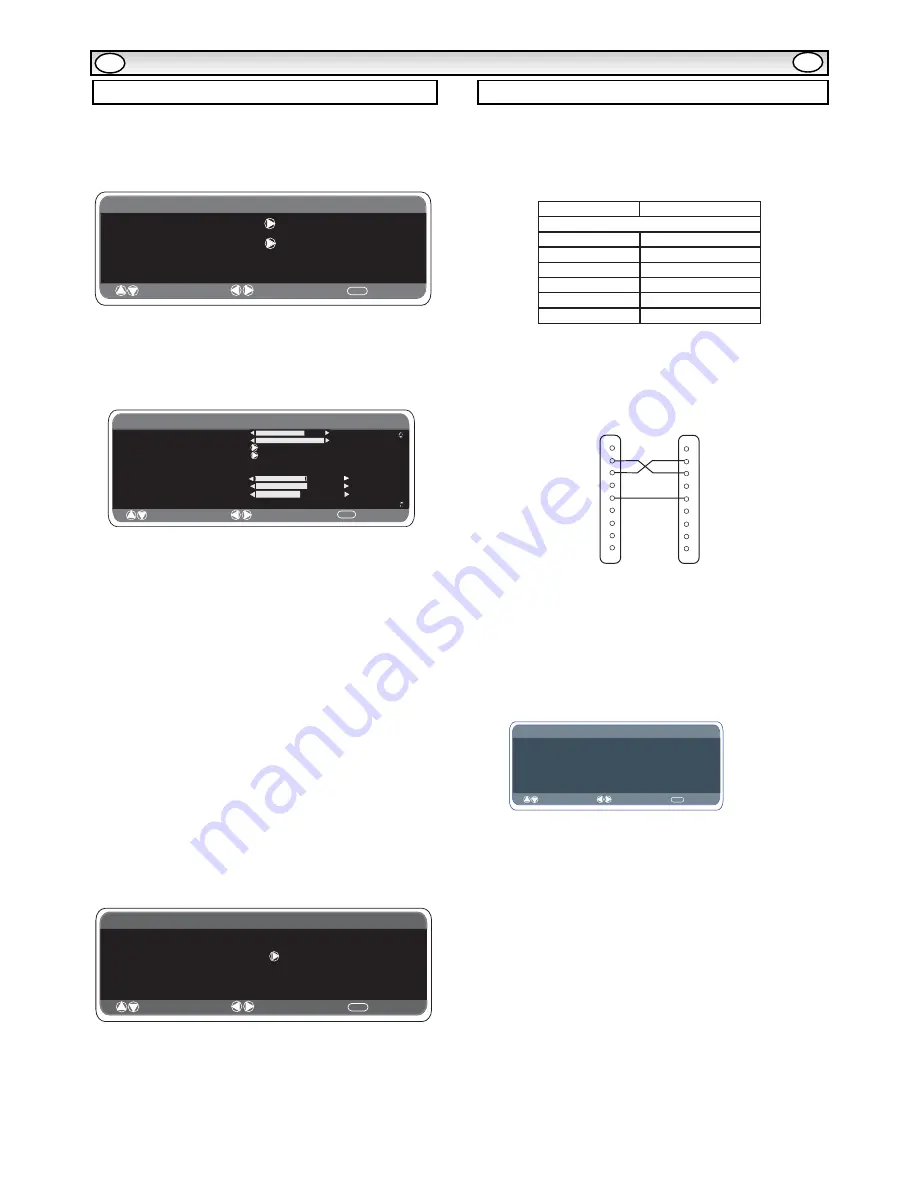
Connect your PC to the connector on the left  side terminal of the
set. Once connected select PC mode via the 

v

button on your

remote control. The set will become a monitor for the PC.

By pressing the MENU button on the remote control a menu window
will appear on screen, this allows the settings to be adjusted. 

To adjust the Picture settings select picture using the 

e

or

d

buttons

on the remote then the 

8

button to enter the following  picture 

settings menu. 
Press the 

7

or

8

buttons to adjusted the Picture brightness and the

same to adjust the contrast of the picture. 

Picture position changes the picture horizontally or vertically, this is
done by using the 

7

or

8

buttons on the remote control.

Video adjust changes the Phase and the clock of the screen. If the
picture is blurred or grainy this function will adjust it to a clearer
picture.
Auto Adjust will automatically adjust the picture by using the

8

button. This will change all the above settings automatically .Auto 
adjust can also be achieved by pressing the 
button on the remote control
Resolution displays the current resolution  of the picture. This is just
for information and cannot be adjusted.

Using the 

7

or

8

buttons it is possible to adjust the tone of the

screen using the White tone Red(R) / Green (G)/ Blue(B). This will
adjust the picture to show more of the chosen colour for example if
red is selected you can adjust the red in the picture to increase or
decrease using the 

7

or

8

buttons

Native Resolution is used when the PC can output WXGA
1366 x 768. The setting on your Monitor set can be changed 
to receive XGA/WXGA signal using the  

7

or

8

buttons . Once the 

signal has been selected, save the settings by switching off then on 
the monitor using the power button.

To select the Settings menu press the menu button on your remote
and using the 

e

or

d

buttons to select Settings. The   

8

button will 

enter the settings menu.

Child lock/ Timer  and AV2 settings are the same as in the TV mode 
(pg 7)
Power save if turned ON will turn the TV into Powersave mode after 
1 minute if no signal is detected, the LED light will turn blue to 
indicate stand by. The TV will automatically turn on when a signal 
has been detected. Use 

7

or

8

buttons to select ON or OFF. 

The TV control commands are used to control a TV through 
RS-232C from a computer.

Serial Interface Specification

Transfer Specification

1. Transmission Speed: initial setting value is 19200
2. Transmission speed can be changed by service mode (Hotel 
mode)

Connection

The Designated RS-232C serial cable that is provided with the LCD 
monitor must be used for a connection to a computer and LCD 
monitor

The TV command is defined by one command/ one line that starts 
with “C” and ends with carriage return (0x0D)

There are two types of commands:

Functional Execution Command  e.g Co5[CR] (table on page 75)
Status Read Commands e.g “CR0 [CR] (see table on page 75)

Setting the monitor address in RS232 mode

To Access hotel mode press the green button on the remote control 
and hold for 5 seconds. A new screen will appear.

Each monitor can have a specific Address for example 007, which 
helps command that monitor individually and will not affect other 
monitors connected to a controlling PC

Address format command

The addressing format command is used for operating multiple 
monitor sets from a single PC via the RS232C command line. If you 
set your monitor address to ‘000’, it will never respond to any 
addressing command from the PC.
If the address from the PC is ‘FFF’, all monitor sets will execute the 
command.
The Address format command is defined by one command, one line 
which starts with ‘A’ and ends with carriage return.(0 x0D)
The Monitor starts to decode when it receives a carriage return 
(0x0D)
An address is added at the top of a control command 

Example:

Functional execution command: 
“A001C05” [CR] means address is  001 and the control command is 
C05
Status read command
“A001CR0”[CR] means address is 001 and command is CR0

The monitor can set its own address in the hotel option menu 
(above) The address range is 000 - 999, the default address will be 
000
The baud rate  indicates the unit for transfer speed of data 
from the PC to the monitor sets

rD

PC menu settings

Main Menu

Picture

Setting

: Select

: Adjust

MENU

: Exit

Picture

: Select

: Adjust

MENU

: Back

Brightness
C

o

ntrast

Position
Video Adjust
Auto Adjust
Resolution
White Tone R
White Tone G
White Tone B

1024 X  768        @60Hz

Native Resolution

XGA / WXGA 1366 x 768

Setting

: Select

: Adjust

MENU

: Back

CHILD  LOCK                                                  OFF / ON

Timer
AV2                                                                    

Power save                                      OFF/ON

 OSD Language 


              English

RGB, HV/ Y,Pb,Pr

PC OPERA

PC OPERA

TION

TION

GB

GB

RS232C settings

ITEM

SPECIFICATION

Synchronous system

Asynchronous

Transmission Speed

9600 / 19200

Data Length

8 bit

Parity

None

Stop Bit

Flow Control

None

1

1
2
3
4
5
6
7
8
9

1
2
3
4
5
6
7
8
9

PC
COM 1

TV CONTROL
PORT

(D-Sub   9 Pin)  

(D-Sub  9 Pin)

CD

RXD

TXD

DTR

SG

DSR

RTS

CTS

RING

N.C.

RXD

TXD

N.C

SG

N.C

RTS

CTS

N.C.

MENU

Hotel mode   

                 ON / OFF

On program                 OFF/ 1~99
Preset                          ON / OFF
Address  


007

Baud 

Rate 

  19200

/ AV1-AV3 /RGB/ HDMI/ PC 

Hotel 

: Select

: Adjust

: Exit

Содержание CE42LM4R -E

Страница 1: ... votre moniteur d affichage à cristaux liquides Nous espérons que votre nouveau dispositif d affichage vous procurera de nombreux instants de bonheur Lesen Sie diese Anleitung bitte aufmerksam durch bevor Sie Ihren LCD Monitor in Betrieb nehmen Wir wünschen Ihnen viel Freude mit Ihrem neuen Gerät Lees deze handleiding voordat u uw LCD monitor gaat gebruiken We wensen u vele uren van plezier met uw...

Страница 2: ...urface of the cabinet finned area must not be covered or the airflow resricted in anyway by enclosing the LCD monitor Installation CAUTION Please read and retain for your safety This unit has been engineered and manufactured to assure your personal safety but improper use can result in potential electric shock or fire hazards In order not to defeat the safeguards incorporated in this receiver obse...

Страница 3: ...itten consent of SANYO and if consent is provided then the Software shall only be transferred in conjunction with the transfer of the Product AND provided that the transferee has read and agreed to accept the terms and conditions of this license 3 You must ensure that the copyright trademark and other protective notices contained in the Software are maintained and not altered or removed 4 The Soft...

Страница 4: ...n AV2 This LCD monitor has a choice of Y Pb Pr or RGB H V connections You can connect your DVD player to the Y Pb Pr terminals instead of using a scart lead This can support high definition in analogue component form RGB H V can be used as a PC input via the BNC terminal 3 PC connection This LCD monitor has a PC connector You can connect a PC to the LCD monitor and use it as a monitor display see ...

Страница 5: ...levels 3 Preset You can select either your Personal settings or Dynamic Standard or Eco settings 4 Noise Reduction May be used to reduce any local picture noise granular appearance being experienced by Using 7 or 8 to select between Mid Max Auto Min OFF 5 Dynamic skin tone May be used to enhance skin tone by Using 7 or 8 to select between On Off Tint is only available if NTSC equipment is connecte...

Страница 6: ...l preference mode Dynamic Suitable for brightly lit rooms Standard Normal viewing mode Eco Suitable for dimlt lit rooms and gives a cinema like effect Programme up and down To select the next programme number or previous programme number CS button Press button to scan through all available channels and back to the original channel Cursors up down To adjust the menu levels Teletext TV selector To a...

Страница 7: ...lay appears in the corner of the screen If the monitor is switched off by the standby button 4 on the remote control or by the standby switch 4 on the top of the TV set the timer settings will be cancelled 1 Press the MENU button 2 Select Preset using the e or d button Press the 8 button to enter The preset menu can be used to tune new channels to re order channels and their programme positions an...

Страница 8: ...3 25 C66 66 E66 E66 831 25 C67 67 E67 E67 839 25 C68 68 E68 E68 847 25 C69 69 E69 E69 855 25 UHF band OIRT Channels CCIR channels Italian channels Displayed channel no C75 X X 69 25 C76 Y Y R3 76 25 C77 C Z Z R4 83 25 C78 Z 1 Z 1 R5 90 25 C79 Z 2 Z 2 97 25 C80 S1 S1 105 25 C81 S2 S2 112 25 C82 S3 S3 119 25 C83 S4 S4 126 25 C84 S5 S5 133 25 C85 S6 S6 140 25 C86 S7 S7 147 25 C87 S8 S8 154 25 C88 S9 ...

Страница 9: ...ue is 19200 2 Transmission speed can be changed by service mode Hotel mode Connection The Designated RS 232C serial cable that is provided with the LCD monitor must be used for a connection to a computer and LCD monitor The TV command is defined by one command one line that starts with C and ends with carriage return 0x0D There are two types of commands Functional Execution Command e g Co5 CR tabl...

Страница 10: ...hut off This monitor will automatically switch into the standby mode 10 minutes after a signal is no longer received The time until the set will switch off is displayed on the screen Sound system selection and Programme information Press the button to display the programme information such as current programme number station name stereo status sound system and remains time if set the timer for abo...

Страница 11: ...ture height is compressed slightly 4 3 14 9 16 9 Letterbox Video As zoom 14 9 but bottom is compressed even more to allow subtitles to be seen As zoom 14 9 but bottom is compressed even more to allow subtitles to be seen As zoom 14 9 but bottom is compressed even more to allow subtitles to be seen As zoom 14 9 but bottom is compressed even more to allow subtitles to be seen TITLES ON SCREEN TITLES...

Страница 12: ...ial connections on back of set Check aerial for broken wires Re orient aerial The following faults are not caused by the receiver GHOSTS Reflections of signals from mountains or high buildings will cause multiple images called Ghosts These abnormal conditions can be reduced to minimum by repositioning aerial or by installing new one suited for your area INTERFERENCE Interference may be caused by e...

Страница 13: ... Dot Clock Frequency Mhz Remark 720x480 15 735 60i 12 27 SDTV 4 80i 720x576 15 625 50i 13 50 SDTV 5 76i 720x480 31 25 60p 27 SDTV 4 80p 720x576 31 25 50p 27 HDTV 5 76p 1280x720 45 00 60p 74 25 HDTV 7 20p 1280x720 37 50 50p 74 25 HDTV 7 20p 1920x1080 33 75 60i 74 25 HDTV 1 080i 1920x1080 28 13 50i 74 25 HDTV 1 080i 1920x1080 31 25 50i 74 25 HDTV 1 152i Resolution Horizontal Frequency kHz Vertical F...

Страница 14: ...t Clock Frequency Mhz Remark 720x480 15 735 60i 12 27 SDTV 4 80i 720x576 15 625 50i 13 50 SDTV 5 76i 720x480 31 25 60p 27 SDTV 4 80p 720x576 31 25 50p 27 HDTV 5 76p 1280x720 45 00 60p 74 25 HDTV 7 20p 1280x720 37 50 50p 74 25 HDTV 7 20p 1920x1080 33 75 60i 74 25 HDTV 1 080i 1920x1080 28 13 50i 74 25 HDTV 1 080i 1920x1080 31 25 50i 74 25 HDTV 1 152i Resolution Horizontal Frequency kHz Vertical Freq...

Страница 15: ...75 RS 232C COMMAND TABLES ...

Страница 16: ...76 Part No 1KA6P1P0330 B N4JJ Printed in U K N4JJ 1 ...

Отзывы: