background image

6

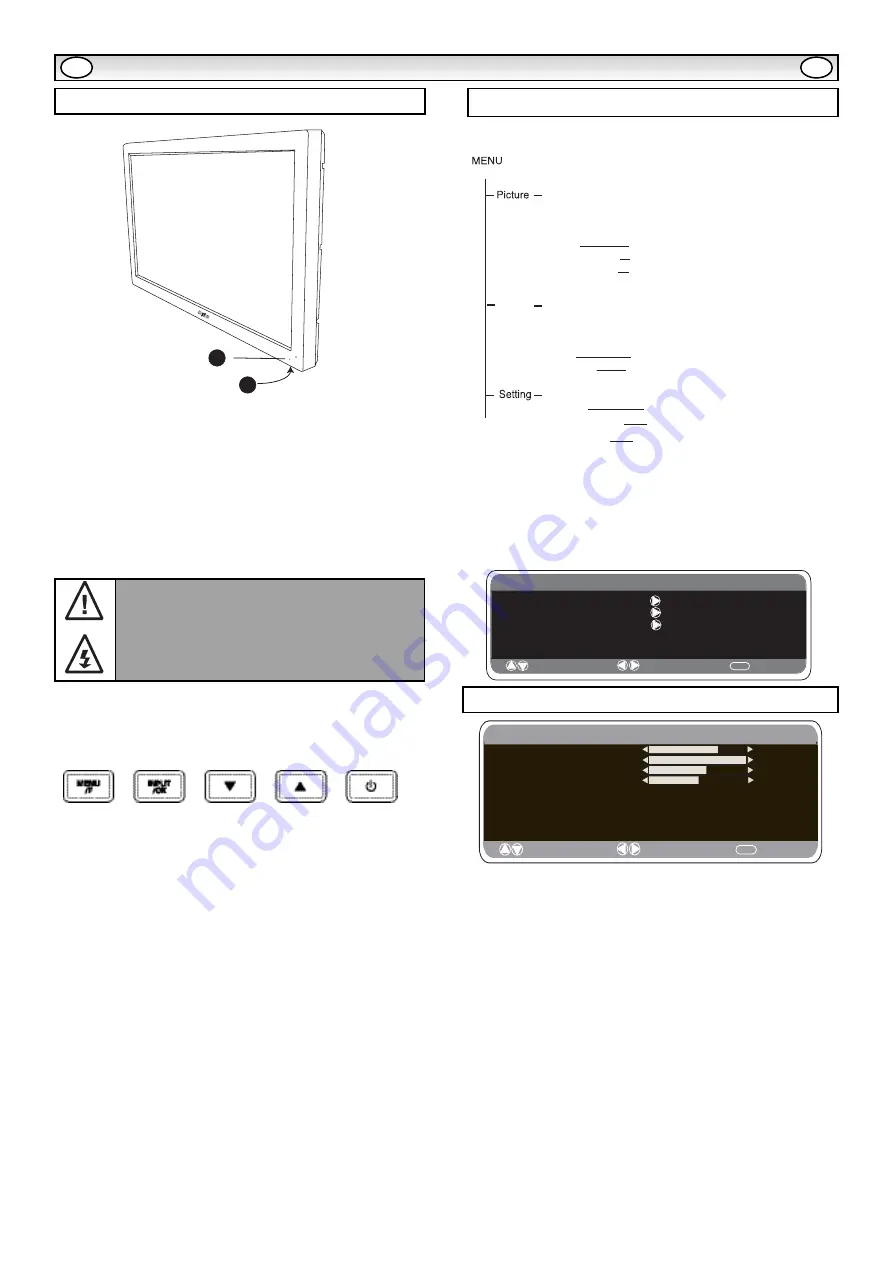
1. The LCD display has a Standby light to show there is power.

Switching into/from standby mode

The Standby mode is used for switching the LCD monitor off for
short periods of time. In standby mode the monitor is switched
off but is still receiving mains power.

To turn the monitor into standby mode, press the 

4

button.

The blue power indicator illuminates more brightly.

To turn the monitor ON from standby mode, press any of the
following buttons:

4

5

6

or 0-9 buttons.

2.

Control buttons (bottom edge of cabinet)

Menu/F button: 

rotate  between volume, Brightness, contrast,

colour, sharpness and OSD language. 

Input/ OK button: s

witch between TV, AV1, RGB, AV2, AV3, DVI

and PC mode.

e d 

buttons: 

provide up and down adjustments

button: 

To switch from display to standby mode (to switch off

completely disconnect the monitor from the power supply)

Many of your monitors functions are controlled through the menu
function, using the remote control handset.

During menu operation the bottom of the on screen display will show
which   controls can be used for menu navigation. 
Press the MENU button to enter the main menu.

A sub menu is selected using the 

e

or

d

button and pressing the

1

button when the required sub menu is highlighted. 

When you have finished you can press the MENU button to exit,
then the MENU button again to exit the main menu. 

1. Press the MENU button. Select Picture using the 

e

or 

d

button.

Press the

1

button to enter.

Set the picture settings for your “personal” preference. 

2. Use the 

e

or

d

button to select eg. Brightness and the

1

2

button to adjust levels.

3. Preset : You can select either your “Personal” settings, or

Dynamic, Standard or Eco settings.

4. Noise Reduction: May be used to reduce any local picture ‘noise’
(granular appearance) being experienced by using 

1 2

to

select between Mid / Max / Auto / OFF /Min.

5. Dynamic skin tone: May be used to enhance skin tone by using

1 2

to select between On / Off.

Tint : is only available if NTSC equipment is connected.

6. Text Brightness: May be adjusted by using  

1 2

button to

select between Min / Mid / Max.
Press the MENU button to return to Main Menu. These settings 
automatically store when you exit the menu.
Press the MENU button to exit menu.

✐ 

Your personal settings are automatically saved when you exit the
menu. 

Controls and Menus

INST

INST

ALLA

ALLA

TION

TION

1

2

GB

GB

Picture menu

Brightness
Contrast
Color
Sharpness
Preset                    Personal / Dynamic / Standard / Eco
Noise Reduction    Min/ Mid / Max / Auto / OFF 
Dyn. Skin 
Text Brightness      Min/ Mid / Max 

Tone      ON / OFF


OSD Language
 Timer 
 Text Language            Greek/ West / East/ Cyrillic

  Off Timer     OFF/ 5-120 mins

Volume
Balance
Bass
Treble
Preset                    Personal /Talk/ Music/ Normal
Surround                Mid / Max  / OFF 


Sound

AV2 setting            RGB, H/V / Y Pb Pr

Picture

: Select

: Adjust

MENU

: Back

Brightness
Contrast
Color
Sharpness
Preset                                                                 Personal / Dynamic / Standard / ECO
Noise   Reduction                                           Mid / Max /  Auto / 

  / OFF

Dyn.     skin   tone                                           ON / OFF

Text Brightness                                                Min / Mid / Max

 Min

DCR                                                                     ON / OFF

Main Menu

Picture

: Select

: Adjust

MENU

: Exit

Setting

Sound

Menu Operation

If you find the power indicator flashing, disconnect
power cord from the power outlet and contact our
Service desk. 

This warning is a sign to let you know that the power 
protection function of this TV set is now operating.

Содержание CE42LE1

Страница 1: ...otre moniteur d affichage à cristaux liquides Nous espérons que votre nouveau dispositif d affichage vous procurera de nombreux instants de bonheur Lesen Sie diese Anleitung bitte aufmerksam durch bevor Sie Ihren LCD Monitor in Betrieb nehmen Wir wünschen Ihnen viel Freude mit Ihrem neuen Gerät Lees deze handleiding voordat u uw LCD monitor gaat gebruiken We wensen u vele uren van plezier met uw n...

Страница 2: ...s Installation CAUTION Please read and retain for your safety This unit has been engineered and manufactured to assure your personal safety but improper use can result in potential electric shock or fire hazards In order not to defeat the safeguards incorporated in this monitor observe the following basic rules for its installation use and servicing Use Important recycling information Your SANYO p...

Страница 3: ...sent of SANYO and if consent is provided then the Software shall only be transferred in conjunction with the transfer of the Product AND provided that the transferee has read and agreed to accept the terms and conditions of this license 3 You must ensure that the copyright trademark and other protective notices contained in the Software are maintained and not altered or removed 4 The Software prov...

Страница 4: ...ect monitors with the use of a loop through function 5 RS232C IN OUT Is a input for external commands to control the monitor see page 8 6 DVI D Digital Video Interface This monitor has an DVI connector This is located at the back of the monitor next to the phono sockets This input will support a large range of resolutions as shown on page 11 See page 6 for details of menu operation 7 PC connection...

Страница 5: ...es a cinema like effect Up and down To select the next item Standby To switch the monitor on and off Also see page 6 Recall To display the program information You can also select colour systems in AV mode as follows AUTO PAL SECAM NTSC3 58 JXPLA keys Level up down To adjust the sound volume level or enter sub menus Sound mute To mute the sound from the speakers The sound changes as follows Normal ...

Страница 6: ...r d button to select eg Brightness and the 1 2 button to adjust levels 3 Preset You can select either your Personal settings or Dynamic Standard or Eco settings 4 Noise Reduction May be used to reduce any local picture noise granular appearance being experienced by using 1 2 to select between Mid Max Auto OFF Min 5 Dynamic skin tone May be used to enhance skin tone by using 1 2 to select between O...

Страница 7: ...the1 or 2 buttons on the remote control Video adjust changes the Phase and the clock of the screen If the picture is blurred or grainy this function will adjust it to a clearer picture adjustment is carried out using the 1 or 2 buttons on the remote control Auto Adjust will automatically adjust the picture by using the 1 button This will change all the above settings automatically Auto adjust can ...

Страница 8: ...button select the start up position using the 1 or 2 buttons Off AV1 RGB AV2 AV3 DVI PC Press the MENU button to exit the menu Max Volume Select Max volume using the 6 button use the 1 or 2 buttons to set the maximum volume required OSD On screen display Select OSD using the 6 button select ON OFF using the 1 or 2 buttons Selecting OFF will inhibit the OSD To re instate OSD press and hold the gree...

Страница 9: ...right picture height is stretched Black bars left right top and bottom 4 3 16 9 Letterbox Video The whole screen is filled stretching the width The whole screen is filled with the corrrect picture ratio The black bars top and bottom are present and the height is compressed 4 3 16 9 Letterbox Video As Zoom 16 9 but bottom is compressed even more to allow subtitles to be seen As Zoom 16 9 but bottom...

Страница 10: ...x 340 with stand Weight kg 22 5 without stand 23 5 With stand NO PICTURE NO SOUND Check if monitor is plugged in Check monitor is not in standby mode POOR PICTURE SOUND OK Adjust BRIGHTNESS CONTRAST LEVELS too low NO COLOUR PICTURE OK Adjust COLOUR control Check lead connections Does the signal input have colour REMOTE CONTROL DOES NOT WORK Check batteries are inserted correctly Check condition of...

Страница 11: ...6 75 025 SXGA VESA 75Hz 1280 _10 24 62 50 58 60 SXGA 1280 _10 24 63 370 60 01 SXGA 1280 _10 24 63 34 59 98 SXGA 1280 _10 24 63 74 60 01 SXGA 1280 _10 24 63 79 60 18 SXGA 1280 _10 24 63 90 60 00 SXGA 1280 _10 24 71 69 67 19 SXGA 1280 _10 24 76 97 72 00 SXGA 1280 _10 24 81 13 76 107 SXGA 1152 _86 4 64 20 70 40 SXGA 1152 _90 0 61 20 65 20 SXGA 1152 _90 0 61 85 66 00 SXGA 1152 _90 0 71 40 75 60 SXGA 1...

Страница 12: ...é lisez attentivement ce qui suit Ce moniteur a été conçu et fabriqué pour garantir votre sécurité personnelle mais peut poser un risque de choc électrique ou d incendie en cas d utilisation incorrecte Afin de faciliter le bon fonctionnement des dispositifs de sécurité intégrés veuillez observer les règles de base suivantes relatives à l installation l utilisation et l entretien de votre moniteur ...

Страница 13: ...tribue à prévenir les risques d in cendie de choc électrique etc Débranchez le moniteur LCD de sa prise murale et faites appel à du personnel qualifié dans les cas suivants Le câble d alimentation ou la prise sont endommagés Du liquide a été renversé sur le moniteur LCD Le moniteur LCD a été exposé à la pluie ou à l eau Le moniteur LCD est tombé ou le boîtier est endommagé Dégradation des performa...

Страница 14: ...lutions page 62 4 AV3 Entrée de signal composite CVBS AV3 OUT assure la sortie des signaux vidéo composites depuis VIDEO IN et permet de brancher vos moniteurs via une fonction en boucle 5 RS232C IN OUT entrée pour les commandes externes du moniteur voir page 18 6 DVI D Interface de vidéo numérique Ce moniteur est équipé d une connexion DVI Cette connexion est située à l arrière du moniteur à côté...

Страница 15: ...vants Personnel le mode que vous préférez Normal mode normal Eco convient aux pièces peu éclairées et donne un effet cinéma Dynamique convient aux pièces à l éclairage lumineux Réglage du volume Permet de régler le volume Fonctionne également comme curseur de déplacement latéral Sélecteur de mode d écran Appuyez pour sélectionner les modes d écran suivants Naturel Plein Zoom Sous titres ou Normal ...

Страница 16: ...ité puis utilisez les touches 1 ou 2pour ajuster au niveau souhaité 3 Présélection Permet de sélectionner vos réglages personnels ou les réglages Dynamique Standard ou Eco 4 Réduction du bruit Atténue les bruits locaux de l image neige Utilisez la touche1 ou 2pour sélectionner Mid Max Auto ARRET Min 5 Ton chair Dynamique Améliore le rendu des tons chair utilisez la touche1 ou 2 pour activer désact...

Страница 17: ... réglage La fonction Ajustement vidéo permet de changer la Phase et l horloge de l écran Si l image apparaît floue ou grenue cette fonction permet d obtenir une image plus claire Utilisez les touches 1 ou2 de la télécommande pour effectuer le réglage La fonction Ajustement automatique permet de régler automatiquement l image via la touche 1 Cette fonction modifie automatiquement tous les réglages ...

Страница 18: ...OFF AV1 RGB AV2 AV 3 DVI PC Appuyez sur le touche MENU pour quitter le menu Volume maxi Sélectionnez Volume maxi à l aide de la touche 6 utilisez les touches1 ou 2 pour régler le volume maximum OSD affichage sur écran Sélectionnez OSD via la touche 6 et désactivez activez cette fonction à l aide des touches 1 ou 2 Sélectionnez OFF pour désactiver OSD Pour réactiver OSD appuyez de manière continue ...

Страница 19: ...résence de bandes noires à gauche à droite en haut et en bas Vidéo boîte aux lettres 4 3 16 9 L image remplit tout l écran la largeur est allongée L image remplit tout l écran avec le rapport d image correct Les bandes noires supérieure et inférieure sont conservées et la hauteur est comprimée Vidéo boîte aux lettres 4 3 16 9 Comme pour le zoom 16 9 mais le bas est encore plus comprimé pour permet...

Страница 20: ... DE SON Vérifiez que le moniteur est branché Vérifiez que le moniteur n est pas en mode de veille IMAGE DE MAUVAISE QUALITE SON CORRECT Réglez les niveaux de LUMINOSITE CONTRASTE PAS DE COULEURS IMAGE CORRECTE Ajustez la commande de COULEUR Vérifiez les branchements du cordon d alimentation Vérifiez si l entrée du signal est en couleur LA TELECOMMANDE NE FONCTIONNE PAS Vérifiez que les piles sont ...

Страница 21: ... de certaines parties de matériels four nis sous license à SANYO pour un tiers fournisseur 5 Sauf autorisation légale expresse vous n êtes pas autorisé à l utiliser le Logiciel avec tout autre matériel informa tique que le produit l copier tout ou partie du Logiciel l intégrer tout ou partie du Logiciel dans d autres programmes développés par ou pour le compte de et ou utilisés par votre personne ...

Страница 22: ...ewahren Dieses Gerät wurde so konstruiert und hergestellt daß Ihre persönliche Sicherheit gewährleistet ist Unsachgemäßer Gebrauch kann jedoch zu elektrischem Schlag oder zu Feuergefahr führen Beachten Sie die folgenden Grundregeln für den Anschluß den Gebrauch und die Wartung um die in diesen Monitor eingebauten Schutzvorrichtungen nicht außer Kraft zu set zen SICHERHEITSMASSNAHMEN SICHERHEITSMAS...

Страница 23: ...olgenden Fällen den Stecker aus der Steckdose und übergeben Sie den LCD Monitor qualifizierten Fachkräften zur Wartung wenn das Anschlußkabel oder der Stecker beschädigt ist wenn eine Flüssigkeit in den LCD Monitor gelangt ist wenn der LCD Monitor Regen oder Wasser ausgesetzt war wenn der LCD Monitor heruntergefallen oder das Gehäuse beschädigt ist wenn sich die Leistung des LCD Monitor erheblich ...

Страница 24: ...gnal von VIDEO IN sodass Monitore mittels Durchschleifung angeschlossen werden kön nen 5 RS232C IN OUT Eingang für externe Befehle zum Steuern des Monitors siehe Seite 28 6 DVI D Digital videoschnittstelle Dieses LCD Monitor verfügt über einen DVI Eingang Bei Verbindung mit der DVI Quelle ist die Bildauflösung wesentlich höher Der Eingang befindet sich auf der Rückseite des Fernsehgeräts 7 Anschlu...

Страница 25: ...ab Zum Einstellen der Lautstärkestufe Auswahl des Bildmodus Drücken Sie die Taste wiederholt um die folgenden Bildmodi einzustellen Persönlich Persönlicher bevorzugter Modus Standard Normale BIldeinstellung Dynamisch Geeignet für hell erleuchtete Zimmer Öko Geeignet für schwach beleuchtete Räume bewirkt kinoähnlichen Effekt Surround Modus Auswahltaste Zum Ein Ausschalten des Surround Modus AUS MID...

Страница 26: ...dschärfe einstellen Nehmen Sie anhand der Tasten 1 oder 2 die gewünschten Einstellungen vor 3 Preset Anhand der Tasten1 oder 2 können Sie entweder Ihre persönlichen Einstellungen vornehmen oder Dynamisch Standard oder Eco auswählen für Helligkeit Kontrast Farbe und Bildschärfe 4 Rauschunterdrückung Zur Reduzierung des Bildrauschens Körnung Anhand der Tasten 1 oder 2 lässt sich die Rauschunterdrück...

Страница 27: ...keit und den Kontrast einzustellen Bildposition verändert die horizontale oder vertikale Ausrichtung des Bildes rufen Sie die Untermenüs mit der Taste1 auf und nutzen Sie für Veränderungen die Taste 1 oder 2 auf der Fernbedienung Videoanpassung verändert die Phase und die Uhr auf dem Bildschirm Ist das Bild verschwommen oder körnig so können Sie es mit dieser Funktion schärfer stellen Nutzen Sie f...

Страница 28: ... Startprogramms einschalten und über die Taste 1 oder 2 das gewünschte Programm auswählen OFF AV1 RGB AV2 AV3 DVI PC Zum Verlassen des Menüs betätigen Sie die Menü Taste Max Lautstärke Mit der 6 Taste Max Lautstärke auswählen und mit den Tasten 1 oder 2 die maximale Lautstärke einstellen OSD Wählen Sie mithilfe der Taste 6 die Funktion OSD und anschließend EIN AUS über die Tasten 1 oder 2 Bei AUS ...

Страница 29: ...t gestreckt Schwarze Balken links rechts oben und unten 4 3 16 9 Letterbox Video Der gesamte Bildschirm ist gefüllt das Bild ist in die Breite gezogen Der gesamte Bildschirm ist gefüllt das Bildformat ist korrekt Die schwarzen Balken oben und unten sind vorhanden und die Bildhöhe ist komprimiert 4 3 16 9 Letterbox Video Wie bei Zoom 16 9 der untere Bildrand ist aber noch stärker komprimiert damit ...

Страница 30: ... ob der monitor an den Strom angeschlossen ist Überprüffen Sie ob der Monitor sich im Standby Modus befindet SCHLECHTES BILD TON IN ORDNUNG Stellen Siedie HELLIGKEIT den KONTRAST neu ein zu niedrig KEINE FARBE BILD IN ORDNUNG Stellen Sie den FARBREGLER neu ein Überprüfen Sie die Kabelanschlüsse Überprüfen Sie ob der Signaleingang Farbe hat FERNBEDIENUNG FUNKTIONIERT NICHT Überprüfen Sie ob die Bat...

Страница 31: ...n die SANYO in Lizenz von einem Drittunternehmen erhalten hat 5 Ausgenommen im gesetzlich zulässigen Rahmen dürfen Sie die Software nicht l mit anderer Computer Hardware als dem Produkt verwenden l ganz oder teilweise kopieren l in ihrer Gesamtheit oder teilweise in Programme einbauen die von Ihnen oder in Ihrem Auftrag entwickelt wurden bzw von Ihnen genutzt werden l zurückbauen dekompilieren ode...

Страница 32: ...zen en bewaren Dit toestel is ontworpen en gemaakt met het oog op uw persoonlijke veiligheid Verkeerd gebruik kan echter een elektrische schok veroorzaken of brandgevaar opleveren Om te voorkomen dat de beveiligingen die in dit toestel zijn ingebouwd buiten werking worden gezet dient u de volgende basisregels voor installatie gebruik en onderhoud in acht te nemen VEILIGHEIDSMAA VEILIGHEIDSMAATREGE...

Страница 33: ... de wandcontactdoos en laat in de onderstaande gevallen eventuele reparaties uilcd moni toroeren door vakbekwame servicemonteurs Als netsnoer of stekker beschadigd zijn Als er vloeistof in de LCD Monitor is gelopen Als de LCD Monitor blootgesteld is aan regen of water Als de LCD Monitor is gevallen of de kast is beschadigd Als de LCD Monitor opeens duidelijk anders werkt dan normaal Als de LCD Mon...

Страница 34: ...aal van VIDEO IN zodat u monitoren kunt aansluiten met behulp van de lus functie 5 RS232C IN UIT Is een ingang voor externe opdrachten voor bediening van de monitor zie pagina 8 6 DVI D Digital Video Interface Deze monitor heeft een DVI aansluiting Deze bevindt zich aan de achterkant van de monitor naast de fono ingangen Deze invoer ondersteunt vele verschillende resoluties zoals weergegeven op pa...

Страница 35: ... Drücken Sie die Taste wiederholt um die folgenden Bildmodi einzustellen Persönlich Persönlicher bevorzugter Modus Standard Normale BIldeinstellung Dynamisch Geeignet für hell erleuchtete Zimmer Öko Geeignet für schwach beleuchtete Räume bewirkt kinoähnlichen Effekt Surround Modus Auswahltaste Zum Ein Ausschalten des Surround Modus AUS MID MAX Menü zum Öffnen und Schließen von Untermenüs TV AV Tas...

Страница 36: ...ets 1 of 2 3 Voorinstelling Met de toets 1 of 2 kunt u uw Persoonlijke instellingen selecteren maar ook de instellingen Dynamisch Standaard of Eco voor helderheid contrast kleur en scherpte 4 Ruisdemping Hiermee kunt u eventueel aanwezige beeldruis kor relig beeld verminderen Selecteer Midden Hoog Auto Laag of UIT met de toets 1 of 2 5 Huidskleur Hiermee kunt u de weergave van de huidskleur ver be...

Страница 37: ...Pas met de toetsen 1 en2 de helderheid en het contrast van het beeld aan Met Beeldpositie stelt u de weergave in op horizontal of verticaal Druk op de toets 1 om de submenu s te openen aanpassen doet u met de toetsen 1 en2 van de afstandsbediening Met Video aanpassen kunt u de fase en de klok op het scherm aan passen Wanneer het beeld onscherp of korrelig is kunt u met deze functie het beeld helde...

Страница 38: ... AAN met de toets 5 selecteer de gewenste programmapositie met behulp van de toetsen 1 of 2 OFF AV1 RGB AV2 AV3 DVI PC Druk op de toets Menu om het menu te verlaten Max volume Max volume selecteren met de 6 toets de 1 of 2 toetsen gebruiken om het maximum volume in te stellen OSD Selecteer OSD gebruikend 6 dichtknopen selecteren BIJ VAN het gebruiken van de 1 of 2 knopen Wanneer u UIT selecteert w...

Страница 39: ...t Zwarte balken links rechts boven en onderaan 4 3 16 9 Letterbox Video Het volledige scherm wordt gevuld Het beeld wordt in de breedte uitgerekt Het volledige scherm wordt gevuld met de juiste beeldratio Er zijn zwarte balken aanwezig boven en onderaan en het beeld wordt in de hoogte samengedrukt 4 3 16 9 Letterbox Video Zoals Zoom 16 9 maar de onderkant wordt nog meer samengedrukt om ervoor te z...

Страница 40: ... BEELD GEEN GELUID Controleer of de stekker in het stopcontact is gestoken Conroleer of de monitor niet op standby staat SLECHT BEELD MAAR GOED GELUID HELDERHEID CONTRAST afstellen te laag GEEN KLEUR MAAR GOED BEELD De KLEUR afstellen FIJN AFSTEMMING afstellen Wordt het programma in kleur uitgezonden DE AFSTANDSBEDIENING WERKT NIET Controleer of de batterijen juist zijn geplaatst Controleer of de ...

Страница 41: ...nd 5 Tenzij dit expliciet is toegestaan krachtens de wet mag u niet de Software gebruiken in combinatie met andere computerhardware dan die van het product de Software geheel of gedeeltelijk kopiëren de Software geheel of gedeeltelijk opnemen in andere programma s die door u of namens u zijn ontwikkeld en of door u worden gebruikt de Software nabouwen decompileren of demon teren de Software of een...

Страница 42: ...lusso di aria chiu dendo il monitor LCD in uno spazio ristretto Installazione Utilizzo ATTENZIONE Leggere e conservare per motivi di sicurezza Questo apparecchio è stato progettato e fabbricato per garantire la sicurezza dell utilizzatore ma un uso inappropriato può causare scariche elettriche o rischio d incendio Al fine di non invalidare i circuiti di sicurezza incorporati nel monitor osservare ...

Страница 43: ...o di parti originali con caratteristiche prescritte dal costruttore nel caso sia necessario la sostituzione Scollegare il ricevitore dalla presa a muro e richiedere l intervento di personale qualificato quando si verificano le seguenti condizioni Il cavo o la presa di alimentazione sono danneggiati È stato versato del liquido nel ricevitore del monitor LCD Il monitor LCD è stato bagnato da pioggia...

Страница 44: ...mandi esterni che controllano il monitor vedere pagina 48 6 DVI D Video interfaccia di Digitahi Questo Monitor LCD dispone di un connettore DVI Questo è posizionato sul retro del monitor accanto alle prese foniche Questo input supporta un ampia gamma di risoluzioni come mostrato a pag 11 Per informazioni dettagliate sulle funzioni del menu vedere pag 6 7 Connessione del PC L unità di visualizzazio...

Страница 45: ... È possibile inoltre selezionare i sistemi a colori in modalità AV come indicato di seguito AUTO PAL SECAM NTSC3 58 Sostituzione programmi Per invertire la posizione del programma attuale con quello precedentemente visualizzato JXPLA Standby Accensione Spegnimento Per accendere e spegnere il monitor Livello Successivo Precedente Per regolare il livello del volume Funziona anche come cursore di spo...

Страница 46: ...l pulsante 1 o 2 3 Preselezione mediante il pulsante 1 o 2 è possibile selezionare sia le impostazioni Personali che quelle Dinamiche Standard o Eco per Luminosità Contrasto Colore e Nitidezza 4 Riduzione rumore è possibile ridurre eventuali rumori granulosità locali dell immagine utilizzando il pulsante1 o 2 per selezionare Medio Alto Autom Basso OFF 5 Tonalità pelle dinamica consente di aumentar...

Страница 47: ...la fino ad ottenere un immagine più nitida Con la funzione Regolazione Auto è possibile regolare automatica mente l immagine utilizzando il pulsante 1 In questo modo tutte le impostazioni precedenti verranno cambiate automaticamente La regolazione auto può essere ottenuta anche premendo il pulsante di richiamo sul telecomando senza dover selezionare il menu non incluso nel modo di DVI Risoluzione ...

Страница 48: ...tare la posizione iniziale mediante il pulsante 1 o 2 OFF AV1 AV3 RGB DVI PC Premere il pulsante Menu per uscire dal menu volume Massimo Selezionare Max volume Volume max utilizzando il pulsante 6 Utilizzare il tasto 1 o 2 per impostare il volume massimo OSD Selezionare OSD utilizzando il pulsante 6 please replace with appropriate symbol selezionare ON OFF utilizzando i pulsanti 1 o 2 OFF bloccher...

Страница 49: ...ideo Letterbox 4 3 16 9 L intero schermo viene riempito estendendo l immagine in larghezza L intero schermo viene riempito mantenendo una corretta proporzione dell immagine Le bande nere nelle parti superiore e inferiore sono presenti e l altezza viene leggermente compressa Formato video Letterbox 4 3 16 9 La larghezza corretta dell immagine viene conservata ma le parti superiore e inferiore vengo...

Страница 50: ...crizioni dell articolo 1 del D M 26 marzo 1992 fatto a Suffolk U K il 27 02 96 SANYO Industries U K Limited Oulton Works School Road Lowestoft Suffolk NR33 9NA United Kingdom QUANDO NON E PRESENTE NÉ SUONO NÉ IMMAGINE Controllare se il monitor è alimentato Verificare che il monitor non sia in stand by IMMAGINE SCARSA CON AUDIO OK Regolare la luminosità LUMINOSITÀ CONTRASTO livello troppo basso MAN...

Страница 51: ...messo espressamente dalla legge l utente non può l utilizzare il Software congiuntamente ad altro hard ware a parte il prodotto l copiare il Software interamente o in parte l incorporare tutto o parte del Software in altri pro grammi sviluppati da o a nome di l utente e o utilizzati dal l utente l retroingegnerizzare decompilare o disassemblare il Software l rendere il Software o qualsiasi parte d...

Страница 52: ...dad Este aparatose ha diseñado y fabricado para asegurar su seguridad personal pero la utilización indebida puede dar como resultado descargas eléctricas o riesgos de incendio Para evitar situaciones peligrosas que no puedan evitar las medidas de seguridad de este monitor cumpla las siguientes normas básicas para su instalación utilización y mantenimiento PRECAUCIONES DE SEGURIDAD PRECAUCIONES DE ...

Страница 53: ... otros peligros Desenchufe el monitor de LCD de la toma de corriente y encargue el mantenimiento al personal de mantenimiento cualificado en los casos siguientes En caso de que esté dañado el cable o enchufe eléctricos Si se ha derramado líquido dentro del monitor Si el monitor ha estado expuesto a lluvia o humedad Si se ha caído el monitor o se ha dañado Si el monitor muestra cambio evidente de r...

Страница 54: ...C Es una entrada para comandos externos de control del monitor consulte la página 58 6 DVI D Interfaz de Vídeo Digital Este monitor dispone de un conector DVI Este conector se encuen tra en la parte posterior del monitor junto a las conexiones de audio Esta entrada permite una amplia gama de resoluciones tal y como se muestra en la página 62 Consulte en la página 55 la información sobre el funcion...

Страница 55: ...ctor de modo envodlvente Para seleccionar entre desactivado medio y máximo Standby Modo de espera Para encender y apagar el monitor Ver también la página 56 Rellamada Para mostrar la información del programa También puede seleccionar los sistemas de color en el modo AV del siguiente modo AUTO PAL SECAM NTSC3 58 Arriba y abajo Para seleccionar el siguiente elemento Modo silencio Para silenciar los ...

Страница 56: ...les según sea necesario 3 Sintonía Utilice el botón1 o 2 para seleccionar la config uración Personal o las opciones de configuración Dinámica Estándar o Eco para Brillo Contraste Color y Realce 4 Filtro de ruido Esta opción sirve para reducir el ruido de ima gen local aparición de ruido granular que pudiese haber Utilice 1 o 2para seleccionar Med Alto Auto Bajo NO 5 Tono de piel dinámico Esta opci...

Страница 57: ...ara acceder a los submenús La posi ción se ajusta utilizando los botones 1 o 2 del mando a dis tancia Con Ajuste de imagen se cambian la fase y el reloj de la pantalla Si la imagen aparece borrosa o con niebla esta función la ajustará para conseguir una imagen más nítida La imagen se ajusta usando los botones 1 o 2 del mando a distancia La función Ajuste Automático ajustará la imagen automáticamen...

Страница 58: ...cionando SÍ o NO Programa Escoja el programa y seleccione SÍ con el botón 6 A contin uación seleccione la posición al inicio sirviéndose de los botones 1 o 2 AV1 AV2 AV3 RGB DVI PC Pulse el botón Menú para salir del menú Volume Maximo Seleccionar el volumen máximo usar el botón 6 utilizar los 1 o 2botones para fijar el volumen máximo OSD Seleccione OSD con el botón 6 seleccione SI o NO con los bot...

Страница 59: ...perior e inferior Las barras negras de la parte superior e inferior son más pequeñas y la altura de imagen está levemente comprimida Zoom 4 3 16 9 Letterbox Video Como en Zoom 16 9 pero la parte inferior está aun más comprimida para que puedan verse los subtítulos TITLES ON SCREEN TITLES ON SCREEN TITLES ON SCREEN Como en Zoom 16 9 pero la parte inferior está aun más comprimida para que puedan ver...

Страница 60: ... con soporte NO HAY IMAGEN NI SONIDO Compruebe que el monitor esté enchufado Compruebe que el monitor no esté en modo de espera LA IMAGEN ES MALA PERO EL SONIDO ES BUENO Ajuste los niveles de BRILLO y CONTRASTE estarán muy bajos LA IMAGEN ES BUENA PERO NO ESTÁ EN COLOR Ajuste el COLOR Compruebe las conexiones de los cables La señal de entrada es en color EL MANDO A DISTANCIA NO FUNCIONA Compruebe ...

Страница 61: ...l facilitado a SANYO bajo licen cia de terceros 5 Salvo en los casos expresamente permitidos por la ley no puede a utilizar el software con ningún otro equipo físico que no sea el producto b copiar el software parcial ni totalmente c incluir la totalidad o parte del software en otros programas desarrollados por usted o en su nombre y o uti lizados por usted d investigar secretos de fabricación del...

Страница 62: ...00 60 00 SXGA VESA 60Hz 1280 _10 24 79 976 75 025 SXGA VESA 75Hz 1280 _10 24 62 50 58 60 SXGA 1280 _10 24 63 370 60 01 SXGA 1280 _10 24 63 34 59 98 SXGA 1280 _10 24 63 74 60 01 SXGA 1280 _10 24 63 79 60 18 SXGA 1280 _10 24 63 90 60 00 SXGA 1280 _10 24 71 69 67 19 SXGA 1280 _10 24 76 97 72 00 SXGA 1280 _10 24 81 13 76 107 SXGA 1152 _86 4 64 20 70 40 SXGA 1152 _90 0 61 20 65 20 SXGA 1152 _90 0 61 85...

Страница 63: ...63 RS 232C COMMAND TABLES ...

Страница 64: ...64 Part No 1KA6P1P0418 N6GJ Printed in U K ...

Отзывы: