background image

English

   - 10 -

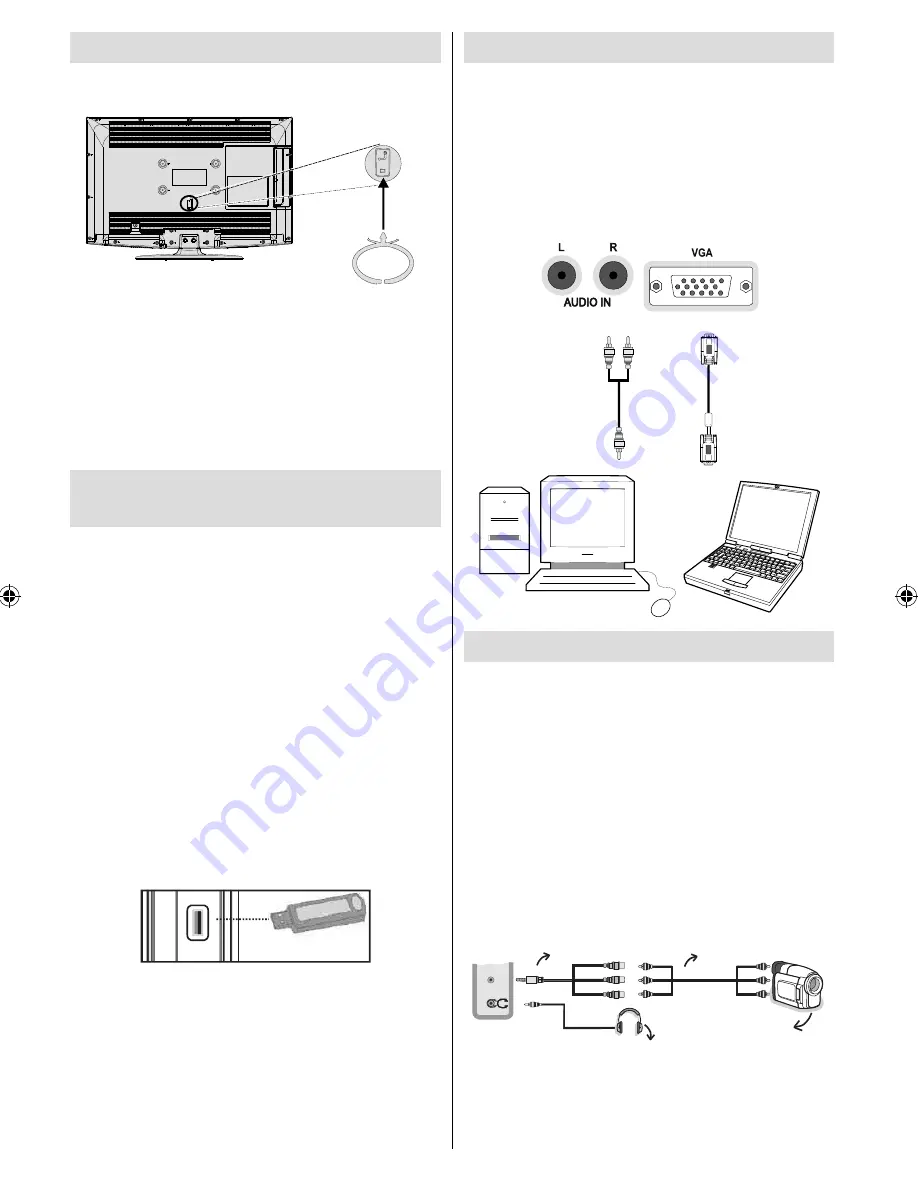
Using the Cable Holder

You can use the supplied cable holder as the 
following:

Place the cable holder into the cable holder hole 

• 

located on the rear side of the TV as illustrated 
above.
Place cables into the cable holder after all necessary 

• 

connections are made.

Using Digital Multimedia 
Connectors

You can connect USB devices to your TV by using 

• 

the USB inputs of the TV. This feature allows you 
to display/play JPG, MP3 and video 

fi

 les stored in 

a USB stick.
It is possible that certain types of USB devices (e.g. 

• 

MP3 Players) may not be compatible with this TV. 
You may back up your 

fi

 les before making any 

• 

connections to the TV set in order to avoid any 
possible data loss. Note that manufacturer will not 
be responsible for any 

fi

 le damage or data loss.

 Do not pull out USB module while playing a 

fi

 le.

• 

CAUTION: Quickly plugging and unplugging USB 
devices, is a very hazardous operation. Especially, 
do not repeatedly quickly plug and unplug the 
drive. This may cause physical damage to the USB 
player and especially the USB device itself.

SIDE VIEW        USB MEMORY

5Vdc

Max:500mA

USB

USB Memory Connection

IMPORTANT: The TV should be switched off while 
plugging or unplugging a  USB device.

 Plug your 

USB devices to the USB input of the TV. You can 
connect a usb device to your TV by using the USB 
input of the TV.

Note: It is possible certain types of hard disk drives 
are not supported.

Connecting the LCD TV to a PC

For displaying your computer’s screen image on your 
LCD TV, you can connect your computer to the TV set. 
Power off both computer and display before making 
any connections. Use 15-pin D-sub display cable to 
connect a PC to the LCD TV. When the connection 
is made, switch to PC source. See “Input selection” 
section. Set the resolution that suits your viewing 
requirements. Resolution information can be found 
in the appendix parts.


PC  audio  cable

(not  supplied)

to  AUDIO  INPUTS 

on  the  TV

PC  RGB  cable
(not  supplied)
to  PC  input

Audio

Inputs

PC  Input

Using Side AV Connectors

You can connect a range of optional equipment to your 
LCD TV using side connectors of the TV.

For connecting a camcorder or camera , you should 

• 

use 

AV

 socket (side). To do this, you must use the 

supplied 

video/audio connection cable

. First, plug 

single jack of the cable to the TV’s

 AV IN

 socket 

(side). Afterwards, insert your camera cable’s (

not 

supplied

) connectors into the plural part of the 

video/

audio connection cable

. Colours of the connected 

jacks should match. See illustration below. 
Afterwards, you should switch to 

• 

Side AV

 source. See 

the section 

Input selection

 in the following sections 

for more information.

Camera

AV Connection

Cable (supplied)

AV Cable

(not supplied)

Headphone

SIDE

 AV

To listen the TV sound from headphones, you 

• 

should connect headphones to your TV by using the 

HEADPHONE 

jack as illustrated above.

A01_MB61_[GB]_3920UK_IDTV_BRONZE16_32917LED_10069609_50173868.indd   10

A01_MB61_[GB]_3920UK_IDTV_BRONZE16_32917LED_10069609_50173868.indd   10

08.11.2010   10:50:11

08.11.2010   10:50:11

Содержание CE32LD17E-B

Страница 1: ...32 CE32LD17E B Please read this Instruction book before using your television We wish you many hours of pleasure from your new television Problems with set up Call 0844 335 2230 INSTRUCTION MANUAL LCD Television ...

Страница 2: ...Channel List 16 Operating the Channel List 16 Moving a Channel 16 Deleting a Channel 16 Renaming a Channel 16 Locking a Channel 17 Managing Stations Favourites 17 Button Functions 17 Managing Stations Sorting Channel List 17 On Screen Information 17 Media Playback Using Media Browser 18 Viewing Videos via USB 18 Viewing Photos via USB 18 Media Browser Settings 19 Changing Image Size Picture Format...

Страница 3: ...or use Thank you for choosing this product This manual will guide you for the proper operation of your TV Before operating the TV please read this manual thoroughly Please do keep this manual in a safe place for future references This device is intended to receive and display TV programs The different connection options make an additional expansion of the reception and display sources possible rec...

Страница 4: ... has used replacement parts which are specified by the manufacturer or have the same specifications as the original one Unauthorized substitutions may result in fire electrical shock or other hazards Servicing Please refer all servicing to qualified personnel Do not remove the cover yourself as this may result in an electric shock Waste Disposal Instructions for waste disposal Packaging and packag...

Страница 5: ...hould be set up in a way that an unobstructed access to mains socket is guaranteed so that in case of emergency the mains plug can be pulled immediately To exclude the danger of fire the power cord should principally be separated from the mains socket prior to a longer period of non usage i e during vacations Electrical device not in the hands of children Never let children use electrical device u...

Страница 6: ... Mode When the TV is not in use please switch off or disconnect the TV from the mains plug This will also reduce energy consumption Disconnect power when going away for longer time Note that annually using the TV set in Power Save Mode has more power efficiency than disconnecting the TV from the mains plug instead of keeping stand by mode Therefore it is highly recommended to activate Power Save M...

Страница 7: ...d over the stand so that it concides with the stand mounting point and 2 then it is left to be mounted with its own weight Detachable Stand Uninstallation Method TV is laid on a flat table so that backcover will be on topside 1 Clamps on the stand are pushed 2 Stand is pulled back 3 Stand is detached 4 ...

Страница 8: ...p 19 Previous programme 20 Yellow button Pause in Media Browser 21 Timeline Schedule in EPG Blue button Edit Channel List Filter İn 22 Favourite List EPG Loop Shuffle in Media Browser Picture mode selecion Changes picture mode 23 in Media Browser video mode Sleep Timer 24 No function 25 Subtitle on off in DVB channels 26 Standby On 27 SCREEN SCREEN LANG LANG SUBTTL SUBTTL PIP PIP 1 2 3 4 6 5 9 7 8...

Страница 9: ...ill automatically switch to AV mode Note To connect external device please use to supplied scart connection cable Component Video Inputs YPbPr 3 are used for connecting component video You can connect the component video and audio sockets with a device that has component output Connect the component video cables between the COMPONENT VIDEO INPUTS on on the TV and the component video outputs of you...

Страница 10: ...n see Conditional Access section Side USBs 2 Headphone jack is used for connecting an external headphone to the system 3 Connect to the HEADPHONE jack to listen to the TV from headphones Side audio video connection 4 input is used for connecting video and audio signals of external devices To make a video connection you must use the supplied AV connection cable for enabling connection First plug si...

Страница 11: ...B input of the TV Note It is possible certain types of hard disk drives are not supported Connecting the LCD TV to a PC For displaying your computer s screen image on your LCD TV you can connect your computer to the TV set Power off both computer and display before making any connections Use 15 pin D sub display cable to connect a PC to the LCD TV When the connection is made switch to PC source Se...

Страница 12: ...f you want to connect a DVD player to your LCD TV you can use connectors of the TV set DVD players may have different connectors Please refer to your DVD player s instruction book for additional information Power off both the TV and the device before making any connections Note Cables shown in the illustration are not supplied If your DVD player has an HDMI socket you can connect via HDMI When you...

Страница 13: ...on is pressed the TV returns to television broadcasting With digital terrestrial broadcasting DVB T in addition to digital teletext broadcasting together with the normal broadcasting there are also channels with just digital teletext broadcasting The aspect ratio picture shape when watching a channel with just digital teletext broadcasting is the same as the aspect ratio of the picture viewed prev...

Страница 14: ...igate through channels Press buttons to navigate through the programme list EPG menu displays available information on all channels Please note that event information is updated automatically If there are no event information data available for channels EPG will be displayed with blanks OK Options Displays programme options including Select Channel option INFO Event Details Displays the programmes...

Страница 15: ...g you to set Country Teletext Language and Scan Encrypted options By pressing or button select the country you want to set and press button to highlight Teletext Language option Use or button to select desired Teletext Language Press button after setting Teletext Language option Scan Encrypted will be then highlighted You can set Scan Encrypted as Yes if you want to scan coded stations Afterwards ...

Страница 16: ...lation process will start and progress bar will move along Press MENU button to cancel process In such a case located channels are not stored Manual Tuning HINT This feature can be used for direct broadcast entry Select Manual Channel Scan from the Installation menu by using and OK buttons Manual Scan options screen will be displayed Select the desired Search Type using or button Manual search opt...

Страница 17: ...t the channel that will be processed Press or button to select a function on Channel List menu Use P P buttons to move page up or down Press BLUE button to view filtering options Press MENU button to exit Moving a Channel First select the desired channel Select Move option in the channel list and press OK button Edit Number screen will be displayed Enter the desired channel number by using the num...

Страница 18: ...unctions OK Add remove a station YELLOW Tag untag a channel GREEN Tag untag all channels BLUE Displays filtering options Managing Stations Sorting Channel List You can select broadcasts to be listed in the channel list To display specific types of broadcast you should use Active channel list setting Select Active channel list from the Channel list menu by using or button Press OK button to continu...

Страница 19: ...s available video files will be filtered and listed on this screen You can use or button to select a video file and press OK button to play a video If you select a subtitle file and press OK button you can select or deselect that subtitle file The following menu will be displayed while playing a video file Play RED button Starts the video playback Stop BLUE button Stops the video playback Pause OK...

Страница 20: ...in to disable both Loop and Shuffle Press once more to enable only Shuffle Press again to enable all You can follow the disabled functions with the change of the icons Media Browser Settings You can set your Media Browser preferences by using the Settings dialog Press or button to highlight an item and use or button to set View Style Sets default browsing mode Slide Show Interval Sets slide show i...

Страница 21: ...atio to the upper and lower limits of the screen 14 9 Zoom This option zooms to the 14 9 picture 4 3 Use to view a normal picture 4 3 aspect ratio as this is its original size Panoramic This stretches the left and right sides of a normal picture 4 3 aspect ratio to fill the screen without making the picture appear unnatural The top and bottom of the picture are slightly cut off Cinema This zooms u...

Страница 22: ...to factory default settings While in VGA PC mode some items in Picture menu will be unavailable Instead VGA mode settings will be added to the Picture Settings while in PC mode PC Picture Settings For adjusting PC picture items do the following Press or buttontoselectPictureicon Picturemenu appears on the screen Contrast Brightness Colour ColourTempandPicture Zoomsettingsinthismenuareidenticaltose...

Страница 23: ...o view Settings menu Operating Settings Menu Items Press or button to highlight a menu item Press OK button to select an item Press MENU button to exit Settings Menu Items Conditional Access Controls conditional access modules when available Language Configures language settings Parental Configures parental settings Timers Sets timers for selected programmes Date Time Sets date and time Sources En...

Страница 24: ...current settings will be used Audio Sets the preferred audio language Subtitle Sets the subtitle language Selected language will be seen in subtitles Teletext Sets teletext language Guide Sets the preferred Guide language Current These settings can be changed if only the broadcaster supports Otherwise settings will not be available to be changed Audio Changes the audio language for the current cha...

Страница 25: ...en when the menu screen is not visible Set PIN Defines a new PIN number Use numeric buttons to enter a new pin number You will need to code your new pin a second time for verification purposes IMPORTANT The factory default pin number is 0000 if you change the pin number make sure you write it down and keep it safe Timers To view Timers menu press MENU button and select Settings icon by using or bu...

Страница 26: ...Date Time on the top of the menu list will then change according to the selected Time Zone Changes are automatically stored Press MENU to exit Configuring Source Settings You can enables or disable selected source options The TV will not switch to the disabled source options when SOURCE button is pressed Select Sources in the Settings menu and press OK button Press or buttons to select a source Us...

Страница 27: ...sometimes during dialogue if deemed necessary You can use this feature only if the broadcaster supports that additional narration track Auto TV Off You can set the timeout value of auto off feature After the timeout value is reached and the Tv is not operated for selected time the TV will go off Standby Search Use or button to select Standby Search and then press or button to set this setting as O...

Страница 28: ... Please note that ghosting may occur while displaying a persistent image LCD TVs image persistence may disappear after a short time Try turning off the TV for a while To avoid this do not leave the screen in still picture for extended periods No Power If your TV system has no power please check the main power cable and connection to the mains socket outlet Poor Picture Have you selected the correc...

Страница 29: ...you confront with such a problem please try switching your PC to different resolution modes Appendix B AV and HDMI Signal Compatibility Input Signal Types Source Supported Signals Available EXT 1 SCART 1 PAL 50 60 O NTSC 60 O RGB 50 O RGB 60 O EXT 2 SCART 2 PAL 50 60 O NTSC 60 O RGB 50 X RGB 60 X SIDE AV PAL 50 60 O NTSC 60 O YPbPr 480I 60Hz O 480P 60Hz O 576I 50Hz O 576P 50Hz O 720P 50Hz O 720P 6...

Страница 30: ...ing resolution information 24Hz 25Hz 30Hz 50Hz 60Hz 480i 480p 576i 576p 720p 1080i 1080p Appendix D Supported File Formats for USB Mode Supported Formats File extension Container Video Audio avi AVI MPEG4 MPEG2 Xvid H 264 MP3 AC3 LPCM ADPCM mkv MKV H 264 MPEG1 2 4 MP3 AC3 LPCM ADPCM mp4 AVI MP4 H 264 MPEG4 MP3 AAC dat mpg mpeg Mpeg1 2 Mpeg1 Mpeg2 AC3 MPEG Audio LPCM ...

Страница 31: ...continue with the reboot operation 2 3 AM search and upgrade mode If Automatic scanning in Upgrade Options menu is enabled TV wakes up at 03 00 and searches broadcast channels for new software upgrade If new software is found and downloaded successfully with next power up TV opens with new software version Note on reboot operation Reboot is the last step in software upgrade operation if download o...

Страница 32: ...9 5 Digital Reception DVB T Transmission Standards DVB T MPEG2 DVB T MPEG4 HD i DEMODULATION Symbol rate COFDM with 2K 8K FFT mode Modulation 16 QAM 64 QAM FEC for all DVB modes automatically found MHEG 5 ENGINE compliant with ISO IEC 13522 5 UK engine Profile UK only Object carousel support compliant with ISO IEC 135818 6 and UK DTT profile UK only Frequency range 474 850 MHz for UK models ii VID...

Страница 33: ...green or green and yellow The wire which is coloured blue or black must be connected to the terminal which is marked with the letter N or coloured Black The wire which is coloured brown or red must be connected to the terminal which is marked with the letter L or coloured Red For continued protection against risk of fire replace only with same type and rating of fuse ASTA approved 5A 250VAC fuse C...

Страница 34: ...l 01923 246363 The seller of this equipment the vendor warrants to the initial retail purchaser that if the equipment becomes defective and the defect is shown to be due to faulty materials or workmanship within a period of 12 Months from the date of sale to the original purchaser it will be repaired or at the vendors sole option replaced free of charge always providing that The equipment has at a...

Отзывы: