background image

7

GENERAL OPERA

GENERAL OPERA

TION

TION

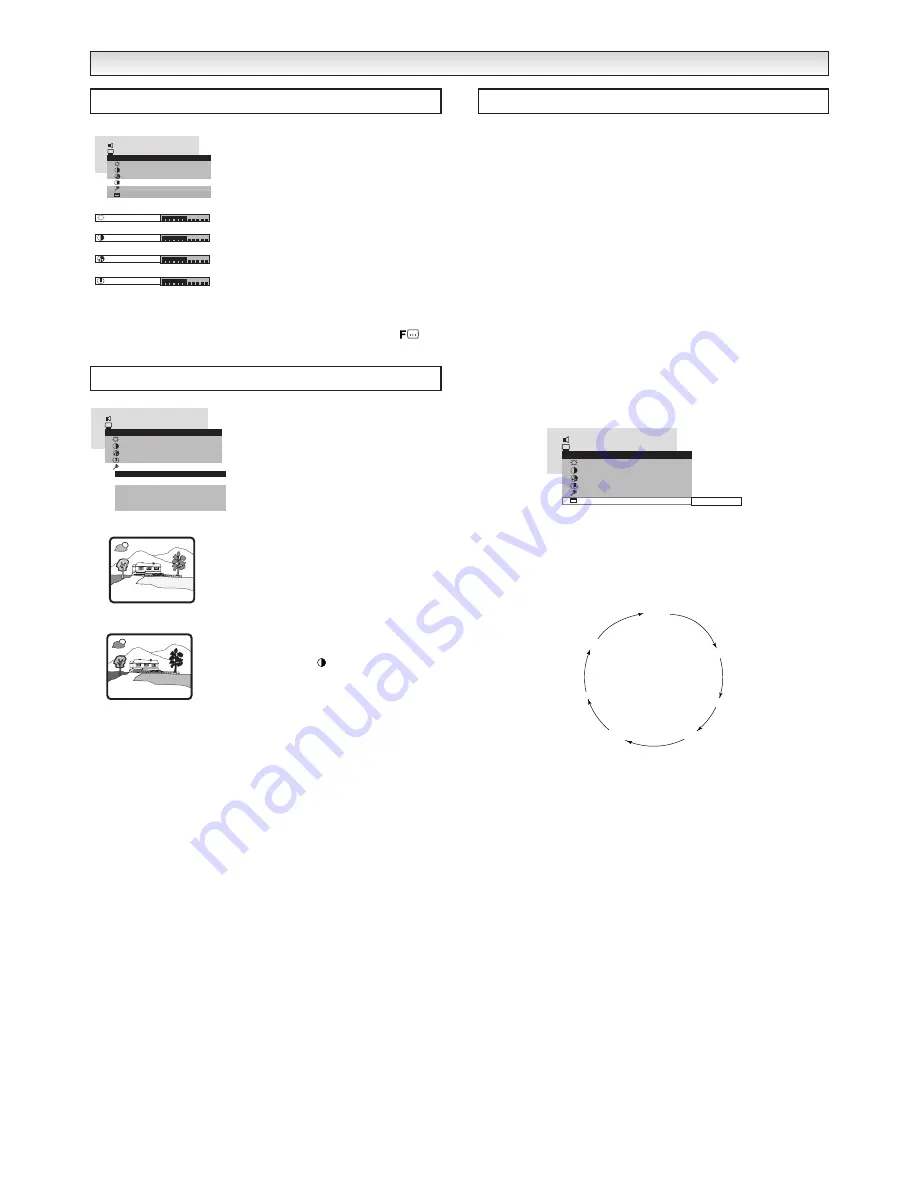
To adjust the picture, open the Main
Menu by pressing the Menu button and
select Picture by pressing the 

or 

buttons followed by the 

© 

button for

sub menus. Along with the basic
Brightness, Contrast, Colour and
Sharpness saturation options, you will
find a sub menu with other less common
functions and a picture format control
function.

You can have direct access to the following picture controls,
Brightness, Contrast, Colour and Sharpness by pressing the

/

OK button repeatedly.

■ 

Noise Coring : Can be enabled or

disabled (ON/OFF). When enabled, it
eliminates “fuzz” on the picture.

■ 

Colour Tone  : Three colour tones can be
selected, corresponding to “normal”,
“warm” or “cold” colour ranges.

■ 

Blue Stretch : Can be enabled or
disabled (ON/OFF). When enabled, it
increases the proportion of blue on white
picture tones.

■ 

Black Stretch : Can be enabled or
disabled (ON/OFF). When enabled, it
darkens the grey areas of the screen,
this can be changed in normal TV mode
by pressing the

button.

■ 

Skin Tone  : Can be enabled or disabled
(ON/OFF). When enabled, it corrects skin
tones providing more natural colours.

This television can make the most of the range of picture formats now 
being transmitted. Many programmes are now being transmitted in Wide 
formats 14:9 or 16:9 and films in wider formats known as Letterbox whilst 
many programmes are the traditional 4:3 picture ratio.

It is possible to identify that the transmission is 4:3, Letterbox or 
Wide screen format (14:9 or 16:9), but it is difficult to tell the difference 
between 16:9 and 14:9.

You may choose to leave your Picture Format as Auto, your television will 
automatically fill the screen, but this may not always give you what you 
want. If so you can select from a range of picture formats. You can select 
the Picture Format option either through the Menu screen or by pressing 
the Wide button.

Picture Format by Menu

Press the Menu button, use the

or

buttons to highlight Picture, 

press the 

§

and

©

buttons to select, press the 

or

buttons to 

highlight Format, press the 

§

and

©

buttons to select the format 

required.

Picture Format by pressing the Wide button

Press the Wide button repeatedly to select the different formats.

The format changes as follows:

Wide Screen Signalling (WSS)

Your television will automatically select the correct picture format if the
transmission source is transmitting the WSS signal e.g. a DVD player or
digital TV decoder.

The WSS signal can be overridden by manually selecting the Picture
Format.

Note : When you switch on your TV set the picture format will be AUTO.

Note : When in AUTO your picture may change especially when adverts

appear. Many adverts are in a different transmission format to
the programme.

+

Sharpness

Brightness

Contrast

Colour

Sintonía

Otros

Conexiones

Sound

>

>

>

Menu

Picture

>

Effects
Format

Sharpness

Colour

Contrast

Brightness

Picture

>

Sintonía

Otros

Conexiones

Sound

>

>

>

Menu

Picture

>

Effects

Sharpness

Colour

Contrast

Brightness

Picture

>

Black stretch

Blue stretch

Colour tone

Noise coring

Effects

Skin tone

Blackstretch

OFF

Blackstretch

ON

Picture Adjustment

Picture Effects

Picture Format

Sintonía

Otros

Conexiones

Sound

>

>

>

Menu

Picture

>

Effects
Format

Sharpness

Colour

Contrast

Brightness

Picture

>

NATURAL

AUTO

NATURAL WIDE

ZOOM 

       14:9

FULL

NORMAL

 16:9

Содержание CE28WN3-B

Страница 1: ...Please read this Instruction book before using your television We wish you many hours of pleasure from your new television Colour Television Instruction Manual CE28WN3 B CE32WN3 B ...

Страница 2: ... your television and can be dangerous This television receiver should be operated only from the type of power source indicated on the television or as indicated in the Operating Instructions If you are not sure of the type of power supply in your home consult your sales person or your local power company Never add accessories that have not been specifically designed for this television Do not drop...

Страница 3: ... To change a fuse in this type of plug proceed as follows 1 Remove the fuse cover and fuse 2 Fit a new fuse which should be a BS1362 5 Amp A S T A or BSI approved type 3 Refit the fuse cover If the fitted plug is not suitable for your socket outlets it should be cut off and an appropriate plug fitted in its place If the mains plug contains a fuse this should have a rating of 5 Amp If a plug withou...

Страница 4: ...eries may leak and damage the unit The normal life of batteries should be from nine to ten months The aerial socket is located on the back of the TV set A colour picture of good quality requires a higher aerial signal than a black white picture If you tune your set to a station with a weak colour signal the television set automatically changes to a black white picture For all aerial problems pleas...

Страница 5: ...hed on by using the On timer function with no signal being received the auto shut off function will be ignored If you found a power indicator flashing please turn the TV set off completely with the Mains ON OFF switch and contact our Service desk This warning is a sign to let you know that the power protection function of this TV set is now operating Controls Mains ON OFF Standby Auto Shut Off If ...

Страница 6: ...t signal Stereo Mode Several of the following options are displayed depending on the type of broadcast when pressing the Surround button or the button PSEUDO STEREO ON OFF When ON it provides a pseudo stereo effect to mono broadcasts NORMAL STEREO Switches to stereo sound if broadcast is in stereo SPATIAL STEREO Enhances stereo sound when enabled 3D SURROUND MONO This mode is especially prepared t...

Страница 7: ...between 16 9 and 14 9 You may choose to leave your Picture Format as Auto your television will automatically fill the screen but this may not always give you what you want If so you can select from a range of picture formats You can select the Picture Format option either through the Menu screen or by pressing the Wide button Picture Format by Menu Press the Menu button use the or buttons to highl...

Страница 8: ... arrows turn blue Whilst Zoom is displayed press the Green button the centre of the picture moves up Note the arrows turn blue 14 9 16 9 Transmission Reception NORMAL AUTO FULL ZOOM 14 9 16 9 You will see a black bar left right top and bottom The viewing ratio is correct These formats fill the width with the whole picture and stretch the height to fit Correct viewing ratio for 14 9 transmission fi...

Страница 9: ...g stretched even more This automatically zooms into picture all the arrows relating to the coloured buttons are black The picture is stretched and enlarged so that the edges of the picture are missing Whilst Zoom is displayed press the yellow button more of the top and bottom become visible and eventually the picture is as the Normal format Note the arrows turn blue and at this point the Red and G...

Страница 10: ... that time is incorrect you can enter the time manually using the numeric buttons e g for 8 30 am enter 0830 for 8 30 pm enter 2030 A manually set time is only cancelled when the TV is switched off with the Mains On Off button and overrides the teletext signal Alarm Set Using the remote control unit numeric keys you can set the TV alarm function When the alarm is enabled a sequence of beeps is hea...

Страница 11: ...second digit continue to enter for up to 5 digits Press the button so that no digit is highlighted press the button until Store is selected the word Confirm appears press the button and the word changes to Stored To Search for another channel With Search still highlighted press the button again until another channel is found When you have searched for and stored all the channels press the Menu but...

Страница 12: ...lled at a later date Using the Menu button or the OK button select a Picture setting eg Contrast Adjust the level using the button and whilst the display is still on the screen press the button You must now select which User level setting to store these settings by pressing the numeric button 1 2 or 3 Restoring the saved settings Press the button repeatedly to restore either Normal level Factory s...

Страница 13: ...a wide range of peripherals Keep in mind that the use of the appropriate connecting cable is essential for good results Stereo Headphone Jack The Sound menu provides a specific set of sound control options Volume Balance Bass Treble that are available only when the TV set detects that headphones are actually plugged into the set When the set receives a Dual language broadcast another option mode w...

Страница 14: ...own to begin video recording The main TV functions can be operated by using the local keypad situated on the bottom front of the set The keys on the keypad are directly related to the corresponding buttons on the remote control unit 1 Key equivalences for navigating screen menus 2 Switching channels 3 Adjusting the volume 4 Storing restoring defaults The local keypad key performs the same function...

Страница 15: ...O O O O O O T T T B B B A A A L L L L L L R R R U U U G G G B B B Y Y Y H H H H O O O O C C C C K K K K E E E E Y Y Y Y P P P 3 3 3 0 0 0 1 1 1 CRICKET TENNIS F BALL RUGBY P P P 3 3 3 0 0 0 2 2 2 P P P 3 3 3 0 0 0 5 5 5 P P P 3 3 3 1 1 1 0 0 0 P P P 3 3 3 1 1 1 5 5 5 P P P P 3 3 3 3 2 2 2 2 5 5 5 5 FOOTBALL CONTENTS P P P 3 3 3 1 1 1 0 0 0 DV1 DV2 PRE SCOT SPORT C C CC CC R R RI I IC C CC CC K K K...

Страница 16: ...d sub coded page is found the page number will appear over the TV picture 4 Press the button to view the sub coded page X X i Index Page Selection Sub Page Access Stop Double Letter Height INDEX P P P P 2 2 2 2 0 0 0 0 1 1 1 1 P P P P 2 2 2 2 5 5 5 5 1 1 1 1 P P P 3 3 3 0 0 0 1 1 1 P P P 3 3 3 5 5 5 1 1 1 P P P 4 4 4 0 0 0 1 1 1 P P P 1 1 1 0 0 0 0 0 0 TOPICS NEWS WEATHER SPORT T T T T O O O O P P...

Страница 17: ...ay appears on the screen Enter the code you require e g 19 using the numeric buttons 1 and 9 When you next switch on the TV set there conditions will apply Changing from Hotel Codes 20 29 You must first reduce the colour to minimum before entering a new Hotel code Switch off the TV with the Mains On Off button and then switch on the code is activated Press the button to restore the picture setting...

Страница 18: ...normal conditions can be reduced to minimum by repositioning aerial or by installing new one suited for your area INTERFERENCE Interference may be caused by electrical appliances car ignition systems etc This should normally be a temporary condition but should this interference persist contact your dealer Stand by mode In order to save energy and to maintain an optimum picture quality it is advisa...

Страница 19: ...lable to the purchaser of this equipment Note This warranty supersedes any other form of guarantee that may inadvertently have been enclosed with or attached to the product Dear Customer Thank you for buying SANYO This equipment should give you many years of pleasure and faithful service but in the event that a fault occurs the following notes for you guidance may be helpful 1 PLEASE RETAIN YOUR P...

Страница 20: ...Part No SKP10179 B F7HS YS SANYO Industries U K Ltd Printed in U K ...

Отзывы: