background image

2

Instruction Manual for HRV

1-888-726-8869

www.sanuvox.com

TABLE OF CONTENTS

 IMPORTANT SAFETY INSTRUCTIONS 

1

TABLE OF CONTENTS

2

ABOUT THE PRODUCT

3

COMPONENTS

3


How it Works

3

TECHNICAL SPECIFICATIONS

3

SETUP & INSTALLATION

4


What you will need

4


What’s included

4


Step by Step Setup & Installation

4

OPERATION

6


How to Operate your Product

6


How to Read the Signal Lights (LED)

6

MAINTENANCE

6


How to Replace Lamp

6


Step by Step Lamp Replacement

6


How to Clean your Product

8

STORAGE

8

ULTRAVIOLETS: UVC

8

ELECTRICAL RATINGS, POWER CONSUMPTION & AVAILABLE VOLTAGE

8

TROUBLESHOOTING

8


What you will need

8


Problems & Solutions Table

8


A. Step by Step UV Lamp Continuity Test

9

WARRANTY

10

CUSTOMER SERVICE

10

Содержание HRV6

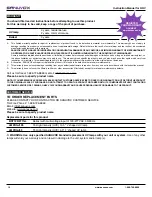
Страница 1: ...he UV unit or system and all other safety precautions considered as best practices in the HVAC industry if applicable 9 When applicable local regulation may comprise more restrictive installation and or certification requirements The aforementioned requirements prevail on those of this document and the installer agree to conform to these at his own expense 10 Follow all the safety instructions out...

Страница 2: ...hat s included 4 Step by Step Setup Installation 4 OPERATION 6 How to Operate your Product 6 How to Read the Signal Lights LED 6 MAINTENANCE 6 How to Replace Lamp 6 Step by Step Lamp Replacement 6 How to Clean your Product 8 STORAGE 8 ULTRAVIOLETS UVC 8 ELECTRICAL RATINGS POWER CONSUMPTION AVAILABLE VOLTAGE 8 TROUBLESHOOTING 8 What you will need 8 Problems Solutions Table 8 A Step by Step UV Lamp ...

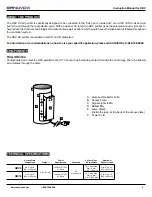
Страница 3: ...ze your specific application please call SANUVOX at 1 888 726 8869 COMPONENTS How it Works Contaminated air enters the HRV parallel to the UV J Lamp thus increasing contact time with the UV energy Then the treated air circulates through the home A Aluminum Reflector Tube B Access Plate C Signal Lights LED D Ballast Box E Lamp Clamp inside the tube at the back of the access plate F Power Cord TECHN...

Страница 4: ...Step by Step Setup Installation 1 Prepare the HRV for installation Remove the contents from packaging Using a flat screwdriver turn the 4 access door screws so that you can separate the assembly ballast and access door from the reflector tube CAUTION Before installing or performing maintenance on the unit or system TURN OFF AND DISCONNECT the unit or system from all power sources there may be more...

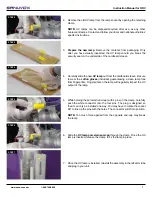
Страница 5: ... up the pins with the holes The connector will fit into position NOTE Too much force applied from the opposite endcap may break the lamp 6 Gently replace the assembly ballast access door and lamp in the reflector tube taking care not to hit the lamp Once the assembly is in place turn the 4 tightening screws using a flat screwdriver make sure that the access plate is securely attached to the tube S...

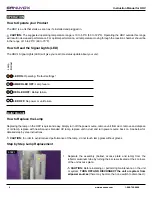
Страница 6: ...lure LED OFF No power or unit failure Lamp Ballast MAINTENANCE How to Replace the Lamp Replacing the lamp on the HRV is quick and easy Simply turn off the power source remove unit from duct remove and dispose of old lamp replace with new Sanuvox branded UV lamp replace unit in duct and turn power source back on See below for detailed step by step instructions CAUTION In order to avoid reduced perf...

Страница 7: ...ure to wear the cotton gloves included guaranteeing a clean lamp free from fingerprints Fingerprints on the lamp will negatively impact the UV output of the lamp 7 Once the UV lamp is installed reinstall the assembly in the reflector tube and plug in your unit STEP 7 5 While holding the porcelain end cap with 4 pins in the clamp carefully push the white connector onto the four pins The plug is des...

Страница 8: ...t 120 277 240VAC 50 60Hz The HRV6 has a power of 25 Watts and th HRV8 of 40 Watts See product label to confirm power consumption of your specific unit or system NOTE IF YOU EXPERIENCE A PROBLEM PLEASE CONTACT CUSTOMER SERVICE FIRST OR SEE YOUR WARRANTY DO NOT RETURN THE PRODUCT TO THE ORIGINAL PLACE OF PURCHASE DO NOT ATTEMPT TO OPEN THE PRODUCT OR TAMPER WITH ITS COMPONENTS WITHOUT CONTACTING CUS...

Страница 9: ...stalling or performing maintenance on the unit or system TURN OFF AND DISCONNECT the unit or system from all power sources there may be more than one switch to disconnect 2 Remove the UV lamp from the lamp socket by opening the retaining clamp 3 Using an ohmmeter place 1 probe on 1 of the 4 pins and by sensing the 3 remaining pins one should have continuity Make sure the 2 remaining pins also have...

Страница 10: ... SANUVOX will repair or replace this product if it is found to be defective in material or workmanship C This warranty does not cover damage resulting from any unauthorized attempts to repair or from any use not in accordance with the instruction manual D This warranty does not cover the filters pre filters or other accessories if included except for material or workmanship defects Call us toll fr...

Отзывы: