background image


User manual 

SanStore-4LEMX / SanStore-8LEMX / SanStore-16LEMX 

SanStore-4LMX / SanStore-8LMX / SanStore-16LMX 


_____________________________________________________________________________ 


- 34 - 


5.5 Spot monitor 

 
In addition to the main monitor, you can connect an additional spot monitor which 
enables you to view additional channels independent from the main monitor. 
 
 
Procedure: 

  Press the [SPOT] button on the remote control and then press the number of the 

camera you wish to see in full screen. 

  Press the [SPOT] button twice to toggle between the two cameras. The interval 

between the two cameras is described in section “Sequence setting.” 

  If an alarm has been triggered, the corresponding channel is displayed as full 

screen. 

  Press the [ESC] button to exit the spot function. 


Содержание SanStore-16LEMX

Страница 1: ...Version 2 1sfi 0813 engl A5 USER MANUAL SanStore digital video recorder Models SanStore 4 8 16 LEMX SanStore 4 8 16 LMX SanStore LEMX series SanStore LMX series...

Страница 2: ...o com All rights reserved This publication may not be reproduced stored in a retrieval system or transmitted in any form or by any means electronic mechanical photocopying recording or otherwise witho...

Страница 3: ...1 Front panel 16 2 1 2 Rear panel connectors 19 2 3 Remote control 21 2 4 Mouse control 22 2 5 Virtual keypad for mouse control 23 3 INSTALLATION AND CONNECTIONS 24 3 1 Complete system configuration 2...

Страница 4: ...5 Info 80 8 PAN TILT ZOOM PTZ CONTROL 81 8 1 PTZ menu 82 8 2 Preset and tour 83 8 3 Custom functions 85 8 4 Auto pan auto tilt power on off 85 8 5 PTZ camera models 85 9 SEARCH PLAYBACK 86 9 1 Playbac...

Страница 5: ...l for future reference 1 1 Description of symbols Caution Danger to life In the text this sign symbolises life threatening voltages which may lead to damages to humans and to material Attention Import...

Страница 6: ...to an electronic shock a short circuit or fire Note This equipment has been tested and found to comply with the limits for a Class A digital device pursuant to part 15 of the FCC Rules These limits ar...

Страница 7: ...use the power source specified on the nameplate Please consult your electrician if you are unsure whether the power supply on site is appropriate Only use the supplied power cables or power adapters o...

Страница 8: ...f mechanical parts We explicitely point out that any type of recording device no matter if it is an analogue or digital device is subject to natural attrition Every recording device contains mechanica...

Страница 9: ...on is available in the stores of the respective providers Apps for Apple iPhone and Android Smartphones Max DVRs Live View Search Playback Snapshot OSD DVR control Virtual DVR PTZ MobileCMS Lite free...

Страница 10: ...SanStore 4LMX SanStore 8LMX SanStore 16LMX _____________________________________________________________________________ 10 2 CONTROLS 2 1 SanStore LEMX series 2 1 1 Front panel SanStore 4LEMX 4 chann...

Страница 11: ...by field during still mode o FR Fast Rewind Use this button to fast rewind during playback mode o REC Recording Use this button to start the recording Press it again to stop the recording CLR Still P...

Страница 12: ...mode This button is also used to switch channels or to increase values in the setup menu 6 Channel numeric buttons Press these buttons to enter data and to make selections e g enter the numeric code...

Страница 13: ...________________________________________ 13 10 Time search and minus button Press this button to access the calendar and the time search menu This button is also used to change channels or to decrease...

Страница 14: ...anStore 8LEMX SanStore 16LEMX SanStore 4LMX SanStore 8LMX SanStore 16LMX _____________________________________________________________________________ 14 2 1 2 Rear panel connectors SanStore 4LEMX San...

Страница 15: ...8 Mouse connector To connect a PS2 USB 9 4 8 or 16 alarm inputs 10 Alarm output replay 11 RS 422 485 To connect a PTZ camera 12 RS 232C Only for development purposes 13 12 V DC power jack 2 1 3 Power...

Страница 16: ...Front panel 1 Status LED 3 LEDs indicate the status of the video recorder Green Recoder is operating Red Recording in process Blue Power on 2 Playback Record These functions are used in live mode or...

Страница 17: ...buttons is used to move forward picture by picture In playback mode this button is used to fast forward Stop Press this button tos top the playback OK Press this button to confirm your selection REC...

Страница 18: ...to choose channels 10 Example Press this button once and then 6 to see channel 16 7 Function buttons Backup Press this button to go to the backup menu You can set the time and the channels to backup f...

Страница 19: ...anStore 16LEMX SanStore 4LMX SanStore 8LMX SanStore 16LMX _____________________________________________________________________________ 19 2 2 2 Rear panel connectors SanStore 4LMX 4 channels SanStore...

Страница 20: ...connecting alarm out relays 4 RS 422 485 For connecting a PTZ camera and or a keyboard 5 LAN RJ 45 Ethernet port For connecting to a remote PC via Ethernet network 6 VGA VGA out connector 7 HDMI HDMI...

Страница 21: ...________________________________________________ 21 2 3 Remote control Note DVR ID button Set the proper DVR system ID through which to operate Press the ID button and then press the number button wit...

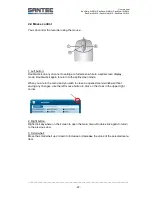
Страница 22: ...ull screen while in a split screen display mode Double click again to return to the split screen mode When you are in the menu and you wish to close an opened menu window without saving any changes us...

Страница 23: ...n keypad to perform the control by mouse Connect a mouse via the USB port before use 1 While in live view or playback mode right click to open the configuration window 2 Click on Setup The login windo...

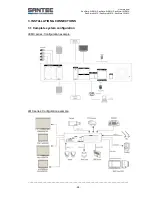
Страница 24: ...MX SanStore 4LMX SanStore 8LMX SanStore 16LMX _____________________________________________________________________________ 24 3 INSTALLATION CONNECTIONS 3 1 Complete system configuration LEMX series...

Страница 25: ...X RS 422 TX terminal and connect the video output on the recorder s rear panel 3 3 Audio connection The recorder has an audio output and an audio input If you want to record and playback audio signals...

Страница 26: ...Note The connection and remote viewing of the DVR may not be successful on all PCs due to the variety of PCs Internet connection settings Please contact the technical support for further assistance Mi...

Страница 27: ...uick start please stop all recordings which might be running During a recording the time and recording menus are not active Enter the password using the numeric keys either use the remote control or t...

Страница 28: ...ns on the recorder s front panel Alternatively use the mouse Press ENTER to save your entries and to exit the menu Alternatively click SAVE Press ESC to exit the menu without saving the entries Altern...

Страница 29: ...the recording status Black No recording Yellow Recording continues Red Event recording motion alarm 1 2 3 Event indicator 1 Alarm Indicates that an alarm has been triggered To hide the symbol press C...

Страница 30: ...iguration window Click on M again to close the window 4 Indicates the log list Close the log list again by clicking on the cross 5 Indicates the login status A is for Admin and U is for User 6 Indicat...

Страница 31: ...lick again to close the full screen 5 2 2 Multi screen display and switch sequencing display 1 Press the DISPLAY button to activate the multiscreen display It changes the order as defined in the SPLIT...

Страница 32: ...13 split mode must be checked in SPLIT MODEto use this function 2 It is possible to reposition the camera from the bigger window to a smaller one It is used on 6 7 8 9 10 13 16 split mode a Press the...

Страница 33: ...een to get a close up view of the screen To activate the digital zoom select the full screen display of the camera you wish to zoom Then press the ZOOM button on the remote control A zoom area box pop...

Страница 34: ...hich enables you to view additional channels independent from the main monitor Procedure Press the SPOT button on the remote control and then press the number of the camera you wish to see in full scr...

Страница 35: ...nge the password when you install the DVR also see chapter 7 8 3 Login 1 On the front panel or the remote control press the POWER button 2 When the DVR is powered on it will start to scan the its stat...

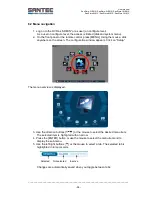
Страница 36: ...emote control press MENU Using the mouse click anywhere on the screen The configuration window appears Click on Setup The menu overview is displayed 3 Use the direction buttons or the mouse to select...

Страница 37: ...s on the left hand column and settings in the right hand column A cursor highlighted menu can be moved using the direction buttons 7 Press the buttons to change the value or select options Alternative...

Страница 38: ..._____________________________________________ 38 7 SETUP 7 1 Display 7 1 1 General The menus are displayed with options on the left hand column and settings in the right hand column A cursor highlight...

Страница 39: ...black dark grey BACKGROUND Select the background colour in case of NO VIDEO status i e when no video is running Grey white blue black dark grey OSD ALIGNMNET The main video output can be displayed on...

Страница 40: ...buttons 2 Settings Device Each monitor may be configured in a different way Main monitor spot 1 Dwell time Select the interval that each camera or multi screen mode is alternatingly displayed Use the...

Страница 41: ...ithout saving the changes press the MENU or CANCEL button Alternatively close the window by clicking the cross 4 Press and hold the DISPLAY button for 2 seconds to automatically toggle between cameras...

Страница 42: ...______________ 42 7 2 Camera Configure the properties of the camera LEMX series LMX series 1 Press left right buttons or the numeric buttons or the mouse to select the desired camera 2 The camera chan...

Страница 43: ...ure live picture recording and playback o Default setting is OFF o Press the down button on the recorder front panel or on the remote control to call up the privacy mask function The grid is displayed...

Страница 44: ...model and then enter the corresponding Baud rate and camera PTZ ID address b Tour group Preset tours allow a camera to move though a programmed sequence of PTZ presets Note The programmed tours are s...

Страница 45: ...haracters including blanks To enter a camera title you can either use the virtual keyboard or can can press the appropriate numeric button on the remote control or on the front panel virtual keypad En...

Страница 46: ...utton when it set ON Disk overwrite Select the record policy of the hard disk drive ON By default the hard disk drive will overwrite from the beginning when it becomes full ring buffer OFF It stops re...

Страница 47: ...SAVE To exit the menu without making changes press the CANCEL button Alternatively close the window by clicking the cross Approximate file size Quality PAL Unit 720x576 720x288 360x288 LOW 14 0 7 0 3...

Страница 48: ...et the resolution and the recording speed for each channel individually D1 720x576 Field 720x288 CIF 360x288 You may also select identical settings for all channels In order to do so enter the desired...

Страница 49: ...Item Adjustment RES Indicates the selected resolution AUDIO Select whether audio data should be recorded F S Select the recording speed for each camera QUALITY Specify the picture quality of the reco...

Страница 50: ...7 3 4 Event recording On the Day event tab you can define the parameters for alarm motion detection and video loss Alarm recording One alarm input can be configured to one channel One camera channel c...

Страница 51: ...ssigned to multiple motion detections Press the buttons or the mouse to change the value or select options By mouse use the wheel indicates that multiple alarm sources are selected Note There may be c...

Страница 52: ...ntrol or by clicking the mouse 7 3 5 Continuous and event motion alarm recording Both continuous and event recording can be set at the same time The DVR records video data continuously over a 24 hour...

Страница 53: ...ied date settings A schedule is used to record selected cameras with different times recording rates alarm or event By selecting Schedule Use as ON The night mode will be activated 7 4 1 Chart setup T...

Страница 54: ...ode Night Day No Rec o Begin The time the recording starts o End The time the recording ends The ending time must not be before the starting time or the same as the starting time It must be any time l...

Страница 55: ...create up to 32 holidays If a holiday occurs on the same date as a weekday the holiday schedule will override the weekday schedule 1 A cursor highlighted menu can be moved using the direction buttons...

Страница 56: ...ons Press the up down buttons to highlight the HDD then press the buttons to confirm your selection Device and size This information lists the installed drives and their respective capacities Status o...

Страница 57: ...tream mirror This menu will be activated when you work with 2 HDDs at the same time It will automatically configure one HDD for recording and the other one for mirroring duplicating Initialize for bac...

Страница 58: ...TFS file system X X O must be formatted on DVR before backing up or exporting data to the device X O Symbols x yes O no Notes A USB flash memory is working without formatting If a FAT32 NTFS is instal...

Страница 59: ...ze the stored data range and the status of the recording 2 Device It displays whether the HDD is master or slave for mirroring The upper device is the master and the other one is the slave Once the sl...

Страница 60: ...formation such as bad sector temperature or HDD running time SMART information may be slightly different depending on the HDD manufactures It is recommended to exchange the HDD when the HDD status Pre...

Страница 61: ...service type to configure the DVR for the networking purposes 7 6 1 Ethernet 1 Static IP If the static IP is selected the following settings are available IP address Enter the static IP address Netmas...

Страница 62: ...on The default is unlimited 4 KBPS 8 MBPS Block Ping No response for ping Default is OFF Scan No response for auto scan Default is OFF Stream mode For stream mode choose between dual and optimized Dua...

Страница 63: ...16LMX _____________________________________________________________________________ 63 Auto port FWD Click on Insert to automatically open ports for router communication with UPNP compliance 2 Way Aud...

Страница 64: ...d column and settings in the right hand column A cursor highlighted menu can be moved using the direction buttons or the mouse Use Set the e mail notification to ON or OFF The default is OFF Press the...

Страница 65: ...65 E mail source An event has to be specified by notification options Event edit Notifications can be enabled for each channel for alarm motion video loss and system HDD failure record failure HDD fu...

Страница 66: ...appropriate numeric button on the remote control or the front panel Port Define the port that the SMTP server will communicate through By default it set to 25 Authentication Check this to ON if your m...

Страница 67: ...ection buttons or the mouse Use Set DDNS to ON or OFF The default is OFF Press the button to select Using the mouse click the option to select DDNS provider Default Default it is provided by the manuf...

Страница 68: ...er your password d Update test Click the update test button to confirm the connection A success message will appear To save changes and exit the menu press the MENU button To exit the menu without mak...

Страница 69: ...eam applications such as Hypertext Transfer Protocol HTTP port 80 File Transfer Protocol FTP port 21 Telnet port 23 and Post Office Protocol 3 POP3 port 110 are used To solve the firewall problem and...

Страница 70: ...WAN Connect via IP address If you are connecting from outside your network and if you know your static IP address use the IP address Ex http 124 137 23 72 6000 2 Description of symbols Connected x No...

Страница 71: ...ion 800 x 600 1024 x 768 1280 x 720 1280 x 1024 1600 x 1200 1680 x 1050 1920 x 1080I 1920 x 1080P HDMI Auto If the HDMI Auto function is activated the HDMI resolution on the monitor is automatically r...

Страница 72: ...modes including real time There may be a slight delay in synchronisation of the audio and video data 3 Keypad Model Select the joystick and the Baud rate Note Default device SANTEC KSC 3505 4 Extend...

Страница 73: ...ngs in the right hand column A cursor highlighted menu can be moved using the direction buttons or the mouse Input Change the input type Use the button to change the values Output You can configure ho...

Страница 74: ...in sequence Auxiliary event reserved Control Manual control for relay output and buzzer Buzzer Use o ON The buzzer sounds if an alarm is triggered The buzzer will sound for the duration of the record...

Страница 75: ...ne go to tour Inactive Configure the command once an event has ended none go to tour Event edit Press ENTER to edit multiple events The menus are displayed with options on the left hand column and set...

Страница 76: ...00 all DVRs irrespective or their ID will be controlled at the same time DVR Name Assign a name to the DVR especially when you have several DVRs in the network Key tone By default the DVR emits a bee...

Страница 77: ...the system time stamp for recorded data When the Daylight Saving Time ends the DVR automatically adjusts the time Date format Select the format to display the date MM DD YYYY DD MM YYYY YYYY MM DD NT...

Страница 78: ...e The admin user can define each user s privilege such as playback PTZ control backup configuration except for disk and system recording stop system shutdown Network PWD The DVR comes pre configured w...

Страница 79: ...to START Press the button to look for the upgrade file If the DVR finds a valid update file the update menu is activated 4 Press the button to find proper upgrade file Version information is displaye...

Страница 80: ..._____________________________________________________________________ 80 7 8 5 Info No adjustments can be made here but only system information is displayed Press the INFO button on the remote control...

Страница 81: ...for all other buttons When in PTZ interface mode all buttons are used for PTZ related operation 8 1 PTZ menu To activate the pan tilt control select the full screen display of the camera you wish to...

Страница 82: ...e virtuelle PTZ Steuerung zu aktivieren Hiermit k nnen Sie jetzt heran herauszoomen Touren starten usw 5 Um die PTZ Steuerung wieder zu verlassen dr cken Sie die ESC Taste Alternativ klicken Sie mit d...

Страница 83: ...camera into the desired position Press the Preset button Custom 1 will illuminate Set the number for the preset position Press the ENTER button to save the presets and to exit the menu Go to the pres...

Страница 84: ...g the ID and the corresponding Baud rate Please also refer to the PTZ camera manufacturer s instruction manual for proper settings 2 Tour There are 4 programmable tours Using the button to choose a to...

Страница 85: ...n PTZ button on the remote control 8 4 Auto pan auto tilt power Button Function Auto pan STOP button on the remote control Auto tilt REW button on the remote control Power on off FF button on the remo...

Страница 86: ...a it will stop the playback During playback the DVR may be played back in reverse paused speed search with up to 16 times the normal speed or move picture by picture 9 2Time search 9 2 1 Multi channel...

Страница 87: ...view search single channel playback The DVR allows you to quickly review a single channel of playback over a period of day hour and minute Press the T Time Search button to access the time search tabl...

Страница 88: ...Recorded event search The recorded event search feature allows you to search for recorded video by event 1 Click on Event Select 2 Press ENTER Press the buttons or use the mouse to select the event 3...

Страница 89: ...vent source search The event source search feature allows you to search for a triggered event alarm motion video loss 1 Select Motion Area to search for a specific area 2 Select the channel 3 Select t...

Страница 90: ...anStore 16LMX _____________________________________________________________________________ 90 9 3 Go to search 1 Press the Time Search button for 2 seconds The time input menu will pop up 2 Set the d...

Страница 91: ...cident To start the event search press the LOG button on the remote control The log list menu pops up as shown below MENU TAB CONDITION ALL All events are listed which occurred ever since the recorded...

Страница 92: ...LMX SanStore 8LMX SanStore 16LMX _____________________________________________________________________________ 92 Detailed log information icon means that there is more detailed information available...

Страница 93: ...ote The CD DVD must be formatted before backup 2 Press the BACKUP button on the remote control and the backup menu will appear 3 Use the button to select the device CD DVD RW 4 Use the button to selec...

Страница 94: ...ng BACKUP button again the backup status is displayed again It is recommended not to perform any playback while the DVR is in backup session 10 When finished the CD DVD icon will changed to grey and t...

Страница 95: ...RW backup To read the USB backup please use FAT32 or NTFS formats To backup as an AVI file set the file format to AVI using the button 10 1 3 Backup range setup It is possible to run a backup over a s...

Страница 96: ...tins The menus are displayed with options on the left hand column and settings in the right hand column ITEM ADJUSTMENT Server Select th highlighted FTP server and then press the numeric buttons to de...

Страница 97: ...Log list backup 1 Plug in the USB memory stick to the USB port 2 Press the LOG button to see the log list of the DVR 3 Press the BACKUP button to save the log list to the USB memory stick Use the butt...

Страница 98: ...__________ 98 11 Remote access via the Internet Explorer You can access your SanStore recorder via the Internet Explorer 11 1 IP address 11 2 Login Open the Internet Explorer As URL enter the IP addre...

Страница 99: ...anStore 8LMX SanStore 16LMX _____________________________________________________________________________ 99 If you access the recorder via the Internet Explorer for the first time click on add on so...

Страница 100: ...After the ActiveX plug in has been installed the following screen pops up 1 Main camera display window A live video or a playback video is displayed for 4 8 16 cameras depending on the recorder model...

Страница 101: ...de are displayed or not displayed on the screen 8 Select camera number Select the appropriate camera number which should be displayed as full screen 9 Display of camera views You can select from the f...

Страница 102: ...n 3 Zoom out Zoom out 4 Focus Focus near Focus far Auto focus 5 Iris Iris close Iris open Auto iris 6 Preset and tour Save preset Go to preset Run presets sequentially 7 Special functions First custom...

Страница 103: ...________________________________ 103 11 4 Live mode 1 Camera title 2 Time 3 Recorder status REC Normal recording Wait Wait for initial connection Loss Video loss Close Disconnected from recorder Alarm...

Страница 104: ...window pops up Select the date and the time and then clikc on Play to start the playback 1 Year and month 2 Day 3 Hour 4 Minute 5 Type of video recording For every hour or minute window the respective...

Страница 105: ...click on hour or minute or clip at any time to scrol forwards or backwards You can also changethe playback speed 1 Camera title 2 Time 3 Recorder status REC Normal recording Wait Wait for initial conn...

Страница 106: ...nload a file click on download instead of on play as described in the previous chapter The download window pops up The begin the end and the current time are indicated As soon as the download process...

Страница 107: ...1 4 1x RCA 3 D Sub 1 Characteristics Display Brightness contrast colour setting per channel Camera name 12 characters per camera Recording Manual schedule alarm motion Recording mode 5 compression lev...

Страница 108: ...D1 400 fps 720 x 576 D1 Audio inputs output 1x cinch 1x cinch Characteristics Recording mode Continuous alarm motion schedule Motion detection Mask 8 x 8 adjustable Sensitivity 20 levels PTZ Steuerun...

Страница 109: ...User manual SanStore 4LEMX SanStore 8LEMX SanStore 16LEMX SanStore 4LMX SanStore 8LMX SanStore 16LMX _____________________________________________________________________________ 109 NOTES...

Страница 110: ...User manual SanStore 4LEMX SanStore 8LEMX SanStore 16LEMX SanStore 4LMX SanStore 8LMX SanStore 16LMX _____________________________________________________________________________ 110 NOTES...

Страница 111: ...User manual SanStore 4LEMX SanStore 8LEMX SanStore 16LEMX SanStore 4LMX SanStore 8LMX SanStore 16LMX _____________________________________________________________________________ 111 NOTES...

Страница 112: ...__________________________________________________________________________ www santec video com Your local distributor...

Отзывы: