HANDLE TRIM INSTALLATION
The measurements shown are for reference only. Products and specifications shown are subject to change without notice.
www.santecfaucet.com | P: 310.542.0063 F: 310.542.5681
COMPLETE ASSEMBLY
DO NOT DISASSEMBLE HANDLE ASSEMBLY - DROP-IN VALVES
Rubber washer
Rubber washer
Metal washer
Brass lock nut
2/7
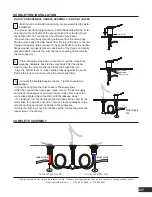
- Both hot and cold side handle trims are pre-assmbled for faster
installation.
- For proper handle turning direction, install the handle with the “cold”
blue label at the right side of the spout (looking from the front) and
the handle with “hot” red label at the left side of the spout.
- Remove the valve body mounting hardware from the valve body.
Slip the valve body’s flexible hoses from the top of the sink or counter
through the appropriate hole next to the spout. Make sure the handle
flange washer is properly placed underneath of the flange and gently
pressed against the sink top. Aim the tee connecting hoses toward
the tee connector.
1
- From beneath of the basin or counter, screw the valve body
mounting hardware back to the valve body. First the rubber
washer, then the nylon washer and lastly the brass lock nut.
- Align the handle lever or cross handle properly against the spout.
Tighten the lock nut until it secures the valve body firmly.
2
- connect the flexible hoses to the tee. Tighten to avoid the
leakage.
- Connect and tighten the Inlet hoses to the supply lines.
- After the connections have been made, turn on the water supply
and check for leakages at all joints. If water leaks from any of the
connections tighten the connection until the leakage stops.
- If no leakage, turn the handles to the full open position and let the
water flush for about 45 seconds. This can prevent damages to the
ceramic cartridges caused by debris in the supply line.
- During the flushing, check for leakage at the connecting joints and
repeat step 3 if necessary.
3
Water supply
INLET HOSE
line
TO THE HOT SUPPLY LINE
TO THE COLD SUPPLY LINE
INLET HOSE
INLET HOSE


