Sansui SLED3200 Скачать руководство пользователя страница 21

21 

EN

NOTE:

You can only download the additional V-Chip rating 

system when your TV is receiving a digital signal.

When you download the additional rating system, it 

may take some time for the download to occur.

The V-Chip rating information and system are not 

determined or controlled by the TV.

The standard V-Chip rating system is available 

whether your TV is receiving a digital signal or not, 

and will block both analog and digital programs. To 

set the restriction level using the standard V-Chip 

rating system, select “V-Chip Set” in step 2.

The downloadable V-Chip rating system is an 

evolving technology, and availability, content, and 

format may vary.

You cannot select this feature if the TV is not 

receiving a digital signal for the current station.

To clear the all V

-

Chip settings

1

In the V-Chip menu, press 

 or 

 to select 

“V-Chip Clear”, then press 

 or 

ENTER

.

The V-Chip Clear screen will appear.

2

Use 

Number buttons (0

-

9)

 to enter your 

password, then press 

ENTER

. All of your settings 

return to the factory settings.

Closed Caption

WHAT IS CLOSED CAPTIONING?

This television has the capability to decode and 

display Closed Captioned television programs. 

Closed Captioning will display text on the screen 

for hearing impaired viewers or it will translate and 

display text in another language.

Captions: 

This Closed Caption mode will display 

text on the screen in English or another language. 

Generally, Closed Captions in English are transmitted 

on C1 and Closed Captions in other languages are 

transmitted on C2.

Text: 

The Text Closed Caption mode will usually fill 

1/2 of the screen with a programming schedule or 

other information.

1

Select “Setup 

 Closed Caption”, then press 

 or 

ENTER

.

2

Press 


or 

 to set “CC Setting” to “On”.

On:

 Captions will be displayed on the screen.

Off:

 Captions will not be displayed on the screen.

3

Press 

 or 

 to select “Analog Caption” or “Digital 

Caption”.
When you select “Analog Caption”, you can 

choose from C1, C2, C3, C4, T1, T2, T3 and T4.
When you select “Digital Caption”, you can 

choose from CS1, CS2, CS3, CS4, CS5 and CS6. 

4

Press 


or 

 to select the desired Closed 

Caption mode for both Digital and Analog Caption.

5

Press 

 or 

 to select “CC Priority”, then press 


or 

 to select “Digital CC” or “Analog CC”.

NOTE:

Depending on the broadcast signal, some 

Analog Captions will function with a Digital 

broadcast signal. This step prevent that two 

kind of captions are overlapping.

NOTE:

If the program or video you selected is not closed-

captioned, no captions will display on-screen.

If text is not available in your viewing area, a black 

rectangle may appear on-screen. If this happens, 

set the CC Setting to “Off”.

When selecting Closed Captions, the captioning will 

be delayed approx. 10 seconds.

If no caption signal is received, no captions will appear, 

but the television will remain in the Caption mode.

Misspellings or unusual characters may 

occasionally appear during Closed Captioning. 

This is normal with Closed Captioning, especially 

with live programs. This is because during live 

programs, captions are also entered live. These 

transmissions do not allow time for editing.

When Captions are being displayed, on-screen 

displays, such as volume and mute may be seen 

but may interfere with Closed Captions.

Some cable systems and copy protection systems 

may interfere with the Closed Captioned signal.

If using an indoor antenna or if TV reception is very 

poor, the closed caption decoder may not appear or 

may appear with strange characters or misspelled 

words. In this case, adjust the antenna for better 

reception or use an outdoor antenna.

Closed Caption menu also can be displayed by 

pressing 

CCD

 on the remote control.

CC advanced

When you have selected Custom as the display 

method, you can adjust the various setting listed 

below as follows:

This feature is designed to customize Digital Caption 

only.

1

Select “Setup 

 Closed Caption”, then press 

 or 

ENTER

.

2

Press 


or 

 to set “CC Setting” to “On”.

3

Press 

 or 

 to select “Digital CC Preset”, then 

press 


or 

 to select “Custom”.

4

Press 

 or 

 to select “CC Advanced”, then 

press 

 or 

ENTER

.

The CC Advanced menu will appear.

5

Press 

 or 

 to select the desired item, then 

press 


or 

 to change the setting.
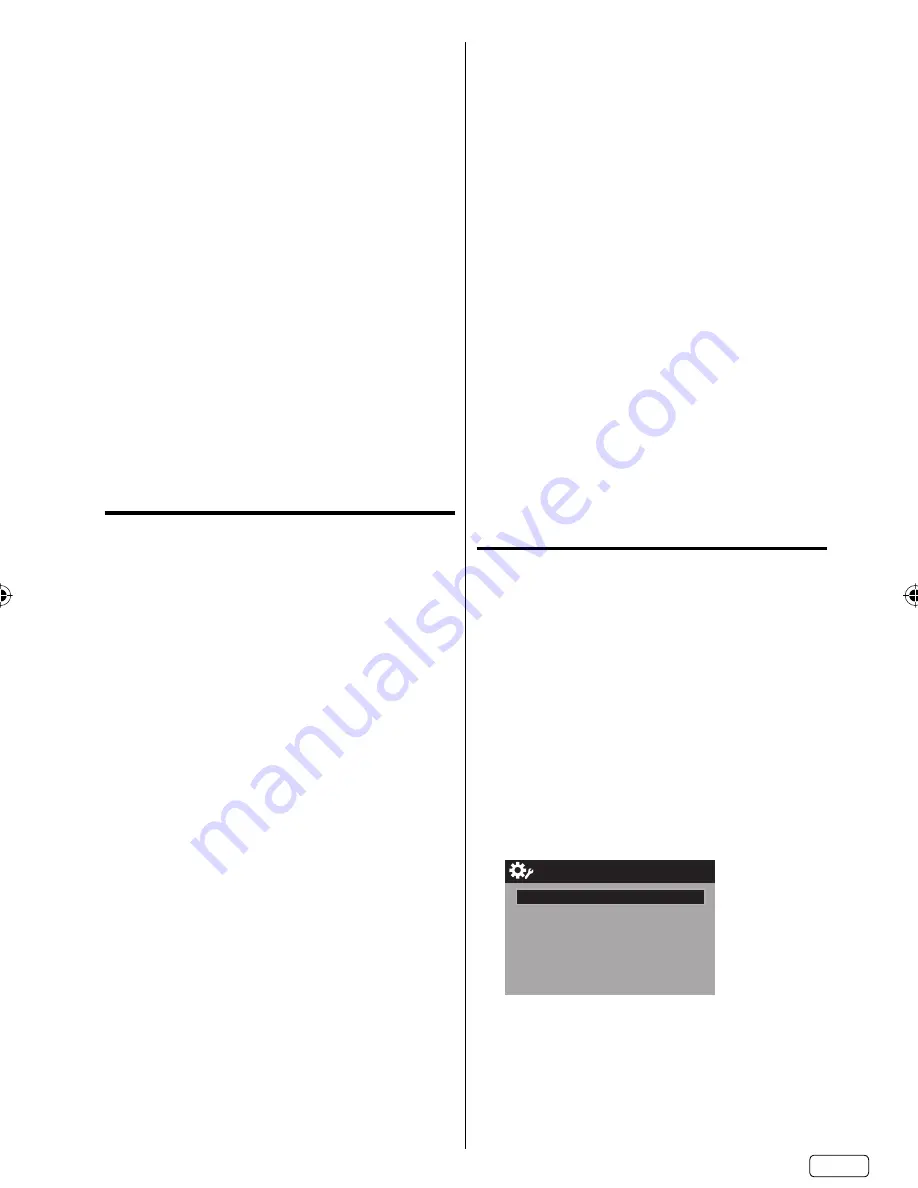
CC Advanced

Text Size

Auto

Text Type

Auto

Text Edge

Auto

Text Color

Auto

Text Opacity

Auto

Background Color

Auto

Background Opacity

Auto

J3PF0121A_EN.indd   21

J3PF0121A_EN.indd   21

8/14/12   5:22:58 PM

8/14/12   5:22:58 PM

Содержание SLED3200

Страница 1: ...ppareil sort de l usine l option Signal Type est en mode Cable c blodistribution Si vous n utilisez pas la c blodistribution s lectionnez l option Air Before operating the unit please read this manual...

Страница 2: ...n be determined by turning the equipment off and on the user is encouraged to try to correct the interference by one or more of the following measures Reorient or relocate the receiving antenna Increa...

Страница 3: ...ric shock Never spill or spray any type of liquid into the unit 19 If an outside antenna or cable system is connected to the unit be sure the antenna or cable system is grounded to provide some protec...

Страница 4: ...the display and wall mount manufacturers If you have any doubts about your ability to safely install your flat panel display contact your retailer about professional installation Make sure that the w...

Страница 5: ...ou do not touch the liquid in the panel This may cause skin inflammation If the liquid gets in your mouth immediately gargle and consult with your doctor Also if the liquid gets in your eyes or touche...

Страница 6: ...wly as shown in figure 1 Finally secure the bottom plate with 4 screws supplied 4x16mm 5 32x5 8 inches as indicated by the arrows in figure 2 Be sure to follow the instructions Insufficient tightening...

Страница 7: ...connected to this unit On Screen 3 Languages Display You can select one of 3 languages English French or Spanish for on screen programming Manufactured under license from Dolby Laboratories Dolby and...

Страница 8: ...ons 11 Connections to other equipment 12 TV operation Starting setup 15 TV operation 15 Quick guide for menu operation 16 Convenience functions 17 Memorizing channels 18 Checking the digital signal st...

Страница 9: ...ed setting during the menu screen operations Remote sensor Power Indicator Red Standby Green On POWER button INPUT ENTER button VOL VOLUME buttons MENU button CH CHANNEL buttons Rear PC DVI AUDIO IN j...

Страница 10: ...SPLAY Button When you press this button the current information will be displayed on a screen To remove the display from the screen press this button again 3 Direct Channel Selection Buttons 0 9 Allow...

Страница 11: ...or subscribers to unscrambled Cable TV service with scrambled premium channels If you subscribe to a Cable TV service in which basic channels are unscrambled and premium channels require the use of a...

Страница 12: ...picture by connecting the unit s COMPONENT VIDEO OUT jacks of your DVD player with the component video cables not supplied NOTE Component Video input of the unit are for use with a device which outpu...

Страница 13: ...ternal speakers and adjust the audio level using the TV s remote control To control the audio turn on the TV and the stereo amplifier and turn off the TV s built in speakers see page 17 NOTE To hear s...

Страница 14: ...e screws on the plug In case of a Multimedia computer connect the audio cord to the audio output of your Multimedia computer and to the AUDIO IN connector of the PC DVI AUDIO IN jack of the TV You can...

Страница 15: ...ay take approx 10 seconds for a picture to appear on screen 2 Adjust the volume level by pressing VOL or The volume level will be indicated on the screen by green bars As the volume level increases so...

Страница 16: ...LAY again to clear the call display NOTE After a few seconds DISPLAY screen will return to normal TV operation automatically SLEEP To set the TV to turn off after a preset amount of time press SLEEP o...

Страница 17: ...uage or other audio information When the TV receives a stereo or SAP broadcast the word Stereo or SAP displays on screen every time you press DISPLAY Surround On Off The dynamic presence and sound cre...

Страница 18: ...digital signals Memorizing channels can only be accomplished while a station is broadcasting a digital signal to set that channel into memory If you are unsure of the digital channels available in you...

Страница 19: ...tedly until the character you want appears in the first space Label Clear Ch Label Channel Number 15 1 Ch Label CH 1 CH The characters rotation as follows SPACE If the character which you desire appea...

Страница 20: ...ental guidance TV 14 14 years old and above TV MA 17 years old and above When you select TV Y7 TV PG TV 14 or TV MA press DISPLAY to explain the rating Genre D Dialogue L Language S Sex V Violence FV...

Страница 21: ...CS6 4 Press or to select the desired Closed Caption mode for both Digital and Analog Caption 5 Press or to select CC Priority then press or to select Digital CC or Analog CC NOTE Depending on the broa...

Страница 22: ...emote control Natural In some cases this image will display the size of standard 4 3 with a black side bar Cinema Wide1 for 4 3 format programs To fill the screen the right and left edges are extended...

Страница 23: ...hift operation buttons The status display will appear USB Memory Information Delay Time 00 02 09 Message Now Play View To delete the recorded program Disconnect the USB memory record another program o...

Страница 24: ...ATION A slight picture size variation is normal when you adjust the CONTRAST or BRIGHTNESS settings Most types of television interference can be remedied by adjusting the height and position of the VH...

Страница 25: ...cuit breaker Unplug unit for an hour then plug it back in Poor sound or no sound Station or Cable TV experiencing problems tune to another station Check sound adjustments VOL or MUTE Check for sources...

Страница 26: ...00 135 01 4A Tuner type Frequency synthesized Inputs Video RCA 1 V p p 75 ohms Audio RCA 8 dBm 50k ohms Component video Y 1 V p p 75 ohms Pb Pr 0 7 V p p 75 ohms HDMI HDMI compliant type A connector H...

Страница 27: ...ment of other manufacturers This warranty does not cover a Damage to equipment not properly connected to the product b Costs incurred in the shipping of the product to an ORION authorized Independent...

Отзывы: