background image

21

ESP

AÑOL

Para cambiar la contraseña

1

Seleccionar “Lock”, luego presione


 o 

ENTER

.

2

Utilice los 

Botones numéricos (0

-

9)

 para 

ingresar su contraseña, luego presione 

ENTER

Aparecerá el menú Lock.

3

Presione


para seleccionar “Change 

Password”, luego presione


 o 

ENTER

.

Aparecerá la pantalla Change Password.

4

Ingrese la contraseña nueva con los 

Botones 

numéricos (0

-

9)

, luego presione 

ENTER.

5

Ingrese nuevamente la misma contraseña para 

confirmar, luego presione 

ENTER

.

La contraseña queda registrada. 

Descargar el sistema de evaluación 

adicional Chip

-

V

Como suplemento para el sistema de evaluación Chip-V, 

su televisor podrá descargar un sistema de evaluación 

adicional, de ser disponible en un futuro.

Para bajar el sistema de evaluación adicional 

Chip

-

V (si está disponible)

1

Seleccionar “Lock”, luego presione


 o 

ENTER

.

2

Utilice los 

Botones numéricos (0

-

9)

 para 

ingresar su contraseña, luego presione 

ENTER

.

Aparecerá el menú Lock. 

3

Presione


para seleccionar “V-Chip” en “On” .

4

Presione


para seleccionar “V-Chip Set 

(DTV)”, luego presione


 o 

ENTER

5

Si el TV no tiene el sistema de evaluación 

adicional, comenzará a bajarlo, lo que puede 

llevar algún tiempo hasta que se complete.

6

Configure los límites de evaluación de contenidos 

preferidos para el sistema de evaluación 

adicional.

7

Para actualizar la información de clasificación, 

también necesita “Update”.

NOTA:

Puede descargar el sistema de evaluación 

adicional Chip-V sólo cuando su TV esté 

recibiendo una señal digital.

Cuando descargue el sistema de evaluación 

adicional, puede llevar un tiempo hasta que se 

complete.

El sistema de información y evaluación Chip-V no 

están determinados o controlados por el TV.

El sistema de evaluación estándar Chip-V está 

disponible ya sea que el TV reciba una señal digital 

o no, y bloquea programas analógicos y digitales.

Para establecer un nivel de  restricción usando el 

sistema de evaluación estándar Chip-V seleccione 

V-Chip Set en el paso 4.

El sistema de evaluación Chip-V que se puede 

descargar de Internet es una tecnología en 

evolución y puede variar la disponibilidad, el 

contenido y la forma.

No puede seleccionar esta función si el TV no 

recibe señal digital de la estación que está viendo.

Para borrar todos los ajustes de Chip

-

V

1

Seleccionar “Lock”, luego presione


 o 

ENTER

.

2

Utilice los 

Botones numéricos (0

-

9)

 para 

ingresar su contraseña, luego presione 

ENTER

Aparecerá el menú Lock.

3

Presione


para seleccionar “V-Chip 

Clear”, luego presione


 o 

ENTER

.

Aparecerá la pantalla V-Chip Clear.

4

Entre la contraseña nueva con los 

Botones 

numéricos (0

-

9)

, luego presione 

ENTER.


Todos sus ajustes vuelven a la configuración de 

fábrica.

Subtítulos

¿QUE ES LA RECEPCIÓN DE TEXTO?

Este televisor tiene capacidad para decodificar y 

mostrar los programas de televisión con emisión de 

texto. Esta función mostrará el texto en pantalla para 

los usuarios con problemas de audición ó traducirá y 

mostrará el texto que se encuentre en otra lengua.

Leyendas: 

Este modo de recepción de texto 

mostrará el texto en pantalla en inglés u otro idioma. 

Generalmente, los teletextos en idioma inglés se 

transmiten en C1 y en otros idiomas se transmiten en 

C2.

Texto: 

El modo Text Closed Caption (teletexto) 

suele llenar la mitad de la pantalla con el horario de 

programación e información adicional.

1

Seleccionar “Setup”, luego presione 


ENTER

.

2

Presione


para seleccionar “Closed 

Caption”, luego presione


 o 

ENTER

.

Aparece la pantalla del menú Closed Caption.

3

Presione


para seleccionar “CC Setting” en “On”.

On:

 Se muestran subtítulos en la pantalla.

Off:

 No se muestran subtítulos en la pantalla.

4

Presione


para seleccionar “Analog 

Caption” o “Digital Caption”.
Cuando selecciona “Analog Caption”, puede 

elegir entre C1, C2, C3, C4, T1, T2, T3 y T4.
Cuando selecciona “Digital Caption”, puede elegir 

entre CS1, CS2, CS3, CS4, CS5 y CS6. 

5

Presione


para seleccionar el modo de 

Closed Caption deseado para Digital y Analog 

Caption.

6

Presione


para seleccionar  “CC Priority”, 

luego presione


para seleccionar “Digital 

CC” o “Analog CC”.

NOTA:

Según la señal de emisión, algunos textos 

analógicos funcionarán con una señal de 

emisión digital. Este paso impide que dos tipos 

de textos se sobrepongan.

3FR5521A_EnSp.indb   21

3FR5521A_EnSp.indb   21

9/17/11   5:53:05 PM

9/17/11   5:53:05 PM

Содержание SLED1953W

Страница 1: ...e men al modo de Antena Before operating the unit please read this manual thoroughly Antes de usar la unidad lea detenidamente este manual de instrucciones IF CONTACT WITH CUSTOMER SERVICE IS REQUIRED...

Страница 2: ...instructions may cause harmful interference to radio communications However there is no guarantee that interference will not occur in a particular installation If this equipment does cause harmful int...

Страница 3: ...t in fire or electric shock Never spill or spray any type of liquid into the unit 19 If an outside antenna or cable system is connected to the unit be sure the antenna or cable system is grounded to p...

Страница 4: ...the display and wall mount manufacturers If you have any doubts about your ability to safely install your flat panel display contact your retailer about professional installation Make sure that the wa...

Страница 5: ...y cause skin inflammation If the liquid gets in your mouth immediately gargle and consult with your doctor Also if the liquid gets in your eyes or touches your skin consult with your doctor after rins...

Страница 6: ...the stand slowly as shown in figure 1 Finally secure the bottom plate with 2 screws supplied as indicated by the arrows in figure 2 Be sure to follow the instructions Insufficient tightening or incorr...

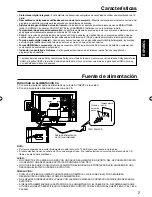
Страница 7: ...n screen programming NOTE Please make sure to insert the cord securely at both the LCD TV and the wall outlet The AC cord has a polarized type AC line plug If the supplied AC cord does not match your...

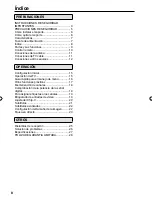
Страница 8: ...ns 11 Connections to other equipment 12 TV operation Starting setup 15 TV operation 15 Quick guide for menu operation 16 Convenience functions 17 Memorizing channels 18 Checking the digital signal str...

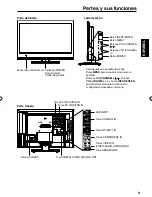
Страница 9: ...the menu screen Press MENU button to display the menu screen CH CHANNEL buttons VOL VOLUME buttons and INPUT ENTER button can be used to select the desired setting during the menu screen operations A...

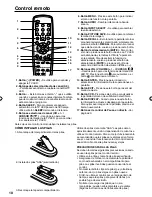
Страница 10: ...of the LCD TV 3 Button This button is used when selecting digital channels Also can display the current channel number when viewing the program 4 SLEEP Button To set the LCD TV to turn off after a pre...

Страница 11: ...For subscribers to unscrambled Cable TV service with scrambled premium channels If you subscribe to a Cable TV service in which basic channels are unscrambled and premium channels require the use of...

Страница 12: ...UDIO IN To Component OUT Audio cord not supplied Component video cord not supplied To AUDIO IN Left of the unit To COMPONENT IN To Audio OUT NOTE Component Video input of the unit are for use with a d...

Страница 13: ...S RESOLUTION AND REFRESH RATE 60 HZ Connect one end of a male to male VGA cable to the video cord of the computer and the other end to the VGA connector PC MONITOR IN on the rear of the TV Attach the...

Страница 14: ...required Connections to other equipment continued NOTE When using HDMI DVI IN to connect your HDMI or DVI devices you must select the corresponding audio input source HDMI or DVI on the menu screen se...

Страница 15: ...r on screen 2 Adjust the volume level by pressing VOL or The volume level will be indicated on the screen by green bars As the volume level increases so do the number of bars If the volume decreases t...

Страница 16: ...last channel selected by pressing RECALL Press RECALL again to return to the last channel you were watching MUTE Press MUTE to switch off the sound The TV s sound will be silenced and Mute will appea...

Страница 17: ...language or other audio information When the TV receives a stereo or SAP broadcast the word Stereo or SAP displays on screen every time you press DISPLAY Surround On Off The dynamic presence and soun...

Страница 18: ...vance for several minutes please be patient NOTE Memorizing channels is best accomplished during evening PRIMETIME hours as more stations are broadcasting digital signals Memorizing channels can only...

Страница 19: ...ENTER The Ch Label menu will appear 3 Press or to select a channel you want to label then press Ch Label Label Clear Ch Label Channel Number 15 1 CH 1 Adjust Select CH 4 Press or repeatedly until the...

Страница 20: ...TV Y7 7 years old and above TV G General audience TV PG Parental guidance TV 14 14 years old and above TV MA 17 years old and above When you select TV Y7 TV PG TV 14 or TV MA press DISPLAY to explain...

Страница 21: ...ENTER The Closed Caption menu will appear 3 Press or to set CC Setting to On On Captions will be displayed on the screen Off Captions will not be displayed on the screen 4 Press or to select Analog C...

Страница 22: ...l 3 Cinema Wide3 NOTE Selectable picture sizes may vary depending on the input source or broadcast signal Picture Size menu also can be displayed by pressing PICTURE SIZE on the remote control Natural...

Страница 23: ...ching a DTV channel or press the Time Shift operation buttons The status display will appear USB Memory Information Delay Time 00 02 09 Message Now Play View To delete the recorded program Disconnect...

Страница 24: ...TION A slight picture size variation is normal when you adjust the CONTRAST or BRIGHTNESS settings Most types of television interference can be remedied by adjusting the height and position of the VHF...

Страница 25: ...an hour then plug it back in Poor sound or no sound Station or Cable TV experiencing problems tune to another station Check sound adjustments VOL or MUTE Check for sources of possible interference Poo...

Страница 26: ...86 94 95 99 A 5 A 1 100 135 100 135 01 4A Tuner type Frequency synthesized Inputs Video RCA 1 V p p 75 ohms Audio RCA 8 dBm 50k ohms Component video Y 1 V p p 75 ohms Pb Pr 0 7 V p p 75 ohms HDMI HDMI...

Страница 27: ...ipment of other manufacturers This warranty does not cover a Damage to equipment not properly connected to the product b Costs incurred in the shipping of the product to an ORION authorized Independen...

Страница 28: ...causar interferencias perjudiciales a las radiocomunicaciones Sin embargo no garantizamos que no ocurrir n interferencias en una instalaci n en particular Si este equipo causa interferencias perjudici...

Страница 29: ...o a la lluvia o humedad si no funciona con normalidad o se ha ca do 15 El aparato no deber exponerse a objetos que goteen o salpiquen ni a recientes conteniendo l quido como jarrones 16 Una antena ext...

Страница 30: ...La experiencia del entretenimiento de cine en casa es una tendencia creciente y es cada vez m s com n comprar pantallas planas m s grandes Sin embargo las pantallas planas no siempre se colocan en sop...

Страница 31: ...tes no indican mal funcionamiento sino una limitaci n t cnica Por tanto no aceptaremos ninguna responsabilidad por esos s ntomas Las TV LED est n fabricadas con una tecnolog a de gran precisi n sin em...

Страница 32: ...eguro y acolchonado para evitar cualquier da o a la unidad No toque o presione la pantalla de la TV ya que el cristal podr a romperse con la presi n Coloque la TV sobre su respaldo parte anterior de l...

Страница 33: ...s franc s o espa ol por programaci n en pantalla NOTA Por favor aseg rese de insertar firmemente el cable tanto en la TV LED como en el enchufe de la pared El cable el ctrico tiene un enchufe de CA co...

Страница 34: ...uipos 12 OPERACI N Configuraci n inicial 15 Operaci n del TV 15 Gu a r pida para el manejo de men 16 Otras funciones pr cticas 17 Memorizaci n de canales 18 Comprobaci n de la potencia de la se al dig...

Страница 35: ...C INPUT Toma HDMI DVI IN Toma DIGITAL AUDIO COAXIAL OUT Toma RF ANT IN Parte trasera Para visualizar la pantalla de men s Pulse MENU para visualizar el men en la pantalla Botones CH CHANNEL botones VO...

Страница 36: ...do el programa 4 Bot n SLEEP Para programar el apagado autom tico de la TV LED pasado cierto tiempo utilice el bot n SLEEP del mando a distancia 5 Botones selectores de canal CH CURSOR Usado para oper...

Страница 37: ...ales premiados codificados Si usted est abonado a un servicio de TV cable en el cual los canales b sicos no est n codificados y los canales premium requieren el uso de un convertidor caja decodificado...

Страница 38: ...V deo Audio no suministrado Izquierdo del unidad A entrada de VIDEO AUDIO NOTA La entrada de v deo componente de esta unidad est prevista para su uso con dispositivos que emitan se ales entrelazadas...

Страница 39: ...TUALIZACI N 60 HZ Conecte un extremo del cable VGA macho a macho a la tarjeta de v deo del PC y el otro extremo al conector VGA del monitor PC MONITOR IN de la parte posterior de la TV LED F ije los c...

Страница 40: ...exiones a otros equipos continuaci n Izquierdo y parte trasera del unidad NOTA Cuando use el HDMI DVI para conectar sus dispositivos HDMI o DVI debe seleccionar la correspondiente fuente de entrada de...

Страница 41: ...parezca una imagen en la pantalla 2 Ajuste el nivel de volumen presionando VOL o El nivel de volumen ser indicado en la pantalla por medio de barras azules A medida que el volumen aumenta se increment...

Страница 42: ...zado al presionar el bot n RECALL Presione RECALL otra vez para regresar al ltimo canal que estaba mirando SILENCIAMIENTO MUTE Presione el bot n MUTE para silenciar el sonido El sonido del aparato ser...

Страница 43: ...segundo idioma o informaci n de audio adicional Si el televisor recibe una emisi n est reo o SAP en pantalla aparece la palabra Stereo o SAP cada vez que se pulsa el bot n DISPLAY Surround On Off El s...

Страница 44: ...cable digitales Dependiendo de la condici n de recepci n la barra desplegada puede no avanzar durante varios minutos sea paciente NOTA La memorizaci n de los canales se logra mejor durante las horas...

Страница 45: ...un canal Para crear etiquetas de canal 1 Seleccionar el men Channel luego presione o ENTER 2 Presione o para seleccionar Ch Label luego presione o ENTER Aparece la pantalla del men Ch Label 3 Presione...

Страница 46: ...cos 0 9 para ingresar su contrase a luego presione ENTER Luego aparecer el men Lock 3 Presione o para seleccionar V Chip en On 4 Presione o para seleccionar V Chip Set luego presione o ENTER Aparecer...

Страница 47: ...se puede descargar de Internet es una tecnolog a en evoluci n y puede variar la disponibilidad el contenido y la forma No puede seleccionar esta funci n si el TV no recibe se al digital de la estaci n...

Страница 48: ...a del men Closed Caption 3 Presione o para seleccionar CC Setting en On 4 Presione o para seleccionar Digital CC Preset luego presione o para seleccionar Custom 5 Presione o para seleccionar CC Advanc...

Страница 49: ...1080p s lo HDMI s lo las funciones Cinema Wide2 y Full Picture est n disponibles En modo PC solamente los tama os de imagen Natural Full y Native est n disponibles En modo PC WXGA solamente los tama o...

Страница 50: ...mpatibilidad con todos los tipos marcas de dispositivos de memoria USB No se asumir ninguna responsabilidad por p rdida de archivos en dispositivos USB derivados de la conexi n a esta unidad Estado de...

Страница 51: ...agen es normal cuando usted ajusta los controles de CONTRAST Contraste o BRIGHTNESS Brillo La mayor a de los tipos de interferencia de televisi n pueden ser solucionados ajustando la altura y la posic...

Страница 52: ...problemas Compruebe que se han hecho correctamente todas las conexiones cuando utilice el equipo con otros aparatos S NTOMA POSIBLE SOLUCI N Problemas con la pantalla en emisiones digitales Compruebe...

Страница 53: ...135 100 135 01 4A Tipo de sintonizador Frecuencia sintetizada Entradas V deo 1 0 V p p 75 ohmios Audio 8 dBm 50k ohmios Componente Y 1 0 V p p 75 ohmios Pb Pr 0 7 V p p 75 ohmios HDMI Cable HDMI conec...

Страница 54: ...Memo...

Страница 55: ...Memo...

Страница 56: ...Printed in Thailand Impreso en Tailandia J3FR5521A SH 11 10 K...

Отзывы: