background image

PANEL

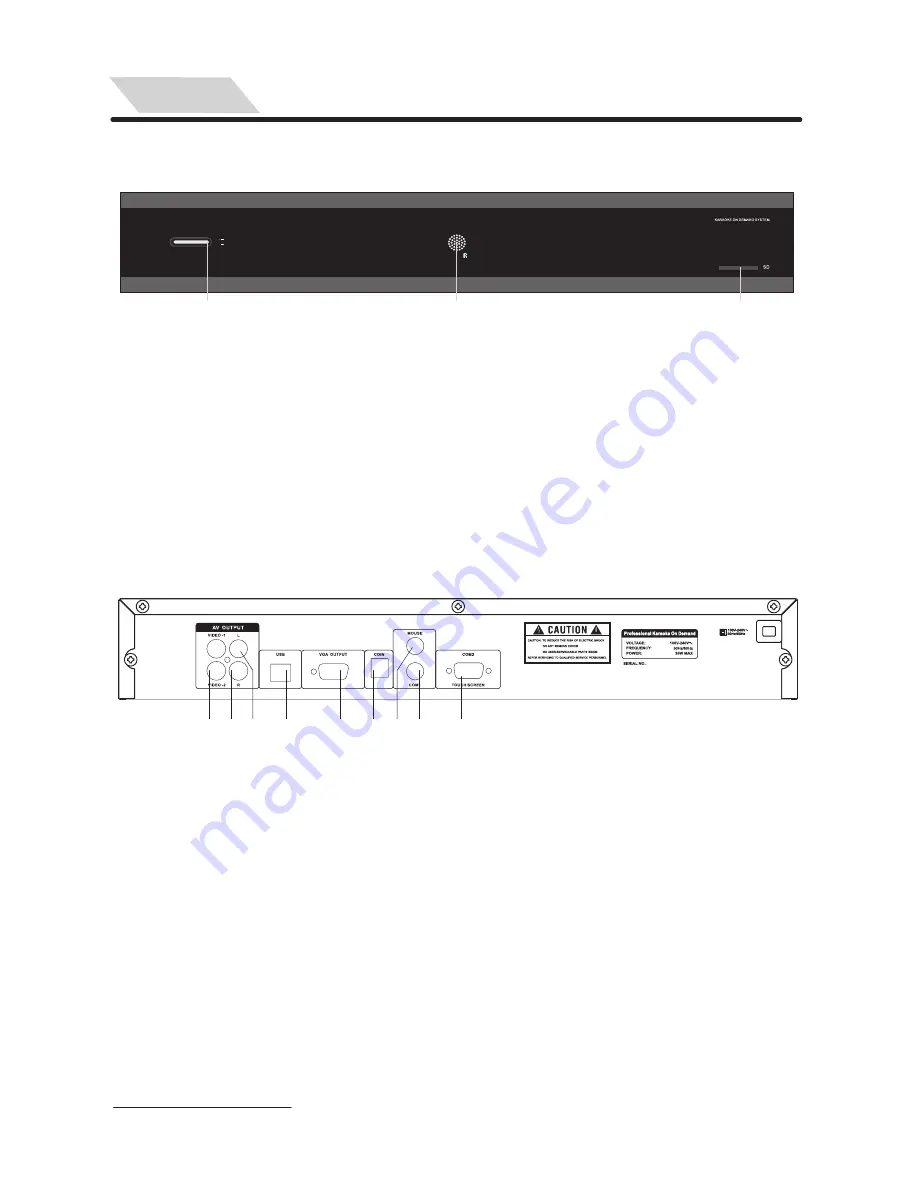
Front Panel View

1. Video Output

2. Right Channel Audio Output 

3. Left Channel Audio Output

4. USB

5. VGA Output

Real Panel View

4

1 2 3

4

5

6 7 8

9

Note: COM1 and COM2 can not support two touch screens at the same time. 

          Please select the right one for your touch screen according to the shape 

          of plug. 

6. COIN Selector Input

7. MOUSE Input

8. COM1 Input(For touch screen, 

    Extension Control Panel& MCU update)

9. COM2 Input (For touch screen)

Front Panel View

1

2

3

1. Power Button

2. Remote Sensor 

3. SD Card Reader

POWER

ON
OFF

Содержание KOD

Страница 1: ...User s Guide Professional Karaoke On Demand ...

Страница 2: ... Panel 4 How To Connect 5 Remote Controller 6 Double Screen Play Mode 7 10 Single Screen Play Mode 11 Non Karaoke Play Mode 12 13 How To Add Up Songs 14 16 How To Delete Songs 17 Trouble Shooting 18 Notes 18 Specifications 19 1 CONTENTS ...

Страница 3: ...JPEG formats etc 3 Easy to add songs by yourself 1 Add songs from PC to hard disk through provided high speed USB cable 2 Add songs from SD card through built in card reader 4 Fantastic effect to cheer up Applause and flower effects 5 Easy To Change User s Operation Interface Provides 3 different styles of user s interface in monitor operation Multi interface available 6 Supports Single Screen ope...

Страница 4: ...he following accessories are included in the box The Karaoke On Demand Jukebox Hereinafter called The KOD USB Cable Remote Controller AV Cable User s guide USB Cable Remote Controller AV Cable User s Guide ACCESSORIES 3 ...

Страница 5: ...M1 and COM2 can not support two touch screens at the same time Please select the right one for your touch screen according to the shape of plug 6 COIN Selector Input 7 MOUSE Input 8 COM1 Input For touch screen Extension Control Panel MCU update 9 COM2 Input For touch screen Front Panel View 1 2 3 1 Power Button 2 Remote Sensor 3 SD Card Reader POWER ON OFF ...

Страница 6: ... Right HOW TO CONNECT 1 TV Monitor Mouse Audio Connection 2 Touch Screen Connection 3 USB Connection Component VGA CABLE Monitor MOUSE TV Touch Screen PC Component Rear Panel Of PC Component 5 Components of TV Touch Screen Cable VGA CABLE ...

Страница 7: ...previous Menu 13 14 15 16 17 ENTER 18 Enter and confirm what you select TUNING Open close tuning menu RESERVED LIST List all reserved songs FWD Access fast forward scanning while playing Mp3 MTV DAT MPG VOB files in Non karaoke Mode ADVANCE Advance a song in reserved list REV Access backward scanning while playing Mp3 MTV DAT MPG VOB files in Non karaoke Mode PAGE UP Page up PAGE DOWN Page down WO...

Страница 8: ...H ARTIST to make you find your desired artist quickly by input the first character initial letter of each word of an artist s name See Pic 1 3 For example if you want to search an artist named Baby Fa Honey then you just need to input the initial letters of her full name as BFH then the photo of Baby Fa Honey will be displayed on screen Pic 1 2 Pic 1 3 Tips Press 1 8 buttons accordingly on Remote ...

Страница 9: ...rds in a song title For example WORD COUNTS of MY LOVE is 2 words 4 1 touch or click icon of directly on the screen to enter WORD COUNTS menu See Pic 4 1 Tips You can also press 4 on remote controller directly to enter this menu Pic 4 1 5 LANGUAGE Search a song by LANGUAGE 5 1 Touch or click on the screen directly or press 5 on remote controller to enter the menu See Pic 5 1 Pic 5 1 6 TOP HITS Top...

Страница 10: ...er to enter SONG LIST menu to see the latest updated songs list See Pic 8 1 Pic 8 1 9 MOVIES Select a movie by different types 9 1 Touch or click the icon of on screen directly or Press 9 on remote controller to enter TYPE menu See Pic 9 1 Pic 9 1 0 THEMES You can change to different style of display background on the screen The first 3 times click will change background in English version another...

Страница 11: ...rs will be effective VOCAL Vocal on off NEXT Stop current playing then go to play the next reserved song REPLAY Repeat the current playing song MUTE Mute all audio signal output VOL Music volume down VOL Music volume up MENU Enter main menu BACK Return to the previous menu Tips 1 There is a number for each item in main menu you can press the number buttons on remote controller directly to select t...

Страница 12: ...3 directly to enter 4 WORD COUNT Press to select WORD COUNT then press ENTER or 4 directly to enter then search a song by word count of the song title 5 LANGUAGE Press to select LANGUAGE then press ENTER or 5 directly to enter then search a song by language 6 NEW Press to select NEW then press ENTER or 6 directly to enter then select a song from the latest updated songs list Tips Press RETURN to r...

Страница 13: ...to play back 1 2 Press PLAY PAUSE to play or pause playing Press RETURN to exit Tips If there are hard disk and SD card inside the KOD but you didn t select a target item before browsing photos the system will play contents from hard disk automatically first then SD card 2 MUSIC Play MP3 from HD or SD card If there are MP3 songs in both of subdirectory and root directory of HD or SD card system wi...

Страница 14: ... SD card then press ENTER to enter Hard disk is the system disk for karaoke mode there are system files and folders such as KARAOKVOB LIST MOVIE ad_pic PicPack dat TaiPack dat in root directory of hard disk please do not rename or delete those files and folders or the KOD will not work properly 5 SETUP Press or 5 directly to move cursor to 5 SETUP then press ENTER to enter Setup Menu You can press...

Страница 15: ...turn on power 1 Press EXIT KARAOKE to switch to non karaoke mode See Pic 1 2 1 Pic 12 1 Pic 12 2 3 Press 3 directly or to select 3 USB mode then press ENTER to set to ON Mode See Pic 1 2 3 Pic 12 3 Tips If there is no TV for above operations to get into USB mode you can press MENU and hold on a few seconds when you turn on KOD then there is an USB icon will be displayed on the PC taskbar If PC sti...

Страница 16: ...dd up new songs into SD card move the SD card from PC to the KOD 3 Enter Setup Menu and select 5 Add Song By SD Card then press ENTER on remote controller See Pic 3 1 4 It will start to transfer data from SD to hard drive inside the KOD then there will be Upgrade finished shown on the bottom of setup menu after finishing all data transfer See Pic 4 1 Pic 3 1 Pic 4 1 5 Press 0 or RETURN on remote c...

Страница 17: ... standard SD card If you see there is a mark of SDHC on it that means it is a SDHC card but not a standard SD card The KOD supports standard SD Card only Usually a SD card under 2GB will be compatible with the KOD Make sure there are KARAOKVOB folder and LIST folder in root directory of SD card Make sure there are related files and folder in above mentioned folder Please check whether the channel ...

Страница 18: ...rmation of song tracks were listed on PC See Pic 2 1 Pic 2 1 Note How long it will take to list all information of song tracks depends on performance of PC and capacity of hard drive usually it will take about 30 seconds 3 Move cursor to the target you want to delete then right click by mouse See Pic 3 1 4 Click Delete then click Create Song Depot 5 Exit Setup Menu Done On Device Add On Device Add...

Страница 19: ...aokvob Make sure there are songs in Karaokvob folder Make sure there is a file Syspack sfl in the root directory of HD Syspack sfl is a file of font don t delete it Make sure there are songs in the right way of subfolders under KARAOKVOB in the root directory of HD Make sure there is list dat in LIST folder under the root directory of HD list dat is a index file of songs Make sure there is a file ...

Страница 20: ...rd drive included AC 100 250V 50 60Hz 3 KG 305mm 430mm 70mm 35W MAX 19 General Video Dimension Interface Max Capacity HD 2000GB SATA 3 5 Characteristics Signal Noise Ratio dB 80 Dynamic Range dB 70 1kHz Distortion And Noise dB 60 1kHz Channel Separation dB 70 1kHz Audio Output Voltage V 2 0 0 2 1 0 Frequency Response 20Hz 20kHz 3dB File System Subarea FAT32 Primary Partition SD Max Capacity 2GB ...

Отзывы: