


16
Note:
If you hold down
M
, you can set the values faster.
• Press and
M
simultaneously. The month starts flashing. Using
the
M
button, set the month 1 to 12 and confirm with .
• Set the day, hour and minute and confirm in each case with .
5. Measuring blood pressure
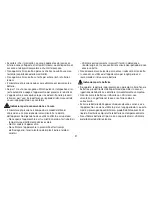
Positioning cuff
• Bare your left wrist, making sure that the circulation in the arm is
not restricted by any clothes etc. that are too tight. Position the
cuff on the inside of your wrist.
• Fasten the cuff with the Velcro fastening so that the upper edge
of the monitor is positioned approx. 1 cm below the ball of your
thumb.
• The cuff has to be fitted tightly around the wristbut should not
constrict it.
Important:
The instrument should only be operated with the original
cuff.
Correct posture
• Rest for approx. 5 minutes before each measurement. Otherwise
there may be divergences.
• You can perform the measurement while sitting
or lying. To carry out a blood pressure
measurement, make sure you are sitting
comfortably with your arms and back leaning
on something. Do not cross your legs. Place
your feet flat on the ground. Make sure to rest
your arm and move it. Always make sure that the cuff is at heart
level. Otherwise significant deviations can occur. Relax your arm
and the palm of your hand.
• In order not to distort the result, it is important to keep still during
the measurement and not talk.
Measuring blood pressure
• Start the blood pressure monitor with the button. Following the
display check, during which all numbers light up, the cuff pumps
up automatically.
• Cuff air pressure is released slowly.
If a tendency towards high blood pressure is already detectable,
the cuff is pumped up again and cuff pressure increased further.
As soon as a heart rate is detected, the heart rate symbol
is
displayed.
• Systolic and diastolic pressure are alternately displayed with the pulse.
• You can interrupt measurement at any time by pressing the button.
1
2
3
1 cm
M
M
M
• • • • • • • • • • • • •
Содержание SBC 24
Страница 38: ...38 1 2 BF 2002 96 EC WEEE Waste Electrical and Electronic Equipment...
Страница 39: ...39 20 C 50 C RH 85 SN 0483 CE 93 42 EWG 5 5 30...
Страница 40: ...40 1...
Страница 41: ...41 2002 96 EC WEEE Waste Electrical and Electronic Equipment 3 1 2 START STOP 3 M 4 5 5 3 2 1 4...
Страница 42: ...42 1 2 3 4 5 6 7 8 9 4 1 5 Micro LR 03 Pb Cd Hg 24 M M M 1 12 2 4 8 7 5 3 1 6 9...
Страница 43: ...43 5 1 5 1 2 3 1cm M M M...
Страница 44: ...44 _ 5...
Страница 45: ...45 3 180 110 2 160 179 100 109 1 140 159 90 99 130 139 85 89 120 129 80 84 120 80 1999 6 60 M A M M 3...
Страница 46: ...46 7 _ 300 3 8 9 SBC 24 0 300 60 260 40 199 40 180 3 3 5 8 8 60 94 8 x 63 3 x 25 5 103 140 195...
Страница 48: ......
Страница 52: ...52 752 910 0712 Irrtum und nderungen vorbehalten...