background image

7

  Using the Supplied AC Power Adapter

The supplied AC adapter is 9 Volts DC output 700 mA center
pin positive.

1. Insert the AC power adapter plug into the DC-In jack on the left
    hand side of the radio.
2. Plug in the AC power adapter into a standard 13A main
    socket outlet.
    Whenever the AC power adapter is plugged in to the radio and
    to the main AC outlet, the batteries are automatically disabled.

The AC adapter should be disconnected from the main AC outlet,
when the radio is not in used.
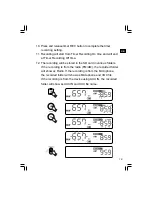
  Setting the Clock

1. Clock can be set in both ways; radio power must be on or off.
2. The display will show “- : - -“ when the batteries are installed or
    when the radio is plugged in to a main AC outlet.
3. Press and hold the time set button     until LCD flashes the time
    set symbol and also the year digit followed by a beep.
4. Press tuning up/down button to set required year.
5. Follow the above procedure step to set the month, date,
    hour and minute.
6. LCD display will stop flashing and will display the real time when
    it’s completed.

Содержание PR-D8

Страница 1: ...PR D8 Revision 2 GB...

Страница 2: ...1...

Страница 3: ...c Normal News Tone Control Lock Switch Telescopic Aerial Antenna SD Card Slot Line Out Jack DC In Jack Alkaline Rechargeable Batteries NiMH NiCad Switch Reset Button Push to Replace Batteries LCDDispl...

Страница 4: ...Clock Stereo Frequency Sleep and Snooze AM PM Timer Recording On Off Time Recording On Off Clock Alarm Buzzer Alarm Radio Time Set Unit Battery Power Indicator Station Presets Key Lock FM AM MW Band A...

Страница 5: ...s File Format Play Mode Play Pause Stop Fast Forward Fast Rewind Record MP3 file WMA file Filename Folder name Repeat one Repeat Folder Repeat All Random play Repeat A B Volume label or Disk S N Folde...

Страница 6: ...n and then replace the battery cover Important When using alkaline batteries the battery switch must be placed in the alkaline position Failure to do so could result serious damage to the batteries or...

Страница 7: ...lashes indicating that the batteries are charging When the DC jack ring stops flashing it should indicate that the batteries are fully charged Approximate charging time is 8 hours Important When using...

Страница 8: ...adapter should be disconnected from the main AC outlet when the radio is not in used Setting the Clock 1 Clock can be set in both ways radio power must be on or off 2 The display will show when the b...

Страница 9: ...dio to get best signal 3 Press and release Scan button press and hold Scan button more than 2 seconds will activate time setting the radio will search up and will stop automatically when it finds a ra...

Страница 10: ...automatically when it finds a station with sufficient signal 5 Rotate the volume control to get the required sound level 6 To turn the radio off press the power button Display will show OFF Storing St...

Страница 11: ...display Setting the Radio Alarm When the radio alarm is selected the radio will turn on and play the chosen radio station at the chosen alarm time The radio alarm will continue for an hour unless tur...

Страница 12: ...et required minute Press button again to complete the alarm time setting 6 During the radio alarm time setting the display will also flash the last tuned radio frequency Press tuning up down button to...

Страница 13: ...zer alarm can be set in both ways radio on or off 2 Press and release HWS buzzer button the symbol will show on the display 3 Press and hold button for more than 2 seconds followed by a beep display h...

Страница 14: ...llowed by a beep the display will cycle through the available sleep timers in the order of 60 45 30 15 120 90 60 Release the power button when the required sleep timer appears in the display The symbo...

Страница 15: ...ust the tuning step so the radio may continue to serve you well Upon resetting to the 12H 24H format the display will show FM and flash 50 kHz tuning step followed by a beep By pressing the up down tu...

Страница 16: ...In jack 2 Press the band button to select AUX band The display will show AUX 3 Adjust the volume control for comfort listening Operating the Radio Line Out The radio can be used as a separate tuner by...

Страница 17: ...operation when the radio is packed in a suitcase or carrying a pouch To release the lock switch simply move the switch to OFF position the LOCK icon will be disappear from the display Tone Control The...

Страница 18: ...ress TIMER REC button again to complete TIMER REC on time The display will flash TIMER REC OFF 7 Pressing tuning up or down button to select Timer REC OFF time Press TIMER REC button to complete timer...

Страница 19: ...g Off time 12 The recording will be stored in the SD card in various folders If the recording is from the radio FM AM the recorded folder will show as Radio If the recording is from the Microphone the...

Страница 20: ...es from SD Card Secure Digital SD or SDHC card which can be used with PR D8 for playback of MP3 or WMA files The PR D8 can also be recorded to SD SDHC in MP3 format The PR D8 has been tested with a ra...

Страница 21: ...standby mode without pressing the stop button the next time the unit is turned on it will return to the previous play file Selecting a File 1 While the SD card device is playing press either the fast...

Страница 22: ...Folder 1 While playing the SD card either on play or stop mode press and hold the folder up A B or folder down STOP button to skip to the next folder The first file of the next or previous folder wil...

Страница 23: ...he SD card by random Repeat File within Section A B If you d like to repeat the file only within the selected section e g learning languages during the playback press and release the button for the se...

Страница 24: ...k bits per second SD SDHC must use the FAT or FAT 32 file system in order to operate with the PR D8 SD card is usually supplied already formatted or can be formatted using a PC with a suitable card re...

Страница 25: ...select REC quality initial setting at 128 kbps Press the button to select between 64k 128k 192k and confirm the setting by pressing Play Pause button 4 Press the RECORD button until the display will s...

Страница 26: ...d release Play and Pause button the display will show Radio recording from radio AUXIN recording from Aux In and MIC recording from built in microphone 3 Press and release Play and Pause button again...

Страница 27: ...ect the folder where the file you like to delete is stored 4 Press and release Play and Pause button to enter the folder and press folder Up or Down button to select the file you like to delete 5 Pres...

Страница 28: ...y pressing up or down button to select recording quality to be 64kbps or 128 kbps or 192 kbps Confirm the selection by pressing Play and Pause button b System Setup Press Play Pause button to enter Sy...

Страница 29: ...folder up or own button to select required auto power off time To select OFF the radio will be always on unless you switch it off Note Power saving mode won t be effective when you are playing the fil...

Страница 30: ...de the battery compartment for at least 1 second this will reset the microprocessor clock time and clear all stations stored in the preset memory Care and Maintenance Do not allow this radio to be exp...

Страница 31: ...5mW Rechargeable Current of Charger 0 5A AUX IN Level 0 5Vrms typical 1Vrms max LINE OUT Level 0 5Vrms 1Vrms max MP3 WMA Features SD Card Capacity 16MB 32GB SDHC SD Card Format FAT FAT 32 Playable Me...

Страница 32: ...f this product please note that Waste electrical products should not be disposed of with household waste Please recycle where facilities exist Check with your Local Authority or retailer for recycling...

Отзывы: