background image

96

GB

Software update 

From time to time, new software features for your radio may be developed. Your radio has therefore 

been designed to allow its internal software to be updated using your Internet connection.You 

should not attempt to update your radio unless it is recommended to you by Sangean Customer 

Services. Updating the software may remove all network settings, radio station presets and alarm 

settings from your radio. It is important that you do not attempt this procedure unless you have a 

good Internet connection and a reliable mains power supply. If the radio connects to your router 

using a WiFi connection, make sure that this is also reliable before proceeding.

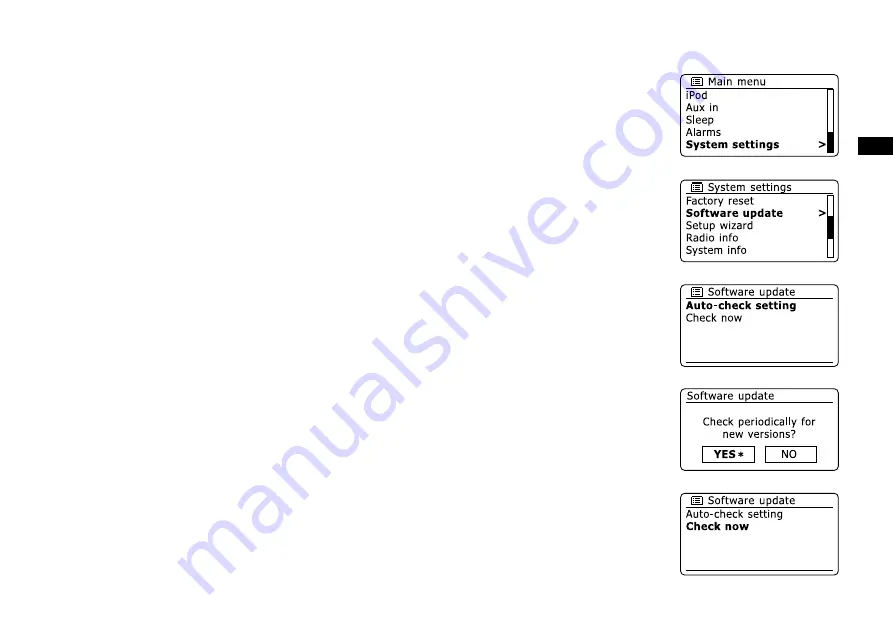
The 'Software update' option is accessed via the 'System settings' menu. When you select 

'Software update' the menu will display 'Auto check setting' and 'Check now'. If you want your 

radio to check periodically for new software versions press the Folder Up or Down buttons to 

highlight 'Auto check settings'. Then press the Select button and select 'YES'. If you do not 

want your radio to check for updates select the 'NO' option.

To check if there are any software updates available currently, press the Folder Up or Down 

buttons to highlight 'Check now' and then press the Select button. The radio will check to see if 

an update is available. The display will show 'Checking for new versions'. If there are no 

updates then the display will show 'Software up to date'. If a software update is available 

your radio will then offer the choice of updating the software or not, displaying 'New version 

available. Update software?'. Select the 'YES' option if you wish to go through the update 

process. 

If you choose to update your radio it will first download the new software and will then 

reprogram its internal memory. This may take a few minutes depending on the speed of your 

internet connection.

Once the software update is completed, the radio will prompt you to press Select to restart. 

Press the Select button and your radio will then restart. You may find that you will need to 

reconfigure your network connection following an update. You may also need to re-enter all 

radio station presets, alarm settings, and configuration options. 

VERY IMPORTANT: 

Do not switch off the power to the radio until the update operation is complete and the radio 

has restarted, otherwise the unit may become permanently damaged.

.

2.

.

.

Содержание DDR-62

Страница 1: ...Version 1 DDR 62 GB...

Страница 2: ...smartphone The app allows selection of Internet radio stations selection and control of media for UPnP DLNA music streaming from a local computer server or NAS device as well as control of FM radio a...

Страница 3: ...mode 44 52 Selecting a DAB radio station 45 Display modes 46 47 Finding new DAB radio stations 48 50 Station order setup 51 52 FM mode 53 58 Manual tuning 54 55 Scan tuning 56 Stereo Mono switching 5...

Страница 4: ...ed to know the WEP WPA or WPA2 key used for encryption so you can get the internet radio to communicate with the network or your router needs to offer WiFi Protected Setup WPS If connecting using WiFi...

Страница 5: ...ton 6 Volume Up Down button 7 Back button 8 Repeat button 9 Play pause button 10 Select stop button 11 Tuning Down Rewind button 12 SD card USB memory socket behind panel 13 Tuning Up Fast forward but...

Страница 6: ...nd connections Rear View 21 Telescopic aerial 22 Wi Fi antenna 23 Headphone socket 24 Line output socket 25 Auxiliary input socket 26 Optical output socket Toslink 27 Ethernet socket RJ 45 28 Mains in...

Страница 7: ...a button Sleep Clock set button Record button Equalizer button Alarm button Radio button Auto tune Program tracks button Random button Play Pause button Folder Down button Tuning Up Fast forward butto...

Страница 8: ...ining lugs first then apply pressure to the free end such that the catch latches the cover securely 4 If the remote is not to be used for an extended period of time it is recommended that the batterie...

Страница 9: ...ctions In this case simply keep your finger held on the remote controlbutton for 2 3 seconds until the display on the radio shows that the command has been accepted Network remote control options Netw...

Страница 10: ...enu system The info button also allows the display of information relating to the radio station or music file being played Many operations require the user to make a selection from the menu Highlight...

Страница 11: ...should be removed from the mains socket outlet completely When you apply power the display on the radio will light up and say WELCOME and STARTING with a progress indicator The first time that you use...

Страница 12: ...Winter time Press the Folder Up or Down buttons on the remote control handset to highlight YES to turn on daylight savings if required or NO if you do not wish to use daylight savings then press the S...

Страница 13: ...rd If no networks are found then you may have to get your wireless router working please see the instructions supplied with it or you may be too far from the router When the radio finds your wireless...

Страница 14: ...adio PIN the display shows an identification number which you must enter into your router using a web browser refer to your router s user documentation You should then press the Select button on the r...

Страница 15: ...character just entered long press to clear select when the complete key has been entered select to cancel an re run the Network Wizard If a WEP or WPA key has previously been entered for the selected...

Страница 16: ...rol panel to the desired network name Press the Select button to select this network The radio will then use its WiFi system to communicate with the network Depending on the settings for the new netwo...

Страница 17: ...o be compatible with the settings in your router and must be a unique address on your network If you are using DHCP for some devices and static manually configured IP addresses for others the IP addre...

Страница 18: ...he SSID setting is sensitive to upper and lower case characters and symbols You must enter it exactly as set up in your router The three controls on the right hand side of the screen have special func...

Страница 19: ...to clear Info again to continue select when the complete encryption key has been entered select to cancel and go back to the TKIP AES options screen Once the key is entered the radio should connect t...

Страница 20: ...ion If you know the name of the station and the country from which a station is broadcast this may be the easiest method to find a station It is also a great way to experience radio from other parts o...

Страница 21: ...BBC stations for example Press the Tuning Up or Down buttons on the touch panel until Location is highlighted on the display and then press the Select button to select Press the Tuning Up or Down but...

Страница 22: ...dcasts on particular dates or days of the week The examples shown here are typical Podcasts and Listen Again content can also be accessed separately from the main Internet Radio menu If your radio can...

Страница 23: ...set to scroll through the list of content types This menu is normally cyclic you can scroll the list continually in either direction When the chosen genre is highlighted press the Select button You th...

Страница 24: ...al character of the search has been entered use the Info button and then the Folder Up or Down buttons on the remote control handset to highlight the symbol on the screen and then press the Select but...

Страница 25: ...s the Select button to enter your choice Press the Tuning Up or Down buttons on the touch panel or Folder Up or Down buttons on the remote control to highlight the station that you wish to listen to a...

Страница 26: ...on Press the Tuning Up or Down buttons on the touch panel or Folder Up or Down buttons on the remote control until Podcasts is highlighted on the display and press the Select button You may then searc...

Страница 27: ...the methods described on the preceding pages 2 To store the currently playing radio station as a preset press and hold the required Preset button 1 10 on the remote control until the display shows Pre...

Страница 28: ...ect button 2 The display will then show a list of the last ten Internet radio stations or podcasts Press the Tuning Up or Down buttons on the touch panel to highlight whichever you wish to listen to a...

Страница 29: ...iability may be poor and you may find that there are many breaks in the audio this is not always the case for REAL audio streams f Format Displays the current date Additional or alternative informatio...

Страница 30: ...n account During the registration process the web site asks for an access code This allows it to uniquely identify your internet radio from the many others that it also provides data for To obtain the...

Страница 31: ...n added radio station click on the icon with a heart and minus symbol Customizing your radio cont Configuring My Favorite Stations 1 2 3 4 5 Using the website at http www wifi radio frontier com it is...

Страница 32: ...l appear on the display set up as described on the preceding page Press the Tuning Up or Down buttons on the touch panel to highlight the required station and then press the Select button to confirm y...

Страница 33: ...e it finds the new station Should you be unable to connect to a particular station please note that some radio stations do not broadcast 24 hours per day and some stations are not always on line In ad...

Страница 34: ...e WMA 10 Professional and for files which have DRM protection are not supported When using a UPnP server the search and selection criteria are determined by the server software but typically include A...

Страница 35: ...ate a library from all the media files available on your PC To add new media files to the library select Library then Music then All music or Artist Album etc This will show you the current library co...

Страница 36: ...her prompted or not in order that the radio may access the music files you will need to click the Library tab in WMP 12 and select the Stream item to open the Media Streaming window Select Automatical...

Страница 37: ...ws multiple media types select Music Some UPnP servers can serve pictures and video content to suitable devices The radio will now list the media categories which are made available by the UPnP server...

Страница 38: ...e content by Artist Album Genre etc according to your needs then press the Select button to enter your choice When you reach the album or folder the menu will then switch to showing the tracks in that...

Страница 39: ...playback of the current track 2 If you press the Play Pause button playback will resume from the point where it was paused 3 Press the Rewind Tuning Down button to start playback of the previous track...

Страница 40: ...on again Shuffle tracks 1 When playing a track activate the shuffle option by pressing the Random button Your selected tracks will be shuffled and the shuffle indicator will show on the display 2 To t...

Страница 41: ...y playing b Artist Displays the artist information for the track currently playing c Album Displays the album information for the track currently playing d Format Displays the bit rate and format of t...

Страница 42: ...m the menu Adding a single track to your playlist 1 When selecting or when playing a track using a UPnP server press and hold the Select button and the display will show Added to My playlist 2 The tra...

Страница 43: ...ing a track from the playlist 1 Press and hold the Menu button to enter the main Music Player menu 2 Press the Folder Up or Down buttons on the remote control until My Playlist is highlighted on the d...

Страница 44: ...ht NO and press the Select button to confirm Playing your playlists 1 Press and hold the Menu button to enter the main Music Player menu 2 Press the Folder Up or Down buttons on the remote control unt...

Страница 45: ...tion counter will increase and the stations will be added to the list which is stored in the radio The bar graph indicates the progress of the scan When scanning is completed the radio will list the s...

Страница 46: ...reception A question mark in front of the station name merely indicates that the station has not recently been detected by the radio It may still be available Secondary services Some DAB radio station...

Страница 47: ...ng listened to such as Pop Classic News etc c Multiplex Name Frequency Displays the name of the DAB multiplex to which the current station belongs as well as its broadcast frequency d Signal error str...

Страница 48: ...Date Displays the current date A signal strength indicator is always shown in the lower area of the display on the right hand side If the broadcast being received is in stereo then the stereo speaker...

Страница 49: ...and hold the Menu button 3 Press the Folder Up or Down buttons until Full scan is highlighted on the display 4 Press the Select button to initiate the scan The display will show Scanning and your radi...

Страница 50: ...as tuned the display shows the channel number and frequency and the name of the DAB multiplex found if any A bar graph shows the signal strength and is useful if you need to reposition the radio or it...

Страница 51: ...il DRC is highlighted on the display 5 Press the Select button to enter the DRC adjustment mode The current DRC setting will be indicated with an asterisk 6 Use the Folder Up or Down buttons to highli...

Страница 52: ...er Up or Down buttons until Station order is highlighted Press the Select button to enter the station order adjustment mode Use the Folder Up or Down buttons to choose between Alphanumeric Ensemble an...

Страница 53: ...n as needed to select DAB radio mode 3 Press and hold the Menu button to enter the DAB menu 4 Press the Folder Up or Down buttons until Prune invalid is highlighted Press the Select button 5 To cause...

Страница 54: ...dio station name If you only hear hiss or interference simply press the Auto button to scan further Your radio may have found a spurious interference signal To find more FM stations press the Auto but...

Страница 55: ...the Tuning Up or Down buttons on the radio or Tuning Up or Tuning Down buttons on the remote control to control the frequency that the radio will tune to The frequency will change in steps of 50kHz Wh...

Страница 56: ...te Displays the current date Note If no RDS information is available then the radio will only be able to display the frequency There will be no text or program type information available under these c...

Страница 57: ...an adjustment mode The current scan setting is indicated with an asterisk To set your radio so that only the stations with the strongest signals are found during scanning press the Folder Up or Down b...

Страница 58: ...r Up or Down buttons until Audio setting is highlighted on the display Press the Select button to enter the audio setting mode The current setting is indicated with an asterisk To switch to mono in or...

Страница 59: ...ns which are already stored in the presets may be over written by following the above procedure Note The radio station presets are retained in memory when the radio is switched off and disconnected fr...

Страница 60: ...acing up To remove dust and dirt breathe on the CD and wipe it with a soft lint free cloth in a straight line from the centre towards the edge Cleaning agents may damage the CD Do not expose the CD to...

Страница 61: ...D that has just been ejected press the Eject button a second time 4 Insert a disc with printed side facing up into the CD slot The disc will be loaded automatically The unit will check the CD type and...

Страница 62: ...CD is playing press either the Fast forward or Rewind buttons to change to the desired track The updated track number is shown in the display 2 You can also skip tracks when the player is paused or st...

Страница 63: ...all tracks symbol appears in the display All of the tracks on the CD will be played repeatedly Play tracks introduction 4 While the CD is playing press the Repeat button until the track introduction s...

Страница 64: ...er the selected track into the program 5 Choose another track using the Fast forward or Rewind buttons and enter it into the program using the Auto button track 10 in example shown 6 Repeat step 5 to...

Страница 65: ...o encoding software or by the hardware settings of the PC s CD writer or by the CD being used Should such problems arise contact the customer services of your CD writer or software manufacturer or loo...

Страница 66: ...The display will show Eject In order to protect the disc if it is not removed the unit will reload the disc after 10 seconds and then enter standby mode To reload a CD that has just been ejected press...

Страница 67: ...ring 15 will play the fifth file in the second folder Search function 1 While the MP3 WMA CD is playing press and hold the Fast forward or Rewind buttons Release the button when the desired part of th...

Страница 68: ...he different options a Progress Displays the playback progress for the track currently playing b File name Displays the file name and audio format of the track currently playing c Album Displays the n...

Страница 69: ...he DDR 62 Audio formats supported for playback are MP3 and WMA Playback doesnot support files encoded using WMA lossless WMA Voice WMA 10 professional nor files of any format which have DRM protection...

Страница 70: ...nd on PCs 2 To select either SD card or USB mode press the Media button until the desired mode is shown on the display Playing MP3 WMA files SD USB 1 Press the Play Pause button to start playing from...

Страница 71: ...he button when the desired file number is displayed 3 Press the Play Pause button to play the selected file Select a specific file 1 For file numbers 1 9 simply press the corresponding digit button Fo...

Страница 72: ...he SD card USB memory device in stop or play mode press and release either the Up or Down Folder button on the remote control The first file of the next or previous folder will be played Repeat Intro...

Страница 73: ...ed to those already present on the media Making a recording 1 Select the desired source for the recording Internet Radio DAB FM CD etc Internet Radio is shown in the illustration Set the volume to the...

Страница 74: ...tion shows the folders as they may appear on a PC running Windows with files in the CD folder being shown on the right Note The SD card USB memory device should only be removed when recording is stopp...

Страница 75: ...by this Insert the media that the files will be recorded on to SD or USB Press the Record button The display will show Record initial If only one media type is present the audio will stop while the so...

Страница 76: ...Tuning Up or Down on the touch panel until Delete this file is highlighted on the display 3 Press the Select button The display will ask you if you wish to Delete this file 4 If you do not wish to del...

Страница 77: ...es use the Folder Up or Down button to highlight NO and press the Select button to confirm Alternatively to delete all the files on the media use the Folder Up or Down button to highlight YES and pres...

Страница 78: ...ortant Do not connect this USB socket with your PC USB port as it highly possible may cause breakdown of the units Standby USB charger By default your radio cannot charge your handheld device with USB...

Страница 79: ...pecify that the time is not automatically updated In this case the clock must always be set manually after a power interruption With your radio switched on press and hold the Menu button to access the...

Страница 80: ...menu 3 Press the Folder Up or Down buttons until Time Date is highlighted on the display Press the Select button to enter the time setup 4 Press the Folder Up or Down buttons until Set format is high...

Страница 81: ...tings is highlighted on the display Press the Select button to enter the system settings menu To change the time zone setting go to step 11 To change from winter to summer time go to step 13 To change...

Страница 82: ...then press the Select button Press the Folder Up or Down buttons to highlight the time zone which is applicable to your location then press the Select button to confirm the setting Press and hold the...

Страница 83: ...he System settings menu Press the Folder Up or Down buttons until the desired alarm 1 or 2 is highlighted on the display Press the Select button to enter alarm setup Press the Folder Up or Down button...

Страница 84: ...DAB radio FM radio CD USB SD and iPod For whichever radio mode is selected the radio alarm may be set to any of the stations which have been stored as presets or to the station most recently listened...

Страница 85: ...th a YES or NO option Press the Folder Up or Down buttons to choose NO and then press the Select button Alarm not saved will show on the display Active alarms are shown using small alarm indicators at...

Страница 86: ...ns to highlight Off and press the Select button 4 Press the Folder Up or Down buttons until the Save option is highlighted on the display then press the Select button to save the new setting The chose...

Страница 87: ...ll appear on the display 3 Repeatedly press the Sleep Clock set button to select the desired sleep time The options are 15 30 45 60 75 90 105 or 120 minutes Use the OFF option to cancel the sleep func...

Страница 88: ...holding the Menu button Alternatively press the EQ button on the remote control and proceed to step 4 Press the Folder Up or Down buttons until System settings is highlighted on the display Press the...

Страница 89: ...adjust the treble level press the Folder Up or Down buttons until Treble is highlighted on the display Press the Select button to enter the adjustment mode and press the Folder Up or Down buttons unt...

Страница 90: ...switched on press the Folder Up or Down buttons until Normal is highlighted on the display To adjust the display brightness when the radio is in standby press the Folder Up or Down buttons until Stand...

Страница 91: ...ontrast is highlighted on the display and press the Select button 3 Press the Folder Up or Down buttons to adjust the contrast and viewing angle The contrast level indication on the screen will change...

Страница 92: ...urrent mode by pressing and holding the Menu button 2 Press the Folder Up or Down buttons until System settings is highlighted on the display Press the Select button to enter the system settings menu...

Страница 93: ...before connecting headphones to the radio It is also recommended to reduce the volume before unplugging your headphones Important Excessive sound pressure from earphones and headphones can cause heari...

Страница 94: ...on your radio 3 Press the Radio button until AUX in mode is shown on the display 4 Press the play on the connected audio device If you are using its headphone output for the connection set its volume...

Страница 95: ...lescopic aerial is suitable for most applications The telescopic aerial may be removed to allow connection to an external aerial using a coaxial cable First remove the two small screws holding the ant...

Страница 96: ...oceed If you do not wish to carry out a system reset highlight NO and then press the Select button The display will revert to the previous menu With YES highlighted press the Select button A full rese...

Страница 97: ...NO option To check if there are any software updates available currently press the Folder Up or Down buttons to highlight Check now and then press the Select button The radio will check to see if an...

Страница 98: ...1 Access the menu for the current mode by pressing and holding the Menu button Press the Folder Up or Down buttons until System settings is highlighted on the display Press the Select button to enter...

Страница 99: ...info for your radio 3 Press and hold the Menu button to exit Audio FAQ Your radio can access some audio help for Internet Radio use 1 With your radio switched on and in the Internet Radio mode press...

Страница 100: ...an use Microsoft s Windows Media Player version 11 to act as your UPnP Universal Plug and Play media server If not already installed on your PC Windows Media Player 11 may be downloaded from Microsoft...

Страница 101: ...will need to click the Library tab in WMP 11 and select the Media Sharing item to open the Media Sharing window Make sure the box Share my media to is ticked In the Media Sharing window the radio wil...

Страница 102: ...o will play the supported formats with most common UPnP servers Bit Rates The following table summarizes the maximum supported bit rates for the various audio formats that are playable on your radio H...

Страница 103: ...ed to operate the product such that there is a minimum distance 10cm recommended to adjacent objects in order to ensure good ventilation The ventilation of the product should not be restricted by cove...

Страница 104: ...quency Coverage FM DAB Wired Ethernet WiFi Circuit features Loudspeaker Output power Headphone socket Aux In socket Line Out socket Digital optical output socket Aerial System AC 100 240 V 50 60 Hz 32...

Отзывы: