Sandstrom ssc3st12 Скачать руководство пользователя страница 13

13

Cleaning

Defrosting

The freezer compartments of this unit is frost free. With proper use, there should not be any frost 
accumulated.

However, in the case of improper use of the freezer compartments, frost might build up in the freezer 
compartments after the unit has been used for a period of time. Scrape away the frost using a plastic 
scraper (not included).

We recommend that defrosting should be carried out when the frost layer builds up to 10mm (~0.39”). 
Choose a time when the stock of frozen food is low, and follow these steps:

1.  Take out the food, turn the unit off at the mains supply and leave the door open. Ideally, the frozen 

food should be put into another freezer. If this is not possible, wrap the food in several sheets of 
newspaper or large towels and then a thick blanket to keep it cool.

2.  Place a shallow bowl or pan below the freezer compartment. Scrape away the 

frost using a plastic scraper. Defrosting the remaining frost can be speeded 
up by placing a bowl of hot water inside the freezer compartment and closing 
the door. As the solid frost loosens, scrape it away with the plastic scraper and 
remove.

3.  When defrosting is complete, clean your unit’s interior and exterior.

Cleaning the Interior and the Exterior of the Unit

•  Remove all the shelves, drawers and salad bin before cleaning. To remove the salad bin first remove the 

lower fridge door shelf.

•  Wipe the inside of the unit with a weak solution of bicarbonate soda and then rinse with warm water 

using a ‘wrung-out’ sponge or cloth. Wipe completely dry before replacing the shelves, drawers and 
salad bin.

•  Use a damp cloth to clean the exterior, and then wipe with a standard furniture polish. Make sure that 

the doors are closed to avoid the polish getting on the magnetic door seals or inside the fridge/freezer 
compartments.

•  The grille of the condenser at the back of the unit and the adjacent components can be vacuumed 

using a soft brush attachment.

Cleaning Tips

Condensation may appear on the outside of the unit. This maybe due to a change in room temperature. 
Wipe off any moisture residue. If the problem continues, please contact a qualified technician for 
assistance.

Do not use a metal or sharp instrument to scrape away the frost, nor should you use any electrical 
appliances to aid defrosting.

SSC3ST12_IB_120411_Annie.indd   13

12年4月11日   下午5:55

Содержание ssc3st12

Страница 1: ...Instruction Manual Frost Free Fridge Freezer SSC3ST12 SSC3ST12_IB_120411_Annie indd 1 12 4 11 5 54...

Страница 2: ...SSC3ST12_IB_120411_Annie indd 2 12 4 11 5 54...

Страница 3: ...andby Mode for the Fridge Storage Compartment 10 Turning Off Refrigeration 10 Fault Indication 10 Noises Inside the Unit 10 Shopping for Chilled Foods 11 Tips for Keeping Food in the Unit 11 Shopping...

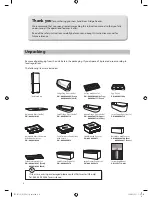
Страница 4: ...pper 0060206718 Lower Food Freshness Control Box with Cover x 1 P N 0060826072 Salad Bin with Cover x 1 P N 0060826071 Large Freezer Drawers x 2 P N 0060825972 Small Freezer Drawer x 1 P N 0060825974...

Страница 5: ...the exterior of the unit with a damp cloth If you require more information refer to the Cleaning section Before Plugging in YOU MUST Check that you have a socket which is compatible with the plug supp...

Страница 6: ...l Panel Fridge Flap Door Shelf Middle Fridge Door Shelf Large Fridge Door Shelf Small Fridge Door Shelf Small Freezer Drawer Salad Bin Freshness Control Box Adjustable Glass Shelf with Wire Wine Holde...

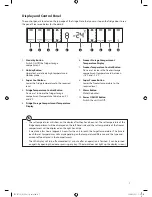
Страница 7: ...the left hand side and the set temperature of the freezer compartment will be displayed on the right hand side It may take a few hours approx 5 hours for the unit to reach the target temperatures The...

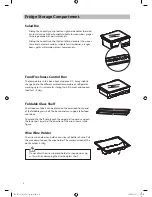
Страница 8: ...umidity control button rightward enables the salad bin to maintain a higher humidity suitable for cucumbers grapes Chinese gooseberries persimmons etc Sliding the humidity control button leftward enab...

Страница 9: ...the Freezer Temperature Control button on the right hand side of the LED display panel to adjust the temperature The setting will be automatically confirmed after 5 seconds or by pressing any button S...

Страница 10: ...power indicator and the display panel will go off The refrigerator will stop operating To restore this function press and hold the button for 3 seconds Fault Indication When the temperature shows E or...

Страница 11: ...tem of frozen food for the period shown against the 4 star rating This is usually the period stated as Best before on the front of the packaging The maximum freezing capacity of this freezer is shown...

Страница 12: ...the door and searching around unnecessarily Defrosting Frozen Food 1 Take the frozen food out from the freezer compartment and uncover the frozen food Let it defrost at room temperature Don t forget...

Страница 13: ...loosens scrape it away with the plastic scraper and remove 3 When defrosting is complete clean your unit s interior and exterior Cleaning the Interior and the Exterior of the Unit Remove all the shelv...

Страница 14: ...Time When the unit is not in use for a long period of time disconnect it from the mains supply empty all food and clean the unit leaving the door ajar to prevent unpleasant smells Disposal Old units...

Страница 15: ...er 18 C Fridge 0 8 C average 4 C Freshness Control Box 2 C 3 C Energy Consumption 0 900 kWh 24hr Energy consumption 328 kWh per year based on standard test results for 24 hours Actual energy consumpti...

Страница 16: ...he refrigerant circuit applicable only for appliances with refrigeration circuits which are accessible to the user The unit must be maneuvered by a minimum of 2 persons This unit is not intended for u...

Страница 17: ...in an organised way If food is not stored in an organised way searching for an item will mean the door is open for longer Allow hot food and drinks to cool down before placing them in the unit Placing...

Страница 18: ...uk or call 0844 800 3456 UK customers only Calls charged at National Rate If you require a replacement for any of the items listed below please quote their corresponding part numbers Replacement Part...

Страница 19: ...SSC3ST12_IB_120411_Annie indd 19 12 4 11 5 55...

Страница 20: ...SSC3ST12_IB_120411_Annie indd 20 12 4 11 5 55...

Отзывы: