background image

GB-6

Settings

Basic Operation

Preparations

Introduction and 

Product Overview

Troubleshooting 

and Specification

Safety Warnings

SD/MMC/MS

DC 5V

UNSCREW

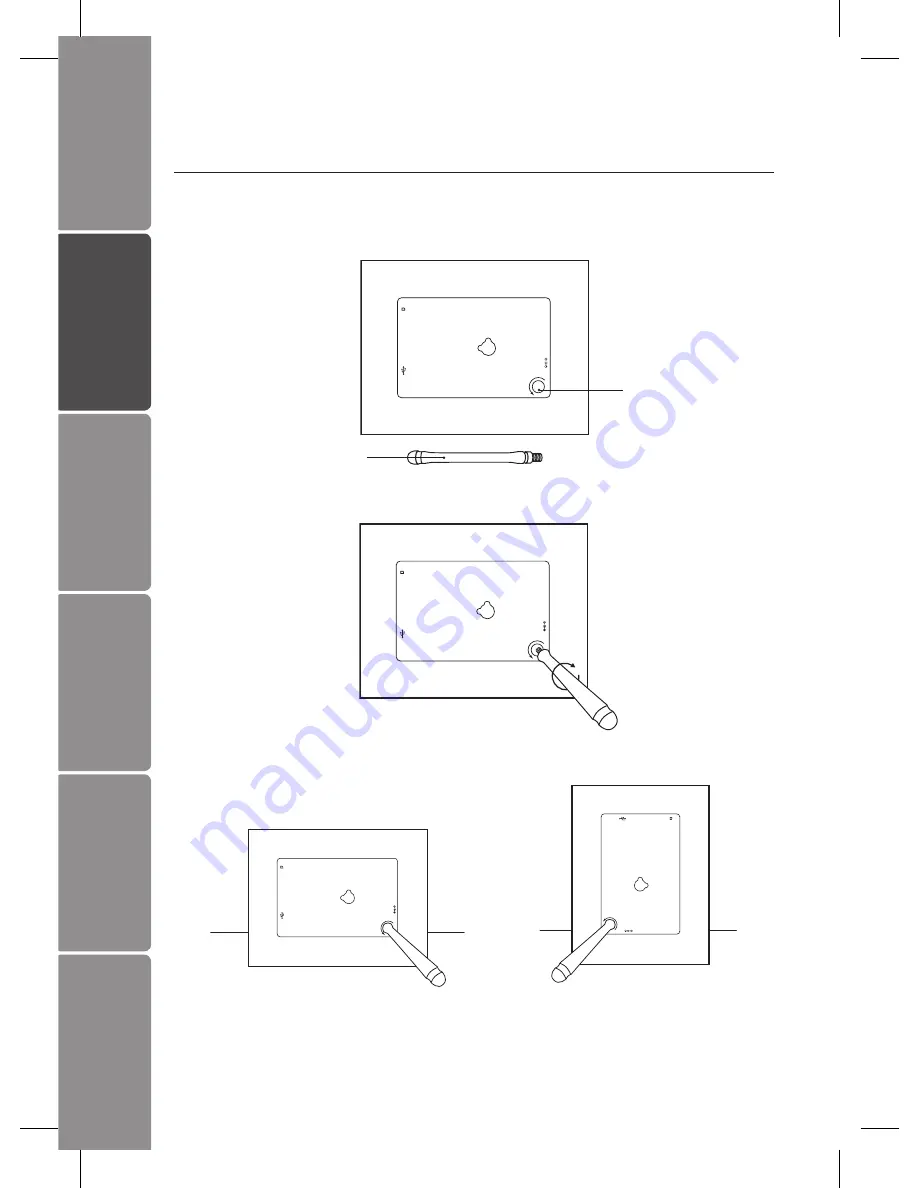
2.  Screw in the stand into the stand receptacle.

3.  Now the stand is fixed, you can choose to display your photo frame in a landscape 

or portrait position.

To take off the stand, unscrew it from its receptacle.

Preparations

Attaching the Stand

1.  Take out the stand attached in the package.

Stand

Stand Receptacle

Landscape Position

Portrait Position

SD/MMC/MS

DC 5V

UNSCREW

SD/MMC/MS

DC 5V

UNSCREW

SD/MMC/MS

DC 5V

UNSCRE

W

Содержание S08DPF10

Страница 1: ...Instruction Manual 8 Digital Photo Frame S08DPF10 ...

Страница 2: ......

Страница 3: ...ng a Memory Card USB Flash Disk 8 Basic Operation 9 Display image 9 Setting 10 Set Image Size 10 Set Slideshow Effect 11 Set Slideshow Interval 11 Set Split Slideshow 11 Rotate 12 Zoom File 12 Delete File 13 Reset Setting 13 Language 14 Brightness Contrast Color Tint 14 Time 15 Troubleshooting 16 Specifications 17 Safety Warnings 18 ...

Страница 4: ...spose it please do so according to local regulations If items are missing or damaged please contact partmaster UK only Tel 0844 800 3456 for assistance Congratulations on the purchase of your new Sandstrøm Digital Photo Frame We recommend that you spend some time reading this instruction manual in order that you fully understand all the operational features it offers You will also find some hints ...

Страница 5: ...menu or return to last display 4 button To move left or up in the menu thumbnail mode option settings To display the previous photo 5 Enter Play Pause button To confirm a setting or enter next display To slideshow the photos To pause the sildeshow 6 button To move right or down in the menu thumbnail mode option settings To display the next photo 7 Power button Press to turn the photo frame on Pres...

Страница 6: ...stand receptacle 3 Now the stand is fixed you can choose to display your photo frame in a landscape or portrait position To take off the stand unscrew it from its receptacle Preparations Attaching the Stand 1 Take out the stand attached in the package Stand Stand Receptacle Landscape Position Portrait Position SD MMC MS DC 5V UNSCREW SD MMC MS DC 5V UNSCREW SD MMC MS DC 5V UNSCREW ...

Страница 7: ...nect the supplied mains adapter 5V DC 1 2A to the photo frame and plug in the mains adapter into the mains socket 2 Press the button on the photo frame to turn it on SD MMC MS DC 5V UNSCREW DC 5V SD MMC MS DC 5V UNSCREW MENU EXIT 3 The opening screen will appear The display will automatically switch to calendar in 3 seconds To turn off press and hold the button ...

Страница 8: ...ck only one memory card or a USB flash drive at a time This unit does not support any external hard disk and MP3 player connection via the USB 2 0 A Type port Some of the newer higher capacity cards may not be compatible with this frame Do not insert a micro or mini memory card without an adapter MMC SD SD MMC MS DC 5V UNSCREW Insert your memory card into the appropriate slot following the orienta...

Страница 9: ...fter turning on the unit the opening screen will appear and after 3 seconds automatically switch to calendar display with slideshow image If no memory card is inserted a still image in the internal memory is displayed Calendar Display MENU EXIT MENU EXIT MENU EXIT M E N U E X I T Slideshow Image default Index Thumbnails Hold to scroll whole page Still Image ...

Страница 10: ...ting mode and confirm the setting Press the MENU EXIT button to exit to last menu When in slideshow you need to press the button to still an image and then you can enter the setting menu Set Image size Press and hold the MENU EXIT button to display the setting menu Press the button to select image size then press the button to select Auto fit Optimal Full The setting will activate when you exit th...

Страница 11: ...utton to select slideshow interval and then press the button to set a value from 3 seconds default 5 seconds 15 seconds 3 minutes 5 mintues and 15 minutes for the interval between images Set off on single or calendar view mode if no need slideshow is required During slideshow no matter what value including Off you set there is still no function for Set Split Slideshow In the menu press the button ...

Страница 12: ...ess the button to rotate the current image 90 clockwise Press the MENU EXIT button to exit from rotate mode and return the photo back to its original orientation Zoom File Only available on single view mode Select Zoom in the setting menu press the button to enlarge the image for total 5 times Press the button or hold the button to move the viewing area Press the MENU EXIT button to exit from rota...

Страница 13: ...n Safety Warnings Delete File Only available in thumbnail mode Enter Delete file menu select Yes and press the button to delete the selected image from the thumbnails Reset Setting Enter Reset Setting menu select Yes and press the button to confirm all settings to return to factory defaults except time setting ...

Страница 14: ... Overview Troubleshooting and Specification Safety Warnings Unplugging the photo frame won t change all the settings but will reset the time to 00 00 00 Jan 1 2011 Language Set the display language on the LCD screen English default French German Spanish Portuguese Dutch ...

Страница 15: ...lect the item you want to change and press the button to display a bar Press the button to adjust the level from 0 40 Time Press the button to highlight the year month day hour minute second option you want to set Press the button to adjust the digit and then press the button again to donfirm Finally select Save Time and press the button to activate the new time ...

Страница 16: ...ry card is compatible 3 If the photo display is distorted or cannot display properly Go to the main menu then the SETUP and change the display mode to match your photo Full Standard 4 If photo display seems slow Use lower resolution photos 5 The image is distorted or blurred Resolution of the image is too low Try playing a file with a higher resolution Resolution of 800 X 600 pixels is recommended...

Страница 17: ...D Panel View Area 800 x 600 pixels Brightness 200 cd m2 Contrast 400 1 Stand Detachable I O Ports DC IN USB 2 0 Memory Card Slot SD MMC MS Support File Format Photo JPEG AC Adapter Input AC 100 240V 0 2 max 50 60 Hz Dimensions Approx 190 x 150 x 19mm W x H x D without stand Net Weight Approx 282g Features and specifications are subject to change without prior notice ...

Страница 18: ... Do not obstruct the ventilation openings of the photo frame with items such as newspapers tablecloths curtains etc Overheating will cause damage and shorten the life of the photo frame Do not handle the power cable with wet hands Be careful with the LCD panels on the photo frame Only use attachments accessories specified by the manufacturer When the photo frame is not in use or unattended for a l...

Страница 19: ...d electronic equipment should be disposed at the end of its life separately from your household waste There are separate collection systems for recycling in the EU For more information please contact the local authority or your retailer where you purchased the product P N 71 DPF980 002 Visit Partmaster co uk today for the easiest way to buy electrical spares and accessories With over 1 million spa...

Страница 20: ......

Страница 21: ......

Страница 22: ......

Страница 23: ......

Страница 24: ......

Отзывы: