


11
5.
Install cylinder heads
1. Place head gasket on top of cylinder. Locate
on dowels installed in cylinder.
NOTE - Head gaskets should be installed clean and dry.
2. Before installing heads spin each head bolt
down on its respective stud to be sure threads
are clean and free of contamination. Place a
drop or two of oil on threads and under head of
each head bolt just prior to final assembly.
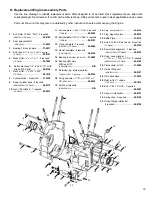
3.
Bolt heads on cylinders. Use three stage
procedure and torque values. See Figure 2.
NOTE - If different camshafts, or S&S heads assembled by
other source are used, engine builder must confirm lift
capability of valve springs and collars as well as valve-to-
valve clearance. Refer to Installation Information for S&S
Twin Cam Style Camshafts.
CAUTION - Failure to establish correct clearances can
cause extensive engine damage not covered under
warranty.
NOTE - Light coating of oil on head bolt threads minimizes
friction so torque values will not be distorted. It cannot be
emphasized enough that these steps must be done carefully.
Maintaining a good head gasket seal depends on it.
CAUTION - Improper torquing sequence and head bolt
torque values may cause head gasket failure.
6. S&S Reed
Valve
installation
The S&S Reed Valve Assembly #31-2071 included
with the crankcase is an effective way to control
internal air pressures inside the crankcase, reducing
oil carry over, blow-by, and oil leakage. It is a one-way
valve that allows for the smooth passage of air
through and out of the engine breathing system.
Installation of the S&S Reed valve is optional. It is not
required for crankcase assembly. However, its use is
highly recommended. It installs easily, and requires
no extra machining. Refer to the included iinstructions
to install the Reed Valve Assembly. See Picture E16.
NOTE - S&S recommends using the S&S Reed Valve in
conjunction with the OEM oil pump only.
7. Camshaft and cam plate installation.
S&S Camshafts install using the instructions
packaged with them. Other camshafts install per
the manufacturers instructions.
CAUTION: S&S Twin Cam style crankcases require
installation of seven o-rings (S&S #50-8066) between the
case and cam support plate. (see section “O” item 13)
8. Oil pump, lifters, lifter covers, and cam cover
installation.
These and any other components not included with
the engine kit, install per appropriate OEM service
manual.
Stage 1
8 Ft. Lbs.
Stage 2
18 Ft. Lbs.
Stage 3
Turn additional 90
O
1
2
4
3
Rear Head
2
1
3
4
Front Head
Top View
Driveside
Camside
Figure 2
S&S Reed Valve assembly and wave washer
Picture E16
Содержание 124 Twin Cam Style
Страница 20: ...Because every industry has a leader ...