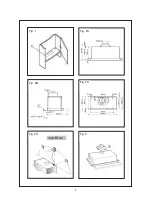
3- To fix the hood on to the kit-
chen unit, use 4 screws that are
appropriate to the unit type,
making the relevant holes in
observance of the distances indi-
cated (Fig. 2 C).
4- Fix coupling B on the upper
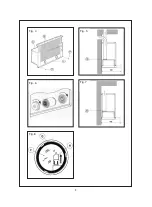
part of the hood (Fig. 3).
5- Fix the device to the kitchen
unit, aligning the front of the
hood and the cupboard door and
regulate spacer L using screws P
(Fig. 4). Finally, make sure the
back of the hood coincides with
the kitchen unit.
2.3 Extraction Version
Using a joining pipe of diameter
150 mm, connect coupling B to the
discharge opening (Fig. 5).
(This
must not be done in the filter-recy-
cling version).
2.4 Filter Version
If you require the filter version
evacuation (recycling) inside the
kitchen, you will have to ask your
supplier for active carbon filters,
which are supplied as an acces-
sory and are not included as
standard equipment.
The active carbon filters must be
used in the suction unit located
inside the hood (opposite the
motor); they must be centred and
rotated 90 degrees until you
come to a stop (Fig. 6).
To perform this operation, the
first thing that must be done is to
dismantle grids G (Fig. 4).
Finally, using a joining pipe of
diameter 150 mm, connect cou-
pling B to the discharge opening
(Fig. 7).
3. USE AND MAINTENANCE
IMPORTANT! Before carrying out
any cleaning or maintenance ope-
ration, disconnect the hood from
the electricity supply.
- You are advised to switch the
device on before cooking any kind
of food. When finished, you are
advised to leave the device on for
15 minutes for complete evacua-
tion of the contaminated air.
- The controls are comprised of a
light switch and a 3-speed selector
switch. If the hood is closed, the
device stops working.
- Proper working of the hood
depends on the frequency with
which maintenance operations are
carried out and especially fre-
quency with which the grease-
proof active carbon filters are
changed.
- The metal filters are used to trap
the grease particles that are sus-
pended in the air, which can obs-
truct the filters over time, depen-
ding on how often the device is
used. In any event, to avoid fire
hazards, the filters should be clea-
10
Содержание GET-60 NF PLUS
Страница 2: ...2 Fig 1 Fig 2A Fig 2C Fig 2D Fig 2B Fig 3...
Страница 3: ...3 Fig 4 Fig 5 Fig 7 Fig 8 Fig 6...


