background image


104 

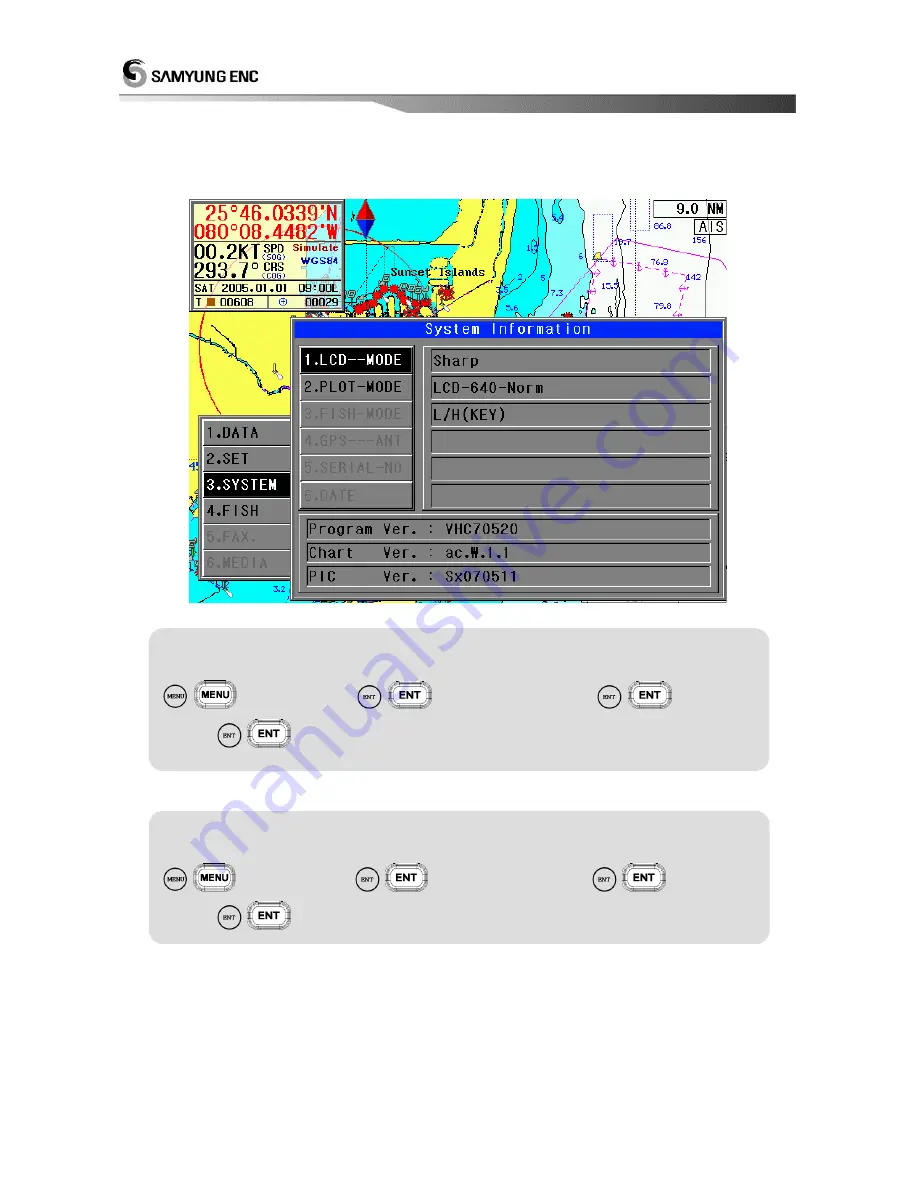
3.5 SYSTEM INFO 

Users can identify the system information such as LCD, Plotter Model, Program, Chart, Pic version,etc.


 LCD-MODE SET UP 


- LCD mode should be Sharp. 

(

)


  [3.SYSTEM] 

(

)


  [5.SYSTEM  INFO.] 

(

)


  [1.LCD-

MODE] 

(

) (PRESS Enter key to select 

Sharp/PVI-1/PVI-5

one by one.)


 PLOT-MODE SET UP 

- Plot mode should be selected to use Samyung SAS-7 Autopilot. 

(

)


  [3.SYSTEM] 

(

)


  [5.SYSTEM  INFO.] 

(

)


  [2.PLOT-

MODE]


(

) (Press Enter Key to change

Norm/AutoPilot

Mode)


Содержание NAVIS 5100

Страница 1: ...ck Data 25 1 1 1 Track Set 25 1 1 2 Track Clear 28 1 1 3 Track CALC 29 1 1 4 Track Save 30 1 1 5 Track Load 32 1 1 6 Track Erase 34 1 2 Mark Data 36 1 2 1 Mark Select 36 1 2 2 Mark Append 37 1 2 3 Mar...

Страница 2: ...rsor Setup 87 2 5 Ship Tracking 89 2 5 1 RUNNING 89 2 5 2 EDIT 90 2 6 Simulation 91 2 7 Etcetera Set 92 3 System 94 3 1 Satellite Information 94 3 2 Screen Print 97 3 3 How to test Keyboard 97 3 4 How...

Страница 3: ...3 Appendix Appendix Installation Drawing 126...

Страница 4: ...vanced Navigation device since ever developed However a navigation officer of ability should not make a decision by information from this device only which might be occurred damages in people s life a...

Страница 5: ...5 This chapter provides an overview of the GLOBAL POSITIONING SYSTEM GPS 1 GPS PLOTTER...

Страница 6: ...uire the position Once the GPS Plotter has received an accurate fix from the satellites ship s position bearing time speed and other operations can be calculated GPS Global Positioning System has two...

Страница 7: ...7 This chapter provides Features of NAVIS GPS Plotter GPS Antenna Receiver DGPS Antenna Beacon Receiver Main Unit Features Functions Standard Components 2 FEATURES...

Страница 8: ...eceiving Architecture 16 channel Multiple Tracking Receiving Channel 16 channel Receiving Code C A code 1 023 MHz chip rate Tracking Capacity 12 simultaneous satellite vehicles Receiving Sensitivity L...

Страница 9: ...n Temp Antenna 30 85 Main Unit 15 55 Humidity 95 30 60 Positioning Tracking Speed Velocity 1000Knots 514 m s Acceleration 4g Signal Correction Tracking Full Auto Tracking Micro Computer Accuracy 15m R...

Страница 10: ...s Line Drawing Mark 999 points Waypoint Route Memory 10 000 points 20 routes 1 route 20 points Navigation 2 Auxiliary Memory Unit Coast Line TRACK Event Waypoint User s Line to be saved Disk save SD c...

Страница 11: ...1EA FishFinder NAVIS800FS 2 GPS Antenna SAN 60 1EA 3 Antenna Cable RG 58C U 10 20m 4 DC Cable SQ 0 75 X3P 3m 5 Spare Fuse 24V 3A 2EA 6 Spare Fuse 12V 7A 2EA 7 Install Material 1LOT 8 Transducer 50KHz...

Страница 12: ...12 This chapter provides Device Display about GPS Plotter Display Device Remote Controller Power ON OFF Menu Plotter Display 3 Device Display...

Страница 13: ...aypoint Route Navigation ESC Return to plotter display Select MARK TRACK color other mode Select Gain Menu in the fish finder screen CNVT N S W E mutual Switch Waypoint Jump Reverse Navigation Button...

Страница 14: ...Select High Low in Fish Finder ENT Select Menu Input Data Insert Event mark Erase 8 Direction Button Moving Chart Cursor Menu CTR Move ownship to the center Move Cursor position to the center Select f...

Страница 15: ...15 3 Power ON OFF Power ON Press Power OFF Press and hold approximately 2 sec...

Страница 16: ...SHIP TRACKING 6 SIMULATION 7 ETC SET 3 SYSTEM 1 SATELLIE INFO 2 SCREEN PRINT 3 KEYBOARD TEST 4 SYSTEM SET 5 SYSTEM INFO 4 FISH 1 SCREEN SPEED 2 NOISE ERASE 3 COLOR ERASE 4 TX POWER SET 5 PULSE WIDTH...

Страница 17: ...y mode Able to choose a wishable display mode by Display mode change at Plotter Display Only Display mode change at Plotter Fishfinder Display Plotter Navigation Fishfinder Plotter Navigation Plotter...

Страница 18: ...18 GPS Plotter Display...

Страница 19: ...lay on plotter screen 13 Latitude of Cursor Latitude of current cursor position 14 Longitude of Cursor Longitude of current cursor position 15 Distance to Cursor Distance between current position and...

Страница 20: ...tter Display On the plotter screen of Plotter Fish Finder screen press button or button DEPTH BRIGHT ALARM CLEAR press BRIGHT and you can set up Brightness and Transparency Day Night screen can be shi...

Страница 21: ...21 Navigation Display In Navigation Display Press You can see Ownship s position Speed Bearing in full screen which is helpful for your sailing...

Страница 22: ...22 Fish finder Combo Display Fish finder Display...

Страница 23: ...23 Depth Info on the plotter screen On the Plotter screen Press button or DEPTH BRIGHT ALARM CLEAR DEPTH button and you can choose the screen with Depth or without Depth display Depth...

Страница 24: ...24 This chapter provides Operating Instruction in NAVIS series DATA SET SYSTEM FISH Fishfinder NAVIS 5100F 5100FS Fax Fax function available NAVIS 5100 5100F Media 4 Operating Instruction...

Страница 25: ...city is 20 000 points When the point is over 20 000 it is deleted previous point one by one Note If you choose Track data save ON Track data will be drawn and saved but if OFF is chosen track data wil...

Страница 26: ...3333h 10m 138days 21h 30 min 9999h 30m 416days 15h 60 min 19999h 833days 7h Note You can use button on the remote controller Track Save mode set up 1 DATA 1 TRACK DATA 1 SET 2 SELECT press button to c...

Страница 27: ...A 1 SET 6 SHAPE Press button to change thickness Time Interval T Mark Display 1 DATA 1 TRACK DATA 1 SET 7 T MARK Press to change ON OFF Track color selection by using Function Key TRACK COLOR COURSE U...

Страница 28: ...s function to erase the TRACK line of the Vessel How to delete All track 1 DATA 1 TRACK DATA 2 CLEAR 1 ALL TRACK Select YES How to delete Track with different color 1 DATA 1 TRACK DATA 2 CLEAR 2 COLOR...

Страница 29: ...his function to calculate the Vessel s TRACK How to calculate all track distance 1 DATA 1 TRACK DATA 3 CALC 1 ALL TRACK How to calculate Track distance with different color 1 DATA 1 TRACK DATA 3 CALC...

Страница 30: ...1 4 Track Save Use this function to save TRACK DATA to selected device while Vessel navigates How to Save Track on the internal ROM 1 DATA 1 TRACK DATA 4 SAVE Input File name From 0001 to 9999 Interna...

Страница 31: ...se it 1 6 Disk Format for your reference Track save in SD card It is available for the Model with SD slide 1 DATA 1 TRACK DATA 4 SAVE After input file name 0001 9999 SD CARD Track save by Data transmi...

Страница 32: ...32 1 1 5 Track Load Load saved file from 1 1 4 TRACK Save and Display on the plotter screen Internal ROM track load 1 DATA 1 TRACK DATA 5 LOAD Internal ROM Select to change Datum...

Страница 33: ...DATA 5 LOAD SD CARD After selecting the file that should be called Track call by data transmitting 1 DATA 1 TRACK DATA 5 LOAD COM PORT After selecting the file that should be called If the track file...

Страница 34: ...It is a function to erase TRACK file saved device at 1 1 4 TRACK Save Be pay attention to use this menu You never recover once you complete this menu Internal ROM Erase 1 DATA 1 TRACK DATA 6 ERASE Int...

Страница 35: ...35 SD card erase It is available for the Model with SD slide 1 DATA 1 TRACK DATA 6 ERASE SD CARD Select the file that should be erased Select YES...

Страница 36: ...for button and button Select Start drawing line or Keep drawing line and on the plotter screen Select each position of the cursor and then press and you can draw the line for more than 2 position If...

Страница 37: ...hip s position After pressing button and after moving cursor if button is press Mark can be appended easily Total 10 000 MARK are available If you use out of 10 000MARK It is shown MARK out message in...

Страница 38: ...lear a mark All Mark clear 1 DATA 2 MARK DATA 3 CLEAR 1 ALL MARK Select YES Mark clear in ownship s position 1 DATA 2 MARK DATA 3 CLEAR 2 SHIP POS Mark clear each color 1 DATA 2 MARK DATA 3 CLEAR 3 CO...

Страница 39: ...r way of Mark on plotter display Moving direction on the MARK that will be cleared Using direction key Mark clear in a value of Lat Lon 1 DATA 2 MARK DATA 3 CLEAR 4 LAT LON Input the value of LAT Inpu...

Страница 40: ...40 1 2 4 Mark Save 1 2 2 Mark Append is saved to saving tool as a file Save in internal ROM 1 DATA 2 MARK DATA 4 SAVE Input file name 0001 9999 INTERNAL ROM...

Страница 41: ...with SD slide 1 DATA 2 MARK DATA 4 SAVE Input file name 0001 9999 SD CARD MARK save by data transmitting The function that is saved into other equipment by using external input ouput terminal 1 DATA...

Страница 42: ...42 1 2 5 Mark Load 1 2 4 Display a mark in a Plotter screen after calling a saved file from a storage tool Mark load saved in internal ROM 1 DATA 2 MARK DATA 5 LOAD INTERNAL ROM After select Datum...

Страница 43: ...lide 1 DATA 2 MARK DATA 5 LOAD SD CARD Select the file that you will load Mark load saved by data transmitting 1 DATA 2 MARK DATA 5 LOAD COM PORT Select the file that you will load If mark file saved...

Страница 44: ...1 2 6 Mark Erase 1 2 4 Erased a saved MARK file from a storage tool Must be careful to command this delete due to no recover the file Internal ROM erase 1 DATA 2 MARK DATA 6 ERASE INTERNAL ROM Select...

Страница 45: ...45 SD card erase It is available for only the model with SD slide 1 DATA 2 MARK DATA 6 ERASE SD CARD Select the file you want to erase Select YES...

Страница 46: ...play Displayed a coastal line drawn by a user into a Plotter screen In setting ON the coastal line is displayed in a function of 1 3 2 User s Line Drawing in advance User s coast line display ON OFF 1...

Страница 47: ...ng 1 DATA 3 USER S LINE 2 DRAWING After mover the coordinates cursor to the position of line drawing start After move the cursor to a point to be connected In order to jump the coastal line up to anot...

Страница 48: ...button Letter input Direction key CTR key Coastal line erase mode 1 DATA 3 USER S LINE 2 DRWAING After move the cursor to a point of start of range that you want to erase Range set Using direction ke...

Страница 49: ...l Line Save 1 3 2 Coastal data is saved into a storage tool in a coastal drawing Coastal line save in internal ROM being able to save only one file 1 DATA 3 USER S LINE 3 SAVE Input file name 0001 999...

Страница 50: ...with SD slide 1 DATA 3 USER S LINE 3 SAVE Input file name 0001 9999 SD CARD Coastal line save by data transmitting The function that is saved into other equipment by using external input ouput termin...

Страница 51: ...3 4 Coastal Line Load 1 3 3 Displayed a mark in a Plotter screen after calling a saved file from a storage tool Coastal line load in internal ROM 1 DATA 3 USER S LINE 4 LOAD INTERNAL ROM After select...

Страница 52: ...th SD slide 1 DATA 3 USER S LINE 4 LOAD SD CARD Select file that you load Coastal line load by data transmitting 1 DATA 3 USER S LINE 4 LOAD COM PORT Select file that you load If user s line file is l...

Страница 53: ...stal Line Erase 1 3 3 Delete a coastal line file from a storage tool Must be careful to command this delete due to no recover the file Coastal line erase in internal ROM 1 DATA 3 USER S LINE 5 ERASE I...

Страница 54: ...54 Coastal line erase in SD card It is available for only the model with SD slide 1 DATA 3 USER S LINE 5 ERASE SD CARD Select the file name that you want to erase...

Страница 55: ...Function to mark the waypoint that the user registered into a Plotter screen In setting ON the waypoint is marked in a function of 1 4 2 Waypoint Edit in advance Registered waypoint display ON OFF 1 D...

Страница 56: ...9 score Waypoint registration mode 1 DATA 4 WAYPOINT DATA 2 EDIT Select waypoint number Input a LAT of waypoint Input a LON of waypoint It is possible to omit after this Select Mark Select Mark color...

Страница 57: ...p Waypoint Waypoint Press to edit Waypoint Delete waypoint data edited At waypoint Select blank number Overlap Select number to be deleted by direction key Move waypoint data to another number Ex In c...

Страница 58: ...function is to save the Lat Long of the waypoint MARK name registered from 1 4 2 Waypoint Edit into an available storage tool as a file Save waypoint at Internal ROM 1 Data 4 Waypoint Data 3 Save Inpu...

Страница 59: ...available model only 1 Data 4 Waypoint Data 3 Save Input File name 0001 9999 SD Card Save Waypoint by data transfer To save waypoint data by external data in out terminal 1 Data 4 Waypoint Data 3 Sav...

Страница 60: ...4 Waypoint Load 1 4 3 Display a waypoint in a Plotter screen after calling a saved file from a storage tool Load waypoint saved at internal ROM 1 Data 4 Waypoint Data 4 Data Internal ROM Select datum...

Страница 61: ...nly 1 Data 4 Waypoint Data 4 Load SD Card Select file to be loaded Load waypoint saved by data transfer 1 Data 4 Waypoint data 4 Load Com PORT Select file to be loaded Once you load waypoint data file...

Страница 62: ...ool Must be careful to command this erase due to no recover the file Erase waypoint at internal ROM 1 Data 4 Waypoint Data 5 Erase Internal ROM Select YES Erase waypoint at SD Card SD slide available...

Страница 63: ...gistered till 20 numbers per a route The Lat Lon of the waypoint should be registered into 1 DATA 4 WAYPOINT DATA 2 EDIT in advance and it can be possible to register to a route DATA To edit Route 1 D...

Страница 64: ...ted route while sailing Move cursor to the waypoint you want to pass Press then the waypoint is passed temporary being displayed J Jump Press once again to cancel Edited route waypoints would be used...

Страница 65: ...ve any data without the Disc Format Note In case of Disk Format failure SD CARD damaged Insert New Card Internal Slide defected Not being inserted SD Card To format disk 1 Data 6 Disk Format 1 SD Card...

Страница 66: ...e description of abbreviated form and symbol for seabed displayed on the plotter chart To open Seabed 1 Data 7 Seabed Type To display Calendar on the screen Plotter or Navigation screen 7 Calendar Mov...

Страница 67: ...te Able to replace the plotter program in a main after call the newest plotter program saved into a storage tool To update program Service Engineer Mode Insert storage tool which has new program 1 Dat...

Страница 68: ...when the vessel navigates between two waypoints registered in 1 4 2 Waypoint Edit or to the waypoint registered in a current own position Waypoint Navigation Set 2 SET 1 Navigation 1 Waypoint Navigat...

Страница 69: ...ton menu On plotter screen 6 Waypoint Edit or Select waypoint Select Navigation menu Exit Waypoint Navigation Soft Key in Remote Press 2 1 4 Exit WPT RTE ANCHOR Exit Waypoint Navigation by F key Exit...

Страница 70: ...ute registered in 1 5 1 Route Edit with Route Navigation Set 2 SET 1 Navigation Set 2 Route Navigation Select edited route number 01 20 Route Navigation in reverse order Select route number 01 20 R le...

Страница 71: ...71 Exit Waypoint Navigation Press Soft Key of Remote controller 2 1 4 Exit WPT RTE ANCHOR Exit Route Navigation by Function Soft Key Exit Depth Dimmer Alarm Exit Alarm Press then exit alarm...

Страница 72: ...a new route navigation in a plotter screen with ease More easy to set Route Navigation Move cursor to waypoint Edit the first route waypoint number 9980 Move cursor next waypoint Edit second route wa...

Страница 73: ...range set up as inputting the position information of the current own ship It can be used with 2 2 3 Anchorage Alarm Set Anchor 2 SET 1 Navigation Set 3 Anchor Own ship is set as Anchor position It is...

Страница 74: ...2 2 3 Anchor Alarm ON It is displayed Red Circle When it is broke anchor Alarm is blown Exit Anchor Press 2 1 4 Exit WPT RTE ANCHOR Exit Anchor by F key Exit Depth Dimmer Alarm Exit Alarm Press then...

Страница 75: ...ators to clear the Waypoint Navigation the navigational functions of Route Navigation Anchorage Setup and Monitoring Setup Exit WPT RTE ANCHOR 2 SET 1 NAVIGATION SET 4 Exit WPT RTE ANCHOR Soft Key to...

Страница 76: ...this function is designed to create an alarming once the own ship enters into the radius distance of the preset final destination Set Arrival Alarm ON OFF 2 SET 2 ALARM SET 1 ARRIVAL ALARM Whenever E...

Страница 77: ...Note Ownship is entering in range of Arrival Alarm Red circle is flashing and Alarm is ringing Exit Arrival Alarm by remote controller Press Exit Arrival Alarm by F key Exit Depth Dimmer Alarm Exit Al...

Страница 78: ...creates an alarming once the own ship derails the preset course range on her way to the destination Note XTE range is displayed blue line means XTE distance Exit XTE ALARM 2 SET 2 ALARM SET 2 XTE ALA...

Страница 79: ...he equipment can send out an alarming when the owns ship gets out of the preset range mostly due to the tidal wave the ocean weather etc Set Anchor Alarm ON OFF 2 SET 2 ALARM SET 3 ANCHOR ALARM Whenev...

Страница 80: ...e Alarm When under voyage the own ship can use the function to create an alarming where any underwater cables are installed Set SEA CABLE Alarm 2 SET 2 Alarm Set 4 Sea Cable Alarm Whenever pressing Se...

Страница 81: ...perators when it senses any specific water depth within the preset alarming range through the transducers It is available to input 1m 999m Set Depth Alarm ON OFF 2 SET 2 ALARM SET 5 DEPTH ALARM Whenev...

Страница 82: ...m This is a function to make an alarming when the equipment senses any fish school under voyage Set FISH ALARM ON OFF 2 SET 2 ALARM SET 6 FISH ALARM Whenever pressing Selected ON OFF Fish signal Low M...

Страница 83: ...er input own ship data at the 2 3 Own Ship Set AIS alarm will activate when another vessel comes thru within a own ship radius in AIS screen How to set AIS Alarm ON OFF 2 SET 2 ALARM SET 7 AIS ALARM P...

Страница 84: ...F To display Own Ship in the center of plotter screen 2 SET 3 OWN SHIP SET 1 AUTO CENTER Set Ship Mark Size To set Own Ship Size 2 SET 3 OWN SHIP SET 2 OWN SHIP SIZE RADIUS SET A function to indicate...

Страница 85: ...above 0 000 001 00 01 Position smoothing can be 0 Refer to the value on the above table to make speed and direction change optimum based on the vessel s navigation condition Vessel speed mode set up F...

Страница 86: ...n 00 00 99 99 Edit LON Correction 00 00 99 99 Heading Display ON OFF 2 SET 3 OWN SHIP SET 6 Heading DIsplay Heading Size 2 SET 3 OWN SHIP SET 7 Heading Size Heading Color 2 SET 3 OWN SHIP SET 8 Headin...

Страница 87: ...up the information on Cursor shown on the plotter display CURSOR SIZE SET UP 2 SET 4 CURSOR SET 1 CURSOR SIZE TO CHANGE BIG OR SMALL CURSOR PRESS ENTER KEY CURSOR COLOR SET UP 2 SET 4 CURSOR SET 2 CUR...

Страница 88: ...R SET 3 CURSOR SHAPE TO CHANGE THE THICKNESS PRESS ENTER KEY CURSOR LINE SET UP This function is to change the blue line from own ship to cursor when users press the cursor button 2 SET 4 CURSOR SET 4...

Страница 89: ...ficially used for the cases that a fleet of ships work together to spot the position of other ships Prior to setting up Track at ON 2 5 2 How to edit Track of Ship Position should be done first NOTE E...

Страница 90: ...ote To delete the ship ID Input 9 digit ID and press To delete ship name just input Blank Press to input the calling interval Input the Interval How to edit Track of Ship Position 2 SET 5 SHIP TRACKIN...

Страница 91: ...red for the real navigation to look as if ships are under voyage on the Plotter Display SIMULATION SET UP PLOTTER SIMULATION SET 2 SET 6 SIMULATION 1 PLOTTER Press Enter key to choose ON OFF FISH FIND...

Страница 92: ...NORTH MUST BE USED DISTANCE UNIT SET UP 2 SET 7 ETC SETTING 1 DISTANCE UNIT Press Enter Key to choose NM KM MM MAGNETIC VARIATION SET UP True North differs slightly from Magnetic North This is Magneti...

Страница 93: ...UNCTION BUTTON TRACK COLOR COURSE UP DESTINATION COURSE UP Press to use COURSE UP function POSITION PRINTING SET UP Function to print own ship position speed direction in pre setting time interval 2 S...

Страница 94: ...ecrease the position differentiation through receiving the position correction signal from a separate standard correction station located on land The measured positional deviation of GPS is some less...

Страница 95: ...M 1 SATELLITE INFO 3 UTC CORRECTION Enter Setting Up time TIME DISPLAY 12 24 SET UP 3 SYSTEM 1 SATELLITE INFO 3 12 24 SET PRESS ENTER KEY TO CHOOSE 12 24 HOURS DISPLAY VESSEL SPEED SET UP MODE Functio...

Страница 96: ...say Geodetic Datum is the Survey Datum which is common worldwide Geodetic Datum is one thing as a definition but each country has different time of establishment mechanism and accuracy ITRF WGS PZ da...

Страница 97: ...w to test Keyboard Users can make a self test to see if the remote works okay HOW TO TEST KEYBOARD 3 SYSTEM 3 KEYBOARD TEST Press each button to check the same button is pressed on the screen If not t...

Страница 98: ...c NOTE INTERNAL User can directly use the data received from GPS linked to this System EXTERNAL User can use the data interfaced from other equipment to input this system GPS Port Set up Function to s...

Страница 99: ...utput PORT Set Choose NMEA version Choose bps Choose Time Interval In case of connecting Samyung Auto pilot SAS 7 Move cursor to PLT on the Output Sentence Check PLT AIS SET Function to display AIS da...

Страница 100: ...100 AIS DATA DISPLAY SET 3 SYSTEM 4 SYSTEM SET 3 AIS SET 2 DISPLAY SET Choose Mark you want Check...

Страница 101: ...e 9 ETC COLOR is to set the color for the vessel which is not set from 4 Target Color 2 To 8 Target color 6 Color Selection only AIS TARGET COLOR SET Function to set each MID Country code per each col...

Страница 102: ...p NAME Ship Name C SIGN Call Sign MMSI Maritime ID IMO NO IMO number DRAUGHT Draught S TYPE Ship Type DEST Destination NAV Current Navigational Status LAT Latitude LON Current Longitude of Ship SOG Sp...

Страница 103: ...e color of the map on the plotter screen 3 SYSTEM 4 SYSTEM SET 6 Chart Color Set 1 Color Mode Press Enter Key to change Mode 1 Mode 2 User Mode one by one LANGUAGE Set Up 3 SYSTEM 4 SYSTEM SET 7 LANGU...

Страница 104: ...ic version etc LCD MODE SET UP LCD mode should be Sharp 3 SYSTEM 5 SYSTEM INFO 1 LCD MODE PRESS Enter key to select Sharp PVI 1 PVI 5 one by one PLOT MODE SET UP Plot mode should be selected to use Sa...

Страница 105: ...in order How to change F Finder screen size on the plotter screen Press to select plotter with F Finder screen Press to see Set Menu Press to reduce F Finder screen size Press to enlarge F Finder scr...

Страница 106: ...req Low Freq Set up Press to select High Freq Low Freq Dual Freq in order Press on the Plotter F Finder screen or Fish Finder screen RANGE SET Depth is deeper Max 1500m Depth is shallower Min 5m DEPTH...

Страница 107: ...finder line homing magnification screen To select the screen press on F Finder only screen Press to change frequency Depth Range Set Up by using Function Key RANGE SET STC GAIN RANGE SET Press to set...

Страница 108: ...g magnification screen Press to shift Line Homing magnification screen in order Line magnification range set up Press to change the range 2 5m 5m 10m 20m 40m 80m in order Press to change the range in...

Страница 109: ...09 4 1 Screen Speed A function to adjust a screen moving speed How to adjust Fish Finder screen shift speed Normally HIGH is set Press Select 4 FISH 1 SCREEN SPEED Select the speed Off Low Mid High X...

Страница 110: ...110 4 2 Noise Erase To erase an interfacing signal occurs periodically or temporally is shown as noise on fish finder display Erasing Noise set up 4 FISH 2 NOISE ERASE Select OFF Low Mid High...

Страница 111: ...Color Erase Clear a color for noise and response for unnecessary school of fish step by step It helps to recognize of big fish group with distinct display NOISE ERASE SET 4 FISH 3 COLOR ERASE OFF Low...

Страница 112: ...112 4 4 Tx Power Set To adjust a transmitting output of supersonic wave transmitted from transducer TX POWER SET UP 4 FISH 4 TX POWER SET Select High Low...

Страница 113: ...PULSE WIDTH SET In response to range of depth and transmitting times adjust transmitting power by LOW and HIGH about automatic adjustment of pulse width PULSE WIDTH SET UP 4 FISH 5 PULSE WIDTH Select...

Страница 114: ...114 4 6 COLOR PATTERN SET Select a color to show a fish group and three colors available COLOR PATTERN SET 4 FISH 6 COLOR PATTERN SELECT PATTERN 1 PATTERN 2 PATTERN 3 and then press...

Страница 115: ...115 4 7 A SCOPE SET A scope on or off A Scope Set Press 4 Fish 7 A Scope Set Select ON OFF and Press...

Страница 116: ...ft water depth adjustment water temperature display offset and frequency Water Temperature Set up 4 FISH 8 ETC SET 2 TEMPER DISPLAY Press to choose ON OFF Draft Set 4 Fish 8 ETC Set 1 Draft Set Set Dr...

Страница 117: ...After Input Offset Value 9 9 9 9 Frequency Set Plotter Fish of Fish only 4 Fish 8 ETC Set 4 Frequency Set when you Press the Key Low High Dual will be shown stepwise Depth Set 4 Fish 8 ETC Set 5 Auto...

Страница 118: ...118 5 Weather Fax...

Страница 119: ...6 MEDIA 6 1 TV VTR 6 2 CAMERA This function is to see the screen from camera Connect the camera cable to plotter and you can see the screen from the camera on the plotter Camera 1 set up 6 MEDIA 2 CAM...

Страница 120: ...120 6 3 CAMERA SCAN Camera scan function is available and it enables the pictures from each camera to plotter screen Camera Scan Set up 6 MEDIA 6 CAMERA SCAN...

Страница 121: ...121 6 4 MULTI MEDIA 6 5 MEDIA OFF This function is to stop all the function in Media menu MEDIA OFF SET UP 6 MEDIA 8 MEDIA OFF...

Страница 122: ...amera scan function can be set up here NOTE Bright Adjusting the screen brightness Contrast Unlike Brightness Contrast limits the maximum value of white color On the screen this makes the phase recogn...

Страница 123: ...123 This Chapter describes a Maintenance and Diagnosis for NAVIS Series System Maintenance and Repair Diagnosis 5 System Maintenance Diagnosis...

Страница 124: ...ck up the condition for all sorts of the cables Replace it with new one if it is damaged or cut off Earth Terminal and cable Check up the condition of the Earth terminal If it is rusted or defective r...

Страница 125: ...s Screen color is sometimes changing Check LCD contact point Clean contact point for LCD connector Position coordinator is inaccurate Check whether KOREA is selected at Geodetic tool Set the value 0 i...

Страница 126: ...126 This Chapter describes the appendix related to the operation of the unit Appendix Installation Drawings Appendix...

Отзывы: