background image

Product Data Sheet

V603-T Trim To Suit V132-IS / V132-AIS

- Available Control Options -

V603-TM

V603-TMB

V603-TX

V603-TXB

V603-TL

Содержание V603-T

Страница 1: ...Product Data Sheet V603 T Trim To Suit V132 IS V132 AIS Available Control Options V603 TM V603 TMB V603 TX V603 TXB V603 TL ...

Страница 2: ......

Страница 3: ...Dimension Key V603 TM V603 TMB ...

Страница 4: ...Dimension Key V603 TM V603 TMB ...

Страница 5: ...Dimension Key V603 TL ...

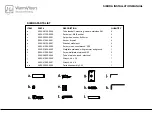
Страница 6: ...d Screw Washer Cheese Head Screw Washer Volume Spindle Diverter Body Thermo Collar Diverter Valve Locking Nut Diverter Cartridge Threaded Shank Shower Plate Thermo Body Volume Body Thermo Spindle Thermo Locking Nut CD Valve Clockwise Closing Thermostatic Cartridge Threaded Shank 1 2 3 4 5 6 7 8 9 10 11 12 13 14 15 16 17 18 ...

Страница 7: ...Installation 1 Install the finished surface ensuring the finished surface is in accordance with the minimum and maximum installation depths shown on the drawings in the front of this booklet ...

Страница 8: ... Attach spindle assembly C onto the temperature cartridge B ensuring that the step on the temperature ring A lines up with the gap on the spindle assembly C 5 Secure the spindle in place by accessing the concealed screw in the spindle assembly C using Allen key D 6 Screw volume collar E onto the diverter valve F and threaded collar G onto the volume cartridge H ...

Страница 9: ...ssembly I will sit 8 Push trim plate assembly I onto the installed shower 9 Clamp the trim plate assembly in place by screwing the diverter body J onto threaded shank E and the volume body N onto the threaded shank G 10 Assemble spindles K washers L and screws M Set Up ...

Страница 10: ...C 106 F 109 F An additional temperature increase is available by pressing in the sprung loaded cross top as shown at the maximum setting The unit automatically clicks back into pre override when rotated back towards cold For further temperature increases please see Adjusting The Temperature ...

Страница 11: ... the concealed screw using Allen key D Note To remove the spindle assembly C the gap in the spindle assembly C must be in line with the step on the temperature collar A 3 Rotate the spindle anti clockwise to make the water hotter and clockwise for colder 4 Reassemble the spindle assembly C ...

Страница 12: ... B followed by screw A Note It is imperative that the anti rotational washer is installed 3 Levers are also available Assembly method is identical Position lever at the preferred angle 4 Using a flat edge screwdriver E tighten the screw A down against the anti rotational washer B to its fullest extent 5 Insert the indice D to complete assembly ...

Страница 13: ...ng assembly guide screw B to mimic the desired position of the Luxe Lever 3 Carefully remove screw B and secure adapter using screw C and washer D 4 Attach Luxe Lever E to adapter A using screw G and washer F 5 Conceal screw using indice H Luxe Lever Assembly Instructions ...

Страница 14: ......

Страница 15: ......
Страница 16: ...en ausgeführt werden 2 Vor Installation Wasserleitung gründlich durchspülen Verschmutzung wird die Funktion der Kartusche erheblich einschränken 3 Für Mischbatterien ist es wichtig daß Wasser mit gleichem Druck eingefuhrt wird 4 Um den optimalen Zustand dieses Produktes zu erhalten wischen Sie es bitte nur mit einem feuchten weichen Lappen ab Auf keinen Fall Scheuermittel verwenden Flecken lassen ...

Отзывы: