background image

5

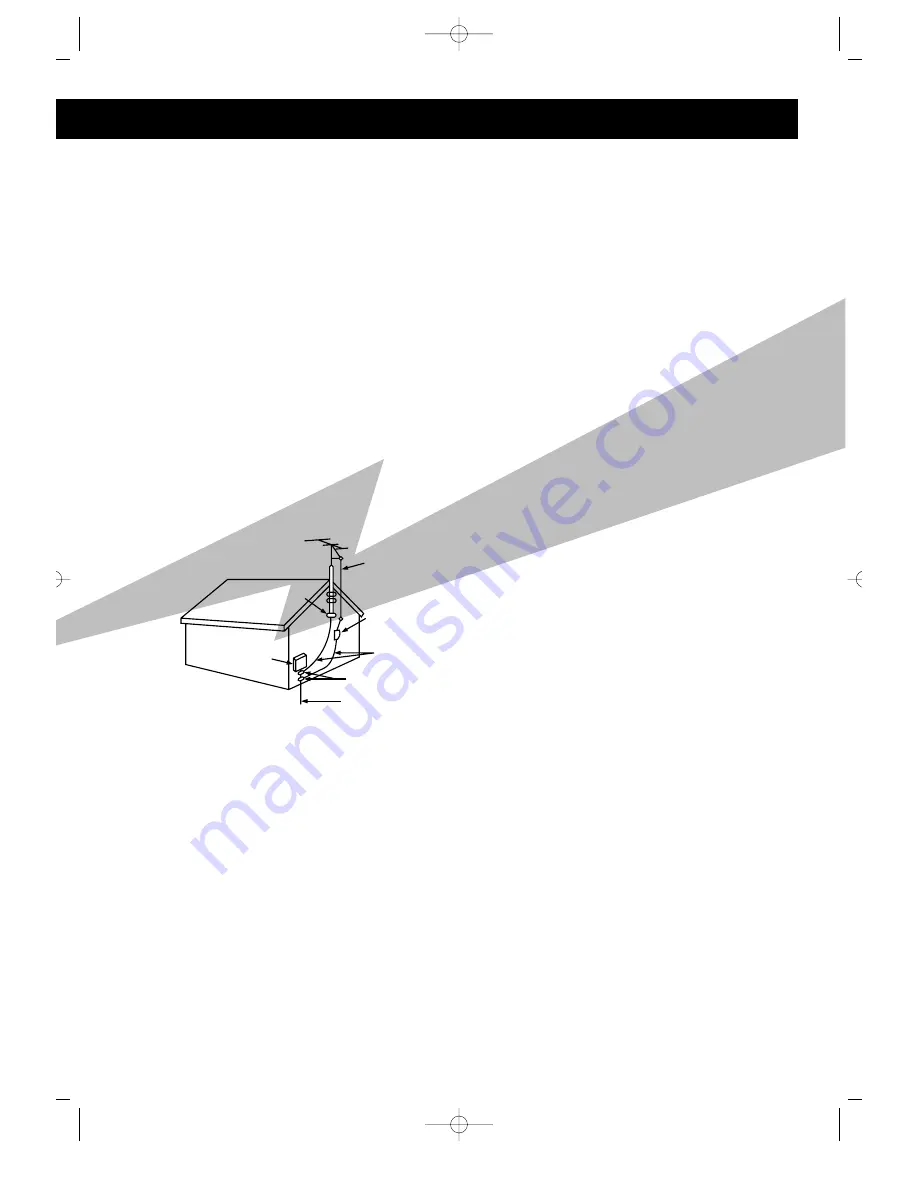
ANTENNA
LEAD IN WIRE

ANTENNA
DISCHARGE UNIT
(NEC SECTION. 810-20)

GROUNDING CONDUCTORS
(NEC SECTION 810-21)

GROUND CLAMPS

POWER SERVICE GROUNDING
ELECTRODE SYSTEM
(NEC ART 250, PART H)

GROUND
CLAMP

ELECTRIC
SERVICE
EQUIPMENT

OUTDOOR ANTENNA GROUNDING

If an outside antenna is connected to the antenna 
terminal, be sure the antenna system is grounded so as to
provide some protection against voltage surges and 
built-up static charges.

In the U.S.A section 810 of the National Electrical Code,
ANSI/NFPA No. 70-1984, provides information with respect to
proper grounding of the mast and supporting structure,
grounding of the lead-in wire to an antenna 
discharge unit, size of grounding conductors location of
antenna discharge unit, connection to grounding 
electrodes, and requirements for the grounding 
electrode. See the figure below.

ATTACHMENTS

Do not use attachments not recommended by the video
product manufacturer as they may cause 
hazards.

SERVICING

Do not attempt to service this product yourself as opening
or removing covers may expose you to 
dangerous voltage or other hazards.

Refer all servicing to qualified service personnel.

REPLACEMENT PARTS

When replacement parts are required, be sure the 
service technician has used replacement parts 
specified by the manufacturer or having the same charac-
teristics as the original part. Unauthorized 
substitutions may result in fire, electric shock or other haz-
ards.

SAFETY CHECK

Upon completion of any service or repairs to this video
product, ask the service technician to perform safety
checks to determine that the video product is in proper
operating condition.

DAMAGE REQUIRING SERVICE

Unplug this video product from the wall outlet and refer
servicing to qualified service personnel under the 
following conditions.

a. When the power-supply cord or plug is damaged.
b. If liquid has been spilled, or objects have fallen into 

the video product.

c. If the video product has been exposed to rain or water
d. If the video product does not operate normally by 

following the operating instructions. Adjust only those
controls that are covered by the operating instructions as
an improper adjustment of other controls may result in
damage and will often require extensive work by a 
qualified technician to restore the video product to its nor-
mal operation.

e. If the video product has been dropped or the cabinet has

been damaged.

f. When the video product exhibits a distinct change in 

performance - this indicates a need for service.

Z-48Q-1  5/13/03 13:44  Page 5

Содержание Z-48Q

Страница 1: ...AH68 10334G In case the need for Servicing arises Don t hesitate to call any nearby AS center with your name address and telephone number when anything wrong with your product occurs Z 48Q 1 5 13 03 13 44 Page 1 2 ...

Страница 2: ... LOW KEY CONTROL HIGH MIN MAX MIC DIGITAL ECHO 2 MIN MAX 1 2 3 4 5 6 7 8 9 10 0 NEXT PREVIOUS RETURN SELECT OPEN CLOSE POWER Power 1 PROGRAM SOUND REPEAT PAL NTSC SLOW 3 4 5 6 7 8 9 10 0 AI SLEEP DISC VIEW ZOOM 2 SELECT PREV NEXT STOP TIME SEARCH VIDEO CD CD PLAYER Before operating the unit please read this manual thoroughly and retain for future reference Z 48Q 1 5 13 03 13 44 Page 1 3 ...

Страница 3: ...ce operation and when not in use for a long period Important This unit is designed for your enjoyment in your home We cannot be liable for the quality of the unit if you use it for commercial use So please do not use this unit for commercial use IMPORTANT NOTICE NOTE TO CATV SYSTEM INSTALLER This reminder is provided to call the CATV system installer s attention to article 820 40 of the NEC provid...

Страница 4: ...denly moisture may condense on the mechanical parts which restricts the laser signal from normal operation If this occurs leave the unit with the power turned on for 1 2 hours without a disc SAFETY INSTRUCTIONS 3 CONTROLS AND COMPONENTS 6 REMOTE CONTROL 8 TO INSERT BATTERIES 8 SYSTEM CONNECTIONS 9 VIDEO CD PLAYBACK 10 DISC VIEW FUNCTION 12 REPEAT FUNCTION 13 PROGRAM FUNCTION 14 ZOOM FUNCTION 15 SE...

Страница 5: ...ge to the video product due to lightning and power line surges OBJECT AND LIQUID ENTRY Never push objects of any kind into this product through openings as they may touch dangerous voltage points or short out parts that could result in a fire or electric shock Never spill liquid of any kind on the video product ACCESSORIES Do not place this video product on an unstable cart stand tripod bracket or...

Страница 6: ...S When replacement parts are required be sure the service technician has used replacement parts specified by the manufacturer or having the same charac teristics as the original part Unauthorized substitutions may result in fire electric shock or other haz ards SAFETY CHECK Upon completion of any service or repairs to this video product ask the service technician to perform safety checks to determ...

Страница 7: ...tton 6 DIGITAL ECHO VOLUME knob 7 MIC jacks 8 MIC VOLUME knob 9 KEY CONTROL buttons 10 PREVIOUS NEXT SKIP SEARCH buttons 11 DISC TRAY VOLUME MIC 1 LOW KEY CONTROL HIGH MIN ON STANDBY MAX MIC DIGITAL ECHO 2 MIN MAX 1 2 3 4 5 6 7 8 9 10 0 NEXT PREVIOUS RETURN SELECT OPEN CLOSE POWER 2 1 10 9 6 7 8 11 3 4 5 Z 48Q 1 5 13 03 13 44 Page 6 ...

Страница 8: ...IER 3 AUDIO OUTPUT TV Connect to the AUDIO IN of your TV set R AMP L AUDIO OUT 1 VIDEO OUT R TV L AUDIO OUT 2 2 3 1 ACCESSORIES REMOTE CONTROL VIDEO CABLE AUDIO CABLE OWNER S INSTRUCTIONS Powe r 1 PROG RAM SO UN D RE PE AT PA L N TS C SLOW 3 4 5 6 7 8 9 10 0 AI SLEE P DIS C VIE W ZO OM 2 SELEC T PREV NEXT STO P TIM E SE AR CH Z 48Q 1 5 13 03 13 44 Page 7 ...

Страница 9: ...n 10 DISC VIEW ZOOM button 11 TIME SEARCH LAST MEMORY button 12 PREVIOUS NEXT SKIP button 1 2 3 4 5 6 8 9 10 11 12 POWER 1 PROGRAM SOUND REPEAT PAL NTSC SLOW 3 4 5 6 7 8 9 10 0 AI SLEEP DISC VIEW ZOOM 2 SELECT PREV NEXT STOP TIME SEARCH 7 Open the battery compartment cover 1 Replace the cover 3 Install two AAA batteries observing the correct polarity as shown in compartment 2 Z 48Q 1 5 13 03 13 44...

Страница 10: ...IDEO IN jack of the TV 2 Connect AUDIO OUT jack of the VCD and CDP to the AUX or CD INPUT jacks of the AMPLIFIER VCD AND CDP TV VCD AND CDP TV AMPLIFIER AUDIO CABLE TO AUDIO IN VIDEO CABLE TO VIDEO IN TV SET REAR R AMP L AUDIO OUT 1 VIDEO OUT R TV L AUDIO OUT 2 TO AUX OR CD IN TO VIDEO IN AMPLIFIER AUDIO CABLE TV VIDEO CABLE SET REAR R AMP L AUDIO OUT 1 VIDEO OUT R TV L AUDIO OUT 2 Z 48Q 1 5 13 03...

Страница 11: ...E SEARCH REPEAT DISC VIEW functions do not work How to select a song or a video without using menu function Select a track number from the disc jacket and press it at the stop mode When playing version 2 0 disc which has no MENU screen If no play or no picture Press SELECT button or NEXT button to see MENU screen or the next screen Press the OPEN CLOSE button The tray is ejected Turn on the POWER ...

Страница 12: ...n Each time the sound button is pressed for 1 sec or longer the mode changes as follows SELECT SOUND TO YOUR PREFERENCE PREPARATION 1 Press the POWER button The audio is set to the stereo mode automatically 2 Insert a disc and press the PLAY button REMOTE CONTROL SOUND 1st press for 1 sec or longer TV monitor LIVE THEATER 2nd press for 1 sec or longer 3rd press for 1 sec or longer 1st press 2nd pr...

Страница 13: ...ck EX If the disc has 14 tracks NEXT PREVIOUS 02 05 08 03 06 09 01 04 07 11 14 12 10 13 The first nine tracks are shown Next track is shown Press the DISC VIEW button DISC VIEW MENU is displayed Press the DIGIT button 1 to select Track View Nine tracks are presented with sound Press the DIGIT button to select the desired track The selected track is displayed on the small screen with sound played E...

Страница 14: ...g the one track repeat lights and the one track is played repeatedly REPEAT indicating the one disc repeat lights and the one disc is played repeatedly Note The repeat function is cancelled when the POWER OPEN CLOSE buttons are pressed Every press of this button changes lights REPEAT FUNCTION 1 TO REPEAT ONE TRACK Press the REPEAT button 2 TO REPEAT ONE DISC Press the REPEAT button again REPEAT PA...

Страница 15: ... continue To escape program function Press the OPEN CLOSE button or press the STOP button two times PROGRAM PROGRAM P 02 00 PROGRAM P 01 00 PROGRAM No Track No ex To program No 4 track of No 2 disc Press the PROGRAM button Press the track number to be programmed Press the digit buttons Ex Select track 4 In a second After step 2 you must press the PROGRAM button again then the selected number 04 is...

Страница 16: ...ISC VIEW ZOOM key for 1 sec or longer again to change the screen to 4 x ZOOM While in the stage of No 1 or No 2 above press the key to scroll the screen to the left right up or down DISC VIEW ZOOM DISC VIEW ZOOM SELECT PREV NEXT STOP 1 2 While in the 4 x ZOOM Press the DISC VIEW ZOOM button for 1 sec or longer and display normal picture DISC VIEW ZOOM 4 3 Z 48Q 2 5 13 03 13 42 Page 15 ...

Страница 17: ...ck If pressed again it returns to the previous track Picture moves to the beginning of the next track whenever button is pressed When the PREVIOUS or NEXT button is pressed while playing a disc such as a movie disc it quickly advances 5 minutes in the forward reverse direction NOTE In case of high speed search When searching a CD disc the volume is lowered and it advances in high speed If the sear...

Страница 18: ...02 23 12 34 1 2 3 4 SELECT If you press the STOP or POWER button during VIDEO CD playback a playback position slightly ahead of the current time is stored in the unit s memory You can easily find the memorized position just press the TIME SEARCH button METHOD When you press the STOP or POWER button to finish the operation Press TIME SEARCH button and this unit will search for original position NOT...

Страница 19: ...ay a disc KEY OPEN CLOSE VOLUME MIC 1 MIC 2 MIN MAX SET KEY CONTROL FUNCTION Make sure to be at the karaoke mode Note Depending on a type of VIDEO CD 2 0 disc it may be not operated KEY CONTROL FUNCTION in still picture KEY KEY 1 KEY 2 Press the Key Control button 1 2 3 ex In case of pressing once more ex In case of pressing On screen Display will disappear in 3 seconds Press the KEY CONTROL butto...

Страница 20: ...volume of the Microphone Turning to the left decreases Volume Turning to the right increases Volume If howling occurs Reduce the microphone volume Change the direction that the microphone faces Move the microphone away from the speaker MIN MAX DIGITAL ECHO To decrease echo effect To increase echo effect SET SET VOLUME MIN MAX Z 48Q 2 5 13 03 13 42 Page 19 ...

Страница 21: ...uality of a particular disc Check if disc is damaged or deformed is poor and picture shakes Check if disc is contaminated SKIP or SEARCH takes too Some discs may require longer time to read encoded much time information Check disc TIME SEARCH searches Check if disc is contaminated or deformed different time When picture shakes disc may be contaminated or deformed causing malfunction Clean disc Aft...

Страница 22: ...ry cloth Store a disc away from direct sunlight or heat source Keep the disc free from dust Color or sync is in trouble according to TV set Compact Disc Digital Audio Max 20 min 8cm Single 3 inch Compact Disc CD Digital Audio Max 74min 12cm Single 5 inch Video Compact Disc Digital Video and Audio Max 74min VCD 12cm Single 5 inch GENERAL INFORMATION ABOUT THE DISC GENERALINFORMATIONABOUTTHEDISC CAR...

Страница 23: ...andling Discs When loading or removing discs do not touch the playing surface CARE OF DISC Never play cracked scratched or warped disc This may damage the player cause it to malfunction DO NOT PLAY CRACKED OR WARPED DISCS GENERAL Power consumption 8W SPECIFICATIONS Weight 2 8 kg Dimensions 420 W x284 D x 111 H mm Operating temperature 5 C 35 C 41 F 95 F DISC USABLE NTSC PAL single 74 min single 20...

Страница 24: ...Z 48Q 1 5 13 03 13 44 Page 13 ...

Отзывы: