background image

99

SYSTEM CONNECTIONS  

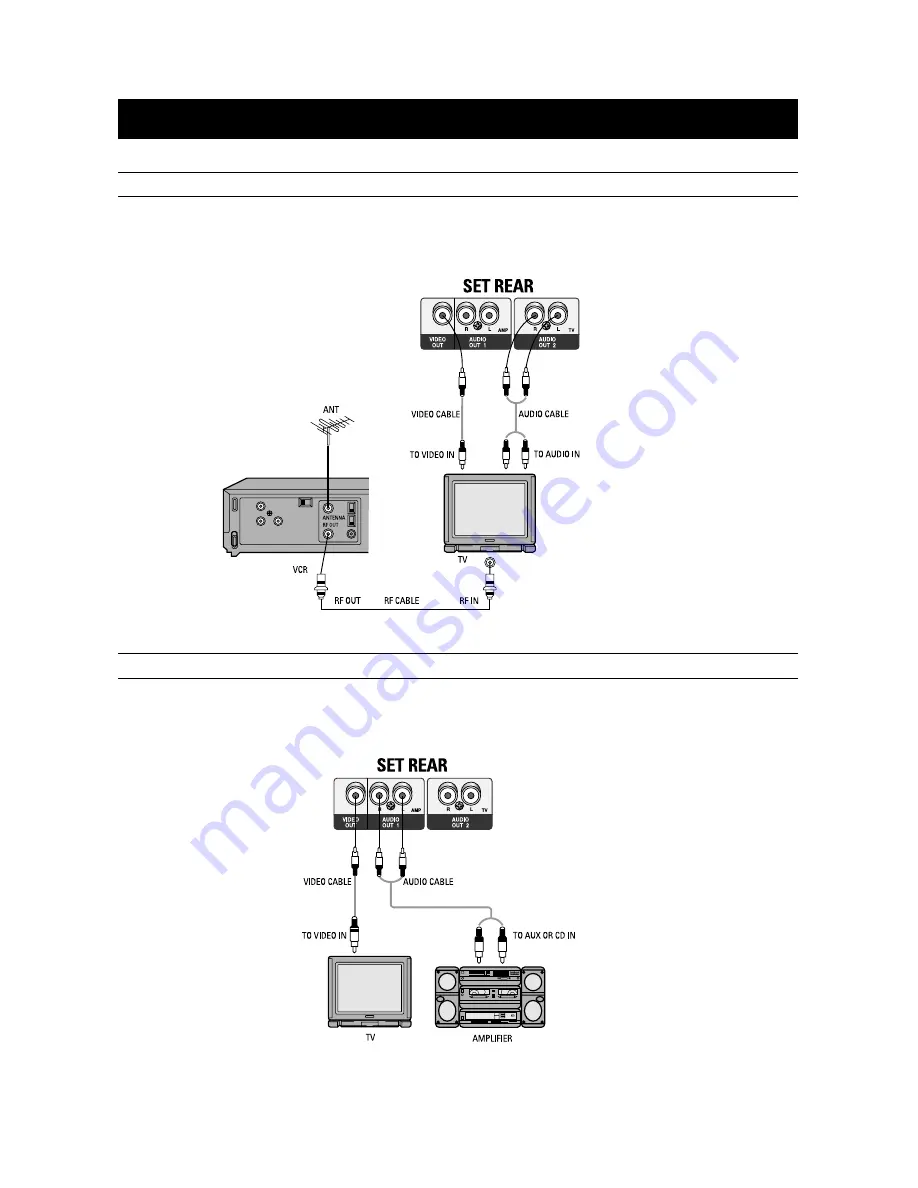
1. Connect AUDIO OUT2 jack of the VCD and CDP to AUDIO IN jack of the TV.
2. Connect VIDEO OUT jack of the VCD and CDP to VIDEO IN jack of the TV.

1. Connect VIDEO OUT jack of the VCD and CDP to VIDEO IN jack of the TV.
2. Connect AUDIO OUT1 jack of the VCD and CDP to the AUX or CD INPUT jacks of the AMPLIFIER.

VCD AND CDP + TV 

VCD AND CDP + TV + AMPLIFIER

Содержание Z-100MS

Страница 1: ...n Select Open Close VIDEO CD CD MP3 DISC PLAYER Before operating the unit please read this manual thoroughly and retain for future reference Even though the MP3 disc that you purchased contains the MP3 mark on its cover the disc not written data by the format of MPEG1 LAYER3 file extension name MP3 can not be played back normally COMPACT DIGITAL AUDIO COMPACT DIGITAL VIDEO This player does not app...

Страница 2: ...efore any service operation and when not in use for a long period Important This unit is designed for your enjoyment in your home We cannot be liable for the quality of the unit if you use it for commercial use So please do not use this unit for commercial use IMPORTANT NOTICE NOTE TO CATV SYSTEM INSTALLER This reminder is provided to call the CATV system installer s attention to article 820 40 of...

Страница 3: ... suddenly moisture may condense on the mechanical parts which restricts the laser signal from normal operation If this occurs leave the unit with the power turned on for 1 2 hours without a disc SAFETY INSTRUCTIONS 3 CONTROLS AND COMPONENTS 6 REMOTE CONTROL 8 TO INSERT BATTERIES 8 SYSTEM CONNECTIONS 9 MP3 DISC PLAYBACK 10 VIDEO CD PLAYBACK 11 DISC VIEW FUNCTION 13 REPEAT FUNCTION 14 PROGRAM FUNCTI...

Страница 4: ...l prevent damage to the video product due to lightning and power line surges OBJECT AND LIQUID ENTRY Never push objects of any kind into this product through openings as they may touch dangerous voltage points or short out parts that could result in a fire or electric shock Never spill liquid of any kind on the video product ACCESSORIES Do not place this video product on an unstable cart stand tri...

Страница 5: ...PLACEMENT PARTS When replacement parts are required be sure the service technician has used replacement parts specified by the manufacturer or having the same charac teristics as the original part Unauthorized substitutions may result in fire electric shock or other haz ards SAFETY CHECK Upon completion of any service or repairs to this video product ask the service technician to perform safety ch...

Страница 6: ...tandby On button 7 Select Play Pause button 8 Return Stop button 9 Previous Next buttons 10 Disc Tray 11 Open Close button 12 Mic jacks 13 Mic Volume knob 14 Digital Echo Volume knob MicVol Mic1 Last Memory Key Control MIN MAX MIN MAX Digital Echo Mic2 Repeat Sound Power Next Previous Return Select Open Close 7 1 2 3 4 5 6 14 13 12 10 8 9 11 ...

Страница 7: ...6 7 8 9 10 0 AI SLEE P DIS C VIE W ZO OM 2 SELEC T PREV NEXT STO P TIM E SE AR CH REAR PANEL 1 VIDEO OUTPUT Connect to the VIDEO IN of your TV set 2 AUDIO OUTPUT AMP Connect to the AUDIO IN of your STEREO AMPLIFIER 3 AUDIO OUTPUT TV Connect to the AUDIO IN of your TV set CHANNEL ADJUST RF OUTPUT TO TV R L AMP R L TV VIDEO OUT AUDIO OUT 1 AUDIO OUT 2 2 3 1 ...

Страница 8: ...TSC button 9 SLOW button 10 DISC VIEW ZOOM button 11 TIME SEARCH LAST MEMORY button 12 PREVIOUS NEXT SKIP button 1 2 3 4 5 6 8 9 10 11 12 POWER 1 PROGRAM SOUND REPEAT PAL NTSC SLOW 3 4 5 6 7 8 9 10 0 AI SLEEP DISC VIEW ZOOM 2 SELECT PREV NEXT STOP TIME SEARCH 7 Open the battery compartment cover 1 Replace the cover 3 Install two AAA batteries observing the correct polarity as shown in compartment ...

Страница 9: ...k of the TV 2 Connect VIDEO OUT jack of the VCD and CDP to VIDEO IN jack of the TV 1 Connect VIDEO OUT jack of the VCD and CDP to VIDEO IN jack of the TV 2 Connect AUDIO OUT1 jack of the VCD and CDP to the AUX or CD INPUT jacks of the AMPLIFIER VCD AND CDP TV VCD AND CDP TV AMPLIFIER ...

Страница 10: ...rting MP3 Disc in the Set Press the DISC VIEW button 1 You can see the following information of Disc on the TV 2 Directory No Directory name MP3 TOTAL 150 PAGE 001 004 TR 000 0 00 00 DIRECTORY NAME 1 DIRECTORYNAME I 2 A B C I 3 K B G I 4 C D E G 1 2 3 I TO RETURN TO THE PREVIOUS MENU Press the RETURN button When a wrong menu is selected or other menu is about to be selected hold down the RETURN bu...

Страница 11: ...ode PROGRAM TIME SEARCH REPEAT DISC VIEW functions do not work How to select a song or a video without using menu function Select a track number from the disc jacket and press it at the stop mode When playing version 2 0 disc which has no MENU screen If no play or no picture Press SELECT button or NEXT button to see MENU screen or the next screen Press the Open Close button The tray is ejected Tur...

Страница 12: ... SELECTOR button Every time you press this button sound changes as show below PREPARATION 1 Press the POWER button The audio is set to the stereo mode automatically 2 Insert a disc and press the PLAY button REMOTE CONTROL SOUND 1st press 2nd press 3rd press Screen on your TV monitor L CH R CH STEREO L ch R ch L signal L signal R signal R signal L signal R signal Audio Output NTSC PAL SELECTION MET...

Страница 13: ...an ten Press the NEXT button watching the track bellow Press the PREVIOUS button watching the former track EX If the disc has 14 tracks Press the DISC VIEW button Nine tracks are presented with sound Press the DIGIT button to select Track View The selected track is displayed on the small screen with sound played EX When selecting No 4 Desired music or video display can be used directly without by ...

Страница 14: ...ng desired video INDEX VIEW SELECT DISC VIEW ZOOM REPEAT indicating the one track repeat lights and the one track is played repeatedly REPEAT indicating the one disc repeat lights and the one disc is played repeatedly Note The repeat function is cancelled when the Power Open Close buttons are pressed Every press of this button changes lights REPEAT FUNCTION 1 TO REPEAT ONE TRACK Press the REPEAT b...

Страница 15: ...programmed anymore press again to continue To escape program function Press the OPEN CLOSE button or press the STOP button two times PROGRAM PROGRAM P 02 000 PROGRAM ex To program No 4 track Press the PROGRAM button Press the track number to be programmed Press the digit buttons Ex Select track 4 In a second After step 2 you must press the PROGRAM button again then the selected number 04 is progra...

Страница 16: ...een press the DISC VIEW ZOOM key for 1 sec or longer again to change the screen to 4 x ZOOM While in the stage of No 1 or No 2 above press the key to scroll the screen to the left right up or down DISC VIEW ZOOM DISC VIEW ZOOM SELECT PREV NEXT STOP 1 2 While in the 4 x ZOOM Press the DISC VIEW ZOOM button for 1 sec or longer and display normal picture DISC VIEW ZOOM 4 3 ...

Страница 17: ...returns to the previous track Picture moves to the beginning of the next track whenever button is pressed When the Previous or Next button is pressed while play ing a disc such as a movie disc it quickly advances 5 minutes in the forward reverse direction NOTE In case of high speed search When searching a CD disc the volume is lowered and it advances in high speed If the search does not operate pr...

Страница 18: ...TIME 1 2 3 4 SELECT If you press the STOP or POWER button during VIDEO CD playback a playback position slightly ahead of the current time or track is stored in the unit s memory You can easily find the memorized position or track just press the TIME SEARCH button METHOD When you press the STOP or POWER button to finish the operation Press TIME SEARCH button and this unit will search for original p...

Страница 19: ...nd play a disc Open Close Mic 1 Mic 2 SET KEY CONTROL FUNCTION Make sure to be at the karaoke mode Note Depending on a type of VIDEO CD 2 0 disc it may be not operated Key Control function in still picture This function is operated only on VCD Mode KEY 1 KEY 2 Press the Key Control button 1 2 3 ex In case of pressing once more ex In case of pressing On screen Display will disappear in 3 seconds Pr...

Страница 20: ...rease or increase the volume of the Microphone Turning to the left decreases Mic Vol Turning to the right increases Mic Vol If howling occurs Reduce the microphone volume Change the direction that the microphone faces Move the microphone away from the speaker Digital Echo MIN MAX To decrease echo effect To increase echo effect SET SET Mic Vol MIN MAX ...

Страница 21: ...right Picture quality of a particular disc Check if disc is damaged or deformed is poor and picture shakes Check if disc is contaminated SKIP or SEARCH takes too Some discs may require longer time to read encoded much time information Check disc TIME SEARCH searches Check if disc is contaminated or deformed different time When picture shakes disc may be contaminated or deformed causing malfunction...

Страница 22: ...ust SETMODE TVSYSTEM DISPLAY REMARK PAL PAL NTSC PAL NTSC PAL NTSC OK OK NG NG PAL 50Hz PAL 50Hz No sync No sync DISC PAL PAL NTSC NG NG No color No color NTSC PAL NTSC OK OK NTSC 60Hz NTSC Color or sync is in trouble according to TV set Compact Disc Digital Audio Max 20 min 8cm Single 3 inch Compact Disc CD Digital Audio Max 74min 12cm Single 5 inch Video Compact Disc Digital Video and Audio Max ...

Страница 23: ...cs do not touch the playing surface CARE OF DISC Never play cracked scratched or warped disc This may damage the player cause it to malfunction DO NOT PLAY CRACKED OR WARPED DISCS GENERAL Power consumption 8 5W SPECIFICATIONS Weight 2 8 kg Dimensions 420 W x284 D x 111 H mm Operating temperature 5 C 35 C 41 F 95 F USABLE Media CD CD R single 74 min single 20 min 74 min MP3 12Cm single Format that ...

Страница 24: ...ELECTRONICS AH68 00583B In case the need for Servicing arises Don t hesitate to call any nearby AS center with your name address and telephone number when anything wrong with your product occurs REV 01 ...

Отзывы: