background image

6-6

Samsung Electronics

MEMO

Содержание YP-U5

Страница 1: ...U5JQR XAA MP3 Player Refer to the service manual in the GSPN see the rear cover for the more information CONTENTS 1 Precaution 2 Product Specification 3 Disassembly Reassembly 4 Troubleshooting 5 Exploded View Part List 6 PCB Diagram 7 Schematic Diagram YP U5 ...

Страница 2: ...r domestic law GSPN Global Service Partner Network Area Web Site North America service samsungportal com Latin America latin samsungportal com CIS cis samsungportal com Europe europe samsungportal com China china samsungportal com Asia asia samsungportal com Mideast Africa mea samsungportal com Samsung Electronics Co Ltd May 2009 Printed in Korea ...

Страница 3: ...ons Analysis 2 3 2 4 Accessories 2 5 3 Disassembly Reassembly 3 1 Overall Disassembly Reassembly 3 1 4 Troubleshooting 4 1 Checkpoints by Error Mode 4 2 4 2 Upgrade Methods 4 18 5 Exploded View Part List 5 1 Exploded View 5 2 5 2 Electrical Part List 5 4 6 PCB Diagram 6 1 MAIN PCB Top 6 2 6 2 MAIN PCB Bottom 6 4 7 Schematic Diagram 7 1 Overall Block Diagram 7 2 7 2 MAIN 7 3 ...

Страница 4: ...itical damage 3 You should not use this product near water such as bathtub swimming pool or lake etc 4 Power supply A type of battery as displayed on the label should be only used 5 You should not put any object or liquid into product Otherwise it may cause failure or mal operation 6 If replacement material is required service engineer should use materials with the same standard The use of non sta...

Страница 5: ...tor or devices with elements for semi conductor You should purchase and use static electricity arm rings or commercially available You should remove it due to potential shock before supplying power to the device under test 2 You should place appliance on the conductive surface like aluminum film to prevent that static electricity is accumulated or the device is disclosed outside after removing ele...

Страница 6: ...nd other exercise provides information such as timer AUI and estimated burned calories PopCon Pop art icon User selectable character Not just a simple device but recognized as one s personal possession like an avatar Personalization Slim Design Aimed at creating an entirely slim body and actualizing the clip concept Device thickness 11 8 mm ...

Страница 7: ...F Audio 8kbps 192kbps 8 48kHz Supported Number of Folders Files File Max 3000 Including folder Earphone Output 18mW Ch based on 16Ω Output Frequency Range 40Hz 20kHz Signal to Noise Ratio 88dB with 20kHz LPF based on 1kHz 0dB Play Time Music Max 20 hours MP3 128kbps Volume 15 Normal Sound Mode LCD Off Temperature Range for Operation 23 95 F 5 35 C Case Plastics Weight 0 81 oz Dimensions WxHxD 0 98...

Страница 8: ...ed Pink Blue Black Red Blue Memory 512M X X 1G X 2G 4G 8G X Files Supported MP3 WMA OGG up to Q10 up to Q10 WAV X X AAC X X Audible X X JPEG FLAC X APE X X WMV X X MPEG4 SVI X X Swf X X Others X X Sound Field Preset EQ Normal Rock R B Dance Normal Rock Classical Jazz Ballad R B Dance User EQ 7 Band Control 7 Band Control Special Effect DNSe Portable 3D Studio 3D Concert Hall DNSe Portable 3D Studi...

Страница 9: ...ry Artist Album Genre Title DB sorting Artist Album Genre Title DB sorting File Navigation Additional Functions Video Photo Viewer X X Text Viewer X X Game X X Wallpaper X X Clock X X Etc Screen Saver Screen Saver Additional Functions Other Multi Language Menu 30 Language KOREA ENG FRA GER ITA JPN CHA S CHA T RUS HUG POR SPA DUT POL SWEDISH Thai 30 Language KOREA ENG FRA GER ITA JPN CHA S CHA T RU...

Страница 10: ...ung Electronics 2 5 Product Specification 2 4 Accessories 2 4 1 Supplied Accessories Accessories Item Item Code Remark Earphones AH30 00111A Samsung Service Center Clip AH61 02742A User s Manual AH68 02172Q ...

Страница 11: ...2 6 Samsung Electronics MEMO ...

Страница 12: ...erforming any work as the IC chips on the PCB are vulnerable to static electricity Assemble in the reverse order of disassembly No Part Name Description Description Photo 1 Assy Cover USB 1 Before disassembly 2 Remove the USB Assy Cover 2 CABINET FRONT CABINET REAR 1 Remove the two screws on top of the CABINET FRONT M14 L4 2 Face the back of the USB upwards and put the tips of tweezers in the hole...

Страница 13: ...B with your hand and disassemble the CABINET REAR by slowly pulling it with your thumb 3 BATTERY 1 Be careful of the battery wire during disassembly 2 Disconnect the battery connector using tweezers 4 MAIN PCB 1 Disassemble the MAIN PCB by slowly widening the CABINET FRONT with one hand while holding the USB Jack with the other hand 2 After disassembly ...

Страница 14: ...Samsung Electronics 4 1 Troubleshooting 4 Troubleshooting 4 1 Checkpoints by Error Mode 4 2 4 2 Upgrade Methods 4 18 ...

Страница 15: ...g does the PC recognize the MP3 player through a recovery update Yes Yes No Yes Complete No 1 Is the voltage on the battery above 3 5V Yes Yes Is the power button faulty See Faulty Button No Replace the board Detailed inspection is required Power turns on but it stops after pressing the power key No No Yes After repairing the USB check it again See USB Failure Complete Replace the battery and chec...

Страница 16: ...Samsung Electronics 4 3 Troubleshooting MAIN page 7 3 5 4 3 B A CON3 IC1 IC6 IC3 IC7 MAIN PCB Bottom page 6 4 Fig 4 1 1 1 1 ...

Страница 17: ...me symptom still occur when the latest firmware is upgraded Yes No Yes Yes Yes Yes Is the same symptom still present after replacing the earphones Does it play after re soldering the jack Replace the earphones No No Yes Yes No No No No No Yes If there is no sound Is the soldering on IC3 L1 L2 L3 R9 R100 and R24 normal Check it again after re soldering faulty elements Complete Replace the board Det...

Страница 18: ...the MIC2 C7 and R7 elements Yes Charge the battery If voice recording doesn t work Is the residual capacity of the battery enough Yes Upgrade the firmware to the latest version and then check it again Does the recording timer work correctly Yes Replace or re solder the faulty elements and check it again Replace the board Detailed inspection is required No No ...

Страница 19: ...oes the power button on the PCB work when pressing it Check that the resistance is R14 1KΩ and R90 100KΩ Is the soldering done correctly Repair or replace the knob key and check it again Repair the elements and check it again Replace the board Detailed inspection is required No Yes No Yes No Faulty power button Yes Refer to wave pattern image of Fig 4 2 ...

Страница 20: ...CB work when pressing it Check that the resistance is R14 1KΩ R90 100KΩ and R32 4 7KΩ Is the soldering done correctly Repair or replace the knob key and check it again Repair the elements and check it again Replace the board Detailed inspection is required No Yes No Yes No Faulty user recording button Yes Refer to wave pattern image of Fig 4 2 ...

Страница 21: ...the PCB work when pressing it Check if the resistance is normal at R35 R36 R41 R49 R65 R67 and R70 Repair or replace the knob key and check it again Replace the faulty resistor and check it again Replace the board Detailed inspection is required No Yes No Yes No Faulty FF REW Select buttons Yes Replace the DOME SHEET KEY and check it again Yes ...

Страница 22: ...Samsung Electronics 4 9 Troubleshooting MAIN page 7 3 5 4 3 B A CON3 IC1 IC7 MAIN PCB Bottom page 6 4 Fig 4 2 1 1 1 2 2 2 ...

Страница 23: ...stance is normal at R10 R101 R102 R1L5 R3 C1 C2 R4 and R5 Replace the IC replenish the lead and then check it again Replenish the lead on the faulty element and check it again Replace the board Detailed inspection is required Yes No Yes Yes No Faulty FM reception Replenish the lead on R31 and Xtal 3 or replace them and check it again No Refer to wave pattern image of Fig 4 3 ...

Страница 24: ...Samsung Electronics 4 11 Troubleshooting MAIN page 7 3 5 4 3 B A CON3 IC1 IC7 MAIN PCB Bottom page 6 4 Fig 4 3 1 1 1 ...

Страница 25: ...orrectly Faulty display Is the USB connected and the MP3 playing Yes Re solder the faulty elements or replace them and then check again Is soldering on display elements normal Yes Are L8 or C73 overheating No Replace the OLED and check the voltage again No Yes Replace the faulty elements and the OLED and then check again Yes Check again Check if there is no power or if the USB is connected correct...

Страница 26: ...Samsung Electronics 4 13 Troubleshooting MAIN page 7 3 4 3 2 1 CON3 IC1 IC6 IC3 IC2 IC7 MAIN PCB Bottom page 6 4 Fig 4 4 1 1 1 ...

Страница 27: ...ecovery update device Faulty charging Does the PC recognize the MP3 player when it is connected to the PC Yes Replace the battery and check it again After replacing the battery is it charged correctly No Yes After recovery update check if it is charged correctly Repair the connection to the PC and check it again See Faulty connection to PC No Yes ...

Страница 28: ...t circuit test 1 When the MP3 player is connected to the USB port is the voltage on IC7 Pin 5 approx 5V Replace the faulty elements and then check it again Replace IC7 and check the voltage again No Yes Complete Faulty user hub or faulty extension wire Yes Replace the faulty elements or re solder and then check again Are R18 and R19 cold soldered Yes Replace D1 D2 and D3 remove them if they are no...

Страница 29: ...4 16 Samsung Electronics Troubleshooting MAIN page 7 3 5 4 B A CON3 IC1 IC7 MAIN PCB Bottom page 6 4 Fig 4 5 1 1 1 ...

Страница 30: ...Samsung Electronics 4 17 Troubleshooting MAIN page 7 3 B A CON3 IC1 IC7 MAIN PCB Bottom page 6 4 Fig 4 6 2 2 ...

Страница 31: ...e product The product does not turn on when the power switch is pressed The product powers on normally but no USB connection can be made The product s icons appear garbled or malfunction Files are corrupted or the product shows as a removable storage in Windows but cannot be accessed 4 2 1 Recovery Upgrade Method 1 Download New Recovery program and decompress 2 Execute U5_Updater exe Display pleas...

Страница 32: ...nnect YP U5 with pushing holding USER KEY to PC display Initial and then Prepare well 4 Select Format data region all media remove and file system FAT32 Push the Start button 5 Start to update and then pop up the format windows please chooses Yes ...

Страница 33: ...4 20 Samsung Electronics Troubleshooting 6 Updated completed 7 Disconnect YP U5 from USB confirm that YP U5 display Updating YP U5 will be turn on automatically 8 Check all function 9 Complete Update ...

Страница 34: ...compress The folder content like side 2 Connect YP U5 set to PC and copy YPU5_AUI folder to YP U5 set 3 Disconnect YP U5 set from USB confirm that YP U5 set display Updating When battery level is not enough Updating can not execute Please try after charging 4 Power on and check booting sound of AUI 5 Complete Update ...

Страница 35: ...egional configuration download the Config dat first And look for your country folder 2 Copy the Config dat to YP U5 3 Disconnect YP U5 from USB confirm that YP U5 display Updating YP U5 will be turn on automatically 4 Power on and check FW regional version in Setting System About 5 Complete Update ...

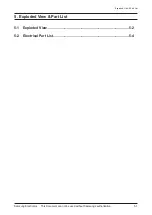
Страница 36: ...Samsung Electronics 5 1 Exploded View Part List This Document can not be used without Samsung s authorization 5 Exploded View Part List 5 1 Exploded View 5 2 5 2 Electrical Part List 5 4 ...

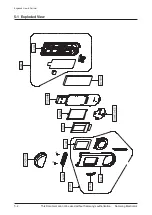
Страница 37: ...5 2 Samsung Electronics Exploded View Part List This Document can not be used without Samsung s authorization 5 1 Exploded View AC000 AC010 AK290 AC010 AC357 AH395 AH300 AA001 ...

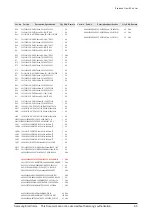
Страница 38: ... 01875A CUSHION LCD YP U5 Wave Fabric Fabric0 15 1 SA AH300 AH61 02744A HOLDER LCD YP U5 ABS T0 7 30 20 BLACK 1 SA AH395 AH61 02740B HOLDER TOP YP U5 PC T1 5 25 12 White 1 SA AK290 AH64 04892G KNOB POWER YP U5 ABS PC T1 2 15 7 V2 Red 1 SA BATTERY AH43 00024A SOFT BATTERY PACK YP U5 Soft Pack Li Pol 1 SNA COVER USB AH97 03149C ASSY COVER USB MP3 YP U5 Red 1 SA DOME SHEET AH59 02190A DOME SHEET META...

Страница 39: ...C CER CHIP 100nF 10 6 3V X5R 0603 1 SA C67 2203 006423 C CER CHIP 100nF 10 6 3V X5R 0603 1 SA C69 2203 006423 C CER CHIP 100nF 10 6 3V X5R 0603 1 SA C7 2203 005509 C CER CHIP 330nF 80 20 10V Y5V TP 1 SA C70 2203 006423 C CER CHIP 100nF 10 6 3V X5R 0603 1 SA C71 2203 006423 C CER CHIP 100nF 10 6 3V X5R 0603 1 SA C73 2404 001418 C TA CHIP 10uF 20 25V TP 3216 1 SA C74 2203 002709 C CER CHIP 100nF 80 ...

Страница 40: ...CH TACT 12V DC 20mA 160gf 4 5x4 1 SA S W3 3404 001152 SWITCH TACT 12V DC 20mA 160gf 4 5x4 1 SA SHEET LCD AH63 01995A SHEET LCD YP U5 3M 5480 7 2 14 1 SA SHEET PCBAH63 01996A SHEET PCB YP U5 3M 5480 7 2 17 5 1 SA VAR1 1405 001093 VARISTOR 14V 20A 1x0 5x0 6mm TP 1 SA VAR100 1405 001093 VARISTOR 14V 20A 1x0 5x0 6mm TP 1 SA VAR101 1405 001171 VARISTOR 6Vdc 0A 1x0 5x0 5mm TP 1 SA VAR2 1405 001093 VARIS...

Страница 41: ...5 6 Samsung Electronics MEMO ...

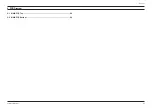
Страница 42: ...Samsung Electronics 6 1 PCB Diagram 6 PCB Diagram 6 1 MAIN PCB Top 6 2 6 2 MAIN PCB Bottom 6 4 ...

Страница 43: ...6 2 Samsung Electronics PCB Diagram 6 1 MAIN PCB Top No Description 1 OLED sticking face 2 LCD Connector 1 2 5 4 3 2 1 A B 1 2 3 4 5 B A 0 0 CON7 ...

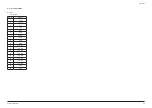
Страница 44: ...Diagram 6 1 1 Pin Connection 2 CON7 LCD Connector Pin No Signal 1 VSS 2 VCOMH 3 VCI 4 VDD 5 IREF 6 CSB 7 RESB 8 DCB 9 WRB 10 RDB 11 LCD_D 0 12 LCD_D 1 13 LCD_D 2 14 LCD_D 3 15 LCD_D 4 16 LCD_D 5 17 LCD_D 6 18 LCD_D 7 19 GND 20 GND ...

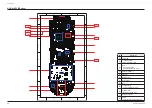
Страница 45: ...in IC Signal Processing Power Management Codec 4 Nand Flash Memory 5 FM Tuner 6 Earphone Jack 7 Reset Switch 8 MIC 9 OLED DCDC IC OLED Voltage Boost Up IC 0 24MHz Crystal Main Clock USB Clock Battery Connector OVP IC USB 5V Over Voltage Protect IC TP1 TP6 TP2 TP3 TP4 TP5 5 4 3 2 1 A B 1 2 3 4 5 B A 0 0 JACK1 1 3 4 5 CON3 IC1 IC6 IC3 IC2 IC4 IC7 ...

Страница 46: ...ctronics 6 5 PCB Diagram 6 2 1 Pin Connection CON3 Battery Connector Pin No Signal 1 GROUND 2 Vbat 6 2 2 Test Point Wave Form 6 JACK1 Earphone Jack Pin No Signal 1 GROUND 2 R CH 3 NC 4 L CH TP1 TP2 TP3 TP4 TP5 TP6 ...

Страница 47: ...6 6 Samsung Electronics MEMO ...

Страница 48: ...Samsung Electronics 7 1 Schematic Diagram This Document can not be used without Samsung s authorization 7 Schematic Diagram 7 1 Overall Block Diagram 7 2 7 2 MAIN 7 3 ...

Страница 49: ...Flash Memory and the USB Block and includes function blocks such as the FM Tuner Display and MIC The display is connected to a 1 inch OLED The Serial Interface between ICs is delivered with various protocols throughout the whole system The main IC STMP3770 uses I2C to operate the FM tuner by communicating with the FM tuner As for the display the display utilizes the boosted 13V through the DCDC IC...

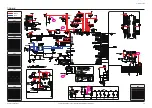
Страница 50: ...Samsung Electronics 7 3 Schematic Diagram This Document can not be used without Samsung s authorization 7 2 MAIN POWER AUDIO TP1 TP1 TP2 TP3 TP4 TP5 TP6 TP2 TP3 TP4 TP5 TP6 ...

Страница 51: ...7 4 Samsung Electronics MEMO ...

Отзывы: