background image

the basics 

_ 25

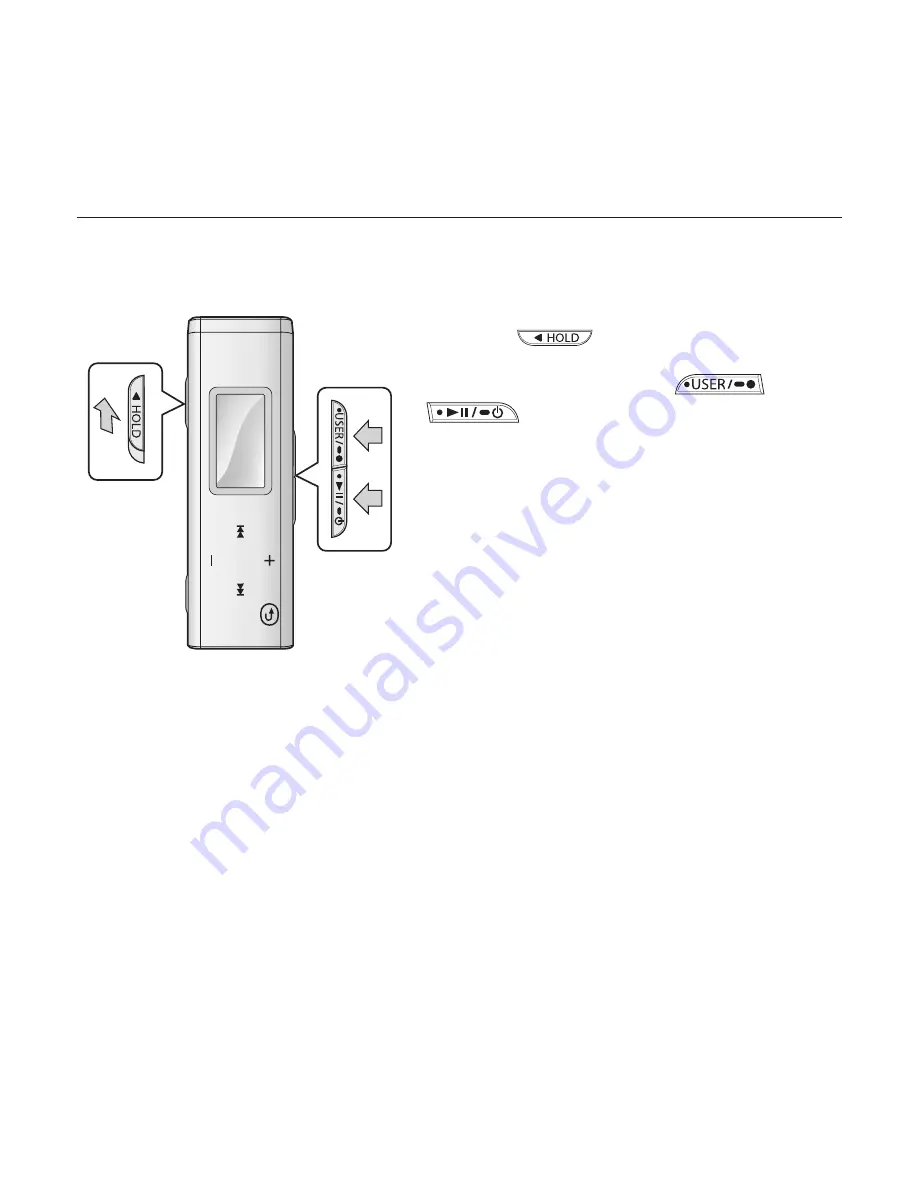
RESETTING THE SYSTEM

If your mp3 player won’t turn on, won’t play music, or isn’t recognized by your 
computer when you connect it, you may have to reset the system.

Push the 

 switch

 in the direction of 

the arrow.
Press and brie

fl

 y hold the 

 and 


buttons

 at the same time to 

reset the system.

The system will be initialized.
Your settings and 

fi

 les will not be affected.

ƒ
ƒ

2

1

Содержание YP-U3JAW

Страница 1: ...MP3 Player user manual YP U3 ...

Страница 2: ...3 PLAYER You can edit your favorite music files in the playlist EXPANSION AND COMPATIBILITY With your new player you re not limited to MP3 files Your player supports MP3 and WMA and Ogg formats TOUCH NAVIGATION You can tap on the touch pad to navigate through the menus LONGER PLAY TIME AND SHORTER DOWNLOADING A fully charged battery can play up to 15 hours of music when using the earphone Download...

Страница 3: ...personal injury when using your MP3 Player follow these basic safety precautions NOTE Means hints or referential pages that may be helpful to operate the player Do NOT attempt Do NOT disassemble Do NOT touch Follow directions explicitly Unplug the power plug from the wall socket Call the service center for help These warning signs are here to prevent injury to you and others Please follow them exp...

Страница 4: ...the earphone while you are driving a bicycle automobile or motorcycle Otherwise it can cause a serious accident and furthermore it is prohibited by the law in some areas Using the earphone while walking or jogging on a road in particular on the crosswalk can lead to a serious accident For your safety make sure the earphone cable does not get in the way of your arm or other surrounding objects whil...

Страница 5: ...he player in temperatures above 95 F 35 C such as a sauna or a parked car Do not cause excessive impact on the player by dropping it Do not place heavy objects on top of the player Prevent any foreign particles or dust from entering into the product Do not place the product near magnetic objects Be sure to backup important data Samsung is not responsible for data loss Use only accessories provided...

Страница 6: ...ons 17 Changing the settings and preferences 17 Music preferences 19 Time preferences 20 Language preferences 22 System preferences 25 Resetting the system SAMSUNG MEDIA STUDIO 26 26 PC requirements 27 Installing Samsung Media Studio 28 Organizing folders and files using Samsung Media Studio 30 To add folders 30 To add files 31 Transferring files to the Player with Samsung Media Studio 33 Using as...

Страница 7: ...ous or next track 37 To search a music file 37 To switch back to the current play screen 38 Creating a playlist using Samsung Media Studio 39 Adding music files to an existing playlist 40 Transferring a playlist to your player using Media Studio 41 Creating a playlist on your MP3 player 42 Playing a playlist 43 User button custom function 43 To set user button mode ...

Страница 8: ...49 49 Troubleshooting APPENDIX 52 52 Menu Tree 53 Product Specifications 55 License contents MORE THAN MUSIC 46 46 Voice Recording 47 To stop recording 48 Recorded file names 48 To listen to a previously recorded file ...

Страница 9: ...INCLUDED Your new mp3 player comes with these accessories If you re missing any of these items contact Samsung Customer Service Center Player Earphones Installation CD The accessories in your box may look slightly different than these ...

Страница 10: ...onnection jack User Recording button Press to set section repetition DNSe Play Speed Play Mode or stop recording Press and briefly hold to start recording Power Play Pause button Press for play pause and move to the selected menu confirm and save your selection Press and briefly hold for power on off LED Lighting ...

Страница 11: ...ove to next track menu Press and briefly hold to quickly scan tracks Up volume button Press to increase the volume or move to an upper item menu Left file browser button Press to move to the previous track menu or play the current track from the beginning Press and briefly hold to quickly scan tracks Back button Press to return to the previous screen Press and briefly hold to move to the main menu...

Страница 12: ...10 _ the basics YOUR MP3 PLAYER Continued Hold switch Push in the direction of the arrow to lock the button functions USB plug USB switch Slides the USB plug in and out Microphone ...

Страница 13: ... A B Play Mode Indicator Play Time Indicator Current Music Number Total Number Indicator Play Pause Search Indicator Music Title Indicator Play Status Bar The screen pictures are for illustration purposes only The actual screen may differ 2 3 4 5 6 7 8 1 1 Singer Song 1 2 3 4 5 6 7 8 NOTE ...

Страница 14: ...ch screen with your fingertip To avoid damage to the touch screen do not use any object other than your fingers to operate the touch screen Do not tap on the touch screen if your fingers are not clean Do not tap on the touch screen with gloves on NOTE ...

Страница 15: ...it before using the player for the first time and when you haven t used it for a long time 1 Slide the switch The USB plug is revealed 2 Connect the USB plug to the USB port on your PC as in the figure 1 2 The insertion direction of the USB port may differ depending on the PC So check the player s USB plug for the direction before insertion Screen Display USB Connected Charging Fully Charged ...

Страница 16: ...ile it is connected to a laptop computer make sure the laptop s battery is also fully charged or that the laptop is plugged into its power source TURNING THE POWER ON OFF Turning the Power on Press and briefly hold the button Power is turned on Turning the Power off Press and briefly hold the button Power is turned off Your mp3 player will be automatically turned off when none of the buttons have ...

Страница 17: ...Press the button to select Music and then press the button The Music list will appear 3 Press the button to select the desired list and then press the button 4 Press the button to select the file to play and then press the button The music will start playing Press the button to move to the previous screen Press and briefly hold the button to move to the main menu screen NOTE Singer Song 1 Music Mu...

Страница 18: ...on to decrease it DISABLING THE BUTTONS The hold function disables all the other buttons on the mp3 player so that if you accidentally bump one while working out for example your music won t be interrupted 1 Push the switch in the direction of the arrow 2 Push the switch in the opposite direction of the arrow to release the hold function Hold ...

Страница 19: ... to select Settings and then press the button The Settings menu appears 3 Press the button to select Music and then press the button The Music menu appears 4 Use the and buttons to choose the settings you prefer Press the button to move to the previous item Press the button to move to the next item select the menu Press the button to move up or down through the current menu If the Settings screen ...

Страница 20: ... All Play Speed Adjust the playback speed of music voice recording Select x0 7 x0 8 x0 9 x1 0 x1 1 x1 2 or x1 3 The higher the number is the faster the playback speed is Skip Interval Set the length of the segment the file will skip when you press the or button during playback Select either 1 Track 3 sec 5 sec 7 sec 10 sec 30 sec or 1 min Tag Allows you to select to display or not to display the f...

Страница 21: ...t functions Time setting options Sleep Turns off power automatically after the preset time Select either Off 15 min 30 min 60 min 90 min or 120 min Auto Power Off Automatically turns power off when there is no button operation after the preset time in the pause mode Select either 15 sec 30 sec 1 min 3 min or 5 min Display Off If no button is pressed within the time set shown below the Screen Displ...

Страница 22: ...f multiple languages 1 Press and briefly hold the button to move to the main menu screen 2 Press the button to select Settings and then press the button The Settings menu appears 3 Press the button to select Language and then press the button The Language menu appears 4 Use the and buttons to set functions Music User Button Mo Time Language ...

Страница 23: ...çe ID3 Tag Set the language in which the track information will appear Select from Afrikaans Basque Catalan Chinese S Chinese T Czech Danish Dutch English Estonian Finnish French German Greek Hrvatski Hungarian Icelandic Italian Japanese Korean Norwegian Polish Portuguese Romany Russian Slovak Slovene Spanish Swedish Turkish Vietnamese Thai Indonesian Ukrainian Bulgarian and Romanian The supported...

Страница 24: ...rded voice file resume that s right for you 1 Press and briefly hold the button to move to the main menu screen 2 Press the button to select Settings and then press the button The Settings menu appears 3 Press the button to select System and then press the button The System menu appears 4 Use the and buttons to set functions System ...

Страница 25: ...g the earphone On will limit the maximum volume level up to 20 The maximum volume level when Volume Limit is set to Off is 40 Even if you have select Off the volume will be set back to 20 to avoid hearing damage when you turn the player back on LED Effect Select LED backlight effect Select either Off Button turns on when a button is pressed Random or Always On Default Set Returns all settings to t...

Страница 26: ...e file list of selected folder 4 Press the button to select a file to delete and then press the button Delete will appear 5 Press the button to select YES and then press the button The selected file will be deleted Files cannot be restored after they are deleted Please check before deleting files Deleting a file will stop playing the current music NOTE CAUTION Delete Recorded Music Playlist Voice ...

Страница 27: ...r isn t recognized by your computer when you connect it you may have to reset the system Push the switch in the direction of the arrow Press and briefly hold the and buttons at the same time to reset the system The system will be initialized Your settings and files will not be affected 2 1 ...

Страница 28: ...sfer them to your mp3 without searching your entire hard drive for the right file PC REQUIREMENTS Your PC system must meet the following minimum specifications in order to install and run Media Studio Pentium 300MHz or higher USB Port 2 0 Windows 2000 XP Vista DirectX 9 0 or higher 100MB of free hard disc space CD Rom Drive 2X or higher Windows Media Player 9 0 or higher Resolution 1024 X 768 or h...

Страница 29: ...d the administrator account please refer to your PC s user manual 1 Insert the Installation CD provided with the player into the CD ROM drive 2 Click Install Now 3 Click Next Media Studio installation starts and then creates an icon on your desktop when installation is complete Handle with care when you use a vertically installed CD ROM to load remove the installation CD Next CAUTION CAUTION ...

Страница 30: ...edia Studio will automatically start when the player is connected to your PC If the program does not start automatically double click the Media Studio icon on the desktop Ejecting the USB Plug Slide the switch to eject the USB plug from the player Inserting the USB Plug Push the USB plug back into the player while sliding the switch Be sure to slide and hold the switch when you push the USB plug i...

Страница 31: ...music list All functions are disabled during connection If you connect the USB plug to the PC in the Low Battery condition the player will be charged for several minutes before connecting to the PC Connect the player to the computer directly rather than through a USB hub to avoid an unstable connection CAUTION NOTE YP U3 YP U3 ...

Страница 32: ...ted folder are added to the list on the left side the Media Studio Screen To add files 4 Click Add File on the bottom of Media Studio The Open window will appear 5 Select the files to add and click Open The files are added to the list on the left side the Media Studio Screen Samsung Media Studio has a thorough Help function If you can t find the answer to your question about Media Studio click MEN...

Страница 33: ...aled 2 Connect the USB plug to the USB port on your PC USB Connected appears on the screen display of the player Media Studio will automatically start when the player is connected to your PC If the program does not start automatically double Click the Media Studio icon on the desktop Connect the player to your computer directly rather than through a USB hub to avoid an unstable connection CAUTION ...

Страница 34: ...g file transfer Disconnecting during transfer may damage the player or your PC Music recognition technology and related data are provided by Gracenote and Gracenote CDDB Music Recognition ServiceSM CDDB is a registered trademark of Gracenote The Gracenote logo and logotype the Gracenote CDDB logo and logotype and the Powered by Gracenote CDDB logo are trademarks of Gracenote Music Recognition Serv...

Страница 35: ...e download or upload Disconnecting the USB plug while the message is displayed may cause malfunction of the player The order of music files displayed in Windows Explorer may differ from the play order on your device If you transfer a DRM file charged file to the removable disk the file will not be played What is DRM Digital Rights Management DRM is a technology and service to prevent the illegal u...

Страница 36: ...ottom right corner of the desktop and click the left mouse button 2 Click the Safely Remove USB Mass Storage Device Drive message 3 Disconnect the player from your PC Do not disconnect the player from the PC during file transfer This may cause damage to data and the player You cannot remove the player while files within the player are being played on your PC Please retry after file playback is fin...

Страница 37: ... button The Music list will appear 3 Press the button to select the desired list and then press the button 4 Press the button to select the file to play and then press the button The music will start playing Music List Music You can search for a music file Playlist You can search for a music file or album in the playlist MP3 WMA and Ogg music files are compatible with the player MP1 or MP2 files w...

Страница 38: ... 2 Release the button at the point you wish to start It starts playing from the point you release the button PLAYING FROM THE BEGINNING OF THE CURRENT TRACK 1 Press the button after 3 seconds of play The current track starts playing from the beginning PLAYING THE PREVIOUS OR NEXT TRACK 1 Press the button within 3 seconds of play The previous track will start playing 2 Press the button The next tra...

Страница 39: ...selected folder 5 Press the button to select a file of your choice 6 Press the button The music file will start playing TO SWITCH BACK TO THE CURRENT PLAY SCREEN You can return to the current play screen at any time while using other functions 1 Press and briefly hold the button to move to the main menu screen 2 Press the button to select Now Playing and then press the button The player switches b...

Страница 40: ...t Connect the player to your PC Media Studio must be installed on your PC 1 Click My Album on the top of Media Studio The My Album window appears 2 Click New Album on the bottom The Creation window appears 3 Type in the album title and click OK A new album playlist will be named and stored in the My Album section of Media Studio 2 5 My Album YP U3 YP U3 1 OK New Album 3 ...

Страница 41: ... PC on the top of Media Studio The My PC window appears 2 Click My Album in the right corner of the window The My Album window appears 3 Double click on an album in the right window 4 Select files that you want to transfer in the My PC window 5 Click The selected files will be added to the album playlist 5 YP U3 1 My PC My Album 3 4 2 ...

Страница 42: ...1 Click My Album on the top of Media Studio The My Album window appears 2 Click Portable in the right corner of the window The Portable window appears 3 Select an album in the My Album list 4 Click The selected album will be transferred to the player folder by folder in Music of the main menu Playlists YP U3 1 My Album 4 3 2 Portable YP U3 ...

Страница 43: ...list will appear 3 Press the button to select Music and then press the button The file list of the Music folder will appear 4 Press the button to add files to the playlist and then press the button The selected file will be marked with and is added to the playlist You can check the playlist in Music of the main menu Playlist Favorite spl If you want to delete a file in Favorite spl select a marked...

Страница 44: ... button The Music list will appear 3 Press the button to select Playlist and then press the button The Playlists will appear If there is no playlist found you will see a No file message on the screen 4 Press the button to select the playlist of your choice and then press the button The music files saved in the selected Playlist will appear 5 Press the button to select the file to play and then pre...

Страница 45: ...ress the button to select Settings and then press the button The Settings menu will appear 3 Press the button to select User Button Mode and then press the button The User Button Mode menu will appear 4 Press the button to select the user button mode and then press the button User Button Mode List Repeat A B Sets section repeat DNSe Allows you to select an appropriate sound effect for music Play S...

Страница 46: ...ting point is set and AJ will appear in the screen display window 3 Press the button again to set the ending of the section you want to repeat AQB will appear on the screen and the specified section starts to play repeatedly To cancel Section Repeat Press the button again during Section Repeat Section Repeat will be canceled Section Repeat will be automatically canceled in the following case The s...

Страница 47: ... Button Mode to Play Speed and press the button Playback speed changes in the following order each time the button is pressed NOR x1 1 x1 2 x1 3 x0 7 x0 8 x0 9 To use the Play Mode button Set the User Button Mode to Play Mode and press the button Playback mode changes in the following order each time the button is pressed Normal Repeat Folder Repeat All Repeat One Shuffle Folder Shuffle All What i...

Страница 48: ...quality of the recording by selecting a different bit rate For more information on setting the voice recording bit rate see page 23 Method 1 You can record a voice recording at any time while using other functions Press and briefly hold the button Voice recording will start as soon as the file name is displayed Method 2 1 Press and briefly hold the button to move to the main menu screen 2 Press th...

Страница 49: ... want recording to stop The confirmation window will appear 2 Press the button to select YES or NO and then press the button YES the just recorded file will play NO the just recorded file will not play The recorded file is stored in the Voice Record of the main menu Recorded Files Do not place the microphone too close or too far away during recording as this can affect the recording quality Voice ...

Страница 50: ...0003 mp3 is the third voice recording file to be saved To listen to a previously recorded file 1 Press and briefly hold the button to move to the main menu screen 2 Press the button to select Voice Record and then press the button The Voice Record list will appears 3 Press the button to select Recorded Files and then press the button The Recorded files list will appear 4 Use button to select a rec...

Страница 51: ...d the and buttons at the same time to reset the system Buttons do not work Check if the switch is in the direction of the arrow position Check if you pressed the right button then press again In Hold state press and briefly hold the and buttons at the same time to reset the system The screen will not turn on If Display Off is selected from Settings Time the screen display will be turned off Press ...

Страница 52: ...ry life may be shortened when the player is left for extended periods in low or high temperatures Media Studio Program Malfunction Check if your PC meets the basic system requirements Connection to your PC is disabled Check the USB plug if it s correctly connected and try again Press Start on the toolbar of your PC to run Windows Update Select Key Updates and Service Packs then update all Reboot y...

Страница 53: ...stem Files or data are missing Check if the USB plug has been disconnected during file or data transmission If this is the case it may cause serious damage not only to files data but also to the product You have to be extra cautious as Samsung is not responsible for data loss Abnormal play time display during play Check if the file is in Variable Bit Rate VBR format Abnormal display of file name G...

Страница 54: ...reen Music Voice Record Settings Now Playing Music User Button Mode Time Language System DNSe Repeat A B Sleep Menu Voice Recording Bit Rate 3D User Set DNSe Auto Power Off ID3 Tag Delete File User EQ Set Play Speed Display Off Resume Play Mode Play Mode Beep Play Speed Volume Limit Skip Interval LED Effect Tag Default Set Format About ...

Страница 55: ...Files Folder Max 2000 File Max 2000 Earphone Output 20mW CH France 5mW CH 16Ω Output Frequency Range 20Hz 20KHz Signal to Noise Ratio 90dB with A filter Based on 1KHz 0dB Play Time 15 hours of music play MP3 128kbps Volume 15 Normal sound mode Temperature Range for Operation 5 35 C 23 95 F Case Plastics Weight 22 8g Dimension WxHxD 80 X 25 4 X 11 mm The contents of this Manual are subject to chang...

Страница 56: ... are granted under this license for product features or functions that do not conform to the ISO IEC 11172 3 or ISO IEC 13818 3 EUROPE ONLY This marking shown on the product or its literature indicates that it should not be disposed with other household wastes at the end of its working life To prevent possible harm to the environment or human health from uncontrolled waste disposal please separate...

Страница 57: ...9 0013 www samsung com latin JAMAICA 1 800 234 7267 www samsung com latin PANAMA 800 7267 www samsung com latin PUERTO RICO 1 800 682 3180 www samsung com latin REP DOMINICA 1 800 751 2676 www samsung com latin TRINIDAD TOBAGO 1 800 SAMSUNG 726 7864 www samsung com latin VENEZUELA 0 800 100 5303 www samsung com latin COLOMBIA 01 8000112112 www samsung com co BELGIUM 0032 0 2 201 24 18 www samsung ...

Страница 58: ... samsung com LITHUANIA 8 800 77777 www samsung lt LATVIA 800 7267 www samsung com lv ESTONIA 800 7267 www samsung ee AUSTRALIA 1300 362 603 www samsung com NEW ZEALAND 0800SAMSUNG 726 7864 www samsung com nz CHINA 800 810 5858 010 6475 1880 www samsung com HONG KONG 3698 4698 www samsung com hk INDIA 3030 8282 1800 110011 www samsung com INDONESIA 0800 112 8888 www samsung com JAPAN 0120 327 527 w...

Страница 59: ...REV 0 0 ...

Отзывы: