background image

Chapter 2. Loading 

Your Desired File

Installing Media Studio/

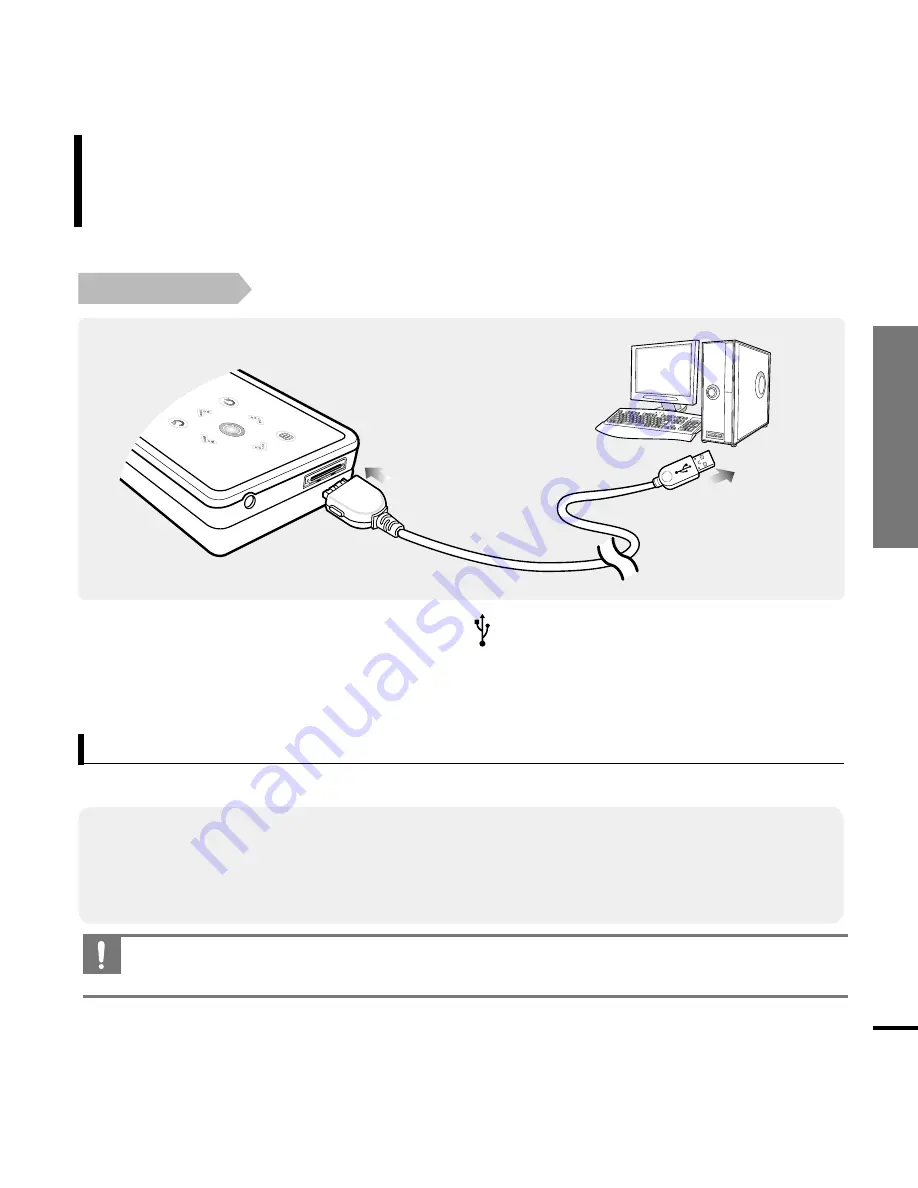
Connecting to your PC

17

Connecting to your PC

Loading Your Desired File

Before you start! 

Use the USB Cable provided when connecting the player to your PC.

1

1

Connect the USB cable to the USB port (     ) on your PC.

2

2

Connect the other end of the USB cable to the USB Connection Port on the 
bottom of the player.

The PC system must meet the following minimum specifications:

■   

Pentium 300MHz or higher

■   

Windows 2000/XP

■   

DirectX 9.0 or higher

■   

USB Port 2.0

■   

100MB of free hard disc space 

■   

CD Rom Drive (2X or higher)

■   

Resolution 1024 X 768 or higher

PC Requirements

CAUTION

■   

If you connect the player through a USB hub, the connection may be unstable. 
Please connect the player to your PC directly.

Содержание YP-K5AB

Страница 1: ......

Страница 2: ...xperience ringing in your ears while using the earphone remove the earphone immediately and lower the volume To avoid a risk of traffic accident Do not use the earphones while you are driving a bicycle automobile or motorcycle It can cause a serious accident and furthermore is prohibited by law in some areas Using the earphones while walking in particular on a crosswalk can lead to a serious accid...

Страница 3: ...uries or damage to the player Do not cause excessive impact on the player by dropping it Do not place heavy objects on top of the player Prevent any foreign particles or dust from entering into the player Always use the accessories provided by or approved by Samsung Do not spray water on the player Never clean the player with chemical substances such as benzene or thinner as it may cause fire elec...

Страница 4: ... Studio 18 Transferring Files to the Player with Samsung Media Studio 20 Using as a Removable Disk 22 Disconnecting from your PC 23 Chapter 3 Multimedia function Listening to Music 24 Listening to Music 24 Creating a Playlist Using Samsung Media Studio 28 To Play a Playlist 30 Using the Music Option Menu 31 Photo Viewing 33 Photo Viewing 33 Using the Photo Option Menu 34 Listening to FM Radio 35 L...

Страница 5: ...etting Settings 42 Setting Alarm 42 Setting Display 44 Setting Time 46 Setting Language 48 Setting the System 49 Chapter 5 Troubleshooting Troubleshooting 51 Chapter 6 Appendix Menu Tree 53 Product Specifications 54 ...

Страница 6: ...ommunication with the PC Touchpad Supporting Various File Formats You can tap on the touch pad to navigate through the menus Supports various file formats including MP3 WMA and Ogg The image file is converted to JPG format before transmitted to the player Easy Simple Menu Structure Convenience Easy to use with a simple menu structure You can set your own graphic display by taking advantage of the ...

Страница 7: ...ion Product Features Components 7 Front Right Side and Top Power Hold Switch Speaker Screen Display Back Button Play Pause Select Button Menu Button Button All buttons are Light touch buttons Components Basic Information ...

Страница 8: ...t Earphone Jack Reset Hole Components Continued Basic Information Rear Bottom Checking the Accessories Player Earphones USB Cable Installation CD Design of accessories is subject to change for the purpose of improvement without notice ...

Страница 9: ...es are for illustration purposes only The actual screen may differ 1 Repeat Play Display 3 Music Information 2 Equalizer 4 Play Status Bar 5 Current Music Number Total Number Display 6 Alarm Display 7 Battery Status Display 8 Play Time Indicator 9 Play Pause Display Music Normal 1 Life is cool 0002 0020 00 02 20 1 2 3 4 5 6 7 8 9 ...

Страница 10: ...p or down continuously Short tap to select the play pause and function move to the next screen Search for a track and control volume while listening to music Press and hold to scan to a point on the current track Tap to move to the previous track or to play the current track from the start Press and hold to scan to a point on the current track Tap and release to move to the next track Tap to reduc...

Страница 11: ... not use any sharp object other than your fingers to operate the touch screen Otherwise touch screen may be damaged Do not tap on the touch screen if your fingers are not clean Tap on touch screen with your fingertip Earphone Connection Bottom Earphones ...

Страница 12: ...nnected with the USB cable it takes about 4 hours for the player to fully charge although this may vary depending on your PC environment Battery Use Recharge and store within the temperature range of 5 C 35 C 40 F 95 F Do not overcharge longer than 12 hours Excessive charging or discharging may shorten the battery s life Battery life naturally shortens slowly over time If you are charging the play...

Страница 13: ... is turned off Power is automatically turned off when none of the buttons have been tapped for a preset period of time Default 1 minute in the pause mode Page 46 NOTE NOTE Tap to move to the previous screen Press and hold to move to the main menu screen Playing Music 1 Press and hold to move to the main menu 2 Tap to select Music and then tap The Music Menu will appear 3 Use and to select a music ...

Страница 14: ... all buttons are disabled This function is useful when you are walking or jogging 1 Slide the HOLD switch in the direction of the arrow 2 Slide the HOLD switch in the opposite direction of the arrow to release the Lock function Basic Use Continued Normal 1 Life is cool 0002 0020 00 02 20 Normal 1 Life is cool 0002 0020 00 02 20 ...

Страница 15: ... back to the original position Please position the player horizontally when using the speaker If you close the slide panel the speaker will shut off If a player malfunction occurs you can re initialize the system by pressing the Reset hole Press the Reset hole at the rear of the player with a pointed object such as a safety clip The system will be initialized Your settings and files will not be af...

Страница 16: ...ROM drive If Media Studio is not installed automatically Install the program on PCs running Windows 2000 or Windows XP after logging on with the Administrator account Please refer to the PC user manual on how to log on with the Administrator account CAUTION 1 Click Install now 2 Click NEXT Media Studio installation starts An icon is created on the desktop after installation is complete and Media S...

Страница 17: ... 2 2 Connect the other end of the USB cable to the USB Connection Port on the bottom of the player The PC system must meet the following minimum specifications Pentium 300MHz or higher Windows 2000 XP DirectX 9 0 or higher USB Port 2 0 100MB of free hard disc space CD Rom Drive 2X or higher Resolution 1024 X 768 or higher PC Requirements CAUTION If you connect the player through a USB hub the conn...

Страница 18: ...d File Please refer to Help for more information on how to use Media Studio Click MENU Help Help from the menu at the top of the Media Studio program Media Studio enables you to select and organize files and folders in preparation for transfer to your player 2 YP K5 YP K5 ...

Страница 19: ...elected folder is added to the list on the left side the Media Studio Screen 1 Media Studio will automatically start when the player is connected to your PC If the program does not start automatically double Click the Media Studio icon on the desktop 2 Click the desired file icon Choose the file type you want to transfer by clicking on one of these icons represents a music file and represents a ph...

Страница 20: ...DB Music Recognition ServiceSM CDDB is a registered trademark of Gracenote The Gracenote logo and logotype the Gracenote CDDB logo and logotype and the Powered by Gracenote CDDB logo are trademarks of Gracenote Music Recognition Service and MRS are service marks of Gracenote 4 3 2 Portable window YP K5 YP K5 Perform the following steps to transfer files from your PC to the player ...

Страница 21: ...file types ex TXT XOV etc other than music and photo files 3 Select the file to transfer in the left file list Do not disconnect the USB cable during file transfer This may cause damage to the player or your PC CAUTION When transferring a photo file to the player using Media Studio it is automatically converted into JPG format before transfer The file size is automatically adjusted too A photo fil...

Страница 22: ...t the illegal use of digital contents and protect the profit and rights of copyright holders DRM files are charged music files applied with the illegal copy protection technology of legally purchased MP3 music You can use the player as a removable storage device The Transferring Files message will appear during file download or upload Disconnecting the USB cable while Transferring Files is display...

Страница 23: ...op of the icon on the taskbar at the bottom right corner of the desktop and click the left mouse button 2 Click Safely Remove USB Mass Storage Device Drive message 3 Disconnect the player from your PC Do not disconnect the player from the PC during file transfer This may cause damage to data and the player You cannot remove the player while files within the player are being played on your PC Pleas...

Страница 24: ...c and then tap The Music Menu will appear Music Menu Now Playing You can see information on the current song File Browser You can search for a music file Playlists To play by Playlist NOTE The music files compatible with the player are MP3 WMA and Ogg MP1 or MP2 files which only have a changed extension to MP3 may not play on the player 3 Tap to select File Browser and then tap 1 2 3 Music ...

Страница 25: ...The music files for the selected folder will appear 5 Tap to select a music file to play and then tap The music will start playing 4 5 File Browser MUSIC PHOTO PLAYLIST NOTE If you select the PHOTO folder in the File Browser only those music files transferred into the PHOTO folder are displayed ...

Страница 26: ...cally turns off when none of the buttons have been tapped for a preset period of time Default 1 minute in the pause mode You can set the time duration before closing the screen display page 46 To search within a track 1 Press and hold while the selected track is playing It searches to the beginning or the end of the track 2 Release the button at the point you wish to start It starts playing from t...

Страница 27: ... 3 seconds of play The current track starts playing from the beginning To play the previous next track Tap within 3 seconds of play The previous track will start playing Tap The next track will start playing CAUTION When playing VBR files the previous track may not play even if you tap within 3 seconds of play ...

Страница 28: ...on the top of Media Studio The My Album window appears A playlist is a list of your favorite songs 2 Click New Album on the bottom The Creation window appears 3 Type in the album title and click OK A new album playlist will be created and stored in the My Album section of Media Studio 1 2 3 3 ...

Страница 29: ...dow appears 3 Double click on a desired album in the right window 4 Select files that you want to transfer in the My PC window 1 Click My Album on the top of Media Studio The My Album window appears 2 Click Portable in the right corner of the window The Portable window appears 3 Select a desired album in the My Album list 4 Click icon The selected album will be transferred to the player and stored...

Страница 30: ...c and then tap The Music Menu will appear 3 Tap to select Playlists and then tap The Playlist s will appear If there is no playlist found you will see a message of No File on the screen 4 Tap to select the playlist of your choice then tap The music files saved in the selected Playlist will appear 5 Tap to select a music file to play then tap The music file will start playing Music Now Playing File...

Страница 31: ...the desired sound effect and then tap You can select either Normal Vocal Bass Boost 3D Sound or Concert Hall 1 Tap while listening to music The music option menu appears 2 Tap to select Graphic EQ and then tap The graphic equalizer menu appears 3 Tap to select On or Off and then tap On The graphic equalizer will be displayed on the screen Off The graphic equalizer will not be displayed on the scre...

Страница 32: ...m sound list Sound Effect Graphic EQ Play Mode Add to Alarm Normal Using the Music Option Menu Continued Listening to Music To select the play mode 1 Tap while listening to music The music option menu appears 2 Tap to select Play Mode and then tap The play mode menu appears 3 Tap to select the desired mode and then tap Sound Effect Graphic EQ Play Mode Add to Alarm Normal Normal To play all the fi...

Страница 33: ...longer to display 1 Tap in Photo Viewing mode The slideshow will start You can view you picture files in order as a Slide show 2 Tap to stop the slideshow Slideshow Viewing Tap You can see the previous or next photo on the display To view the previous next photo NOTE You will see thumbnail photos if the appropriate information is included in the file For a file with no information you will see ins...

Страница 34: ...e song that you last played while viewing your photo 2 Tap to select Background Music On or Background Music Off Background Music On You can listen to the song that you last played while viewing your photo Background Music Off No background music is played while viewing a photo Using the Photo Option Menu Photo Viewing Background Mu Add to Screen S Background Mu Add to Screen S NOTE Select Photo f...

Страница 35: ...he player and check the battery 1 Press and hold to move to the main menu 2 Tap to select FM Radio and then tap FM radio reception will start Tap while listening to the FM radio Sound is muted Tap once again to hear sound To use Mute function Always connect your earphones to the player when searching or setting frequencies The earphones are used as antennas to receive FM radio reception CAUTION ...

Страница 36: ...if you want to search through your saved FM presets one preset at a time 2 Tap to select Go to Manual Mode and then tap You will see Manual Mode on the screen NOTE If no preset frequencies are set you will see Preset list does not exist and the player will not switch to Preset Mode If you select Preset List on the FM option menu you will see the preset frequencies For more information on the prese...

Страница 37: ...or frequencies To automatically search for frequencies Press and hold in Manual Mode The broadcast station frequency nearest from the point the button is released will be searched Tap in Manual Mode Moves to next frequency whenever the button is tapped Manual Mode Manual Mode ...

Страница 38: ...Up to 30 presets are automatically saved Setting FM Presets Listening to FM Radio You can set up to 30 presets in FM Radio mode Go to Preset Add Preset Auto Preset FM Sensitivity Manual Mode To cancel during setting Tap to cancel during auto scanning The auto preset setting is canceled and frequencies set up to then are stored Using Auto Preset deletes all previous presets NOTE ...

Страница 39: ...dded to the preset list A maximum of 30 preset numbers are added to the list in sequential order Tap in Preset Mode The preset number is selected and you can listen to the stored radio frequency 4 To set a preset number for other frequencies follow 1 3 steps above If a frequency that you try to add already exists in the list you will see This preset already exists and the selected frequency is not...

Страница 40: ...lect the preset frequency you want to delete and then tap The confirmation window will appear 4 Tap to select Yes and then tap The selected preset will be deleted 5 To select and delete other preset numbers follow 1 4 steps above To Delete Presets Listening to FM Radio Delete Preset 89 1MHz 89 2MHz 89 3MHz 89 4MHz ...

Страница 41: ...ual Mode Listening to FM Radio Setting FM Radio To set FM Sensitivity 1 Tap in FM Radio mode 2 Tap to select FM Sensitivity and then tap The FM Sensitivity menu appears 3 Tap to select the sensitivity and then tap You can select from High Middle and Low The higher FM sensitivity is the more frequencies that can be received ...

Страница 42: ...nterval and then tap The Confirmation window will appear 10Tap to select Yes and then tap The alarm setting is added to the alarm list 3 Tap to select New Alarm Set and then tap The Alarm Settings menu appears 4 Tap to select a frequency and then tap Select either Once Off Saturday Sunday Monday Saturday Monday Friday or Everyday 5 Tap to select AM or PM and then tap 6 Tap to set the hour and then...

Страница 43: ...tion window will appear 3 Tap to select Yes and then tap The selected alarm setting will be deleted If the USB cable is connected to the player the alarm function does not work CAUTION The player will sound the alarm when it reaches the scheduled time Then tap and use the to select Alarm after 3 min or Alarm Off To end the alarm press and hold button You will return to the main menu NOTE Edit Alar...

Страница 44: ...enu 2 Tap to select Settings and then tap The Settings menu appears 3 Tap to select Display and then tap The Display menu appears 4 Use the and to set the desired functions Settings Display Time Language System Button Operation Tap to move up or down in the list Tap to select and confirm your settings Tap to return to the previous screen NOTE ...

Страница 45: ...matically turn off Select either 15sec 30sec 1min 3min 5min and Always On With the display turned off tap any button to turn back on the display and the buttons Screen Saver Setting Screen Saver Photo 15 sec 1 Tap to select Screen Saver and then tap The screen saver menu appears 2 Tap to select the desired screen saver image and then tap 3 Tap to select a wait time and then tap The Confirmation wi...

Страница 46: ... then tap The Time menu appears 4 Use the and to set the desired functions Sleep Timer Turns off power automatically after the preset time Select either Off 15 min 30 min 60 min 90 min or 120 min Auto Power Off Automatically turns power off when there is no button operation after the preset time Select either 15 sec 30 sec 1 min 3 min or 5 min Date Time Set You can set the current date and time Pa...

Страница 47: ...t the date format and then tap 3 Tap to move to YY year MM month DD day AM PM Hour Minute and use the to set the date and time 4 Tap The confirmation window will appear 5 Tap to select Yes and then tap The date time setting will be saved Ωƒ Date Time Set YY MM DD 06 06 02 PM 06 35 Ωƒ Date Time Set YYMMDD MMDDYY DDMMYY Display Type ...

Страница 48: ...ano Español Magyar Nederlands Polski Português Svenska ID3 Tag Set the track information language Select from Afrikaans Basque Catalan Chinese S Chinese T Czech Danish Dutch English Finnish French German Hrvatski Hungarian Icelandic Italian Japanese Korean Norwegian Polish Portuguese Romany Russian Slovak Slovene Spanish and Swedish Settings Display Time Language System The supported languages can...

Страница 49: ...00 kHz increments between 76 0 MHz 108 0 MHz FM region can be deleted or changed according to the target region of the player If you change the FM region the previously stored radio frequencies are deleted NOTE Resume You can set the start point where the player resumes playback after you stop playing the music Selecting On will resume playback from the last stopped point while Off will resume pla...

Страница 50: ...ty and file number Firmware Version Displays the current firmware version Memory Indicates the remaining memory capacity Used indicates the usage Remain indicates the remaining capacity and Total indicates the total memory capacity Files Music indicates the number of music files Photo for the number of photos and Total for the number of entire files If you reset the player all functions you set ar...

Страница 51: ... or check the Display settings page 45 The screen may not be visible under direct sunlight Check the battery status The power is automatically turned off when the battery is fully discharged Recharge the battery Battery life differs from the Manual The battery time can vary depending on the sound mode and display setting The battery life may be shortened when left for extended periods in low or hi...

Страница 52: ...tery power Check if the USB cable is securely connected Reconnect if necessary Check if the memory is full Press the Reset hole Check if the USB cable has been disconnected during file or data transmission If this is the case it may cause serious damage not only to files data but also to the player You have to be extra cautious as Samsung cannot be not held responsible for data loss Check if the f...

Страница 53: ...t Screen È º Display Music FM Radio Photo Alarm Settings Screen saver Display Off Time Sleep Timer Auto Power Off Date Time Set Language System Resume Beep Volume Limit FM Region Default Set About Menu Tree You can quickly view the menu structure Menu ID3 Tag ...

Страница 54: ...ivity File Speaker Power Output Impedance Frequency Range 0 7W Ch x 2Ch 8Ω 400 Hz 20 KHz Compatibility YP K5 3 7V Li Polymer Rechargeable 830 mAh Music MPEG1 2 2 5 Layer3 8kbps 320kbps 22kHz 48kHz WMA 48kbps 192kbps 22kHz 48kHz Ogg Q0 Q10 Image JPEG ISO IEC 10918 1 Annex F Sequential DCT based mode of operation 20mW 16Ω 20Hz 20KHz 90 dB with 20kHz LPF based on 1KHz 0 dB Music 30 hrs based on MP3 1...

Страница 55: ... product should not be mixed with other commercial wastes for disposal EUROPE ONLY License The product player accompanying this user manual is licensed under certain intellectual property rights of certain third parties This license is limited to private non commercial use by end user consumers for licensed contents No rights are granted for commercial use The license does not cover any product pl...

Страница 56: ...ung com latin ECUADOR 1 800 10 7267 www samsung com latin EL SALVADOR 800 6225 www samsung com latin GUATEMALA 1 800 299 0013 www samsung com latin JAMAICA 1 800 234 7267 www samsung com latin PANAMA 800 7267 www samsung com latin PUERTO RICO 1 800 682 3180 www samsung com latin REP DOMINICA 1 800 751 2676 www samsung com latin TRINIDAD TOBAGO 1 800 7267 864 www samsung com latin VENEZUELA 1 800 1...

Страница 57: ...SIA 8 800 200 0400 www samsung ru UKRAINE 8 800 502 0000 www samsung com ur AUSTRALIA 1300 362 603 www samsung com au CHINA 800 810 5858 010 6475 1880 www samsung com cn HONG KONG 2862 6001 www samsung com hk INDIA 3030 82821600 1100 11 www samsung com in INDONESIA 0800 112 8888 www samsung com id JAPAN 0120 327 527 www samsung com jp MALAYSIA 1800 88 9999 www samsung com my PHILIPPINES 1800 10 SA...

Страница 58: ...REV 0 0 ...

Отзывы: