background image

25

Searching for Music/Voice Files

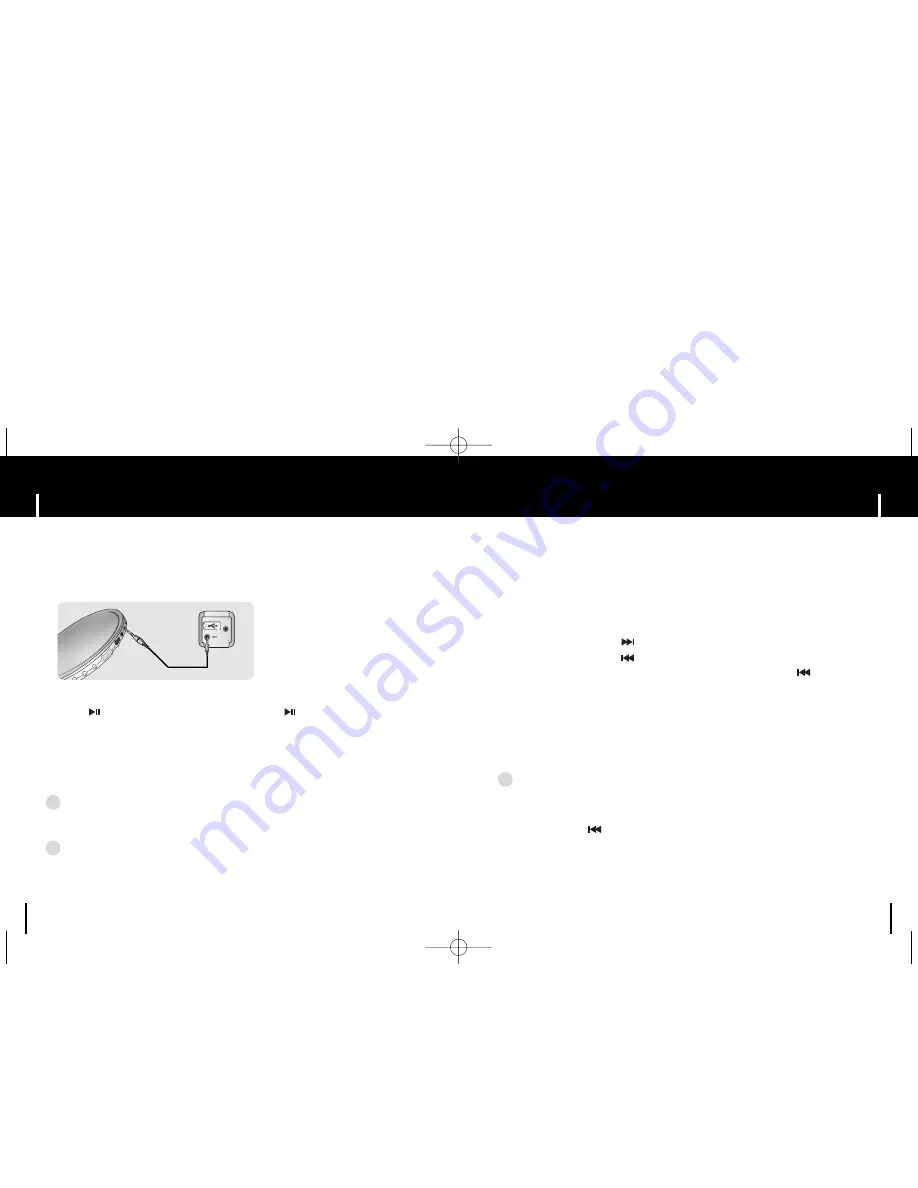
MP3 Encoding

24

To move to other modes from LINE_ENC mode,
refer to “Changing Mode”.

1

Connect the Audio Output port on the external audio source 
(or the Line Out port) to the ENC port on the device with the Line cable.

2

Press and hold the REC button to start MP3 encoding.

● 

If the       button is pressed, encoding is paused and if the       button is pressed again,
the encoding resumes.

3

If the REC button is pressed during encoding, the encoding stops and an 
encoding file is created.

● 

The files are encoded in the order of L001, L002.... 
and saved as MP3 file in LINE_ENC folder after encoding.

N

N

N

N

o

o

o

o

tt

tt

e

e

e

e

- Bit Rates can be set within the range of 32Kbps~128Kbps. 
- Volume can be adjusted while monitoring the Encoding. 

N

N

N

N

o

o

o

o

tt

tt

ii

ii

c

c

c

c

e

e

e

e

- Do not disconnect the Line cable during Encoding.
- If the battery is not sufficiently charged, the player will not completely encode the file.
- Adjust the volume of the external audio source to a suitable level and encode it. 

If the volume level is too high, the sound quality may be poor.

● 

Press and hold the joystick left or right during playback to search for
the part you want to listen to. 

● 

Release the joystick to resume play normally. 

Š

To search for specific parts during play

● 

Press the joystick to the       position briefly during playback to play the next track. 

● 

Press the joystick to the       position briefly within 5 seconds after playback starts,
to move to and play the previous track. Press the joystick to the       position briefly
after five seconds to play the current track from the beginning.

Š

To change tracks during play

● 

Press the joystick left or right in stop mode to move 
to the previous/next track. 

Š

To change tracks when stopped

N

N

N

N

o

o

o

o

tt

tt

e

e

e

e

- VBR(Variable Bit Rate) file: A file that constantly changes the compression rate according 

to the type of sounds, such as their pitch, in the file. 

- In the case of a VBR file, you cannot move to and play the previous track even if you press

the joystick to the        position within 5 seconds after playback starts.

- Files that were downloaded in MP2 or MP1 and had their file extension changed to MP3 

may not play.

T6 AME ENG0.0  10/12/04 10:5612:0  Page 24

Содержание Yepp YP-T6H

Страница 1: ...nnecting the USB cable 18 Formatting 19 Installing yepp Studio 20 To View Help on yepp Studio 21 I Connection to Computer Loop Repeating 28 MENU Options 29 Using Navigation 30 Setting Playlist 33 Setting the Advanced Functions 34 Selecting the Playmode 35 Setting the EQ mode 36 Preset EQ 36 Bass Booster 36 WOW Set 37 User EQ Set 38 Display 39 Scroll Speed 39 Display Time 39 Backlight 40 Contrast 4...

Страница 2: ...raffic Safety Instructions Do not use the earphones while driving an automobile or riding a bicycle It s not only dangerous but also against the law It may cause an accident if you turn up the volume of the earphones while walking especially when crossing intersections Protect your ears Do not turn up the volume too high Doctors warn against prolonged exposure to high volume Stop using the device ...

Страница 3: ...ency Memory functions 3D Sound The 3D surround feature adds spaciousness to the sound USB 2 0 Support Maximum data speed transfer of 18 Mbps Upgradable You can upgrade the built in programs when available Add functions CODEC etc Please check the home page www samsungusa com for upgrades 20 Hours of Continuous Play This player uses one AAA LR03 alkaline battery Operation can last up to 20hours Actu...

Страница 4: ... in memory YP T6 H 128MB YP T6 V 256MB YP T6 X 512MB YP T6 Z 1GB Continued Recording Button Play Pause Button Hold Switch Loop Repeating Button USB Cable Connection Port ENC Jack Microphone Neck strap Hook MENU Navigation button Move to Track Speed Search Volume Button Display Battery Cover Earphone Jack Player Earphone One Battery 1 5V AAA LR03 type USB Cable User manual Line In Cable Installatio...

Страница 5: ...r Before connecting yepp to PC make sure to install USB driver If Add New Hardware Wizard appears press the Cancel button and install the USB driver N N N No o o ot t t te e e e Install the operating system in Administrator Account mode for Windows 2000 or XP Otherwise installation will not be completed Windows ME 2000 and XP can recognize the driver without installing the provided program However...

Страница 6: ...ing during USB driver installation your PC may not function correctly 3 The USB driver is installed with a message saying that it is searching for a new device You may not see the display screen during installation Go to the device manager to check that installation has been successfully completed 4 Upon installation of the USB driver Samaung yepp YP T6 USB Device will appear in the System Propert...

Страница 7: ...om windowsupdate microsoft com The installation method may vary depending on the type of PC or operating system Contact your PC dealer or service center for installation information If errors occur continuously when you install the USB driver reconnect the USB cable after rebooting your system I Installing software 1 Check the device manager Windows 98 ME Control Panel System Device Manager Window...

Страница 8: ...t your computer to complete the installation N N N N N N No o o ot t t te e e e You cannot use it as a removable disc in Windows 98 if the YP T6 program is not installed Make sure to install the USB driver file first 4 After selecting the driver click Update Driver 5 Click Next 6 Select Search for a suitable driver for my device and then click Next 7 Click Next to finish T6 AME ENG0 0 10 12 04 10 ...

Страница 9: ...t Format 2 Press the Start button All saved files will be formatted You can change the name of removable disc by selecting Volume label I Disconnecting the USB cable 1 Double click on the green arrow in the taskbar on the bottom right of the window N N N No o o ot t t ti i i ic c c ce e e e The WRITING READING message will appear during file download or upload Disconnecting the USB cable while WRI...

Страница 10: ...on Please refer to Help for more information on how to use yepp Studio 2 Select language N N N No o o ot t t te e e e Music recognition technology and related data are provided by Gracenote and Gracenote CDDB Music Recognition ServiceSM CDDB is a registered trademark of Gracenote The Gracenote logo and logotype the Gracenote CDDB logo and logotype and the Powered by Gracenote CDDB logo are tradema...

Страница 11: ...he HOLD message will appear on the display I Playing Music Power On Press the button Playback starts 1 Press and hold the REC button to start voice recording 2 Press the REC button again to stop the recording and save the voice file To move to other modes from the Voice mode refer to Changing Mode N N N No o o ot t t te e e e The files are recorded in the order of V001 V002 and saved as WAV file i...

Страница 12: ...vel and encode it If the volume level is too high the sound quality may be poor Press and hold the joystick left or right during playback to search for the part you want to listen to Release the joystick to resume play normally To search for specific parts during play Press the joystick to the position briefly during playback to play the next track Press the joystick to the position briefly within...

Страница 13: ...ight to select the number you want to assign to save the frequency and then press the A B button I Automatic Search for a Frequency Press and hold the joystick left or right to search for and stop at frequencies with reception I Automatic Storage of a Frequency Number of channels saved I Searching Stored Frequencies I Deleting Stored Frequencies 1After moving to the PRESET number you want to delet...

Страница 14: ...nd hold the REC button during FM reception Encoding of the currently transmitted FM broadcast begins 2 Press the REC button again A file is created and the encoding stops Files are encoded in the order F001 F002 F003 and saved as MP3 files in FM_ENC folder Loop Repeating While playing music files press the A B button briefly at the beginning of the loop you want to set A appears in the display Sta...

Страница 15: ...ess and hold the button in Navigation mode to exit the Navigation mode 1 Press the button to enter Navigation mode or press and hold the button to move to Menu and then select Navigation in Menu 2 Select the file or folder that you want to play When moving to a higher level folder When moving to a lower level folder When moving to a file or folder in the same directory Move to the next folder down...

Страница 16: ... is released mark will appear and the selected file will be played Exiting Folder Play I Setting Playlist I Playing Playlist 1 Press and hold the A B button in music mode or select Playlist in Menu The playlist you set will be displayed 2 Move to the file you want to play and press the button mark appears and the selected file will be played Move to the file you want in Navigation mode and press t...

Страница 17: ...select Return 1 Select Play mode in Settings 2 In Play mode use to move to the mode you want and press the button to select I Setting Playlist Normal To play all the tracks in order one time Repeat one To repeat one track Repeat all To repeat all tracks Shuffle To play tracks at random Intro To listen to the first part of all saved tracks for 10 seconds Return To move to a previous menu T6 AME ENG...

Страница 18: ...is a bass boost feature that adds fullness to the sound Use to adjust TruBass from 0 to 10 Focus You can enjoy clearer tone during playback Use to set Focus and then press the button High Middle Low Optimum Optimize the SRS function according to the device connected to the main unit Use to move to the connected device and then press the button Earphone Headphone Speaker Carpack I Preset EQ I WOW S...

Страница 19: ...ust the volume to a suitable level as the volume may increase in the SRS setting This unit supports sampling frequencies of 32KHz 44 1KHz or 48KHz The SRS function is not set for voice recording files Scroll Speed Select Display in Settings Use to set the scroll speed from 1X to 5X to adjust the speed of the track title movement Display Time Use to select the display time Count Up Current playback...

Страница 20: ...m 0 to 10 to adjust the brightness of the screen Language Use to select the language for displaying Tag information Chinese S Chinese T English French German Italian Japanese Korean Rusian Spanish Backlight Jog Use to set the Light On time from Off to 60 seconds When set to On the Light stays on continuously LCD Use to set the LCD Light Off time from Off to 60 seconds When set to On the Light stay...

Страница 21: ...lue the music is replayed at the previously played volume Tuner Region Use to select FM Tuner Region Worldwide Search FM frequency between 87 5MHz to 108 00MHz in the increase of 50 KHz US Search FM frequency between 87 5MHz to108 0MHz in the increase of 100 KHz Japan Search FM frequency between 76 0MHz to 108 0MHz in the increase of 100 KHz Tuner Level Use to select FM Tuner Sensitivity The highe...

Страница 22: ...s saved as one file Power Off Select Time in Settings Use to set the Power Off time from 0 to 30 minites If no button is pressed after play stops the player will automatically turn off after the time you set When set to Off it will not turn off automatically 10 Power Off Use to set the Sleep time to 15 30 60 90 or 120 The player will automatically turn off after the time you set 15 30 60 90 and 12...

Страница 23: ...ting the built in memory It is recommended that formatting be carried out on a PC that has the provided program installed as formatting in the Menu may take a long time Play Mode Now playing FM Radio Navigation Playlist Settings Exit System Normal Repeat One Repeat All Shuffle All Intro Resume Default Vol Tuner Region Tuner Level Default Set About Scroll Lyric Display Time Backlight Contrast Tag L...

Страница 24: ...ot work Check setting of Hold switch Remove the battery once and then insert it again The player keeps being turned off In Stop mode the power is automatically turned off after ten seconds changes depending on settings Check to see if there are files saved in it Something s wrong with play time displayed during Play mode VBR SONG message is displayed while VBR Variable Bit Rate file is playing LCD...

Страница 25: ...s Weight 22 X 55 X23 mm 30 g without battery Case Plastic Aluminuma Noise Ratio 89dB with 20KHz LPF Earphones Jack Output Power 10mW CH 16Ω Output Frequency Range 20Hz 20KHz Operating Temperature Range 5 35 C 23 95 F FM Frequency 87 50 108 00 MHz FM Signal to Noise Ratio 45dB FM T H D 1 FM Useable Sensitiivity 10dB File Support MPEG1 2 2 5 Layer3 8Kbps 320Kbps 8KHz 48KHz WMA ASF 8Kbps 192Kbps 8KHz...

Отзывы: