background image

Media and tray

30

2. Learning the Basic Usage

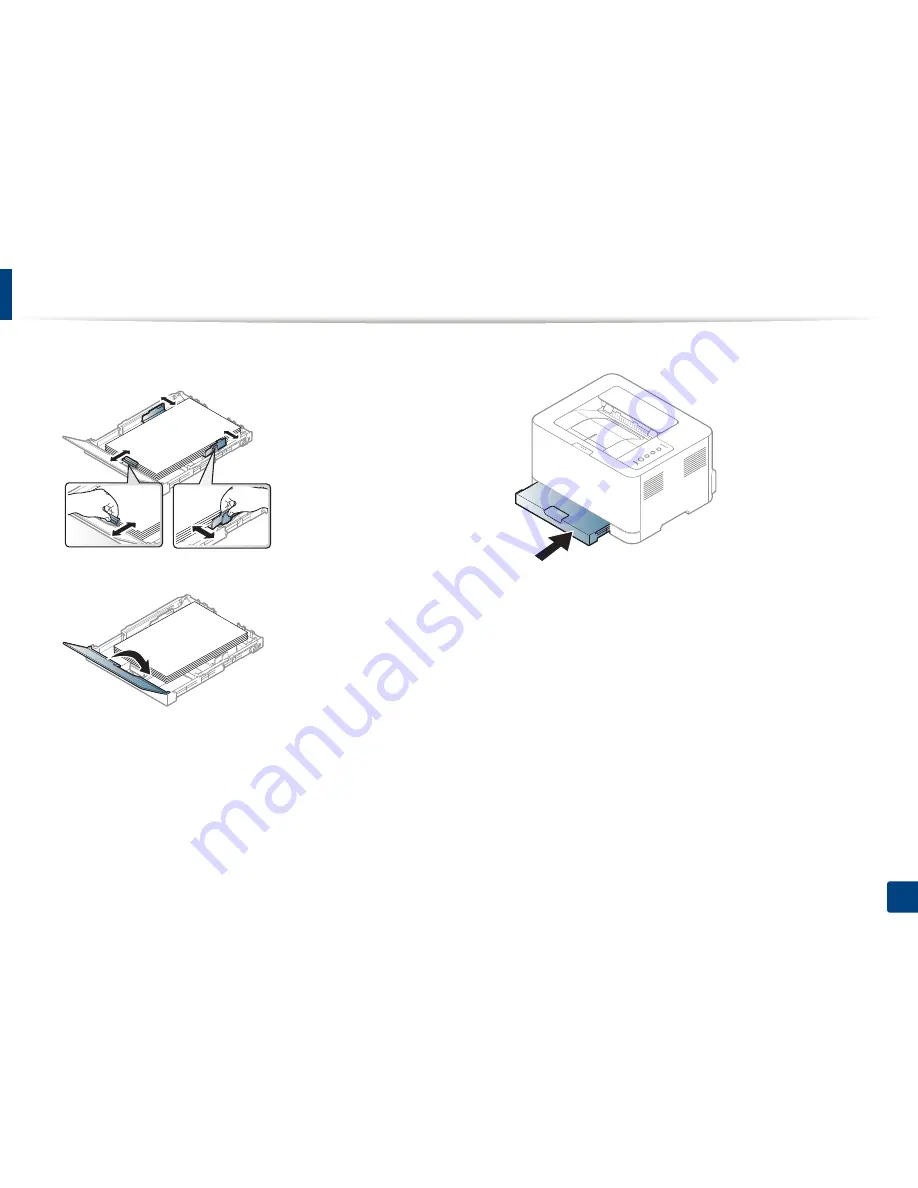
Squeeze the paper width guide and slide it to the edge of the paper stack 
without causing it to buckle.

Close the paper cover.

Insert the paper tray.

When you print a document, set the paper type and size for the tray (see 
"Setting the paper size and type" on page 34).

Содержание xpress C43x series

Страница 1: ...tion concerning the installation basic operation and troubleshooting on windows ADVANCED This guide provides information about the installation advanced configuration operation and troubleshooting on various OS environments Some features may not be available depending on models or countries ...

Страница 2: ...printing 35 3 Maintenance Ordering supplies and accessories 41 Available supplies 42 Available maintenance parts 43 Storing the toner cartridge 44 Redistributing toner 46 Replacing the toner cartridge 48 Replacing the waste toner container 50 Replacing the imaging unit 52 Cleaning the machine 54 Tips for moving storing your machine 56 4 Troubleshooting Tips for avoiding paper jams 58 Clearing pape...

Страница 3: ...know before using the machine Key benefits 4 Features by model 6 Useful to know 9 About this user s guide 10 Safety information 11 Machine overview 17 Control panel overview 20 Turning on the machine 22 Installing the driver locally 23 Reinstalling the driver 25 ...

Страница 4: ...Using the NFC feature on page 125 You can print on the go from your smartphone or computer using Samsung Cloud Print apps see Samsung Cloud Print on page 132 You can print on the go from your smartphone or computer using Google Cloud Print enabled apps see Google Cloud Print on page 134 Easy Capture Manager allows you to easily edit and print whatever you captured using the Print Screen key on the...

Страница 5: ...on page 140 You can print in various operating systems see System requirements on page 71 Your machine is equipped with a USB interface and or a network interface Supports various wireless network setting method Using the WPS Wi Fi Protected Setup button You can easily connect to a wireless network using the WPS button on the machine and the access point a wireless router Using the USB cable or a ...

Страница 6: ...Features by model Some features and optional goods may not be available depending on model or country Operating System Supported Operating System C43x series C43xW series Windows Mac Linux ...

Страница 7: ...ww samsung com find your product Support or Downloads Before installing check whether your computer s OS support the software Samsung Easy Color Managera Samsung Easy Printer Manager Samsung Printer Center Samsung Printer Status Eco Driver Packb b To use the Easy Eco Driver features the Eco Driver Pack must be installed Samsung Stylish Driver Packc c The printer driver includes a user interface th...

Страница 8: ... LAN card may not be available For some countries only 802 11 b g can be applied Contact your local Samsung dealer or the retailer where you bought your machine IPv6 NFC Near Field Communication printing Mopria AirPrint Samaung Cloud Print Google Cloud Print Wi Fi Protected Setup WPS Eco printing Easy Eco Driver b b Setting the ECO settings is available from the windows driver Manual duplex 2 side...

Страница 9: ...bleshoot accordingly see Understanding the status LED on page 62 A paper jam has occurred Open and close the cover see Front view on page 18 Check the instructions on removing jammed paper in this manual and troubleshoot accordingly see Clearing paper jams on page 59 Printouts are blurry The toner level might be low or uneven Shake the toner cartridge Try a different print quality setting Replace ...

Страница 10: ... on its options or model you purchased The screenshots in this user s guide may differ from your machine depending on the machine s firmware driver version The procedures in this user s guide are mainly based on Windows 7 1 Conventions Some terms in this guide are used interchangeably as below Document is synonymous with original Paper is synonymous with media or print media Machine refers to prin...

Страница 11: ...d is damaged or if the electrical outlet is not grounded This could result in electric shock or fire Do not place anything on top of the machine water small metal or heavy objects candles lit cigarettes etc This could result in electric shock or fire If the machine gets overheated it releases smoke makes strange noises or generates an odd odor immediately turn off the power switch and unplug the m...

Страница 12: ...tric shock or fire If the plug does not easily enter the electrical outlet do not attempt to force it in Call an electrician to change the electrical outlet or this could result in electric shock Do not allow pets to chew on the AC power telephone or PC interface cords This could result in electric shock or fire and or injury to your pet Do not forcefully pull the paper out during printing It can ...

Страница 13: ...ord from the electrical outlet Do not place the machine in an area with dust humidity or water leaks This could result in electric shock or fire Place the machine in the environment where it meets the operating temperature and humidity specification Do not use the machine when it is below freezing temperature or has recently been moved from a location below freezing temperature Doing so may damage...

Страница 14: ...mful to your health Place the machine in a well ventilated space or open a window to circulate the air periodically Do not place the machine on an unstable surface The machine could fall causing injury or machine damage Use only No 26 AWGa or larger telephone line cord if necessary Otherwise it can cause damage to the machine Make sure you plug the power cord into a grounded electrical outlet Othe...

Страница 15: ...ll a certified technician when the machine needs repairing To clean and operate the machine strictly follow the user s guide provided with the machine Otherwise you could damage the machine Keep the power cable and the contact surface of the plug clean from dust or water Otherwise this could result in electric shock or fire Do not remove any covers or guards that are fastened with screws Fuser uni...

Страница 16: ...osing of the consumables follow the instructions for disposal Refer to the reseller for disposal instructions Do not wash the consumables For a waste toner bottle do not reuse it after emptying the bottle If you do not follow the instructions above it may cause machine malfunction and environmental pollution The warranty does not cover damages caused by a user s carelessness When toner gets on you...

Страница 17: ...omponents may change depending on the configuration Machine Quick installation guide Power cord Software CDa a The software CD contains the print drivers user s guide and software applications Misc accessoriesb b Miscellaneous accessories included with your machine may vary by country of purchase and specific model ...

Страница 18: ...res and optional goods may not be available depending on model or country see Features by model on page 6 9 10 11 2 3 6 7 5 4 8 1 1 Output tray 7 Front cover release button 2 Output support 8 NFC taga a C43xW series only 3 Top cover 9 Toner cartridges 4 Control Panel 10 Waster toner container 5 Tray 11 Imaging unit 6 Front cover ...

Страница 19: ...his illustration may differ from your machine depending on its model Some features and optional goods may not be available depending on model or country see Features by model on page 6 1 Rear cover 2 Power receptacle 3 USB port 4 Network port 1 4 3 2 ...

Страница 20: ...button and the green LED will start blinking If you want to print only the active screen release the button when the green LED stops blinking If you want to print the whole screen release the button while it s blinking Manual print Press this button each time you load a sheet of paper in the tray if you have selected Manual Feeder for Source in your printer driver Print Screen can only be used in ...

Страница 21: ...s event log report usage counter Press and hold this button for about 4 seconds until the green LED blinks quickly and release Prints supplies info report Press and hold this button for about 6 seconds until the green LED on and release 5 Power Wake Up Youcanturn the power off or wake the machine up from the sleep mode with this button 6 Status LED Shows the status of your machine see Status LED o...

Страница 22: ...r cord supplied with the machine Otherwise it can cause damage or fire to the machine 1 Connect the machine to the electricity supply first 2 press Power Wake Up button on the control panel If you want to turn the power off press and hold Power Wake Up button for about 3 seconds 1 2 ...

Страница 23: ...d to your computer and powered on 2 Insert the supplied software CD into your CD ROM drive If the installation window does not appear click Start All programs Accessories Run X Setup exe replacing X with the letter which represents your CD ROM drive and click OK For Windows 8 If the installation window does not appear from Charms select Search Apps and search for Run Type in X Setup exe replacing ...

Страница 24: ...Search 2 Click Store 3 Search and click Samsung Printer Experience 4 Click Install If you install the driver using the supplied software CD V4 driver is not installed If you want to use the V4 driver in the Desktop screen you can download from the Samsung website www samsung com find your product Support or downloads If you want to install Samsung s printer management tools you need to install the...

Страница 25: ...stall 3 Follow the instructions in the installation window 4 Insert the software CD into your CD ROM drive and install the driver again see Installing the driver locally on page 23 From the Windows 8 Start Screen 1 Make sure that the machine is connected to your computer and powered on 2 Click on the Uninstall Samsung Printer Software tile in the Start screen 3 Follow the instructions in the windo...

Страница 26: ...lete you may want to set the machine s default settings Refer to the next section if you would like to set or change values This chapter provides information about the overall menu structure and the basic setup options Media and tray 27 Basic printing 35 ...

Страница 27: ...s machine It could cause damage to the machine Using inflammable print media can cause a fire Use designated print media see Print media specifications on page 68 The use of inflammable media or foreign materials left in the printer may lead to overheating of the unit and in rare cases may cause a fire 1 Tray overview To change the size you need to adjust the paper guide If you do not adjust the g...

Страница 28: ... paper tray see Tray overview on page 27 2 Open the paper cover 3 Press and unlatch the guide lock in the tray pull the tray out manually Then adjust the paper length guide and paper width guide 4 Flex or fan the edge of the paper stack to separate the pages before loading papers 2 1 2 3 ...

Страница 29: ...th guide and paper width guide For paper longer than A4 sized like Legal press and unlatch the guide lock in the tray pull the tray out manually Then adjust the paper length guide and paper width guide Do not push the paper width guide too far causing the media to buckle If you do not adjust the paper width guide it may cause paper jams Do not use a paper with a leading edge curl it may cause a pa...

Страница 30: ...he paper width guide and slide it to the edge of the paper stack without causing it to buckle 7 Close the paper cover 8 Insert the paper tray 9 When you print a document set the paper type and size for the tray see Setting the paper size and type on page 34 ...

Страница 31: ...ine Open the paper cover and remove paper from the tray if necessary 2 If you want to change the size to Letter hold the lever at the back of the tray and rotate the lever clockwise 3 Squeeze the paper width guide and slide it to the edge of the lever If you want to change the size to A4 first move the paper width guide to left and rotate the lever counterclockwise If you force the lever it could ...

Страница 32: ...gs see Using Samsung Easy Printer Manager on page 162 If your machine is connected to the network you can set the machine s setting from SyncThru Web Service Settings tab Machine Settings see Using SyncThru Web Service on page 159 Whenusing specialmedia we recommend you feed one sheetat a time see Print media specifications on page 68 To see paper weights for each sheet refer to Print media specif...

Страница 33: ...e than 5 mm of curl in any direction Condition Do not use labels with wrinkles bubbles or other indications of separation Make sure that there is no exposed adhesive material between labels Exposed areas can cause labels to peel off during printing which can cause paper jams Exposed adhesive can also cause damage to machine components Do not run a sheet of labels through the machine more than once...

Страница 34: ...per reducing print quality 4 Setting the paper size and type After loading paper in the paper tray set the paper size and type using the display screen For computer printing select the paper size and type in the application program you use on your computer see Opening Printing Preferences on page 36 The paper setting in the machine and driver should match to print without a paper mismatch error Yo...

Страница 35: ...erences window is for Notepad in Windows 7 1 Open the document you want to print 2 Select Print from the File menu 3 Select your machine from the Select Printer list 4 The basic print settings including the number of copies and print range are selected within the Print window To take advantage of the advanced printing features click Properties or Preferencesfrom the Print window see Opening Printi...

Страница 36: ...ting Preferences window that appears in this user s guide may differ depending on the machine in use However the composition of the Printing Preferences window is similar When you select an option in Printing Preferences you may see a warning mark or An mark means you can select that certain option but it is not recommended and an mark means you cannot select that option due to the machine s setti...

Страница 37: ...on page 156 Using a favorite setting The Favorites option which is visible on each preferences tab except for the Samsung tab allows you to save the current preferences for future use To save a Favorites item follow these steps 1 Change the settings as needed on each tab 2 Enter a name for the item in the Favorites input box 3 Click Save 4 Enter name and description and then select the desired ico...

Страница 38: ...onnected to the network you can set the machine s setting from SyncThru Web Service Settings tab Machine Settings see Using SyncThru Web Service on page 159 Depending on the printer driver you use Skip blank pages may not work properly If Skip blank pages feature does not work properly set the feature from the Easy Eco Driver see Easy Eco Driver on page 155 Setting Eco mode on the control panel If...

Страница 39: ... settings you selected The results are calculated on the basis that the total number of printed paper is one hundred without a blank page when the Eco mode is disabled Refers to the calculation coefficient about CO2 energy and paper from IEA the index of Ministry of Internal Affairs and Communication of Japan and www remanufacturing org uk Each model has a different index The power consumption in ...

Страница 40: ...your machine Ordering supplies and accessories 41 Available supplies 42 Available maintenance parts 43 Storing the toner cartridge 44 Redistributing toner 46 Replacing the toner cartridge 48 Replacing the waste toner container 50 Replacing the imaging unit 52 Cleaning the machine 54 Tips for moving storing your machine 56 ...

Страница 41: ... to obtain the list of available supplies and maintenance parts To order Samsung authorized supplies accessories and maintenance parts contact your local Samsung dealer or the retailer where you purchased your machine You can also visit www samsung com supplies and then select your country region to obtain the contact information for service ...

Страница 42: ...nnot guarantee non genuine Samsung toner cartridge s quality Service or repair required as a result of using non genuine Samsung toner cartridges will not be covered under the machine s warranty Type Average yielda a Declared yield value in accordance with ISO IEC 19798 The number of pages may be affected by operating environment printing interval graphics media type and media size Part name Toner...

Страница 43: ... model Replacing maintenance parts can be performed only by an authorized service provider dealer or the retailer where you bought the machine To purchase maintenance parts contact the retailer where you bought the machine The replacement period for the maintenance parts is informed by the Samsung Printer Status program Or on the UI User Interface if your machine supports a display screen The repl...

Страница 44: ...and store in a dark cabinet Opening the cartridge package prior to use dramatically shortens its useful shelf and operating life Do not store on the floor If the toner cartridge is removed from the printer follow the instructions below to store the toner cartridge properly Store the cartridge inside the protective bag from the original package Store lying flat not standing on end with the same sid...

Страница 45: ...e brand refilled or remanufactured toner cartridges Samsung s printer warranty does not cover damage to the machine caused by the use of a refilled remanufactured or non Samsung brand toner cartridges 3 Estimated cartridge life Estimated cartridge life the life of the toner cartridge or imaging unit yield depends on the amount of toner that print jobs require The actual print yield may vary depend...

Страница 46: ...y redistributing the remaining toner in the cartridge In some cases white streaks or light printing will still occur even after you have redistributed the toner Illustrations on this user s guide may differ from your machine depending on its options or models Check your machine type see Front view on page 18 Before opening the top cover close the output support first Do not use sharp objects such ...

Страница 47: ...Redistributing toner 47 3 Maintenance ...

Страница 48: ...m of the cartridge If toner gets on your clothing wipe it off with a dry cloth and wash clothing in cold water Hot water sets toner into fabric Shake the toner cartridge thoroughly it will increase the initial print quality Do not touch the green underside of the toner cartridge Use the handle on the cartridge to avoid touching this area Printing even after the toner empty status can cause serious...

Страница 49: ...Replacing the toner cartridge 49 3 Maintenance When a toner cartridge has reached the end of life the Printing Status window appears on the computer indicating the toner cartridge needs to be placed 1 2 ...

Страница 50: ...nter stops printing Toner particles can be released inside the machine but it does not mean the machine is damaged Contact a service representative when print quality problems occur When you pull out the waste toner container out of the machine move the container carefully not to drop it from your hands Make sure that you lay the waste toner container on a flat surface so that the toner does not s...

Отзывы: