background image

49

Most television channels provide written information services via
teletext. Information provided includes:

Television programme times

News bulletins and weather forecasts

Sports results

Travel information

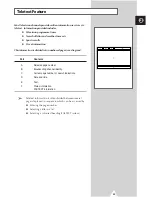
This information is divided into numbered pages (see diagram).

Part

Contents

A

Selected page number.

B

Broadcasting channel identity.

C

Current page number or search indications.

D

Date and time.

E

Text.

F

Status information.
FASTEXT information.

Teletext information is often divided between several
pages displayed in sequence, which can be accessed by:

Entering the page number

Selecting a title in a list

Selecting a coloured heading (FASTEXT system)

Teletext Feature

ENG

Содержание WS32Z108R

Страница 1: ...COLOUR TELEVISION Owner s Instructions Before operating the unit please read this manual thoroughly and retain it for future reference ON SCREEN MENUS PICTURE IN PICTURE PIP TELETEXT TELEWEB OPTION ...

Страница 2: ...there is lightning unplug the television from the mains socket and aerial Do not step on or twist the power cord Do not overload wall outlets or extension cords as this can result in a risk of fire or electric shock Please use a soft and dry cloth not containing volatile matter when you clean the TV If the television is broken do not try to repair it yourself Contact qualified service personnel If...

Страница 3: ...companying the product The main voltage is indicated on the rear of the TV set and the frequency is 50 or 60Hz EUROPEAN NOTICE Products with the CE marking comply with the EMC Directive 89 336 EEC 92 31 EEC 93 68 EEC and the Low Voltage Directive 73 23 EEC issued by the Commission of the European Community Compliance with these directives implies conformity to the following European Norms EN55022 ...

Страница 4: ...tomatically 16 Storing Channels Manually 17 18 Skipping Unwanted Channels 19 Sorting the Stored Channels 20 Assigning Names to Channels 21 Using the LNA Low Noise Amplifier Feature 22 Activating the Child Lock 23 Fine Tuning Channel Reception 24 Displaying Information 24 USING YOUR TELEVISION continued Changing the Picture Standard 25 Adjusting the Picture Settings 25 Viewing the Picture In Pictur...

Страница 5: ...etext Information 50 Selecting Display Options 50 Selecting the Teletext Source 51 Selecting a Teletext Page 52 ADDITIONAL INFORMATION ON CONNECTIONS Connecting to the External Input Outputs 53 Connecting to the DVD Input 53 Connecting to the Audio Outputs 54 Connecting to the Digital Audio Inputs 54 Connecting Headphones 55 Connecting Additional Speakers 55 Connecting to the Audio Video Input 56 ...

Страница 6: ... the Buttons on the Panel If the remote control no longer works or you have lost it you can use controls on the panel of the TV to Switch on the TV when it is in Standby mode and select channels C P Adjust the volume Access the menu MENU Switch among Video input modes TV VIDEO and access to the selected option on the menu system ENTER The actual configuration on your TV may be different depending ...

Страница 7: ... about connection refer to pages 53 57 Whenever you connect an audio or video system to your television ensure that all elements are switched off Refer to the documentation supplied with your equipment for detailed connection instructions and associated safety precautions The actual configuration on your TV may be different depending on your model ...

Страница 8: ...ODUCT REFER TO PAGES 58 60 PREVIOUS CHANNEL MAKE THE REMOTE CONTROL WORK FOR TV VCR CATV DVD STB The remote control might not be compatible with the TV manufactured by another company DOLBY PROLOGIC MODE SELECTION AUTOMATIC SWITCH OFF VOLUME INCREASE NEXT CHANNEL VOLUME DECREASE CHANGE CONFIRMATION INFORMATION DISPLAY DNIe ON OFF INITIALIZE THE REMOTE CONTROL SETTINGS WHEN IT HAS SOME PROBLEMS OR ...

Страница 9: ...XT INFORMATION AND THE NORMAL BROADCAST INTERCHANGE THE MAIN AND SUB PICTURE PIP PIP ON OFF TELETEXT PREVIOUS PAGE TELEWEB BACKWARD TELETEXT NEXT PAGE TELEWEB FORWARD SUB PICTURE PIP SIZE SELECTION TELETEXT REVEAL SUB PICTURE PIP PREVIOUS CHANNEL TELETEXT CANCEL DVR FUNCTIONS REFER TO PAGES 46 48 FASTEXT TOPIC SELECTION SUB PICTURE PIP LOCATION SELECTION VCR CATV DVD DVR OR STB FUNCTIONS REWIND ST...

Страница 10: ...e control and pressing it back into place Connecting to an Aerial or Cable Television Network To view television channels correctly a signal must be received by the set from one of the following sources An outdoor aerial A cable television network A satellite network 1 In the first three cases connect the aerial or network input cable to the 75Ω coaxial socket on the rear of the television 2 If yo...

Страница 11: ...f the television lights up 3 Press the POWER button on the remote control to switch the television on Result The programme that you were watching last is re selected automatically If you have not yet stored any channels No clear picture appears Refer to Storing Channels Automatically on page 16 or Storing Channels Manually on page 17 4 To switch your television off press again the button On Off on...

Страница 12: ... turned off and the Standby indicator on the front of the television lights up 2 To switch the television back on simply press again the POWER button on the remote control Do not leave your television in Standby mode for long periods of time when you are away on holiday for example Turn your television off by pressing the button On Off on the front of the television It is best to unplug the set fr...

Страница 13: ... to increase the volume Used to decrease the volume MUTE Used to switch the sound off temporarily To turn the sound back on press this button again or or button MENU Used to display the Used to return to the on screen menu system previous menu or normal viewing Used to Display a submenu containing selections for the current menu option Increase reduce a menu option value Used to confirm your choic...

Страница 14: ... the ENTER button to confirm your choice Result The ATM menu is displayed 6 To start the channel store press the ENTER button Result The search will end automatically Channels are sorted and stored in an order which reflects their position in the frequency range with lowest first and hialghest last To stop the search before it has finished or return to normal viewing select the Exit and press the ...

Страница 15: ...ter Return Choosing Your Language When you start using your television for the first time you must select the language which will be used for displaying menus and indications 1 Press the MENU button Result The main menu is displayed 2 Press the or button to select Setup Result The options available in the Setup group are displayed 3 Press the ENTER button 4 Press the or button to select Language P...

Страница 16: ...re the channels manually see page 17 5 Press the ENTER button to confirm your country selected 6 Press the or button to select ATM Press the ENTER button 7 Press the ENTER button again to start the search Result The channels are stored in an order which reflects their positions in the frequency range Finally the search will end automatically To stop the search before it has finished or return to n...

Страница 17: ...assign a programme number to a channel press the or button to find the correct number 7 If necessary select the broadcasting standard required Press the œ or button to select Color Press the or button repeatedly Result The color standards are displayed in the following order depending on the model Auto PAL SECAM Auto NTSC3 58 NTSC4 43 PAL60 8 Press the œ or button to select Sound Press the or butt...

Страница 18: ... Set to OK by pressing the or button 12 Repeat Steps 9 to 11 for each channel to be stored Channel mode P Programme mode When completing tuning the broadcasting stations in your area have been assigned to position numbers from P00 to max P99 You can select a channel by entering the position number in this mode C Real channel mode You can select a channel by entering the assigned number to each air...

Страница 19: ...s the or button to select Channel Edit Press the ENTER button Result The Channel Edit menu is displayed with the Add Delete selected 5 Press the ENTER button again Result The current channels are displayed 6 Select the channel that you wish to delete by pressing the or button Press the ENTER button 7 Select Erased or Added by pressing the or button Press the ENTER button Skipping Unwanted Channels...

Страница 20: ...Press the ENTER button Result The current channels are displayed 6 Select the channel that you wish to move by pressing the or button Press the ENTER button 7 Select the number of the programme to which the channel is to be moved by pressing the or button Press the ENTER button Result The channel is moved to its new position and all other channels are shifted accordingly 8 Repeat Steps 6 to 7 unti...

Страница 21: ... button Result The current channels are displayed 6 If necessary select the channel to be assigned to a new name by pressing the or button Press the ENTER button Result Arrow indications are displayed around the name box 7 Press the or button to select a letter A Z a number 0 9 or a symbol _ space Move on the previous or next letter by pressing the œ or button 8 When you have finished entering the...

Страница 22: ... group are displayed 3 Press the ENTER button 4 Press the or button to select Channel Edit Press the ENTER button Result The Channel Edit menu is displayed 5 Press the or button to select LNA Press the ENTER button Result The current channels are displayed 6 Select the required channel by pressing the or button Press the ENTER button 7 Select On or Off by pressing the or button Press the ENTER but...

Страница 23: ... Channel group are displayed 3 Press the ENTER button 4 Press the or button to select Channel Edit Press the ENTER button Result The Channel Edit menu is displayed 5 Press the or button to select Child Lock Press the ENTER button Result The current channels are displayed 6 Select the required channel by pressing the or button Press the ENTER button 7 Select Unlocked or Locked by pressing the or bu...

Страница 24: ...The options available in the Channel group are displayed 3 Press the ENTER button 4 Press the or button to select Fine Tune Press the ENTER button Result The horizontal bar is displayed Move the horizontal bar s cursor left or right by pressing the œ or button to reach the required setting Fine Tuning Channel Reception Country Austria ATM Manual Store Channel Edit Fine Tune Channel Move Enter Retu...

Страница 25: ... settings which allow you to control picture quality 1 Press the MENU button Result The options available in the Picture group are displayed 2 Press the ENTER button 3 Press the or button to select Custom Picture Press the ENTER button Result The options available in the Custom Picture group are displayed 4 Press the or button to select the option to be adjusted Color Tone Brightness Color Contras...

Страница 26: ...y pressing the or button Press the ENTER button You can also activate the PIP simply by pressing the PIP ON button To deactivate press it again 5 Press the or button to select TV Video Press the ENTER button Result The sources available are displayed TV EXT1 EXT2 EXT3 EXT4 S VIDEO 6 Select a source of the sub picture by pressing the or button Press the ENTER button 7 Press the or button to select ...

Страница 27: ...No You can select the channel that you want to view through sub picture by pressing the œ or button When the TV Video is set to TV you can select the channel of sub picture You can select the channel of the sub picture simply by pressing the or button To freeze the sub picture press the STILL button Press it again to return to normal viewing If you press it when the PIP feature is deactivating you...

Страница 28: ...ect these options by simply pressing the P SIZE button on the remote control At this time lifting is available in the Zoom1 or Zoom2 mode by pressing the or button If the PC is connected you can adjust the VGA mode by using the œ or button 4 Press the œ or button to change the setting When you are satisfied with the setting press the ENTER button to store You can shift the screen to your required ...

Страница 29: ...ted to one side you can adjust the tilt setting 1 Press the MENU button Result The options available in the Picture group are displayed 2 Press the ENTER button 3 Select the required option Scan Mode Digital NR DNIe Blue Screen or Tilt by pressing the or button Press the ENTER button 4 Press the or button to change the setting Scan Mode Natural Scan Digital Scan Progressive Digital NR Off or On ac...

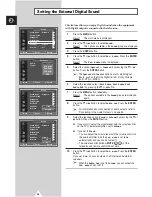
Страница 30: ...ndard Music Movie Speech Custom The sound settings can be adjusted to suit your personal preferences 1 Press the MENU button Result The main menu is displayed 2 Press the or button to select Sound Result The options available in the Sound group are displayed 3 Press the ENTER button 4 Press the or button to select Custom Sound Press the ENTER button Result The options available in the Custom Sound...

Страница 31: ...lable in the Headphone group are displayed 5 Press the or button to select the option to be adjusted Volume Bass Treble or Balance Press the ENTER button Result The horizontal bar is displayed Move the horizontal bar s cursor left or right by pressing the œ or button When either COAXIAL IN or OPTICAL IN on the rear of the television is connected you can not hear from the headphone Adjusting Your H...

Страница 32: ...sh to adjust the volume properly during night viewing press the or button to select Dynamic Range Press the ENTER button 7 Select Off or On by pressing the or button Press the ENTER button Manufactured under license from Digital Theater Systems Inc US Pat No 5 451 942 5 956 674 5 974 380 5 978 762 and other world wide patents issued and pending DTS and DTS Digital Surround are registered trademark...

Страница 33: ...n by pressing the or button Press the ENTER button 14 Select the speaker Front L Center Front R Rear R Rear L Sub Woofer to be adjusted by pressing the or button Press the ENTER button 15 Press the œ or button to adjust the volume 16 When you have finished the level control press the MENU button Result The Dolby Digital menu is displayed again 17 To set the delay time of surround channel select th...

Страница 34: ... Rear Output Input Source In case of Dolby Prologic II Off In case of Dolby Prologic II Movie Sub Woofer L R Large Sub Woofer L R Small Mono Mono Lo Ro Lt Rt 5 1ch Dolby Digital PCM Stereo L R DTS Main Left Center Main Right Right Left Rear Output Input Source Sub Woofer L R Large Sub Woofer L R Small In case of DTS DTS 5 1 is employed ...

Страница 35: ... Ro Lt Rt 5 1ch Dolby Digital PCM Stereo L R DTS Main Left Center Main Right Right Left Rear Output Input Source Sub Woofer L R Large Sub Woofer L R Small Mono Mono Lo Ro Lt Rt 5 1ch Dolby Digital PCM Stereo L R DTS Main Left Center Main Right Right Left Rear Output Input Source Sub Woofer L R Large Sub Woofer L R Small ...

Страница 36: ... Connecting to the Audio Outputs on page 54 9 Select the required option Fixed or Volume by pressing the or button Press the ENTER button If you want to adjust the volume level with the volume control on the TV or external amplifier set to Volume If you set to Fixed You can adjust the volume level with the volume control on the audio amplifier And the Int mute is set to On automatically and you ca...

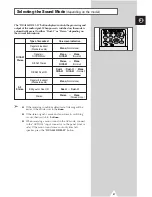
Страница 37: ...tomatic switching occurs then switch to the Mono When receiving a mono sound in the AV mode connect to the AUDIO L input connector on the panel front or side If the mono sound comes out only from left speaker press the DUAL MODE I II button Type of broadcast Regular broadcast Standard audio Regular NICAM Mono NICAM Stereo NICAM Dual I II Regular broadcast Standard audio Bilingual or Dual I II Ster...

Страница 38: ...atedly Result The options available in the Time group are displayed again 9 Press the or button to select Clock Press the ENTER button 10 To set the time automatically by Teletext channel with time information press the œ or button to move to the Channel or Activation Set these by pressing the or button Result If the Activation is set to Yes the correct time will be displayed after a few second Th...

Страница 39: ...Sleep Timer menu is displayed with the Min is selected 6 Select the preset time interval 10 20 30 60 90 120 150 180 for staying on by pressing the or button Press the ENTER button You can set the sleep timer by simply pressing the SLEEP button on the remote control 1 Press the SLEEP button on the remote control 2 Select the preset time interval for staying on by pressing the SLEEP button repeatedl...

Страница 40: ...umeric buttons 7 Press the ENTER button to confirm 8 Press the MENU button repeatedly Result The options available in the Time group are displayed again 9 Press the or button to select Off Time Press the ENTER button Result The Off Time menu is displayed 10 Select the Hour Min or Activation by pressing the œ or button Set these by pressing the or button You can also set the Hour and Min directly b...

Страница 41: ...Ext 2 Selectable out TV Ext 3 Decoder out TV AV Setup Move Enter Return TV EXT1 EXT2 EXT3 EXT4 DVR Plug Play Language English Time Teletext Source Main AV Setup Setup Move Enter Return Viewing Pictures From External Sources Once you have connected up your various audio and video systems you can view different sources by selecting the appropriate input 1 Check that all the necessary connections hav...

Страница 42: ...red 6 Press the or button to select Provider Search Press the ENTER button Start the provider search by moving the joystick left or right Result It will be search only the channels stored If find a provider the Added is displayed and continue the search To stop the search before it has finished press the EXIT TV button 7 When the search has been finished press the or button to select Provider Sele...

Страница 43: ...ted channel and TeleWeb downloading will start During downloading the picture will not be shown and only status bar will be displayed on the screen It takes 30 minutes to one hour depending on the program When pressing the button On Off on the panel of the television the existing downloaded information will disappear If you enter the TeleWeb mode on the channel where no provider is selected you ca...

Страница 44: ...s moves up one by one 4 Select the URL you wish to enter by pressing the or button Press the ENTER button Result The current page moves to the selected URL and the menu is disappeared 5 To delete the bookmarked list select the required list and press the Red button Opening the Home Page 1 Press the MENU button Result The TeleWeb menu is displayed 2 Press the or button to select Home Page Press the...

Страница 45: ...te the TeleWeb feature directly HOME Move the home page of the TeleWeb Display the forward page of the TeleWeb Display the backward page of the TeleWeb Select a option Confirm your choice Easy Accessing the TeleWeb Service via the Remote Control ENG ...

Страница 46: ...o Set to required channel Month Date Set to record start month and date Start Set to record start time hour and minute Stop Set to record stop time hour and minute You can also set the Prog No Month Date Start and Stop directly by using the numeric buttons A warning notice will be displayed if the recording time overlaps with another program Time conflict with another programme Please refer to Pro...

Страница 47: ...IVE button and you can change to a live picture DVR Control Recording Mode Set to record quality XP 10 hours SP 13 hours LP 20 hours EP 40 hours Disk Tools Repair Disk HDD Disk scanning for HDD optimization Format Disk Formatting HDD All recorded programs are erased 4 When you have finished DVR function setup press the EXIT TV DVR mode ON or DVR DVR mode OFF button to return to the TV mode During ...

Страница 48: ...X HELP Sentence Display per DVR Function Situation If the preset channel for timer recording is different than the current PIP channel when it s time for timer recording Change PIP channel to Timer record channel When TV power is Off during timer recording When 16 PIP should be On to do PIP On during the timer recording When the user wants to change the PIP source during the timer recording When t...

Страница 49: ... into numbered pages see diagram Part Contents A Selected page number B Broadcasting channel identity C Current page number or search indications D Date and time E Text F Status information FASTEXT information Teletext information is often divided between several pages displayed in sequence which can be accessed by Entering the page number Selecting a title in a list Selecting a coloured heading F...

Страница 50: ...information separately on the screen 4 If you wish to display the actual broadcast at the same time as the teletext page press the TTX MIX button again 5 Press the EXIT TV button to exit from the teletext display Displaying the Teletext Information Selecting Display Options When you have displayed a Teletext page you can select various options to suit your requirements To display Press the Hidden ...

Страница 51: ...to Main you can display the teletext information of current channel If you set to Sub you can display the teletext information of other channel If the PIP feature is activating you can display the teletext information of sub channel If change the channel of sub picture you can display the teletext information of the changed sub channel If the Double Teletext feature is activating you can display t...

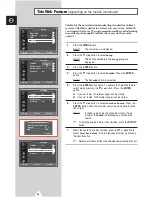
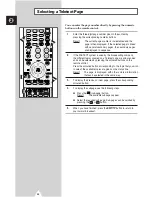
Страница 52: ...re colour coded and can be selected by pressing the coloured buttons on the remote control Press the coloured button corresponding to the topic that you wish to select the available topics are given on the status line Result The page is displayed with other colored information that can be selected in the same way 3 To display the previous or next page press the corresponding coloured button 4 To d...

Страница 53: ...d wish to copy cassettes tape connect the source VCR to EXT 1 and the target VCR to EXT 2 so that you can redirect the signal from EXT 1 to EXT 2 When you wish to record a programme connect the receiver to EXT 1 and the VCR to EXT 2 so that you can redirect the signal from EXT 2 to EXT 2 or VCR Decoder Video game device Video disc player Satellite receiver DVD Connecting to the DVD Input The RCA c...

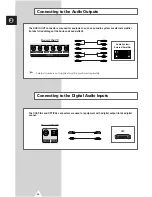
Страница 54: ... to take digital sound Connecting to the Audio Outputs The AUDIO OUT connectors are used for equipment such as an audio system or external amplifier to take full advantage of the Surround sound effect Rear of the TV Rear of the TV Audio System External Amplifier DVD External speakers not supplied must be purchased seperately ...

Страница 55: ...eaker marked L Two for the right hand surround speaker marked R To improve the quality of the sound connect the Red wire to the red terminal Black wire to the black terminal Connecting Headphones You can connect a set of headphones to your television if you wish to watch a television programme without disturbing the other people in the room Prolonged use of headphones at a high volume may damage y...

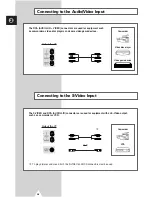
Страница 56: ...nd some video game devices Side of the TV Camcorder Video disc player Video game device Connecting to the S Video Input The S VIDEO and RCA AUDIO L R connectors are used for equipment with an S Video output such as a camcorder or VCR Side of the TV Camcorder VCR To play pictures and sound both the S VIDEO and RCA connectors must be used and ...

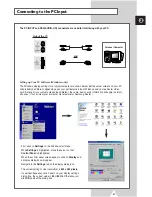
Страница 57: ... look different the same basic set up information will apply in almost all cases If not contact your computer manufacturer or Samsung Dealer First click on Settings on the Windows start menu While Settings is highlighted move the cursor so that Control Panel is highlighted When the control panel screen appears click on Display and a display dialog box will appear Navigate to the Settings tab on th...

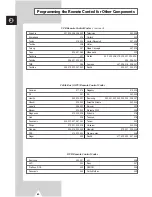
Страница 58: ...ular component If more than one code is listed try each one separately until you find the one that works 5 Press the POWER button on the remote control The component you select should turn on If it turns on your remote control is now set correctly If it does not turn on repeat steps above but try one of the other codes listed for the brand of particular yours If no other codes are listed try each ...

Страница 59: ...9 025 041 042 021 002 007 018 019 021 026 037 041 054 056 007 008 018 021 026 037 007 008 018 026 037 070 025 038 025 021 036 056 059 Marantz Marta MEI Memorex MGA Midland Minolta Mitsubishi Montgomery Ward MTC Multitech NEC Optimus Panasonic Pentax Pentex Research Philco Philips Pioneer Portland ProScan Quartz Quasar Radio Shack Realistic RCA Samsung Sansui Sanyo Scott Sears Sharp Shimom Signatur...

Страница 60: ...ontrol Codes continued Anvision GI Hamlin Hitachi Jerrold Macom Magnavox Oak Panasonic Phlips Pioneer RCA Regal 017 018 041 003 024 031 025 030 038 039 025 030 019 023 028 026 003 022 027 037 044 019 021 023 028 004 018 020 044 014 022 040 003 Regency SA Samsung Scientific Atlanta Sprucer Stargate 2000 Sylvania Texscan Tocom Universal Viewstar Wamer amex Zenith 015 023 042 043 000 001 002 003 004 ...

Страница 61: ... used Never use the plug with the fuse cover omitted if the cover is detachable If a replacement fuse cover is required it must be of the same colour as the pin face of the plug Replacement covers are available from your dealer If the fitted plug is not suitable for the power points in your house or the cable is not long enough to reach a power point you should obtain a suitable safety approved ex...

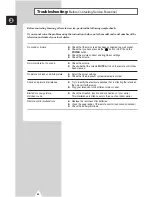
Страница 62: ...all socket Check that you have pressed the button On Off and the POWER button Check the picture contrast and brightness settings Check the volume Check the volume Check whether the volume MUTE button on the remote control has been pressed Adjust the colour settings Check that the broadcast system selected is correct Try to identify the electrical appliance that is affecting the television then mov...

Страница 63: ... PAL60 SECAM NTSC3 58 OPTION NTSC4 43 OPTION BG DK I L OPTION M OPTION N OPTION A2 Stereo NICAM Stereo DTS Dolby Theater System Dolby Pro Logic II 15 W x 5 L MAIN R CENTER L SURR R 25 W x 1 WOOFER 160 300V 50Hz 200 watts External input output EXT1 EXT2 EXT3 DVD video audio inputs Y Pb Pr MONO L AUDIO R Surround speaker outputs R L Audio outputs L MAIN R CENTER L SURR R WOOFER Digital audio inputs ...

Страница 64: ...LECTRONICS AA68 02796A 00 ENG AFTER SALES SERVICE Do not hesitate to contact your retailer or service agent if a change in the performance of your product indicates that a faulty condition may be present ...

Отзывы: