background image

English - 28

T
d

To keep your product up-to-date with new Digital Television
features, software upgrades are periodically broadcast as part of
the normal Television signal. It will automatically detect these
signals and display the software upgrade banner. You are given the
option to install the upgrade.

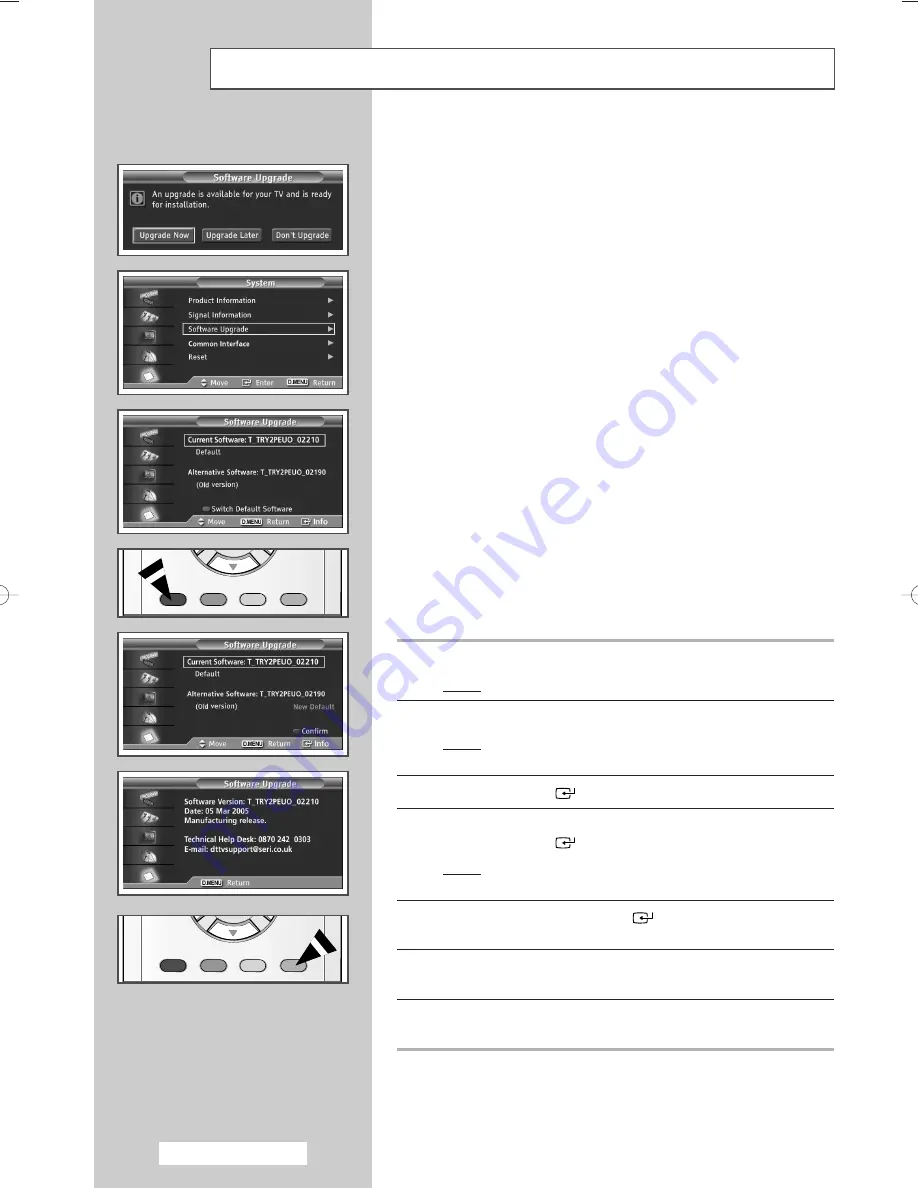
Upgrade Now

If you select  

Upgrade Now

, the 

iDTV

immediately installs

the new upgrade and then restarts.

Upgrade Later

If you select  

Upgrade Later

, the upgrade is postponed

until the next restart or channel change some 90 minutes
later, when the upgrade dialog appears again.

Don’t Upgrade

If you select  

Don’t Upgrade

, the 

iDTV

does not perform

the upgrade and the software upgrade banner is not
displayed again. The upgrade is still stored internally, to
subsequently upgrade to the new version then the following
sequence of steps are performed.

1

Press the 

D.MENU

button.

Result:

The DTV menu is displayed.

2

Press the 

or 

button to select 

System

.

Result:

The options available in the 

System

group are

displayed.

3

Press the 

ENTER 

(

)

button.

4

Press the 

or 

button to select 

Software Upgrade

Press the 

ENTER 

(

)

button.

Result:

The information for 

Software Upgrade

menu is

displayed. 

5

If necessary, press the 

ENTER 

(

)

button again to display the

software version information.

6

Press the 

D.MENU

button to return to the 

Software Upgrade

menu.

7

To switch to an alternative version, press the red button. 
Press the blue button to reset, activate the upgrade and restart.

Upgrading the Software 

(Option)

AA68-03541A-X12Eng  2005/04/28  09:15 AM  Page 28

Содержание WS-28M204D

Страница 1: ...er s Instructions Before operating the unit please read this manual thoroughly and retain it for future reference Register your product at www samsung com global register ON SCREEN MENUS TELETEXT DIGITAL TERRESTRIAL RECEIVER ...

Страница 2: ......

Страница 3: ...g the Channel List Manually 16 Editing Your Favourite Channels 17 Setting up the Parental Lock 19 Viewing EPG Electronic Programme Guide Information 20 Using the Scheduled List 21 Setting the Default Guide 22 Viewing All Channels and Favourite Channels 23 Selecting Category Colours 24 Viewing Channel Lists 25 Displaying Programme Information 25 Using the Preferences 26 Viewing Product Information ...

Страница 4: ...er 48 Switching the Television On and Off Automatically 49 Setting the Preferred Volume Level 50 Activating the Child Lock 51 Viewing an External Signal Source 52 USING THE TELETEXT FEATURE Teletext Feature 53 Displaying Teletext Information 54 Selecting Display Options 55 Selecting a Teletext Page 56 Storing Teletext Pages 57 ADDITIONAL INFORMATION ON CONNECTIONS Connecting to External Input Outp...

Страница 5: ... is displayed For displaying the analog menu press it twice Press the MENU button three times to off To change external sources display the analog menu by pressing the MENU button twice and refer to Viewing an External Signal Source on page 52 Side of the TV Front of the TV Rear of the TV SCART Audio Video Input Output Audio Input Video Input S Video Input Service Port Common Interface 75Ω Coaxial...

Страница 6: ...CHANNEL TELETEXT PREVIOUS PAGE CONFIRM YOUR CHOICE STORE OR ENTER INFORMATION DISPLAY TELETEXT REVEAL SOUND EFFECT SELECTION PICTURE EFFECT SELECTION PICTURE FREEZE AVAILABLE IN DTV MODE EPG DISPLAY DTV MENU DISPLAY DIGITAL SUBTITLE DISPLAY TELETEXT PAGE HOLD TELETEXT DISPLAY MIX BOTH TELETEXT INFORMATION AND THE NORMAL BROADCAST DTV MHEG MENU DISPLAY DTV CHANNEL LIST DISPLAY FASTEXT TOPIC SELECTI...

Страница 7: ... the rear of the remote control by pressing the symbol downwards and then pulling firmly to remove it 2 Insert two R03 UM4 AAA 1 5V or equivalent batteries taking care to respect the polarities on the battery against on the remote control on the battery against on the remote control 3 Replace the cover by aligning it with the base of the remote control and pressing it back into place Do not mix ba...

Страница 8: ...ision 2 If you are using an indoor aerial you may need to adjust it when tuning your television until you obtain a picture that is both sharp and clear For further details refer to Digital TV Updating the Channel List Automatically on page 15 Digital TV Updating the Channel List Manually on page 16 Analog TV Storing Channels Automatically on page 32 Analog TV Storing Channels Manually on page 34 R...

Страница 9: ...witch your television off press the On Off button again Placing Your Television in Standby Mode Your television can be placed in Standby mode in order to reduce Power consumption Wear of the cathode ray tube Standby mode can be useful when you wish to interrupt viewing temporarily during a meal for example 1 Press the POWER button on the remote control Result The screen is turned off and the Stand...

Страница 10: ...he ENTER button Press the ENTER button again to start search the channels Press the MENU button to stop the search Result The Time menu is displayed with Clock selected Refer to Storing Channels Automatically on page 32 5 Press the œ or button to move to the hour or minute Set the hour or minute by pressing the or button Refer to Setting and Displaying the Current Time on page 47 6 When you have f...

Страница 11: ...ange to single digit channels 0 9 faster press the 0 before the single digit For analog channel 4 press the 0 then 4 For digital channel 4 press the 0 0 then 4 MHEG Multimedia and Hypermedia Information Coding Experts Group An International standard for data encoding systems used in multimedia and hypermedia This is at a higher level than the MPEG system which includes data linking hypermedia such...

Страница 12: ...stration When you start using your television for the first time you must select the language which will be used for displaying menus and indications 1 Press the MENU button Result The main menu is displayed 2 Press the or button to select Setup Result The options available in the Setup group are displayed 3 Press the ENTER button 4 Press the or button to select Language 5 Press the ENTER button 6...

Страница 13: ...iano Svenska Translucency Level High Medium Low Opaque Parental Lock Parental Rating Change PIN Feature Subtitle Off On Subtitle Language Audio Language English Digital Text Disable Enable Channel Auto Store Manual Store Channel Frequency Bandwidth Favourite Channels Channel List System Product Information Signal Information Software Upgrade Common Interface Application Info CI Menu Module informa...

Страница 14: ...he ENTER button to confirm Choosing Your Language When you start using your television for the first time you must select the language which will be used for displaying menus and indications 1 Press the D MENU button Result The DTV menu is displayed 2 Press the or button to select Preference Result The options available in the Preference group are displayed 3 Press the ENTER button Result The OSD ...

Страница 15: ...ilable in the Channel group are displayed 3 Press the ENTER button Result The Auto Store is selected 4 Press the ENTER button again to start the search Result When it has finished the number of scanned services will be displayed The existing favourite channel list will be deleted when the channel list is updated To stop the scan before it has finished press the ENTER or D MENU button If the signal...

Страница 16: ...ess the œ or button to select Channel Frequency or Bandwidth Channel Press the or numeric buttons 0 9 to select a channel The available channels are 21 68 Result The corresponding frequency for the selected channel is automatically set Frequency You can specify the frequency KHz using the numeric buttons 0 9 If you do not know the exact frequency follow the above step to select the frequency autom...

Страница 17: ...To undo press the ENTER button again Select All Select all channels currently displayed Select None Deselect all selected channels Preview Displays a currently selected channel s The Favourite Channels settings have been completed Add You can use this function when one or more favourite channels have been selected 1 Press the D MENU button Result The DTV menu is displayed 2 Press the or button to ...

Страница 18: ...utton to select the channel that you want to move then press the green or ENTER button Result The channel is moved to its new position Preview 1 In the Favourite Channels menu select the channel to be previewed by pressing the or button 2 Press the yellow button Result Displays currently selected channel Delete 1 In the Favourite Channels menu select the channel to be deleted from the favourite ch...

Страница 19: ...e displayed with the Parental Rating selected The default PIN code for a new TV set is 0000 If you enter a invalid PIN code the Invalid PIN code Please try again message is displayed 6 Press the ENTER button 7 Press the or button to select the age of 3 18 rating you want to lock out Press the ENTER button If you set the rating to lower than the parental control level of the channel the channel wil...

Страница 20: ...e by in the EPG list pressing the œ button Press the ENTER button If the next programme is selected it is scheduled with the clock icon displayed If the ENTER button is pressed again the scheduling is canceled with the clock icon gone For details about scheduling programmes refer to the next page View programme information Select a programme of your choice by pressing the œ button Press the INFO b...

Страница 21: ...s the ENTER button Result The selected guide menu is displayed 4 Press the red button to add a new programme Result The menu for adding a programme is displayed with Channel selected 5 Press the or button to select the required channel Press the ENTER button Result The Time is selected 6 Enter the start and stop time of the programme by pressing the or numeric button Press the œ or button to move ...

Страница 22: ...hedule by pressing the red button Result The scheduled list is displayed again 10 If you want to edit the scheduled programme select a programme by pressing the or button Press the Green button If necessary select the programme to be deleted by pressing the or button Press the blue button 11 Repeat step 4 to 9 for other programme to be added to the scheduled list When watching analog TV the reserv...

Страница 23: ...e favourite channel list has not been set up The favourites list is empty Would you like to choose your favourites now message is displayed Select Yes Result The Favourite Channels menu is displayed If you select No all channels will remain unchanged To edit the favourite channels refer to page 17 18 for more details All Channels is the list of channels that have been scanned by the channel list u...

Страница 24: ...d 4 Press the yellow button Result A pop up screen that enables you to select category colours is displayed 5 Select a category by pressing the or button 6 Press the ENTER button Result The selectable colours are displayed on the right side of the screen 7 Select a colour by pressing the or button Result The colour selected for a category is stored and the colours for the programme slots of the EP...

Страница 25: ...n to display the previous or next channel list page 7 Press the or button to select a channel to be tuned Press the ENTER button Result The channel number name and an icon are displayed in the top left corner while changing the channel The channel number and name are displayed if the channel is one of the all channels and a icon if the channel is one of the favourite channels 8 Press the blue or C...

Страница 26: ...t The options available in the Feature group are displayed 3 Press the ENTER button Subtitle Subtitle Language Audio Language Digital Text 4 Select your required menu by pressing the or button 5 Press the ENTER button Result The options of the selected menu available are displayed 6 Select the required option by pressing the or button and press the ENTER button to change the setting Subtitle On or...

Страница 27: ...NTER button again Result The product information is displayed Software Version Firmware Version Hardware Version Checking the Signal Information You can get information about the signal status 1 Press the D MENU button Result The DTV menu is displayed 2 Press the or button to select System Result The options available in the System group are displayed 3 Press the ENTER button 4 Press the or button...

Страница 28: ...form the upgrade and the software upgrade banner is not displayed again The upgrade is still stored internally to subsequently upgrade to the new version then the following sequence of steps are performed 1 Press the D MENU button Result The DTV menu is displayed 2 Press the or button to select System Result The options available in the System group are displayed 3 Press the ENTER button 4 Press t...

Страница 29: ...lt The DTV menu is displayed 2 Press the or button to select System Result The options available in the System group are displayed 3 Press the ENTER button 4 Press the or button to select Common Interface Press the ENTER button Result The Application Info is selected 5 Press the ENTER button to display the information for your application ...

Страница 30: ...d 3 Press the ENTER button 4 Press the or button to select Common Interface Press the ENTER button Result The technical information for signal status is displayed 5 Press the or button to select CI Menu Press the ENTER button Result The options of the selected menu available are displayed 6 Select the required option by pressing the or button Press the ENTER button Select the CI Menu based on the ...

Страница 31: ...up are displayed 3 Press the ENTER button 4 Press the or button to select Reset Press the ENTER button Result The Enter PIN is displayed 5 Enter your current 4 digit PIN code by using the numeric buttons 0 9 Result The warning message is displayed All values will be reset by pressing the coloured buttons red green yellow and blue in turn Resetting You can freeze the picture when watching a televis...

Страница 32: ...ntal bar is displayed and then channels are stored in an order which reflects their positions in the frequency range Finally the search will end automatically To stop the search before it has finished press the MENU button 9 When searching and storing are complete the Sort menu is displayed To sort the stored channels into the desired numerical order go to Step 6 of the Sorting the Stored Channels...

Страница 33: ...which you wish to identify by pressing the œ or button repeatedly You can also select the channel number directly by pressing the numeric buttons 0 9 8 Press the or button to select Store Select OK to confirm the exchange of channel numbers by pressing the ENTER button Result The selected channel is exchanged with the one previously stored to the chosen number 9 For all the channels to move to the...

Страница 34: ... broadcasting standards Result The colour standards are displayed in the following order AUTO PAL SECAM NT4 43 10 Press the ENTER button 11 Press the or button to select Sound System 12 Press the ENTER button 13 Press the or button to select the sound standards Result The sound standards are displayed in the following order BG DK I 14 Press the ENTER button Storing Channels Manually Not available ...

Страница 35: ...Store by pressing the or button Press the ENTER button to select OK 18 Repeat Steps 16 to 17 for each channel to be stored Channel mode P Programme mode When completing tuning the broadcasting stations in your area have been assigned to position numbers from P00 to max P99 You can select a channel by entering the position number in this mode C Real channel mode You can select a channel by entering...

Страница 36: ... or button to select Add Delete 5 Press the ENTER button Result The stored channels are displayed 6 Press the or button to select the channel to add or erase If necessary select Added or Deleted by pressing the ENTER button 7 Repeat Step 6 for each channel to be added or erased 8 When you have finished press the EXIT button to exit Skipping Unwanted Channels Not available in DTV or external input ...

Страница 37: ...new name Press the ENTER button 7 To Press the Select a letter or number or button Move on the next letter button Move back the previous letter œ button The characters available are Letters of the alphabet A Z Numbers 0 9 Special characters space 8 You can have each channel newly named 9 When you have finished entering the name press the EXIT button or press the MENU button repeatedly to return to...

Страница 38: ... options available in the Mode group are displayed with Mode selected 5 Press the ENTER button 6 Press the or button to select picture mode Result The following picture effects are available Dynamic Standard Movie Custom 7 Press the ENTER button You can also set these options simply by pressing the P MODE Picture Mode button Changing the Picture Standard Move Enter Return Picture Mode Dynamic Size...

Страница 39: ... is displayed again 9 Press the or button to select Colour Tone Press the ENTER button 10 Press the or button to select colour tones Press the ENTER button Result The following colour tones are available Cool2 Cool1 Normal Warm1 Warm2 11 To return to the factory defaults select Reset by pressing the or button Press the ENTER button The reset function is set for each mode Dynamic Standard Movie or ...

Страница 40: ...uto Wide Digital NR Off Tilt 0 TV Move Enter Return Picture Mode Dynamic Size Auto Wide Digital NR Off Tilt 0 TV Auto Wide 16 9 Panorama 14 9 Zoom 4 3 If the signal received by your television is weak you can activate this feature to reduce any static and ghosting that may appear on the screen 1 Press the MENU button Result The main menu is displayed 2 Press the or button to select Picture Result ...

Страница 41: ...al is very weak a blue screen automatically replaces the noisy picture background If you wish to continue viewing the poor picture you must set the Blue Screen mode to Off 1 Press the MENU button Result The main menu is displayed 2 Press the or button to select Setup Result The options available in the Setup group are displayed 3 Press the ENTER button 4 Press the or button to select Blue screen 5...

Страница 42: ...ted 4 Press the ENTER button again 5 Press the or button to select the sound mode Result The following sound effects are available Standard Music Movie Speech Custom 6 Press the ENTER button You can also set these options simply by pressing the S MODE Sound Mode button Move Enter Return Sound Mode Custom Equalizer Auto Volume Off Dolby Virtual Off Pseudo Stereo Off Turbo Plus Off TV Move Enter Ret...

Страница 43: ...zer 5 Press the ENTER button Result The options available in the Equalizer group are displayed 6 Select the option to be adjusted by pressing the œ or button Press the or button to reach the required setting If you make any changes to these settings the sound standard is automatically switched to Custom Adjusting the Sound Settings Move Enter Return Sound Mode Custom Equalizer Auto Volume Off Dolb...

Страница 44: ...esult The main menu is displayed 2 Press the or button to select Sound Result The options available in the Sound group are displayed 3 Press the ENTER button 4 Select the required option Auto Volume Dolby Virtual Pseudo Stereo or Turbo Plus by pressing the or button Press the ENTER button 5 To activate each feature select On by pressing the or button 6 Press the ENTER button Manufactured under lic...

Страница 45: ...ilable in the Setup group are displayed 3 Press the ENTER button 4 Press the or button to select Melody 5 Press the ENTER button 6 Select Off or On by pressing the or button 7 Press the ENTER button Move Enter Return Setup Plug Play Language English Time Child Lock Blue screen Off Melody On Demonstration TV Move Enter Return Setup Plug Play Language English Time Child Lock Blue screen Off Melody O...

Страница 46: ...ide depending on the model If mono sound only comes out of the left speaker press the DUAL I II button DTV mode Type of broadcast Regular broadcast Standard audio Regular NICAM Mono NICAM Stereo NICAM Dual I II Regular broadcast Standard audio Bilingual or Dual I II Stereo On screen indication MONO Normal use MONO MONO NICAM Normal STEREO MONO NICAM Normal MONO Normal use DUAL I DUAL II STEREO MON...

Страница 47: ...e INFO button You must also set the time if you wish to use the automatic on or off timers When pressing the button On Off on the front of the television the clock setting will be reset 1 Press the MENU button Result The main menu is displayed 2 Press the or button to select Setup Result The options available in the Setup group are displayed 3 Press the ENTER button 4 Press the or button to select...

Страница 48: ... selected 6 Press the or button to select Sleep Timer 7 Select the preset time interval Off 30 min 60 min 90 min 120 min 150 min 180 min for staying on by pressing the œ or button You can also set these options simply by pressing the SLEEP button If the sleep timer is not yet set Off is displayed If the sleep timer is already set the remaining time before which the television switches to Standby m...

Страница 49: ...and then press the or button to select On 7 Press the or button to select Off Timer As the same above set the time at which you wish the television to be switched off automatically Auto Power Off When you set the timer On the television will eventually turn off if no controls are operated for 3 hours after the TV was turned on by timer This function is only available in timer On mode and prevents ...

Страница 50: ...d 3 Press the ENTER button 4 Press the or button to select Time 5 Press the ENTER button Result The options available in the Time group are displayed with Clock selected 6 Press the or button to select On Timer Volume 7 Press the œ or button to adjust volume level Move Adjust Return TV Time Clock 11 00 Sleep Timer Off On Timer 06 00 On Off Timer 23 00 On On Timer Volume 10 Move Enter Return Setup ...

Страница 51: ...isplayed 2 Press the or button to select Setup Result The options available in the Setup group are displayed 3 Press the ENTER button 4 Press the or button to select the Child Lock Press the ENTER button 5 Press the ENTER button again 6 Press the or button to select the On Result The Child Lock menu is displayed If you want to unlock a channel set to Off 7 Press the ENTER button 8 Press the or but...

Страница 52: ...yed 7 Press the or button to select Input Result The options available in the Input group are displayed 8 Press the or button to select Edit Name Press the ENTER button 9 Press the or button to select external source to be edited Press the ENTER button EXT1 EXT2 S Video 9 Press the ENTER button Result The device names available are listed VCR DVD Cable STB Sat STB AV Receiver DVD Recei Game Camcor...

Страница 53: ...nized according to six categories Part Contents A Selected page number B Broadcasting channel identity C Current page number or search indications D Date and time E Text F Status information FASTEXT information It can be different from depending on TTX source Teletext information is often divided into several pages displayed in sequence which can be accessed by Entering the page number Selecting a...

Страница 54: ...eletext service using the P or P button 2 Press the TEXT MIX button to activate teletext mode Result The contents page is displayed It can be redisplayed at any time by pressing the index button 3 If you wish to display the actual broadcast at the same time as the teletext page press the TEXT MIX button again 4 Press the TEXT MIX button Result The screen will be split into two This Double Teletext...

Страница 55: ... games for example The normal screen reveal again A secondary page sub page The next page page up The previous page page down Double size letters in the size Upper half of the screen Once Lower half of the screen Twice Normal screen Three times To return to the normal display after using the reveal or size feature press the TV DTV button Selecting Display Options ...

Страница 56: ...asting company the different topics covered on a Teletext page are colour coded and can be selected by pressing the coloured buttons on the remote control Press the coloured button corresponding to the topic that you wish to select the available topics are given in the status line Result The page is displayed with other coloured information that can be selected in the same way 3 To display the pre...

Страница 57: ...e displayed in different colours The button is used to switch between the LIST and FLOF modes 2 Press the coloured button corresponding to the page that will be replaced 3 Enter the new page number using the numeric buttons 4 Repeat steps 2 and 3 for each page to be stored using a different coloured button each time 5 Press the store button until the corresponding blocks blink ...

Страница 58: ...t VCR to EXT2 AV so that you can redirect the signal from EXT1 RGB to EXT2 AV If you have a decoder connect the decoder to the VCR and the VCR to the television When you wish to record a programme connect the receiver to EXT1 RGB and the VCR to EXT2 AV so that you can redirect the signal from EXT1 RGB to EXT2 AV or DVD Whenever you connect an audio or video system to your television ensure that al...

Страница 59: ...DVB CI peripherals in your region Inserting the CI Common Interface card If you want to watch the scrambled channel insert the CI card into the COMMON INTERFACE slot Connecting to the RCA input When both the side AV and rear connectors are connected to external equipment the side AV receives priority The VIDEO and AUDIO L R connectors are used for equipment such as camcorders video disc players an...

Страница 60: ...mcorder or VCR Camcorder VCR To play pictures and sound both the S VIDEO and AUDIO L R connectors must be used and Side of the TV Connecting to the S Video Input Please be sure to match the colour coded input terminals and cable jacks Please be sure to match the colour coded input terminals and cable jacks ...

Страница 61: ...lour settings Check that the broadcast system selected is correct Try to identify the electrical appliance that is affecting the television then move it further away Plug your television into a different mains socket Check the direction location and connections of your aerial This interference often occurs due to the use of an indoor aerial Replace the remote control batteries Clean the upper edge...

Страница 62: ...ELECTRONICS AA68 03541A 00 AFTER SALES SERVICE Do not hesitate to contact your retailer or service agent if a change in the performance of your product indicates that a faulty condition may be present ...

Отзывы: