background image

Maintaining your washer


_17

maintaining your washer

CLEANING THE EXTERIOR

Turn off the water faucets after finishing the day’s washing.
This will shut off the water supply to your Washer and prevent the unlikely possibility of damage from 
escaping water. Leave the door open to allow the inside of your Washer to dry out.
Use a soft cloth to wipe up all detergent, bleach or other spills as they occur.
Clean the following as recommended:
Control Panel – Clean with a soft, damp cloth. Do not use abrasive powders or cleaning pads. Do not spray 
cleaners directly on the panel.
Cabinet – Clean with soap and water.

CLEANING THE INTERIOR

Clean the interior of your Washer periodically to remove any dirt, soil, odor, mold, mildew, or bacterial 
residue that may remain in your Washer as a result of washing clothes.
Failure to follow these instructions may result in unsatisfactory conditions, including unpleasant odor and/or 
permanent stains on your Washer or laundry.
Hard water deposits may be removed, if needed. Use a cleaner labeled “Washer safe”.

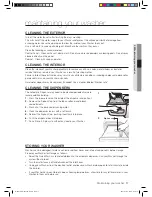
CLEANING THE DISPENSERS

The Automatic Dispenser may need to be cleaned periodically due to 
laundry additive buildup.

1. 

Press the release lever on the inside of the dispenser and pull out.

2. 

Remove the Siphon Cap from the fabric softener and bleach 
compartments.

3. 

Wash all of the parts under running water.

4. 

Clean the dispenser recess with a soft brush.

5. 

Reinsert the Siphon Cap, pushing them firmly into place.

6. 

Push the dispenser back into place.

7. 

Run a Rinse & Spin cycle without any load in your Washer.

STORING YOUR WASHER

Washers can be damaged if water is not removed from hoses and internal components before storage. 
Prepare your Washer for storage as follows:

• 

Select the Quick Wash cycle and add bleach to the automatic dispenser. Run your Washer through the 
cycle without a load.

• 

Turn the water faucets off and disconnect the inlet hoses.

• 

Unplug your Washer from the electrical outlet and leave your Washer door open to let air circulate inside 
the tumbler.

• 

If your Washer has been stored in below–freezing temperatures, allow time for any leftover water in your 
Washer to thaw out before use.

03 Maintaining your washer

1

2

Siphon cap

WF203ANW-02463A-02_EN.indd   17

2007-07-02   ¿ÀÈÄ 8:14:59

Содержание WF203ANS

Страница 1: ...ine the possibilities Thank you for purchasing a Samsung product To receive a more complete service please register your product at www samsung com global register WF203ANW WF203ANS WF203ANW 02463A 02_EN indd 1 2007 07 02 ÀÈÄ 8 14 47 ...

Страница 2: ...E357A7W S R L G An optional 15 pedestal is available to raise the Washer for easier loading and unloading It also offers a built in storage drawer that can hold a 100 oz bottle of detergent 3 Stacking Model No SK 3A1 XAA SK 4A XAA Samsung Washers and Dryers can be stacked to maximize usable space An optional stacking kit is available for purchase from your Samsung retailer Pedestal with Storage Dr...

Страница 3: ...esult in minor personal injury or property damage CAUTION To reduce the risk of fire explosion electric shock or personal injury when using your washer follow these basic safety precautions Do NOT attempt Do NOT disassemble Do NOT touch Follow directions explicity Unplug the pwer plug from the wall socket Make sure the machine is grounded to prevent electric shock Call the service center for help ...

Страница 4: ... on or in your Washer The Washer door isn t easily opened from the inside and a child could be seriously injured if trapped inside Do not tamper with the controls Do not repair replace or service any part of your Washer yourself unless you fully understand the recommended user repair instructions and have the skills to carry them out Work done by an unauthorized person may void your warranty Store...

Страница 5: ...washer 11 Getting started WASHING A LOAD OF LAUNDRY 12 12 Overview of the control panel 14 Child Lock 14 Garment 15 Detergent use 15 Features MAINTAINING YOUR WASHER 17 17 Cleaning the exterior 17 Cleaning the interior 17 Cleaning the dispensers 17 Storing your washer TROUBLESHOOTING 18 18 Check these points if your washer 20 Information codes APPENDIX 22 22 Fabric care chart 23 Helping the enviro...

Страница 6: ...R WASHER use for the Upper Bolt Hole Spanner Bolt hole covers Water Supply Hose Rubber Washer Hose guide Rubber Cup Tape BASIC LOCATION REQUIREMENTS Electrical 120 Volt 60 Hz 15 AMP fuse or circuit breaker Individual branch circuit serving only your Washer is recommended Your Washer is equipped with a power cord NEVER USE AN EXTENSION CORD Cold water supply hose Hot water supply hose Drain Hose Ad...

Страница 7: ...LINES GAS LINES OR HOT WATER PIPES Water To correctly fill your Washer in the proper amount of time a water pressure of 20 120 psi is required Water pressure less than 20 psi may cause water valve failure not allowing the water valve to shut off completely Or it may extend the fill time beyond what your Washer controls allow resulting in your Washer turning off A time limit is built into the contr...

Страница 8: ...r Washer in areas where water may freeze since your Washer will always maintain some water in its water valve pump and hose areas This can cause damage to belts the pump hoses and other components Operating temperature should be above 60 F 16 C Alcove or Closet Installation MINIMUM CLEARANCES FOR CLOSET AND ALCOVE INSTALLATIONS Sides 1 in 25 mm Rear 4 in 102 mm Top 17 in 432 mm Closet Front 2 in 5...

Страница 9: ...evel surface Is away from direct sunlight Has adequate ventilation Will not be freezing below 32 F or 0 C Is away from heat sources such as oil or gas Has enough space so that your Washer need not stand on its power cord Doesn t have any carpeting that will obstruct ventilation openings STEP 3 Installing your Washer 1 Place the drain hose in the drain facility Be sure an airtight connection is NOT...

Страница 10: ...d the faucet for leaks 5 Plug the power cord into a 3 Prong well grounded 120 volt 60 Hz approved electrical outlet protected by a 15 amp fuse or comparable circuit breaker Your Washer is grounded through the third prong of the power cord when plugged into a three prong grounded receptacle 6 Slide your Washer into position 7 Level your Washer by turning the leveling legs in or out as necessary by ...

Страница 11: ...ure thorough cleaning add items within five minutes of starting the wash cycle Try washing bedding towels undergarments and other articles that usually have close body contact using the SilverCare Option which sanitizes using cold water GETTING STARTED 1 Load your Washer 2 Close the door 3 Add detergent and additives to the dispenser see pages 15 16 4 Select the appropriate cycle and options for t...

Страница 12: ...e through the different spin speed options To minimize wrinkling of wrinkle free and no iron fabrics DO NOT use the Extra High spin option or overload your Washer High Use for underwear t shirts jeans and sturdy cottons Medium Use for jeans wrinkle free or wash and wear items and synthetics Low Use for delicate items needing a slow spin speed No Spin Drains your Washer without spinning Use for ext...

Страница 13: ...abrics including cottons linens and normally soiled garments Whites For white fabrics with or without bleach Perm Press For wash and wear synthetic fabrics and lightly to normally soiled garments Sanitize For heavily soiled colorfast garments This cycle heats the water to 150 F to eliminate bacteria If Pause is selected during the heating portion of the Sanitize Cycle your Washer door will remain ...

Страница 14: ...until you deactivate the Child Lock 3 The Child Lock button will be lit while it is in effect When buttons other than the Power button do not respond please check if the Child Lock function is on Garment You can add or take out laundry items even after the wash has started as long as the Garment light is on Pushing the Start Pause button unlocks the door unless the water is too hot or if there is ...

Страница 15: ...rtments before starting your Washer The automatic dispenser MUST ALWAYS be in place before starting your Washer DO NOT open the automatic dispenser when your Washer is running To use 1 Pull out the dispenser drawer on the left side of the control panel 2 Add recommended quantity of additive to the appropriate compartments with laundry additives being careful not to overfill or spill 3 Slide the di...

Страница 16: ... appropriate detergent compartment DO NOT pour color safe bleach into the Bleach compartment Fabric Softener Compartment 1 Pour the recommended amount of liquid fabric softener into the softener compartment For smaller loads use less than one capful 2 Fabric softener should be diluted with water until it reaches MAX FILL in the compartment 3 The dispenser automatically releases liquid fabric softe...

Страница 17: ... labeled Washer safe CLEANING THE DISPENSERS The Automatic Dispenser may need to be cleaned periodically due to laundry additive buildup 1 Press the release lever on the inside of the dispenser and pull out 2 Remove the Siphon Cap from the fabric softener and bleach compartments 3 Wash all of the parts under running water 4 Clean the dispenser recess with a soft brush 5 Reinsert the Siphon Cap pus...

Страница 18: ... Make sure your Washer is running with sufficient water pressure Make sure the Detergent Selector dial is in the upper position when using granular detergent vibrates or is too noisy Make sure your Washer is set on a level surface If the surface is not level adjust your Washer feet to level the appliance Make sure that the shipping bolts are removed Make sure your Washer is not touching any other ...

Страница 19: ...door will remain locked during the heating portion of the Sanitize Cycle It may take a few moments for the door lock mechanism to disengage does not drain and or spin Check the fuse or reset the circuit breaker Straighten the drain hoses Eliminate kinked hoses If there is a drain restriction call for service Close the door and press the Start Pause Button For your safety your Washer will not tumbl...

Страница 20: ... closed Push the Power button to turn off your Washer then turn it on again If the code reappears call for service Motor not running properly Restart the cycle pressing the Start Pause Button If the code reappears call for service Your washer is not draining It can also mean that the unit senses a small clog while draining Before calling for service check the following 1 Turn off the unit and turn...

Страница 21: ...tion sensor problem Restart the cycle If the code reappears call for service see below Too many suds are detected during the washing session The unit is put on hold until the suds are reduced Then the unit will go back to the operation When it finishes washing End and SUdS codes will blink in turn To prevent it cut down on detergents For any codes not listed above call 1 800 726 7864 1 800 SAMSUNG...

Страница 22: ...y Non Chlorine color safe Bleach when needed High Drip Dry Tumble Dry Cycle Medium Dry Flat Normal Low For machine washable wool Loads should be under 8 pounds Permanent Press Wrinkle Resistant Wrinkle Control Gentle Delicates The dot symbols represent appropriate wash water temperatures for various items The temperature range for Hot is 105 125 F 41 52 C for Warm 85 105 F 29 41 C and for Cold 60 ...

Страница 23: ...wer source Remove the door so that animals and small children cannot get trapped inside the appliance Do not exceed the detergent quantities recommended in the detergent manufacturers instructions Use stain removal products and bleaches before the wash cycle only when necessary Save water and electricity by only washing full loads the exact amount depends upon the program used 06 Appendix WF203ANW...

Страница 24: ... Overall 38 96 5 C Depth with door open 90 48 4 123 B Width 27 68 6 D Depth 29 65 75 WATER PRESSURE 50 kPa 800 kPa WEIGHT 85 kg 187 4 lb HEATER RATING 900 W POWER CONSUMPTION WASHING 120 V 240 W WASHING AND HEATING 120 V 1120 W SPIN 120 V 600 W DRAIN 120 V 41 W SPIN REVOLUTION WF203 1000 rpm appendix A C B D WF203ANW 02463A 02_EN indd 24 2007 07 02 ÀÈÄ 8 15 28 ...

Страница 25: ...Delay Start Extra Wash Extra Rinse H C W W W C C C H M L NS H N L Heavy Duty 67 Normal 59 Whites 62 Perm Press 47 Sanitize 112 Rinse Spin 20 Spin Only 11 Temp Spin Soil Level H C Hot Cold W W Warm Warm W C Warm Cold C C Cold Cold H High M Medium L Low NS No Spin H Heavy N Normal L Light 06 Appendix WF203ANW 02463A 02_EN indd 25 2007 07 02 ÀÈÄ 8 15 30 ...

Страница 26: ...ducts if found to be defective during the limited warranty period specified above All replaced parts and products become the property of SAMSUNG and must be returned to SAMSUNG Replacement parts and products assume the remaining original warranty or ninety 90 days whichever is longer This limited warranty covers manufacturing defects in materials and workmanship encountered in normal noncommercial...

Страница 27: ...E OF THE PRODUCT SOLD BY SAMSUNG AND CAUSING THE ALLEGED DAMAGE WITHOUT LIMITING THE FOREGOING PURCHASER ASSUMES ALL RISK AND LIABILITY FOR LOSS DAMAGE OR INJURY TO PURCHASER AND PURCHASER S PROPERTY AND TO OTHERS AND THEIR PROPERTY ARISING OUT OF THE USE MISUSE OR INABILITY TO USE THIS PRODUCT THIS LIMITED WARRANTY SHALL NOT EXTEND TO ANYONE OTHER THAN THE ORIGINAL PURCHASER OF THIS PRODUCT IS NO...

Страница 28: ...COMMENTS Country CALL OR VISIT US ONLINE AT USA 1 800 SAMSUNG 726 7864 www samsung com CANADA 1 800 SAMSUNG 726 7864 www samsung com ca Code No DC68 02463A 02_EN WF203ANW 02463A 02_EN indd 28 2007 07 02 ÀÈÄ 8 15 30 ...

Страница 29: ...ossibilités Merci de votre achat d un produit SAMSUNG Afin de bénéficier d un service plus complet veuillez enregistrer votre produit à l adresse www samsung com global register WF203ANW WF203ANS WF203ANW 02463A 02_CFR indd 1 2007 07 02 ÀÈÄ 8 13 37 ...

Страница 30: ...G Un support optionnel de 40 cm est disponible pour surélever le lave linge pour un remplissage et un vidage plus faciles Il offre également un tiroir de stockage intégré pouvant contenir un baril de produit à lessiver de 2 8 kg 3 Superposition n de modèle SK 3A1 XAA SK 4A XAA Les lave linge et les sèche linge Samsung peuvent être superposés pour optimiser l espace utilisable Un kit de superpositi...

Страница 31: ...matériels ATTENTION Pour réduire le risque d incendie d explosion d électrocution ou de blessure personnelle lors de l utilisation de votre lave linge observez les consignes élémentaires de sécurité suivantes Ne PAS essayer Ne PAS démonter Ne PAS toucher Suivre les instructions à la lettre Débrancher la prise d alimentation Vérifier que la machine est bien reliée à la terre afin d éviter tout choc...

Страница 32: ...nt peut se blesser gravement s il est enfermé dans l appareil Ne neutralisez pas les commandes Ne tentez pas de procéder à la réparation au remplacement ou à l entretien des pièces de votre lave linge à moins que vous ne compreniez les recommandations spécifiques en la matière se trouvant dans le manuel d entretien et que vous ne disposiez des compétences requises pour assurer l opération Toute op...

Страница 33: ... 11 Mise en route EFFECTUER UN LAVAGE 12 12 Présentation du panneau de commandes 14 Verrouillage parental 14 Vêtement 15 Utilisation de la lessive 15 Caractéristiques ENTRETIEN DE VOTRE LAVE LINGE 17 17 Nettoyer l extérieur 17 Nettoyage de l intérieur 17 Nettoyage des bacs 17 Entreposage de votre lave linge DÉPANNAGE 18 18 Vérifiez les points suivants si 20 Codes ANNEXE 22 22 Tableau des symboles ...

Страница 34: ...placer sur le trou de vis supérieur Clé Caches pour les trous des vis Tuyau d arrivée d eau Rondelle de caoutchouc Guide du tuyau de vidange Cale en caoutchouc Papier collant EXIGENCES DE BASES RELATIVES A L INSTALLATION Electricité Fusible ou coupe circuit 120 V 60 Hz 15 AMP Il est recommandé de relier votre lave linge à un circuit distinct Votre lave linge est muni d un cordon d alimentation N U...

Страница 35: ...on de 1 4 à 8 3 bar 20 à 120 psi pour que le lave linge puisse se remplir dans les délais nécessaires Une pression inférieure à 1 4 bar 20 psi peut provoquer une panne de la soupape d admission d eau et l empêcher de se fermer correctement ou allonger la durée de remplissage au delà du niveau autorisé par le contrôleur du lave linge ce qui entraînera l arrêt de ce dernier Un compteur de temps est ...

Страница 36: ...ge dans une zone ou l eau peut geler il contiendra en effet toujours une certain quantité d eau dans la soupape la pompe ou les tuyaux Si celle ci gèle cela peut endommager la courroie la pompe les tuyaux ou d autres composants La température de fonctionnement doit dépasser 16 C Installation dans une niche ou une armoire DEGAGEMENTS MINIMAUX POUR LES INSTALLATIONS DANS UNE NICHE OU UNE ARMOIRE Côt...

Страница 37: ... niveau N est pas soumise à la lumière directe du soleil Dispose d une ne ventilation adaptée Ne risque pas de geler température inférieure à 0 C Ne se trouve pas à proximité d une source de chaleur comme du charbon ou du gaz Dispose de suffisamment d espace de sorte que votre lave linge ne repose pas sur son cordon d alimentation N est pas recouverte de moquette susceptible d obstruer les orifice...

Страница 38: ...ts ne doivent pas présenter de fuites 5 Branchez le cordon d alimentation dans une prise murale 120 V 60 Hz protégée par un fusible de 15 ampères ou un coupe circuit comparable Le fil de terre de votre lave linge est relié à la troisième broche du cordon d alimentation Celle ci doit être insérée dans une prise murale à trois broches correctement mise à la terre 6 Faites glisser votre lave linge ju...

Страница 39: ...our laver la literie les serviettes les sous vêtements et les autres articles habituellement en contact avec la peau nous vous recommandons d utiliser l option SilverCare qui supprime les micro organismes dans l eau froide MISE EN ROUTE 1 Chargez votre lave linge 2 Fermez le hublot 3 Versez le détergent et les additifs désirés dans le bac voir pages 15 à 16 4 Sélectionnez les options et le program...

Страница 40: ... possibles Pour réduire le froissage des tissus infroissables et sans repassage n utilisez PAS l option d essorage Extra High Très élevé et ne surchargez pas votre lave linge High Elevé à utiliser pour les sous vêtements t shirts jeans et cotons épais Medium Moyen à utiliser pour les jeans les articles infroissables et sans repassage et les synthétiques Low Bas à utiliser pour les articles délicat...

Страница 41: ...ement sale Whites Blancs pour le linge blanc avec ou sans agent blanchissant Perm Press Indéplissable pour les vêtements sans repassage les tissus synthétiques et le linge peu à moyennement sale Sanitize Hygiénique pour le linge très sale aux couleurs résistantes Ce programme élève la température de l eau à 65 C afin d éliminer les bactéries Si vous appuyez sur le bouton Pause Pause lors de la pha...

Страница 42: ...sactivation 3 Le bouton Child Lock Verrouillage parental est allumé lorsque la fonction est activée Si les boutons autres que le bouton Power Mise en Marche ne fonctionnent pas vérifiez si la fonction Child Lock Verrouillage parental est activée Vêtement Il est possible d ajouter ou de retirer du linge après le démarrage du lavage tant que le voyant Garment Vêtement est allumé Une pression sur le ...

Страница 43: ...ous les additifs de lavage dans leurs bacs respectifs avant de démarrer votre lave linge Le distributeur automatique DOIT TOUJOURS être en place avant de démarrer votre lave linge N ouvrez PAS le distributeur automatique lorsque votre lave linge est en marche Mode d emploi 1 Ouvrez le tiroir du distributeur qui se trouve sur le côté gauche du panneau de commandes 2 Remplissez les bacs appropriés a...

Страница 44: ... décolorant sans chlore ajoutez le dans le bac approprié NE versez PAS le javellisant non décolorant dans le bac d agent de blanchiment Bac d adoucissant 1 Versez la quantité recommandée d adoucissant liquide dans le bac approprié Pour des charges plus petites utilisez moins d un bouchon de produit 2 L adoucissant doit être dilué avec de l eau pour atteindre la ligne de MAX FILL Remplissage maximu...

Страница 45: ...r pour le lave linge NETTOYAGE DES BACS Il peut être nécessaire de nettoyer régulièrement le distributeur automatique suite à l accumulation d additifs de lavage 1 Appuyez sur la manette d ouverture à l intérieur du distributeur et sortez le 2 Retirez le bouchon du siphon des bacs d adoucissant et d agent de blanchiment 3 Lavez les différents éléments à l eau claire 4 Nettoyez le compartiment du d...

Страница 46: ...fonctionner le lave linge Assurez vous que le cadran de réglage de la lessive est en position haute lors de l utilisation de lessive en poudre votre lave linge vibre ou est trop bruyant Assurez vous que le lave linge est installé sur une surface plane Si la surface n est pas plane ajustez les pieds réglables pour mettre le lave linge à niveau Assurez vous que les vis de transport ont été enlevées ...

Страница 47: ...énique Le mécanisme de verrouillage du hublot se débloque après quelques minutes le lave linge ne se vidange pas et ou n essore pas Vérifiez les fusibles ou réinitialisez le coupe circuit Démêlez les tuyaux de vidange Démêlez les tuyaux En cas de restriction lors de la vidange appelez le service de dépannage Fermez le hublot et appuyez sur le bouton Start Pause Démarrer Pause Pour votre sécurité l...

Страница 48: ...ouille pas Assurez vous que le hublot est correctement fermé Appuyez sur le bouton Power Mise en Marche pour éteindre le lave linge puis rallumez le Si le code réapparaît appelez le service de dépannage Le moteur ne fonctionne pas correctement Relancez le cycle en appuyant sur le bouton Start Pause Démarrer Pause Si le code réapparaît appelez le service de dépannage Votre lave linge ne vidange pas...

Страница 49: ... service de dépannage Tension élevée basse détectée Relancez le cycle Si le code réapparaît appelez le service de dépannage Problème au niveau du capteur de vibrations Relancez le cycle Si le code réapparaît appelez le service de dépannage voir plus bas Trop de mousse est détectée au cours du cycle de nettoyage L appareil est mis en attente jusqu à sa réduction Le fonctionnement reprendra alors Le...

Страница 50: ... Séchage en suspension Blanchiment sans chlore non décolorant uniquement au besoin Séchage sur fil Séchage en suspension Séchage par égouttement Programme de séchage à la machine Séchage par égouttement Séchage à plat Normal Séchage à plat Pour les lainages lavables en machine Les charges doivent être inférieures à 8 livres environ 3 7 kg Textile infroissable Suppression des faux plis Délicats Les...

Страница 51: ...ue Enlevez le hublot pour que des animaux et des jeunes enfants ne se retrouvent pas piégés à l intérieur de l appareil Ne dépassez pas les quantités de lessive préconisées dans les instructions du fabricant de la lessive N utilisez de produits détachant et blanchissant avant le cycle de lavage qu en cas de nécessité Economisez de l eau et de l électricité en ne faisant tourner que des charges ple...

Страница 52: ...ur 38 96 5 C Profondeur hublot ouvert à 90 48 4 123 B Largeur 27 68 6 D Profondeur 29 65 75 PRESSION DE L EAU 50 kPa 800 kPa POIDS 85 kg 187 4 lb PUISSANCE DE CHAUFFE 900 W CONSOMMATION LAVAGE 120 V 240 W LAVAGE ET CHAUFFAGE 120 V 1120 W ESSORAGE 120 V 600 W VIDANGE 120 V 41 W VITESSE D ESSORAGE WF203 1000 tr min annexe A C B D WF203ANW 02463A 02_CFR indd 24 2007 07 02 ÀÈÄ 8 14 18 ...

Страница 53: ... NS H N P Heavy Duty Grandes capacités 67 Normal Nor mal 59 Whites Blancs 62 Perm Press Indé plissable 47 Sanitize Hy giénique 112 Rinse Spin Rinçage Essorage 20 Spin Only Essorage seulement 11 Température Essorage Souillure H C Hot Cold Chaud Froid W W Warm Warm Tiède Tiède W C Warm Cold Tiède Froid C C Cold Cold Froid Froid H High Elevé M Medium Moyen L Low Bas NS No Spin Pas d essorage H Heavy ...

Страница 54: ...placées deviennent la propriété de SAMSUNG et doivent être renvoyés à SAMSUNG Les pièces de rechange et les produits sont couverts pour la période restante de garantie ou quatre vingt dix 90 jours si la période de garantie est inférieure à 90 jours La garantie limitée couvre les vices de fabrication relatifs aux matériaux et à la qualité d exécution survenus dans le cadre d une utilisation normale...

Страница 55: ...NDU PAR SAMSUNG AYANT CAUSE LE PRESUME DEGAT SANS LIMITATION DE CE QUI PRECEDE L ACHETEUR ASSUME TOUS LES RISQUES ET RESPONSABILITES POUR LA PERTE LE DEGAT OU LE PREJUDICE OCCASIONNE A L ACHETEUR ET AUX BIENS DE L ACHETEUR ET A DES TIERS ET A LEURS BIENS DECOULANT DE L UTILISATION DE LA MAUVAISE UTILISATION OU DE L INCAPACITE A UTILISER CE PRODUIT CETTE GARANTIE LIMITEE NE PEUT S ETENDRE A PERSONN...

Страница 56: ...AIRES Pays APPELEZ LE OU RENDEZ VOUS SUR LE SITE USA 1 800 SAMSUNG 726 7864 www samsung com CANADA 1 800 SAMSUNG 726 7864 www samsung com ca Code No DC68 02463A 02_CFR WF203ANW 02463A 02_CFR indd 28 2007 07 02 ÀÈÄ 8 14 21 ...

Отзывы: