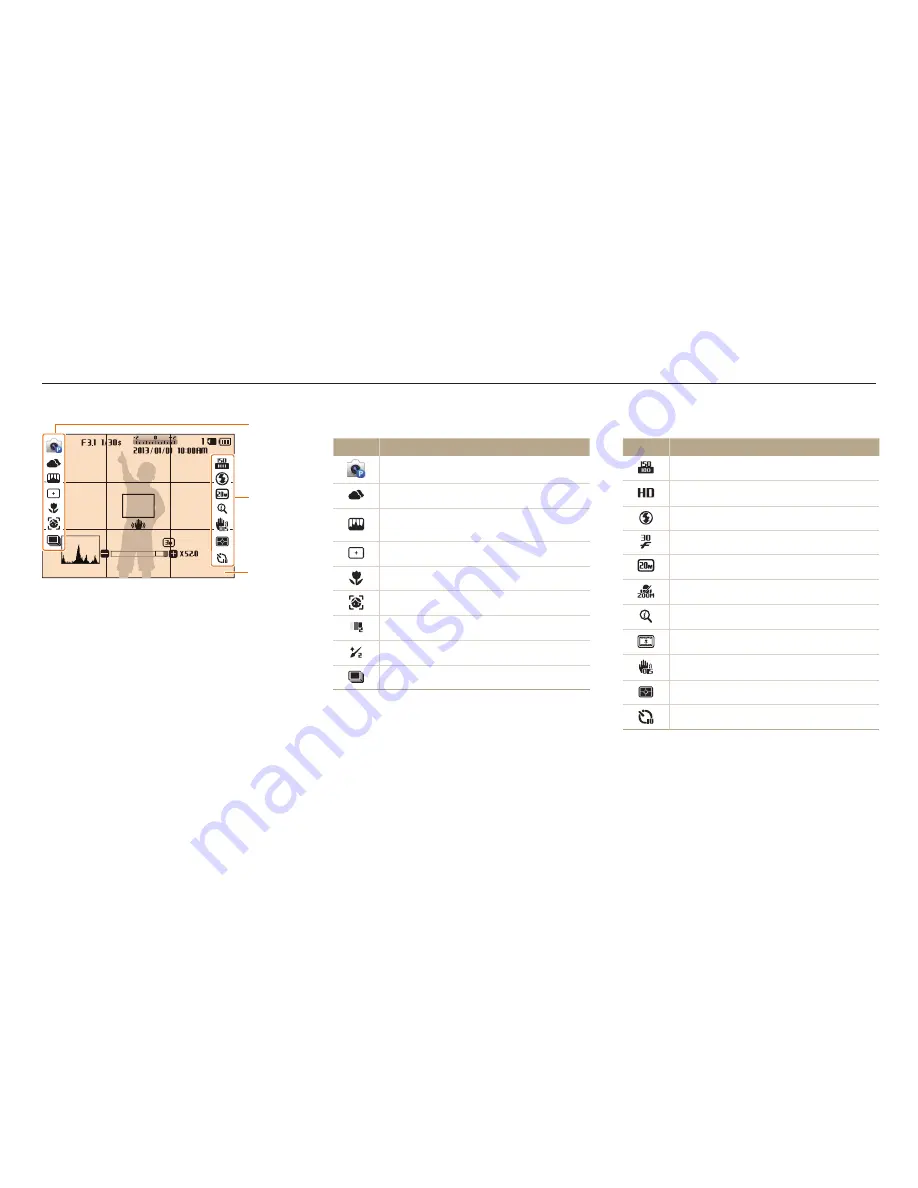
background image

Basic functions

  23

Learning icons

The camera displays icons for the mode and options you set. The icons flash yellow for a while if you change options.

1

2

3

2

 Shooting options (right)

Icon

Description

ISO sensitivity

Video resolution

Flash

Frame Rate (per second)

Photo resolution

Zoom Mute

Intelli zoom on

Smart Filter

Optical Image Stabilization (OIS)

Metering

Timer

1

 Shooting options (left)

Icon

Description

Shooting mode

White Balance
Image adjustment  

(Sharpness, Contrast, and Saturation)
Focus area

Focus

Face Detection

Face Tone

Face Retouch

Burst option

Содержание WB110

Страница 1: ...ge instructions for your camera Please read this manual thoroughly Click a topic WB110 USER MANUAL Basic troubleshooting Quick reference Contents Basic functions Extended functions Shooting options Playback Editing Settings Appendixes Index ...

Страница 2: ...r high temperatures for an extended period of time Prolonged exposure to sunlight or extreme temperatures can cause permanent damage to your camera s internal components Avoid covering the camera with blankets or clothes The camera may overheat which may distort the camera or cause a fire If liquid or foreign objects enter your camera immediately disconnect the power source and then contact a Sams...

Страница 3: ...sung is not responsible for damage or injuries caused by unapproved batteries cables or accessories Use the battery only for its intended purpose Misusing the battery may cause a fire or electric shock Do not touch the flash while it fires The flash is very hot when fired and may burn your skin Do not drop or subject the camera to strong impacts Doing so may damage the screen or external or intern...

Страница 4: ...acrylic parts are broken visit a Samsung Electronics Service Center to have the camera repaired Check that the camera is operating properly before use The manufacturer takes no responsibility for any loss of files or damage that may result from camera malfunction or improper use You must plug the small end of the USB cable into your camera If the cable is reversed it may damage your files The manu...

Страница 5: ...this camera responsibly and adhere to all laws and regulations concerning its use You are not allowed to reuse or distribute any part of this manual without prior permission Outline of the User Manual Basic functions 13 Learn about your camera s layout icons and basic functions for shooting Extended functions 37 Learn how to capture a photo and record a video by selecting a mode Shooting options 5...

Страница 6: ...hen capture bracketed photos The camera will capture 3 consecutive photos each with a different exposure normal underexposed and overexposed p 76 Adjusting the exposure manually EV Depending on the intensity of the ambient light your photos may be too bright or dark In these cases you can adjust the exposure to get a better photo Darker Neutral 0 Brighter 1 In Shooting mode press m 2 Select EV Adj...

Страница 7: ...scene such as a person animal or still life Background The objects around the subject Composition The combination of a subject and background Composition Background Subject Exposure Brightness The amount of light that enters your camera determines the exposure You can alter the exposure by changing the shutter speed aperture value or ISO sensitivity By altering the exposure your photos will be dar...

Страница 8: ...r half press Shutter to ensure the subject is in focus p 35 Use the mode p 44 Photos are blurred when shooting at night As the camera tries to let in more light the shutter speed slows This can make it difficult to hold the camera steady long enough to capture a clear photo and may result in camera shake Select Night in mode p 41 Turn on the flash p 58 Set ISO sensitivity options p 60 Use a tripod...

Страница 9: ...trait 65 Capturing photos at night or in the dark mode Night Sunset Dawn 41 Flash options 58 ISO sensitivity to adjust the sensitivity to light 60 Capturing action photos Continuous Motion Capture 72 Capturing photos of text insects or flowers mode Close up Text 41 Macro 61 Applying effects to videos mode Movie Filter 50 Reducing camera shake Optical Image Stabilization OIS 34 Dual Image Stabiliza...

Страница 10: ...32 Reducing camera shake 34 Tips for getting a clearer photo 35 Basic functions 13 Unpacking 14 Camera layout 15 Attaching a strap 18 Attaching a lens cap 18 Inserting the battery and memory card 19 Turning on your camera 20 Performing the initial setup 21 Learning icons 23 Using the Mode screen 25 Selecting a Mode Screen 25 Icons on the Mode screen 26 ...

Страница 11: ...e 47 Using the Split Shot mode 48 Using the Photo Filter mode 49 Using the Movie Filter mode 50 Using the Movie mode 51 Shooting options 53 Selecting a resolution and quality 54 Selecting a resolution 54 Selecting an image quality 55 Using the timer 56 Shooting in the dark 57 Preventing red eye 57 How to use the flash 57 Using the flash 58 Adjusting the ISO sensitivity 60 Changing the camera s foc...

Страница 12: ...inuous motion capture AEB 72 Adjusting images 73 Reducing the sound of the zoom 74 Playback Editing 75 Viewing photos or videos in Playback mode 76 Starting Playback mode 76 Viewing photos 80 Playing a video 83 Editing a photo 85 Resizing photos 85 Rotating a photo 85 Applying Smart Filter effects 86 Adjusting your photos 87 Viewing files on aTV or HDTV 89 Transferring files to the computer 91 Tra...

Страница 13: ...100 Connectivity 101 General 102 Appendixes 104 Error messages 105 Camera maintenance 106 Cleaning your camera 106 Using or storing the camera 107 About memory cards 109 About the battery 112 Before contacting a service center 114 Camera specifications 117 Glossary 121 FCC notice 126 Index 127 ...

Страница 14: ...g icons 23 Using the Mode screen 25 Selecting a Mode Screen 25 Icons on the Mode screen 26 Selecting options or menus 27 Setting the display and sound 29 Setting the display type 29 Setting the sound 30 Capturing photos 31 Zooming 32 Reducing camera shake 34 Tips for getting a clearer photo 35 Basic functions Learn about your camera s layout icons and basic functions for shooting ...

Страница 15: ...ies Camera case A V cable HDMI cable Memory card Memory card Memory card adapter The illustrations may differ slightly from the items shipped with your product The items included in the box may differ depending on the model You can purchase optional accessories at a retailer or a Samsung service center Samsung is not responsible for any problems caused by using unauthorized accessories ...

Страница 16: ...with your camera s parts and their functions Shutter button Recording button Lens POWER button AF assist light Timer lamp Mode dial p 17 USB and A V port Accepts USB cable and A V cable HDMI port Accepts HDMI cable Speaker Flash pop up button Eyelet for camera strap Flash ...

Страница 17: ...ge is out of focus Steady When the camera is connecting to a computer or when the image is in focus Zoom button In Shooting mode Zoom in or out In Playback mode Zoom in on part of a photo or view files as thumbnails or adjust the volume Display Buttons p 17 Microphone Battery chamber cover Insert a memory card and battery Tripod mount ...

Страница 18: ...ial Icon Description Smart Auto Capture a photo with a scene mode selected automatically by the camera Program Capture a photo by setting options except the shutter speed and aperture value which the camera sets automatically Scene Capture a photo with options preset for a specific scene DUAL IS Capture a photo with options that reduce camera shake Panorama Capture and combine a series of photos t...

Страница 19: ...Camera layout Basic functions 18 Attaching a strap Attach a strap to carry your camera conveniently Attaching a lens cap Attach a lens cap with a lens cap strap to protect the camera lens ...

Страница 20: ...es from the camera and then pull it out of the slot Battery Using the memory card adapter To use micro memory cards with this product a PC or a memory card reader insert the card into an adapter You can use the internal memory for temporary storage if a memory card is not inserted Memory card Insert a memory card with the gold colored contacts facing up Battery Check the polarity of the batteries ...

Страница 21: ...camera turns on and immediately accesses Playback mode If you turn on your camera by pressing and holding P until the status lamp blinks the camera does not emit any sounds Press X to turn your camera on or off The initial setup screen appears when you turn on the camera for the first time p 21 ...

Страница 22: ...t Date Time Set Year Month Day Hour Min DST 4 Press F t to select an item 5 Press D c to set the date time and daylight saving time and then press o Performing the initial setup When the initial setup screen appears follow the steps below to configure the camera s basic settings The default language is preset for the country or region where the camera is sold You can change the language as desired...

Страница 23: ...7 Press D c to select a date type and then press o Date Type Back Set YYYY MM DD MM DD YYYY DD MM YYYY 8 Press c to select TimeType and then press t or o 9 Press D c to select a time type and then press o 10 Press r to finish the initial setup The screen may differ depending on the language selected ...

Страница 24: ... right Icon Description ISO sensitivity Video resolution Flash Frame Rate per second Photo resolution Zoom Mute Intelli zoom on Smart Filter Optical Image Stabilization OIS Metering Timer 1 Shooting options left Icon Description Shooting mode White Balance Image adjustment Sharpness Contrast and Saturation Focus area Focus Face Detection Face Tone Face Retouch Burst option ...

Страница 25: ...peed Available recording time Exposure value Available number of photos Memory card inserted Fully charged Partially charged Replace the batteries Icon Description Current date Current time Auto focus frame Camera shake Zoom indicator Photo resolution when the Intelli zoom is on Zoom ratio Histogram ...

Страница 26: ...to Editor Split Shot Photo Filter Movie Filter For example When you select Magic Frame in Magic Plus mode No Description 1 Current Mode screen Rotate the mode dial to go to another mode screen 2 Mode icons Press D c F t to scroll to a desired mode and then press o to access the mode Using the Mode screen Use the mode dial to select a shooting mode or function Rotate the mode dial to a desired mode...

Страница 27: ...with various effects p 85 Settings Adjust settings to match your preferences p 99 Movie Customize settings to record a video p 51 Icons on the Mode screen Mode Icon Description Smart Auto Capture a photo with a scene mode selected automatically by the camera p 38 Program Capture a photo with settings you have adjusted manually p 40 Scene Capture a photo with options preset for a specific scene p 4...

Страница 28: ...c F t or o Going back to the previous menu Press r to go back to the previous menu Half press Shutter to return to Shooting mode 1 In Shooting mode press m 2 Select an option or a menu To move up or down press D or c To move left or right press F or t 3 Press o to confirm the highlighted option or menu ...

Страница 29: ...e option in Program mode 1 Rotate the mode dial to 2 Press m Exit Select EV White Balance ISO Flash Focus Focus Area 3 Press D c to select White Balance and then press t or o 4 Press F t to select a White Balance option Back Set White Balance Daylight 5 Press o to save your settings ...

Страница 30: ...ation The more of a particular color the taller the peak Under exposed Well exposed Over exposed Setting the display type You can select a display type for the Shooting or Playback mode Each type displays different shooting or playback information See the table below Press D repeatedly to change the display type Mode Display type Shooting Hide all information about shooting options Show all inform...

Страница 31: ...eatedly Hide the option display Show the option display Option display Beauty Shot Panel off For example in mode Setting the sound Turn on or off the sound your camera emits when you perform functions 1 Rotate the mode dial to 2 Select Sounds Beep Sound 3 Select an option Option Description Off The camera does not emit any sounds On The camera emits sounds ...

Страница 32: ... is in focus A red frame means the subject is out of focus 4 Press Shutter to capture a photo 5 Press P to view the captured photo To delete the photo press f and then select Yes 6 Press P to return to Shooting mode See page 35 for tips to get clearer photos Capturing photos Learn how to capture photos easily and quickly in Smart Auto mode ...

Страница 33: ...n a subject in Shooting mode and the zoom indicator is in the digital range your camera is using the Digital zoom By using both the 26X Optical zoom and 5X Digital zoom you can zoom in up to 130 times Zoom indicator Optical range Digital range Digital zoom is not available with the Tracking AF option or Face Detection options If you capture a photo with the Digital zoom the photo quality may be lo...

Страница 34: ...ns you selected the Intelli zoom is not available The Intelli zoom helps you capture a photo with less quality deterioration than the Digital zoom However the photo quality may be lower than when you use the Optical zoom The Intelli zoom is available only when you set a 4 3 resolution ratio If you set another resolution ratio with Intelli zoom on the Intelli zoom will be turned off automatically T...

Страница 35: ...ual IS The Dual Image Stabilizer Dual IS is activated OIS may not function properly when you move your camera to follow a moving subject you use the Digital zoom there is too much camera shake the shutter speed is slow for example when you capture night scenes the battery is low you capture a close up shot If you use the OIS function with a tripod your images may be blurred by the vibration of the...

Страница 36: ...d half press Shutter again if the focus frame appears in red Reducing camera shake Set the Optical Image Stabilization option to reduce camera shake digitally p 34 Select the mode or set the Dual IS option to reduce camera shake both optically and digitally p 44 34 When is displayed Camera shake When you shoot in the dark avoid setting the flash option to Slow Sync or Off The aperture remains open...

Страница 37: ... subject is too bright the subject is shiny or reflective the subject includes horizontal patterns such as blinds the subject is not positioned in the center of the frame When you capture photos in low light Turn on the flash p 58 When subjects are moving rapidly Use the Continuous or Motion Capture function p 72 Using the focus lock Half press Shutter to focus When the subject is in focus you can...

Страница 38: ...e Guide 43 Using the DUAL IS mode 44 Using the Panorama mode 45 Using the Magic Plus mode 47 Using the Magic Frame mode 47 Using the Split Shot mode 48 Using the Photo Filter mode 49 Using the Movie Filter mode 50 Using the Movie mode 51 Extended functions Learn how to capture a photo and record a video by selecting a mode ...

Страница 39: ...bright white backgrounds Landscapes at night Portraits at night Landscapes with backlighting Portraits with backlighting Portraits Close up photos of objects Close up photos of text Sunsets Blue skies Forested areas Close up photos of colorful subjects 1 Rotate the mode dial to 2 Align your subject in the frame The camera automatically selects a scene An appropriate scene icon appears at the top l...

Страница 40: ...es the default settings for mode Even if it detects a face the camera may not select a portrait mode depending on the subject s position or lighting The camera may not select the correct scene depending on the shooting conditions such as camera shake lighting or distance to the subject Even if you use a tripod the camera may not detect the mode if the subject is moving The camera consumes more bat...

Страница 41: ...ocus 4 Press Shutter to capture the photo 1 Rotate the mode dial to 2 Set the desired options For a list of options refer to Shooting options p 53 Using the Program mode In Program mode you can set most options except the shutter speed and aperture value which the camera sets automatically ...

Страница 42: ...cenes and landscapes Close up Capture detailed parts of a subject or small subjects such as flowers or insects Text Clearly capture text from printed or electronic documents Sunset Capture scenes at sunset with natural looking reds and yellows Dawn Capture scenes at sunrise Backlight Capture backlit subjects Beach Snow Reduce underexposure of subjects caused by sunlight reflected from sand or snow...

Страница 43: ...press Shutter to focus 10 Press Shutter to capture the photo When you use the Beauty Shot mode the focus distance will be set to Auto Macro Using the Beauty Shot mode In Beauty Shot mode you can capture a portrait with options to hide facial imperfections 1 Rotate the mode dial to 2 Select Beauty Shot 3 Press m 4 Select FaceTone 5 Select an option For example increase the face tone setting to make...

Страница 44: ... r Using the Frame Guide When you want another person to capture a photo of you you can compose the scene with the frame guide feature The frame guide helps the other person capture a photo of you by showing part of the pre composed scene 1 Rotate the mode dial to 2 Select Frame Guide 3 Align your subject in the frame and then press Shutter Transparent guides appear on the left and right of the fr...

Страница 45: ...al Image Stabilization option or Dual IS option to reduce camera shake in different shooting modes p 34 Before correction After correction 1 Rotate the mode dial to 2 Align your subject in the frame and then half press Shutter to focus 3 Press Shutter to capture the photo Using the DUAL IS mode Reduce camera shake and prevent blurred photos with Optical and Digital Image Stabilization functions ...

Страница 46: ...When you are finished release Shutter When you have captured all the necessary shots the camera combines them into one panoramic photo Shooting example 1 Rotate the mode dial to 2 Align your subject in the frame and then half press Shutter to focus Align the camera with the far left or the far right or very top or bottom of the scene you want to capture 3 Press and hold Shutter to start shooting U...

Страница 47: ... conditions if you change the shooting direction while shooting if you move the camera too rapidly if you don t move the camera Selecting Panorama mode will disable the digital and optical zoom functions If you select Panorama mode while the lens is zoomed in the camera automatically zooms out to the default position Some shooting options are not available The camera may stop shooting due to the s...

Страница 48: ...ding to the frame you select 1 Rotate the mode dial to 2 Select 3 Select an option Panel off Mural 4 Align your subject in the frame and then half press Shutter to focus 5 Press Shutter to capture the photo In Magic Frame mode the resolution is automatically set to Using the Magic Plus mode Capture a photo or record a video by selecting appropriate modes for various effects ...

Страница 49: ...elect Line Blur a desired value To apply a Smart Filter effect to part of the shot press m and then select Smart Filter a desired option You can apply different Smart Filter effects to each part of the shot Panel off 4 Align your subject in the frame and then half press Shutter to focus 5 Press Shutter to capture a photo Repeat steps 4 and 5 to capture the rest of the photos To recapture a photo p...

Страница 50: ... effect of a fisheye lens Old Film Apply a vintage film effect Classic Apply a black and white effect Retro Apply a sepia tone effect 4 Align your subject in the frame and then half press Shutter to focus 5 Press Shutter to capture a photo Depending on the option you select the resolution may change to or smaller automatically To apply filter effects to saved photos press m and then select Open Im...

Страница 51: ...s 1 Rotate the mode dial to 2 Select 3 Select an effect Option Description Vignetting Apply the retro looking colors high contrast and strong vignette effect of Lomo cameras Fish eye Distort close objects to imitate the visual effect of a fisheye lens Classic Apply a black and white effect Retro Apply a sepia tone effect Palette Effect 1 Create a vivid look with sharp contrast and strong color Pal...

Страница 52: ...n length The camera saves recorded videos as MP4 H 264 files MP4 H 264 is a high compression video format established by the international standards organizations ISO IEC and ITU T If you use memory cards with slow write speeds the camera may not save videos properly Video recordings may be corrupted or fail to play back correctly Memory cards with slow write speeds will not support high resolutio...

Страница 53: ...Extended functions 52 Pause recording The camera allows you to temporarily pause a video while recording With this function you can record separate scenes as a single video Press o to pause while recording Press o to resume ...

Страница 54: ... the focus area 62 Using Face Detection 65 Detecting faces 65 Capturing a self portrait shot 65 Capturing a smile shot 66 Detecting eye blinking 66 Tips for detecting faces 67 Adjusting brightness and color 68 Adjusting the exposure manually EV 68 Compensating for backlighting ACB 69 Changing the metering option 69 Selecting aWhite Balance setting 70 Using burst modes continuous motion capture AEB...

Страница 55: ...152 X 2896 Print on A1 paper in panorama ratio 16 9 or play back on an HDTV 3840 X 3840 Print on A1 paper in 1 1 ratio 3648 X 2736 Print on A2 paper 2592 X 1944 Print on A4 paper 1984 X 1488 Print on A5 paper 1920 X 1080 Print on A5 paper in panorama ratio 16 9 or play back on an HDTV 1024 X 768 Attach to an email Setting the video resolution 1 In Shooting mode press m 2 Select Movie Size 3 Select...

Страница 56: ...settings will result in larger file sizes Setting the photo quality The camera compresses and saves the photos you capture in the JPEG format 1 In Shooting mode press m 2 Select Quality 3 Select an option Icon Description Super Fine Capture photos in super high quality Fine Capture photos in high quality Normal Capture photos in normal quality ...

Страница 57: ...tions may differ depending on the shooting conditions 3 Press Shutter to start the timer The AF assist light timer lamp blinks The camera will automatically capture a photo after the specified time has elapsed Press Shutter or t to cancel the timer Depending on the Face Detection options you selected the timer function may not be available Timer options are not available if you set burst options I...

Страница 58: ...rection How to use the flash Press F to pop the flash up when it is need When the flash unit is closed the flash does not fire regardless of the selected option When the flash unit pops up the flash fires according to the selected option While not in use keep the flash unit closed to prevent damage Forcing open the flash unit may cause damage to your camera Press down gently to close Shooting in t...

Страница 59: ...Using the flash Use the flash when you capture photos in the dark or when you need more light in your photos 1 Press F to pop the flash up when it is need 2 In Shooting mode press F Exit Set Flash Off Auto Red eye Fill in Slow Sync Red eye Fix ...

Страница 60: ...al more details in the background Use a tripod to prevent your photos from blurring The camera will display the shake warning when you are shooting in low light Icon Description Red eye Fix The flash fires twice when the subject or background is dark The camera corrects red eyes through its advanced software analysis There is an interval between the 2 bursts of the flash Do not move until the flas...

Страница 61: ... select the more sensitive to light your camera becomes Use a higher ISO sensitivity to capture better photos and reduce camera shake when not using the flash 1 In Shooting mode press m 2 Select ISO 3 Select an option Select to use an appropriate ISO sensitivity based on the brightness of the subject and lighting Higher ISO sensitivities may result in more image noise If you set the ISO option to ...

Страница 62: ...propriate focus option according to the distance between the camera and subjects 1 In Shooting mode press c Exit Set Focus Normal AF Macro Auto Macro Super Macro Using macro Use macro to capture close up photos of subjects such as flowers or insects Refer to Changing the focus option Try to hold the camera firmly to prevent blurry photos Turn off the flash if the distance to the subject is less th...

Страница 63: ... 63 Available shooting options may differ depending on the shooting conditions 2 Select an option Icon Description Normal AF Focus on a subject farther than 31 in 80 cm away Farther than 138 in 350 cm away when you use the zoom Macro Focus on a subject that is 4 31 in 10 80 cm from the camera 79 138 in 200 350 cm when you use the zoom Auto Macro Focus on a subject farther than 4 in 10 cm away Fart...

Страница 64: ...era is tracking the subject When you half press Shutter the green frame means that your subject is in focus The red frame means that your camera failed to focus 4 Press Shutter to capture the photo Focusing on a selected area You can focus on an area that you have selected 1 In Shooting mode press m 2 Select Focus Area Selection AF 3 Press o and then press D c F t to move the frame to a desired ar...

Страница 65: ... dark place colors or patterns on the subject and the background are the same the subject includes horizontal patterns such as blinds the camera shakes excessively When tracking fails the feature will be reset If the camera fails to track the subject you must reselect the subject to track If the camera fails to focus the focus frame will change to red and the focus will be reset If you use this fu...

Страница 66: ...lf The camera sets the focus distance to close up and then emits a beep when ready 1 In Shooting mode press m 2 Select Face Detection Self Portrait 3 Compose your shot with the lens facing you 4 When you hear a quick beep press Shutter When faces are located in the center the camera beeps rapidly If you turn Volume off in the sound settings the camera will not emit a beep p 100 Using Face Detectio...

Страница 67: ...Face Detection Smile Shot 3 Compose your shot The camera automatically releases the shutter when it detects a smiling face When your subject smiles broadly your camera can detect the smile more easily Detecting eye blinking If your camera detects closed eyes it will automatically capture 2 photos in succession 1 In Shooting mode press m 2 Select Face Detection Blink Detection ...

Страница 68: ...t is wearing sunglasses or a mask the subject s facial expression changes drastically the subject is backlit or the lighting conditions are unstable Face Detection is not available when you set the Selection AF or Tracking AF When you set Face Detection options the AF area is automatically set to Multi AF Depending on the Face Detection options you selected some shooting options may not be availab...

Страница 69: ...on an appropriate exposure select the AEB Auto Exposure Bracket option The camera will capture 3 consecutive photos each with a different exposure normal underexposed and overexposed p 72 Adjusting the exposure manually EV Depending on the intensity of the ambient light your photos may be too bright or dark In these cases you can adjust the exposure to get a better photo Darker Neutral 0 Brighter ...

Страница 70: ... of the frame your photo may be improperly exposed Suitable for a subject with backlighting Center weighted Your camera averages the meter reading of the entire frame with emphasis placed on the center Suitable for photos with subjects in the center of the frame Compensating for backlighting ACB When the light source is behind your subject or there is high contrast between your subject and the bac...

Страница 71: ...t light Fluorescent_L For shooting under white fluorescent light Tungsten For shooting indoor photos under incandescent bulbs or halogen lamps Custom Set To use White Balance settings that you define p 71 ColorTemp To adjust the color temperature of the light source p 71 Selecting a White Balance setting The color of your photo depends on the type and quality of the light source If you want the co...

Страница 72: ... lower color temperature setting more blue Back Set Color Temp 6500K 4 Press o to save your settings Defining your own White Balance You can customize the White Balance by capturing a photo of a white surface such as a piece of paper under the lighting conditions in which you intend to capture a photo The White Balance feature will help you to match the colors in your photo with the actual scene 1...

Страница 73: ...exposure normal underexposed and overexposed Use a tripod to prevent blurry photos You can use the flash timer OIS and ACB only when you select Single When you select Motion Capture your camera will set the resolution to and set the ISO sensitivity to Auto Depending on the Face Detection option you selected some Burst options may not be available Using burst modes continuous motioncapture AEB It c...

Страница 74: ...ting the photos on your computer Sharpen the edges to improve the clarity of your photos This may also increase the noise in your photos Contrast Description Decrease the color and brightness Increase the color and brightness Saturation Description Decrease the saturation Increase the saturation 5 Press o to save your settings Select 0 if you do not want to apply any effects suitable for printing ...

Страница 75: ...use the zoom Off Record a video without sound On Record a video with sound Do not block the microphone when you use the Voice function Recordings made with Voice may differ from actual sounds Reducing the sound of the zoom When you use the zoom while recording videos the camera can record the sound of the zoom Use the Zoom Mute function not to record zoom noise ...

Страница 76: ...ing your photos 87 Viewing files on aTV or HDTV 89 Transferring files to the computer 91 Transferring files to yourWindows OS computer 91 Transferring files to your Mac OS computer 92 Using programs on the computer 93 Installing i Launcher 93 Using i Launcher 94 Playback Editing Learn how to play back photos or videos and edit photos or videos Also learn how to connect your camera to your computer...

Страница 77: ...st recent file will be displayed If the camera is off it will turn on and display the most recent file 2 Press F t to scroll through files Press and hold F t to scroll through files quickly If you want to view files stored in the internal memory remove your memory card You may not be able to edit or play back files that were captured with other cameras due to unsupported sizes image size etc or co...

Страница 78: ...t playback time Video length Protected file To display file information on the screen press D Viewing files as thumbnails Scan thumbnails of files In Playback mode rotate Zoom to the left to view thumbnails 12 at a time Rotate Zoom to the left once more to display more thumbnails 24 at a time Rotate Zoom to the right to return to the previous view Menu Press D c F t to scroll through files ...

Страница 79: ...y Date View files by the date they were saved FileType View files by the file type 4 Scroll to a desired list and then press o to open the list 5 Scroll to a desired file and then press o to view the file 6 Rotate Zoom to the left to return to the previous view and then press r If you change the category it may take some time for the camera to reorganize files depending on the number of files If y...

Страница 80: ... Playback mode select a file and then press f 2 When the pop up message appears select Yes You can also delete files in Playback mode by pressing m and then selecting Delete Delete Yes Deleting multiple files You can select multiple files and then delete them at once 1 In Playback mode press f When in thumbnails view press m select Delete Select and then skip to step 3 or press f select Select and...

Страница 81: ...en skip to step 3 2 Select Delete Delete All 3 When the pop up message appears select Yes All unprotected files are deleted Copying files to a memory card Copy files from the internal memory to a memory card 1 In Playback mode press m 2 Select Copy to Card Viewing photos Enlarge part of a photo or view photos as a slide show Enlarging a photo In Playback mode rotate Zoom to the right to enlarge a ...

Страница 82: ...e panoramic photo appears on the screen 2 Press o The camera automatically scrolls through the photo from left to right for a horizontal panoramic photo and from top to bottom for a vertical panoramic photo The camera then switches to Playback mode While playing back a panoramic photo press o to pause or resume from pausing After you have paused the playback of a panoramic photo press D c F t to m...

Страница 83: ...y Repeat Interval Set the interval between photos 1 sec 3 sec 5 sec 10 sec You must set the Effect option to Off to set the interval Music Set background audio Effect Set a scene change effect between photos Off Calm Relax Lively Sweet Shine Select Off to cancel effects When you use the Effect option the interval between photos will be set to 1 second 4 Press m 5 Select Start Slide Show 6 View the...

Страница 84: ...ess o 2 View the video Stop Pause Current playback time Video length To Description Scan backward Press F Each time you press F you change the scan speed in this order 2X 4X 8X Pause or resume playback Press o Scan forward Press t Each time you press t you change the scan speed in this order 2X 4X 8X Adjust the volume level Rotate Zoom to the left or right You can scan backwards or forwards or pau...

Страница 85: ... o c at the point where you want the trimming to end 7 Press c to trim 8 When the pop up message appears select Yes The original video should be at least 10 seconds long The camera will save the edited video as a new file and leave the original video intact Capturing an image from video 1 While viewing a video press o at the point where you want to capture an image 2 Press c The resolution of the ...

Страница 86: ...ial to 2 Select 3 Rotate Zoom to the left and then select a photo 4 Select Rotate an option Cancel Save Rotate Right 90 5 Press c to save The camera will overwrite the original file In Playback mode press m and then select Rotate to rotate a photo Resizing photos Change the size of a photo and save it as a new file 1 In Playback mode select a photo and then press m 2 Select Resize 3 Select an opti...

Страница 87: ...shift effect to make the subject appear in miniature The top and bottom of the photo will be blurred Vignetting Apply the retro looking colors high contrast and strong vignette effect of Lomo cameras Cross Filter Add lines that radiate outward from bright objects to imitate the visual effect of a cross filter Fish eye Distort close objects to imitate the visual effect of a fisheye lens Old Film Ap...

Страница 88: ...d saturation and apply Smart Filter effects at the same time You cannot apply the ACB Face Retouch and Red eye Fix effects at the same time Adjusting brightness contrast or saturation 1 Rotate the mode dial to 2 Select 3 Rotate Zoom to the left and then select a photo 4 Select an adjusting option Icon Description Brightness Contrast Saturation 5 Press F t to adjust the option 6 Press o 7 Press c t...

Страница 89: ...left and then select a photo 4 Select Face Retouch 5 Press F t to adjust the option As the number increases the skin tone becomes brighter and smoother 6 Press c to save Removing red eye 1 Rotate the mode dial to 2 Select 3 Rotate Zoom to the left and then select a photo 4 Select Red eye Fix 5 Press c to save ...

Страница 90: ...then select the A V video source 7 Turn on your camera The camera automatically enters into Playback mode when you connect it to a TV 8 View photos or play videos using the camera buttons Depending on the TV model you may see some digital noise or part of an image may not appear Images may not be centered on the TV screen depending on your TV settings Viewing files on aTV or HDTV Play back photos ...

Страница 91: ...1 to control the camera and TV with the TV s remote control Anynet lets you control all connected Samsung A V devices with the TV remote control The time it takes for the camera to connect to your HDTV may vary with the type of SD SDHC or SDXC card you use A faster SD SDHC or SDXC card will not necessarily result in a faster HDMI transfer because the main function of the card is to improve the tra...

Страница 92: ...sponsible for any loss of data 5 Turn on the camera The computer recognizes the camera automatically 6 On your computer select My Computer Removable Disk DCIM 100PHOTO 7 Drag or save files to your computer Disconnecting the camera for Windows XP With Windows Vista Windows 7 and Windows 8 the methods for disconnecting the camera are similar 1 If the status lamp on your camera is blinking wait until...

Страница 93: ...ograms Mac OS 10 5 or later except PowerPC is supported 1 Turn off the camera 2 Connect your camera to your Mac OS computer with the USB cable You must plug the small end of the USB cable into your camera If the cable is reversed it may damage your files The manufacturer is not responsible for any loss of data 3 Turn on the camera The computer recognizes the camera automatically and displays a rem...

Страница 94: ...ll launch automatically 7 Follow the on screen instructions to complete the installation An i Launcher shortcut will appear on the computer Before installing the program ensure that the PC is connected to a network If you use the Mac OS computer the i Launcher function is not available Installing i Launcher 1 Rotate the mode dial to 2 Select Connectivity i Launcher On 3 Turn off the camera 4 Conne...

Страница 95: ...ay back files with Multimedia Viewer The requirements are recommendation only i Launcher may not work properly even when the computer meets the requirements depending on the condition of your computer If your computer does not meet the requirements videos may not play correctly The manufacturer is not responsible for any damage that results from using unqualified computers such as a computer you a...

Страница 96: ...50 MB or more 1 GB and above recommended Others 1024 X 768 pixels 16 bit color display compatible monitor 1280 X 1024 pixels 32 bit color display recommended USB 2 0 port nVIDIA Geforce 7600GT or higher ATI X1600 series or higher Microsoft DirectX 9 0c or higher A 32 bit version of i Launcher will be installed even on 64 bit editions of Windows XP Windows Vista Windows 7 and Windows 8 Opening i La...

Страница 97: ... AVI MJPEG Photos JPG GIF BMP PNG TIFF MPO Files that have been recorded with other manufacturers devices may not play back smoothly Viewing photos 6 7 9 0 8 5 4 3 1 2 33 No Description 1 File name 2 Enlarged area 3 Histogram 4 Open the selected file 5 Histogram button 6 Rotate to the left Rotate to the right 7 Move to the previous file Move to the next file 8 Fit the photo to the screen 9 View th...

Страница 98: ...n the computer Playback Editing 97 ViewingVideos 6 8 5 4 3 1 2 7 No Description 1 File name 2 Adjust the volume 3 Open the selected file 4 Move to the next file 5 Stop 6 Pause 7 Move to the previous file 8 Progress bar ...

Страница 99: ...Settings menu 99 Accessing the settings menu 99 Sounds 100 Display 100 Connectivity 101 General 102 Settings Refer to options to configure your camera s settings ...

Страница 100: ...essing the settings menu 1 Rotate the mode dial to 2 Select a menu Settings Sounds Display Connectivity General Icon Description Sounds Set various camera sounds and the volume p 100 Display Customize the display settings p 100 Connectivity Set the connection options p 101 General Change the settings for the camera system such as memory format and default file name p 102 Settings menu Learn to con...

Страница 101: ...p you compose a scene Off 2 X 2 3 X 3 Cross Diagonal Date Time Display Set whether or not to display the date and time on the camera s display Off On Help Display Display a brief description of an option or menu Off On Sounds Default Item Description Volume Set the volume of all sounds Off Low Medium High Beep Sound Set the sound the camera emits when you press the buttons or switch modes Off On S...

Страница 102: ... cable NTSC 1080i 720p 480p PAL 1080i 720p 576p If the HDTV does not support the selected resolution the HDTV automatically selects the next lower resolution i Launcher Set i Launcher to launch automatically when you connect your camera to your computer Off On Default Item Description Display Brightness Adjust the brightness of the screen Auto Dark Normal Bright Normal is fixed in Playback mode ev...

Страница 103: ...OTO to 999PHOTO each time a folder is full The maximum number of files that can be stored in one folder is 9 999 The camera defines file names according to the Design rule for Camera File system DCF standard If you intentionally change file names the camera may not play back the files General Default Item Description Language Set a language for the display text Time Zone Set the time zone for your...

Страница 104: ...em Description Imprint Set whether or not to display the date and time on captured photos Off Date Date Time The date and time will be displayed on the bottom right corner of the photo Some printer models may not print the date and time properly The photo will not display the date and time if you select Text in mode you select mode Auto Power Off Set the camera to automatically turn off when you p...

Страница 105: ... 106 Using or storing the camera 107 About memory cards 109 About the battery 112 Before contacting a service center 114 Camera specifications 117 Glossary 121 FCC notice 126 Index 127 Appendixes Get information about error messages specifications and maintenance ...

Страница 106: ...ndard Transfer the files from the memory card to your computer and format the card Then open the Settings menu and select General File No Reset p 102 Error message Suggested remedies File Error Delete the damaged file or contact a service center File system not supported Your camera does not support the FAT file structure of the inserted memory card Format the memory card on the camera Low Battery...

Страница 107: ...ust remains apply lens cleaning liquid to a piece of lens cleaning paper and wipe gently Camera body Wipe gently with a soft dry cloth Never use benzene thinners or alcohol to clean the device These solutions can damage the camera or cause it to malfunction Do not press on the lens cover or use a blower brush on the lens cover Camera maintenance ...

Страница 108: ... wet hands Operating the camera with wet hands may cause damage to your camera Storing for extended period of time When you store the camera for an extended period place it in a sealed container with an absorbent material such as silica gel Batteries discharge even when the camera is not being used Ensure that you replace the batteries with new AA alkaline batteries if you use the camera again aft...

Страница 109: ...struck or dropped This is to protect the memory card Turn on the camera to use it again While you use the camera it may heat up This is normal and should not affect your camera s lifespan or performance When you use the camera in low temperatures it may take some time to turn on the color of the display may be changed temporarily or after images may appear These conditions are not malfunctions and...

Страница 110: ...r microSDXC memory cards Terminal Write protect switch Label front You can prevent files from being deleted by using the write protect switch on an SD SDHC or SDXC card Slide the switch down to lock or slide it up to unlock Unlock the card when capturing photos and videos Memory card adapter Memory card To use micro memory cards with this product a PC or a memory card reader insert the card into a...

Страница 111: ...l 228 353 525 249 366 555 290 462 647 290 462 669 431 669 911 746 1 138 1 485 1 138 1 752 2 136 1 485 2 136 2 734 2 555 3 179 3 461 Video Size 30fps 1280 X 720 Approx 15 46 640 X 480 Approx 30 54 320 X 240 Approx 90 00 The figures above are measured without using the zoom function Available recording time may vary if you use the zoom Several videos were recorded in succession to determine the tota...

Страница 112: ... new memory card Do not bend drop or subject memory cards to heavy impact or pressure Avoid using or storing memory cards near strong magnetic fields Avoid using or keeping memory cards in areas with high temperature high humidity or corrosive substances Prevent memory cards from making contact with liquids dirt or foreign substances If dirty wipe the memory card clean with a soft cloth before you...

Страница 113: ...normal in milder temperatures Remove the batteries from your camera when storing it for an extended period Installed batteries may leak or corrode over time and cause serious damage to your camera Primary cells cannot be recharged If you try to recharge it the batteries may leak Battery capacity may vary by manufacturer Cautions about using the battery Protect batteries and memory cards from damag...

Страница 114: ...leave it in any confined space for a prolonged period Do not allow battery terminals to come in contact with metallic objects such as necklaces coins keys or watches Use only authentic manufacturer recommended batteries Do not disassemble or puncture the battery with any sharp object Avoid exposing the battery to high pressure or crushing forces Avoid exposing the battery to major impacts such as ...

Страница 115: ... or insert a new card Format the memory card The memory card is defective Get a new memory card Make sure that the camera is switched on Replace the batteries Make sure that the battery is inserted correctly The camera freezes Remove the battery and insert it again The camera heats up While you use the camera it may heat up This is normal and should not affect your camera s lifespan or performance...

Страница 116: ...ing memory cards for more detail p 111 Cannot play back files If you change the name of a file your camera may not play the file the name of the file should meet the DCF standard If you encounter this situation play back the files on your computer Situation Suggested remedies The photo is blurry Make sure that the focus option you set is suitable for close up shots p 61 Make sure that the lens is ...

Страница 117: ...rogram that you can install with the i Launcher program on your computer Situation Suggested remedies i Launcher is not functioning properly End i Launcher and restart the program Make sure that i Launcher is set to On in the settings menu p 101 Depending on your computer s specifications and environment the program may not launch automatically In this case click Start All Programs Samsung i Launc...

Страница 118: ...e TFT LCD Feature 3 0 76 2 mm 460K Focusing Type TTL Auto Focus Center AF Multi AF Selection AF Tracking AF Face Detection AF Camera specifications Range Wide W Tele T Normal AF 31 in 80 cm infinity 138 in 350 cm infinity Macro 4 31 in 10 80 cm 79 138 in 200 350 cm Auto Macro 4 in 10 cm infinity 79 in 200 cm infinity Super Macro 0 4 4 in 1 10 cm Only zoom level 9 Shutter speed Auto 1 8 1 2 000 sec...

Страница 119: ...ite Balance Auto WB Daylight Cloudy Fluorescent_H Fluorescent_L Tungsten Custom Set Color Temp Date Imprinting Date Time Date Off Shooting Photos Modes Smart Auto Portrait Night Portrait Backlight Portrait Night Backlight Landscape White Natural Green Blue Sky Sunset Macro Macro text Macro Color Tripod Action Program Scene Beauty Shot Frame Guide Night Portrait Children Landscape Close up Text Sun...

Страница 120: ... Old Film Classic Retro Videos Edit Still image capture Time trimming Storage Media Internal memory Approximately 53MB External memory Optional SD card 2 GB guaranteed SDHC card up to 32 GB guaranteed SDXC card up to 64 GB guaranteed Internal memory capacity may not match these specifications File format Still Image JPEG DCF EXIF 2 21 Movie Clip MP4 Video MPEG 4 AVC H 264 Audio AAC Image size Icon...

Страница 121: ...er source Battery AA Alkaline Batteries Connector type Micro USB 5 pin The power source may differ depending on your region Dimensions W X H X D 4 5 X 3 1 X 3 4 in 114 48 X 79 26 X 86 45 mm without protrusions Weight 13 6 oz 385 g without battery and memory card OperatingTemperature 0 40 C 32 104 F Operating Humidity 5 85 Software i Launcher Specifications may change without notice to improve perf...

Страница 122: ...ens Optical zoom When using the Digital zoom the image quality will deteriorate as the magnification increases ACB Auto Contrast Balance This feature automatically improves the contrast of your images when the subject is backlit or when there is a high contrast between your subject and the background AEB Auto Exposure Bracket This feature automatically captures several images at different exposure...

Страница 123: ...ains a photosite for each pixel in the image Each photosite records the brightness of the light that strikes it during an exposure Common sensor types are CCD Charge coupled Device and CMOS Complementary Metal Oxide Semiconductor DIS Digital Image Stabilization This feature compensates in real time for shaking and vibrating while shooting There can be a certain amount of image degradation compare ...

Страница 124: ...file size ISO sensitivity The sensitivity of the camera to light based on the equivalent film speed used in a film camera At higher ISO sensitivity settings the camera uses a higher shutter speed which can reduce blur caused by camera shake and low light However images with high sensitivity are more susceptible to noise JPEG Joint Photographic Experts Group A lossy method of compression for digita...

Страница 125: ...ture before it reaches the image sensor A fast shutter speed allows less time to let light in and the photo becomes darker and more easily freezes subjects in motion Vignetting A reduction of an image s brightness or saturation at the periphery outer edges compared to the center of the image Vignetting can draw interest to subjects positioned in the center of an image White balance color balance A...

Страница 126: ...c accessories should not be mixed with other commercial wastes for disposal PlanetFirst represents Samsung Electronics commitment to sustainable development and social responsibility through eco driven business and management activities Correct disposal of batteries in this product Applicable in countries with separate collection systems This marking on the battery manual or packaging indicates th...

Страница 127: ...ause harmful interference to radio or television reception which can be determined by turning the equipment off and on the user is encouraged to try to correct the interference by one or more of the following measures Reorientate or relocate the receiving antenna Increase the distance between the equipment and receiver Connect the equipment into an outlet on a circuit different from that to which ...

Страница 128: ...7 Shooting mode 68 Burst modes Auto Exposure Bracket AEB 72 Continuous 72 Motion Capture 72 C Camera maintenance 106 Camera specifications 117 Capturing an image from video 84 Cleaning Camera body 106 Display 106 Lens 106 Connecting to a computer Mac 92 Windows 91 Contrast Playback mode 87 Shooting mode 73 D Date Time Set 102 Deleting files 79 Digital zoom 32 Disconnecting the camera 91 Display br...

Страница 129: ...e Guide 43 G Guide Line 100 H Half press shutter 35 HDMI Size 101 HDTV 90 I Icons Playback mode 76 Shooting mode 23 i Launcher 93 Image Adjustment ACB 87 Brightness Playback mode 87 Shooting mode 68 Contrast Playback mode 87 Shooting mode 73 Red eye 88 Saturation Playback mode 87 Shooting mode 73 Sharpness 73 Image quality 55 Imprint 103 Intelli zoom 33 ISO sensitivity 60 L Language settings 102 M...

Страница 130: ...Reset 103 Resolution Playback mode 85 Shooting mode 54 Retouching faces Playback mode 88 Shooting mode 42 Rotating 85 O Open source licenses 103 Optical Image Stabilization OIS 34 Optional accessories 14 P Panorama mode 45 Playback button 17 Playback mode 76 POWER button 15 Program mode 40 Protecting files 79 Q Quick view 101 Magic Plus mode Magic Frame 47 Movie Filter 50 Photo Filter 49 Split Sho...

Страница 131: ...T Thumbnails 77 Timer Shooting mode 56 Timer lamp 15 Time settings 21 Time zone settings 21 102 Transferring files Mac 92 Windows 91 Tripod mount 16 U Unpacking 14 USB port 15 V Video Playback mode 83 Shooting mode 51 Video out 101 Viewing files Category 78 HDTV 90 Panoramic photos 81 Slide show 82 Thumbnails 77 TV 89 W White Balance 70 Z Zoom Using the zoom 32 Zoom button 16 Zoom sound settings 7...

Страница 132: ...Please refer to the warranty that came with your product or visit our website www samsung com for after sales service or inquiries ...

Отзывы: