background image

maintaining your washer


_21

maintaining your washer

CLEANING THE EXTERIOR

Turn off the water faucets after finishing the day’s washing.
This will shut off the water supply to your washer and prevent the unlikely possibility of damage from 
escaping water. Leave the door open to allow the inside of your washer to dry out.
Use a soft cloth to wipe up all detergent, bleach or other spills as they occur.
Clean the following as recommended:
Control Panel – Clean with a soft, damp cloth. Do not use abrasive powders or cleaning pads. Do not spray 
cleaners directly on the panel.
Cabinet – Clean with soap and water.

CLEANING THE INTERIOR

Clean the interior of your washer periodically to remove any dirt, soil, odor, mold, mildew, or bacterial 
residue that may remain in your washer as a result of washing clothes.
Failure to follow these instructions may result in unpleasant conditions, including odors and/or permanent 
stains on your washer or laundry.
Hard water deposits may be removed, if needed. Use a cleaner labeled “washer safe”.

CLEANING THE DISPENSERS

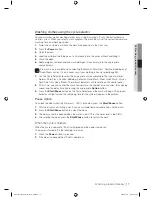
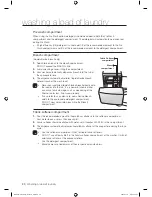
The Automatic Dispenser may need to be cleaned periodically due to 
laundry additive buildup.

1. 

Press the release lever on the inside of the dispenser and pull out.

2. 

Remove the Siphon Cap from the fabric softener and bleach 
compartments.

3. 

Wash all of the parts under running water.

4. 

Clean the dispenser recess with a soft brush.

5. 

Reinsert the Siphon Cap and push it firmly into place.

6. 

Push the dispenser back into place.

7. 

Run a Rinse & Spin cycle without any load in your washer.

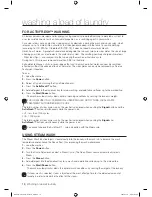
STORING YOUR WASHER

washers can be damaged if water is not removed from hoses and internal components before storage. 
Prepare your washer for storage as follows:

• 

Select the Quick Wash cycle and add bleach to the automatic dispenser. Run your washer through the 
cycle without a load.

• 

Turn the water faucets off and disconnect the inlet hoses.

• 

Unplug your washer from the electrical outlet and leave your washer door open to let air circulate inside 
the tumbler.

• 

If your washer has been stored in below–freezing temperatures, allow time for any leftover water in your 
washer to thaw out before use.

04 maintaining your washer

Siphon cap

BEST-WF419AAW-02657A_EN.indd   21

2009-02-18   ¿ÀÈÄ 3:26:49

Содержание VRT STEAM WF419AAW

Страница 1: ...al imagine the possibilities Thank you for purchasing this Samsung product To receive more complete service please register your product at www samsung com register WF419AAW BEST WF419AAW 02657A_EN indd 1 2009 02 18 ÀÈÄ 3 26 39 ...

Страница 2: ...splay Center jog dial The jog dial enables you to select cycles in both directions with ease and the display is easy to use and understand 7 DD Motor The power to handle anything Our direct drive inverter motor delivers power right to the washer tub from a variable speed reversible motor A beltless direct drive motor generates a higher spin speed of 1 200rpm for more effective quiet operation The ...

Страница 3: ...nd unloading It also offers a built in storage drawer that can hold a 100 oz bottle of detergent 10 Stacking Model No SK 3A1 XAA SK 4A XAA SK 5A XAA Samsung washer and dryer can be stacked to maximize usable space An optional stacking kit is available for purchase from your Samsung retailer Pedestal with Storage Drawers Stacking BEST WF419AAW 02657A_EN indd 3 2009 02 18 ÀÈÄ 3 26 40 ...

Страница 4: ...result in minor personal injury or property damage CAUTION To reduce the risk of fire explosion electric shock or personal injury when using your washer follow these basic safety precautions Do NOT attempt Do NOT disassemble Do NOT touch Follow directions explicity Unplug the power plug from the wall socket Make sure the machine is grounded to prevent electric shock Call the service center for hel...

Страница 5: ...or service any part of your washer yourself unless you fully understand the recommended user repair instructions and have the skills to carry them out Work done by an unauthorized person may void your warranty Store laundry detergents and other laundry supplies in a cool dry place out of children s reach Do not wash or dry items that are soiled with vegetable or cooking oil These items may contain...

Страница 6: ...6 Garment 16 My cycle 17 Washing clothes using the cycle selector 18 For ActivFresh washing 18 Using steam wash 19 Detergent use 19 Features MAINTAINING YOUR WASHER 21 21 Cleaning the exterior 21 Cleaning the interior 21 Cleaning the dispensers 21 Storing your washer 22 Cleaning the debris filter 22 Preserving the top cover and the front frame TROUBLESHOOTING 23 23 Check these points if your washe...

Страница 7: ...ng the unit Packing materials can be dangerous to children keep all packing material plastic bags polystyrene etc well out of the reach of children OVERVIEW OF YOUR WASHER Parts Supplied Wrench Bolt Hole Covers Water Supply Hoses Rubber Washers Hose Guide Plastic Zip Hose Tie Manual Book Tools Needed Pliers Flat screwdriver 01 Installing your washer WARNING Adjustable legs Cold water supply hose H...

Страница 8: ...rical Code ANSI FNPA No 70 Latest Revision and local codes and ordinances It is the personal responsibility of the appliance owner to provide adequate electrical service for this appliance Never connect ground wire to plastic plumbing lines gas lines or hot water pipes Water To correctly fill your washer in the proper amount of time water pressure of 20 116psi 137 800kPa is required Water pressure...

Страница 9: ... move slightly during the spin cycle Never install your washer on a platform or weakly supported structure Location consideration Do not install your washer in areas where water may freeze since your washer will always maintain some water in its water valve pump and hose areas This can cause damage the belts the pump hoses and other components Alcove or closet installation MINIMUM CLEARANCES FOR C...

Страница 10: ...wrench 2 Slide the bolt and spacer up and remove the bolt with the spacer through the hole in the rear wall of your washer Repeat for each bolt 3 Fill the holes with the supplied bolt hole covers page 7 4 Keep the shipping bolts and spacers for future use STEP 2 Selecting a Location Before you install your washer make sure the location Has a hard level surface Is away from direct sunlight Has adeq...

Страница 11: ...plings 3 Check the inlet hose to ensure a washer is inside each fill hose Thread the inlet hoses to the HOT and COLD faucet connections On the other end of the hose check for one rubber washer per hose and install each fill hose to the water valve Make sure the hose with the Hot printed line is attached to the HOT faucet Tighten by hand until snug then two thirds of a turn with pliers For correct ...

Страница 12: ...g the leveling legs in or out as necessary by hand or by using the wrench included with your washer When your washer is level tighten the locking nuts using the wrench or flathead screwdriver Your washer must be leveled on all four sides A carpenter s level should be used on all four corners of your washer It s a good idea after the first dozen washes to recheck your washer s levelness Avoid damag...

Страница 13: ...sing the ActivFresh Option which sanitizes using cold water GETTING STARTED 1 Load your washer 2 Close the door Push the laundry into the drum completely to prevent the laundry from being caught in the door or from falling out of the drum 3 Press the Power button 4 Add detergent and additives to the dispenser page 20 21 5 Select the appropriate cycle and options for the load page 14 16 6 Press the...

Страница 14: ...s bras lingerie silk and other handwash only fabrics For best results use liquid detergent Hand Wash For handwashable special care garments Wool For machine washable wool Loads should be under 8 pounds The Wool course washes laundry by moving the wash tub horizontally to maintain the characteristics of the wool fibers and to prevent damaging the cloth It then stops for a while to allow the laundry...

Страница 15: ...avily soiled colorfast items Only available with the Sanitize cycle Hot Cold Whites and heavily soiled colorfast items Warm Warm Colorfast items When warm rinse is selected only the final rinse will be warm The other rinses will be cold to conserve energy Warm Cold Moderately soiled colorfast items most wrinkle free items Cold Cold Brightly colored very lightly soiled items Spin selection button P...

Страница 16: ...ing the Start Pause button unlocks the door unless the water is too hot or if there is too much water in your washer If you are able to unlock the door and wish to continue the wash cycle close the door and press the Start Pause button My cycle Allows you to activate your custom wash temperature spin soil level etc with one button convenience By pushing the My Cycle button you activate the setting...

Страница 17: ...Spin Spin Only Deep Steam The relevant indicators will illuminate on the control panel 8 At this time you can control the wash temperature the number of rinse cycles the spinning speed and the delay time by pressing the appropriate Option button 9 Press the Start Pause button on the Cycle Selector and the wash will begin The process indicator will light up and the remaining time for the cycle will...

Страница 18: ...g and add fabric softener up to the marked line 6 Press the Start Pause button The washer automatically selects optimal washing conditions by sensing the laundry s weight FOR HOME USE ONLY COMMERCIAL USERS SHOULD NOTIFY THEIR LOCAL WASTE TREATMENT AUTHORITIES BEFORE USE The total number of silver cycles run by the washer is displayed when pushing the Signal button and the ActivFresh button simulta...

Страница 19: ... before starting your washer The automatic dispenser MUST ALWAYS be in place before starting your washer DO NOT open the automatic dispenser when your washer is running To use 1 Pull out the dispenser drawer on the left side of the control panel 2 Add the recommended quantity of additive to the appropriate compartments with laundry additives and be careful not to overfill or spill 3 Slide the disp...

Страница 20: ...s a powerful chemical and can cause fabric damage such as weakening of the fibers or color loss if not used properly If you prefer to use color safe non chlorine bleach add it to the appropriate detergent compartment DO NOT pour color safe bleach into the Bleach compartment Fabric softener compartment 1 Pour the recommended amount of liquid fabric softener into the softener compartment For smaller...

Страница 21: ...ed washer safe CLEANING THE DISPENSERS The Automatic Dispenser may need to be cleaned periodically due to laundry additive buildup 1 Press the release lever on the inside of the dispenser and pull out 2 Remove the Siphon Cap from the fabric softener and bleach compartments 3 Wash all of the parts under running water 4 Clean the dispenser recess with a soft brush 5 Reinsert the Siphon Cap and push ...

Страница 22: ...bris filter is not blocked 6 To assemble the filter cap align the projected part of the filter cap to your 12 o clock on an imaginary clock and turn it clockwise 7 Replace the debris filter cap 8 Replace the filter cover PRESERVING THE TOP COVER AND THE FRONT FRAME Do not place any heavy or sharp objects or a detergent box on the washer Keep them on the purchased pedestal or in a separate storage ...

Страница 23: ... washer is running with sufficient water pressure Make sure the Detergent Selector dial is in the upper position when using granular detergent Vibrates or is too noisy Make sure your washer is set on a level surface If the surface is not level adjust your washer feet to level the appliance Make sure that the shipping bolts are removed Make sure your washer is not touching any other object Make sur...

Страница 24: ...r door will remain locked during the heating portion of the Sanitize Cycle It may take a few moments for the door lock mechanism to disengage Does not drain and or spin Check the fuse or reset the circuit breaker Straighten the drain hoses Eliminate kinked hoses If there is a drain restriction call for service Close the door and press the Start Pause button For your safety your washer will not tum...

Страница 25: ...urn off your washer then turn it on again If the code reappears call for service E3 Motor not running properly Restart the cycle by pressing the Start Pause button If the code reappears call for service nd Your washer is not draining It can also mean that the unit senses a small clog while draining Before calling for service check the following Clean the filter page 19 or 1 Turn off the unit for 1...

Страница 26: ... MAIN PBA Call for service SF1 SF2 SF3 System error Call for service SUdS Too many suds are detected during the washing session The unit is put on hold until the suds are reduced Then the unit will go back to the operation When it finishes washing End and SUdS codes will blink in turn To prevent it cut down on detergents For any codes not listed above call 1 800 726 7864 1 800 SAMSUNG troubleshoot...

Страница 27: ...ine color safe Bleach when needed High Drip Dry Tumble Dry Cycle Medium Dry Flat Normal Low For machine washable wool Loads should be under 8 pounds Permanent Press Wrinkle Resistant Wrinkle Control Gentle Delicates The dot symbols represent appropriate wash water temperatures for various items The temperature range for Hot is 105 125 F 41 52 C for Warm 85 105 F 29 41 C and for Cold 60 85 F 16 29 ...

Страница 28: ... Garment Child Lock EH C H C W W W C C C EH H M L NS H N L Normal 58 Heavy Duty 104 Perm Press 52 Sanitize 117 Bedding 76 Deep Steam 108 Delicates 45 Hand Wash 45 Wool 60 Quick Wash 29 Rinse Spin 19 Spin Only 12 Temp Spin Soil Level EH C Extra Hot Cold H C Hot Cold W W Warm Warm W C Warm Cold C C Cold Cold EH Extra High H High M Medium L Low NS No Spin H Heavy N Normal L Light appendix BEST WF419A...

Страница 29: ...cycle only when necessary Save water and electricity by only washing full loads the exact amount depends upon the program used Use ActivFresh instead of Hot Water Sanitization to save energy DECLARATION OF CONFORMITY This appliance complies with UL2157 SPECIFICATION TYPE FRONT LOADING WASHER DIMENSIONS Div Inch cm A Height Overall 39 99 1 B Width 27 68 6 C Depth with door open 90 51 7 131 4 D Dept...

Страница 30: ...ulated herein with new or reconditioned parts or products if found to be defective during the limited warranty period specified above All replaced parts and products become the property of SAMSUNG and must be returned to SAMSUNG Replacement parts and products assume the remaining original warranty or ninety 90 days whichever is longer This limited warranty covers manufacturing defects in materials...

Страница 31: ...OF THE PRODUCT SOLD BY SAMSUNG AND CAUSING THE ALLEGED DAMAGE WITHOUT LIMITING THE FOREGOING PURCHASER ASSUMES ALL RISK AND LIABILITY FOR LOSS DAMAGE OR INJURY TO PURCHASER AND PURCHASER S PROPERTY AND TO OTHERS AND THEIR PROPERTY ARISING OUT OF THE USE MISUSE OR INABILITY TO USE THIS PRODUCT THIS LIMITED WARRANTY SHALL NOT EXTEND TO ANYONE OTHER THAN THE ORIGINAL PURCHASER OF THIS PRODUCT IS NONT...

Страница 32: ...MMENTS Country CALL OR VISIT US ONLINE AT U S A 1 800 SAMSUNG 726 7864 www samsung com us MEXICO 01 800 SAMSUNG 726 7864 www samsung com mx Code No DC68 02657A_EN BEST WF419AAW 02657A_EN indd 32 2009 02 18 ÀÈÄ 3 26 52 ...

Отзывы: