background image

Extended functions

  38

Shooting modes

Set other options as desired. (For options, refer to 

“Shooting options.”)

Press [

Shutter

] to start recording.

Press [

Shutter

] again to stop recording.
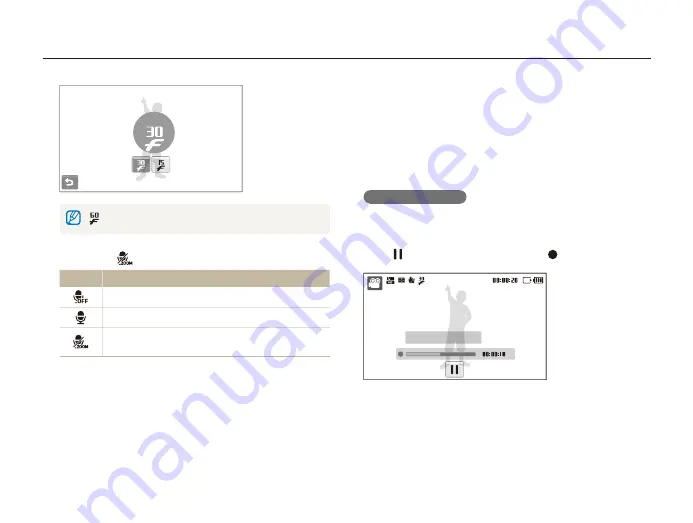
  To pause recording  

The camera allows you to pause temporarily while recording a 
video. With this function, you can record your favorite scenes as 
a single video.

Select   to pause while recording. Select   to resume.

Stop: Shutter

30 FPS

 is available only when the video resolution is 320 X 240.

Select 

>


“


“

an option.

Option

Description

Off

: Record a video without sound.

On

: Record a video with sound.

Zoom Mute

: Record a video without sound while 

zooming.

Содержание Vluu ST600

Страница 1: ...age instructions for your camera Please read this manual thoroughly Click a topic Common questions Quick reference Contents Basic functions Extended functions Shooting options Playback Editing Setting...

Страница 2: ...f the reach of small children and animals Small parts may cause choking or serious injury if swallowed Moving parts and accessories may present physical dangers as well Prevent damage to subjects eyes...

Страница 3: ...and consult a doctor Safety precautions Handle and store your camera carefully and sensibly Do not allow your camera to get wet liquids can cause serious damage Do not handle your camera with wet han...

Страница 4: ...ens from ngerprints and scratches Clean your lens with a soft clean debris free lens cloth Protect batteries chargers and memory cards from damage Avoid exposing batteries or memory cards to very cold...

Страница 5: ...must be recharged before use Disconnect chargers from power sources when not in use Use batteries only for their intended purpose Exercise caution when using the camera in humid environments When tra...

Страница 6: ...Source License information refer to the OpenSourceInfo pdf in the provided CD ROM Organization of the user manual Basic functions 13 Learn about your camera s layout icons and basic functions for shoo...

Страница 7: ...n this manual Icon Function Additional information Safety warnings and precautions Camera buttons For example Shutter represents the shutter button Page number of related information The order of opti...

Страница 8: ...mal or still life Background the objects around the subject Composition the combination of a subject and background Subject Background Composition Expressions used in this manual Exposure Brightness T...

Страница 9: ...alfway down to make sure the subject is focused p 29 Use the d mode p 36 Photos are blurred when shooting at night As the camera tries to let in more light the shutter speed slows This can make it dif...

Страница 10: ...1 EV to adjust exposure f 59 ACB to compensate for subjects against bright backgrounds f 60 Metering f 61 AEB to take 3 photos of the same scene with different exposures f 64 Applying a different effe...

Страница 11: ...on 43 Recording a video with the front display 43 Recording voice memos 44 Recording a voice memo 44 Adding a voice memo to a photo 44 Basic functions 13 Unpacking 14 Camera layout 15 Inserting the ba...

Страница 12: ...60 Changing the metering option 61 Selecting a light source White balance 62 Using burst modes 64 Improving your photos 65 Applying photo styles 65 Applying smart lter effects 66 Adjusting your photos...

Страница 13: ...ngs menu 98 Sound 99 Display 99 Settings 100 Appendixes 103 Error messages 104 Camera maintenance 105 Cleaning your camera 105 About memory cards 106 About the battery 107 Before contacting a service...

Страница 14: ...g the touch screen 21 Selecting a shooting mode 22 Selecting a shooting mode using motion recognition 23 Setting the touch screen and sound 24 Setting the display type for the touch screen 24 Setting...

Страница 15: ...following items Camera AC adapter USB cable Rechargeable battery Strap Cleaner User Manual CD ROM Quick Start Manual Optional accessories Camera case Memory card microSDTM A V cable Battery charger HD...

Страница 16: ...s parts and their functions Battery chamber cover Insert a memory card and battery Tripod mount Speaker Shutter button POWER button Lens Microphone Front LCD button AF assist light timer lamp Flash Fr...

Страница 17: ...photo or video being read by a computer or printer or out of focus Steady When connecting to a computer or in focus Zoom button Zoom in or out Zoom in on part of a photo or view les as thumbnails Play...

Страница 18: ...card until the card disengages from the camera and then pull it out of the slot Push the lock up to release the battery The internal memory can be used as a temporary storage device when the memory c...

Страница 19: ...back mode Press P The camera turns on and accesses Playback mode immediately When you turn on your camera by pressing and holding P for about 5 seconds the camera does not emit any camera sounds Charg...

Страница 20: ...Time Set Set the date and time and select 6 Date Time Set Select 7 Date Type and a date format Language Time Zone Date Time Set Date Type YYYY MM DD MM DD YYYY DD MM YYYY Off Select 8 to switch to th...

Страница 21: ...d will change according to the mode you select or the options you set 1 Status icons Icon Description p Shooting mode Aperture and shutter speed Photo resolution Video resolution Metering Optical Imag...

Страница 22: ...screen When you touch or drag on the screen discolorations may occur It is not a malfunction but a characteristic of the touch screen Touch or drag lightly to reduce these effects The touch screen ma...

Страница 23: ...ects p 32 a Auto Take a photo quickly and easily with minimal settings p 25 p Program Take a photo by setting options p 37 s Scene Take a photo with options preset for a speci c scene p 33 d DUAL IS T...

Страница 24: ...amera parallel to the ground as shown below Selecting a shooting mode using motion recognition Your camera features a built in motion sensor that allows you to quickly switch the shooting mode by tilt...

Страница 25: ...select 1 M Select 2 Beep Sound Select an option 3 Option Description Off The camera will not emit any sounds On The camera emits sounds Select 4 to return to the previous mode Setting the display type...

Страница 26: ...de Make sure that the camera is in 1 a mode Auto the camera s default shooting mode If not select the mode icon t a Align your subject in the frame 2 Half press 3 Shutter to focus A green frame means...

Страница 27: ...make taking pictures of children easier p 41 Couple Shot Take photos of couples automatically when they lean in toward each other p 41 Jump Shot Show a visual cue on the front display so jumping subj...

Страница 28: ...e when using S s in some scenes d D and v modes and when used with Face Detection and Smart Filter It may take longer to save a photo when using the digital zoom Zooming You can shoot close up photos...

Страница 29: ...e your camera to follow a moving subject You use digital zoom There is too much camera shake The shutter speed is slow For example when you select Night in s mode The battery is low You take a close u...

Страница 30: ...nge the frame and half press Shutter again if displayed in red Reducing camera shake Set the Optical Image Stabilization option to reduce camera shake optically p 28 Select the d mode to reduce camera...

Страница 31: ...ind the subject is too bright The subject is shiny The subject includes horizontal patterns such as blinds The subject is not positioned in the center of the frame Use the focus lock Half press Shutte...

Страница 32: ...etection mode 39 Taking photos with the front display 40 Using the Self portrait mode 40 Using the Children mode 41 Using the Couple mode 41 Using the jump shot timer 42 Using the function information...

Страница 33: ...n the camera and subject are stable for a while This is available only when you are shooting in the dark Appears when taking photos of actively moving subjects Appears when taking photos of reworks Th...

Страница 34: ...de on page 35 Align your subject in the frame and half press 3 Shutter to focus Press 4 Shutter to take the photo Half press 3 Shutter to focus Press 4 Shutter to take the photo If the camera does not...

Страница 35: ...frame and half press 4 Shutter to focus Press 5 Shutter to take the photo The focus distance will be set to Auto Macro Using the Beauty Shot mode Take a photo of a person with options to hide facial i...

Страница 36: ...want another person to take a photo of you you can compose the scene with the frame guide feature The frame guide will help the other person take a photo of you by showing the part of the pre compose...

Страница 37: ...his mode The camera will correct photos optically only when you take them with a light source that is brighter than uorescent light If your subject is moving rapidly the photo may be blurry Set the Op...

Страница 38: ...or high speed videos use memory cards with fast writing speed When the Optical Image Stabilization is activated your video may be recorded with the OIS operation sound The zoom sound may be recorded i...

Страница 39: ...a allows you to pause temporarily while recording a video With this function you can record your favorite scenes as a single video Select to pause while recording Select to resume Stop Shutter 30 FPS...

Страница 40: ...style and smart lter options are not available in D mode Using the Smart Scene Detection mode In this mode your camera automatically chooses the appropriate camera settings based on a detected type of...

Страница 41: ...gain or press the front LCD button to turn it off Press 3 Shutter to take the photo Using the Self portrait mode Take photos of yourself conveniently using the front display The camera automatically t...

Страница 42: ...ng com for more information You can add sounds to animations to draw children s attention p 99 S a p s d Using the Couple mode This mode detects two subjects leaning in toward each other and automatic...

Страница 43: ...ts when to jump In Shooting mode press the front LCD button and 1 select Press 2 Shutter The front display will start the countdown a few seconds before shooting S a p s d Jump when the jump icon appe...

Страница 44: ...er half press In Shooting mode press the front LCD button and 1 select Half press 2 Shutter to focus and then the smile icon appears Press 3 Shutter to take the photo S a p s d S a p s d Recording a v...

Страница 45: ...a photo 2 The camera begins to record a voice memo right after you take the photo Record a short voice memo 10 seconds maximum 3 Press Shutter to stop recording a voice memo You cannot add voice memo...

Страница 46: ...sing face detection 55 Detecting faces 55 Taking a smile shot 56 Detecting eye blinking 56 Using smart face recognition 57 Registering faces as your favorites My Star 57 Adjusting brightness and color...

Страница 47: ...Print on A3 paper 2560 X 1920 Print on A4 paper 2048 X 1536 Print on A5 paper 1920 X 1080 Print on A5 paper in panorama ratio 16 9 or play back on an HDTV 1024 X 768 Attach to an email Selecting a re...

Страница 48: ...ck high quality les on an HDTV 1280 X 720 Play back on an HDTV 640 X 480 Play back on a general TV 320 X 240 Post on a web page Selecting image quality Photos you take are compressed and saved in JPEG...

Страница 49: ...t the timer icon or press Shutter to cancel the timer Depending on the selected face defection option the timer may not available or some timer options are not available In Shooting mode select 1 Sele...

Страница 50: ...ay from the camera Your movements are too subtle There is too much light or backlight The subject is close enough to re ect the AF light Using the motion timer In Shooting mode select 1 Press 2 Shutte...

Страница 51: ...l not re Camera shake warning will be displayed when shooting in low light Auto The camera will select a proper ash setting for the detected scene in the S mode Auto The ash res automatically when the...

Страница 52: ...rk The camera reduces red eyes Fill in The ash always res Light intensity is adjusted automatically Slow Sync The ash res and the shutter stays open longer Select this when you want to capture ambient...

Страница 53: ...ect farther than 80 cm farther than 80 cm when using zoom Auto Macro Focus on a subject farther than 5 cm farther than 50 cm when using zoom Macro Focus on a subject 5 80 cm 50 80 cm when using zoom T...

Страница 54: ...subject you must reselect the subject to track If the camera fails to x the focus the focus frame will change to a red single line frame If you use this function you cannot set face detection photo st...

Страница 55: ...mage on the screen Touch and hold the subject to take the photo Smart Touch AF Focus on and track the subject that you touch on the screen p 53 The options may differ depending on the shooting mode a...

Страница 56: ...ooting options In some scene modes face detection is unavailable Face detection may not be effective when The subject is far from the camera The focus frame will appear orange for Smile Shot and Blink...

Страница 57: ...elect f Hold your camera still while Capturing is displayed on the screen When blink detection fails Picture taken with eyes closed message appears Take another photo Taking a smile shot The camera au...

Страница 58: ...ters faces that you frequently photograph This feature will automatically prioritize the focus on those faces and favorite faces This feature is available only when you use a memory card In Shooting m...

Страница 59: ...an register up to 6 favorite faces The ash option will be set to Off If you register the same face twice you can delete one of the faces in the face list Viewing your favorite faces In Shooting mode s...

Страница 60: ...2 2 1 0 0 2 1 EV p d v Adjusting brightness and color Learn how to adjust the brightness and color for better image quality Select 3 The adjusted exposure value will appear as shown below Once you adj...

Страница 61: ...en Continuous Motion Capture or AEB is in use Compensating for backlighting ACB When the light source is behind your subject or there is high contrast between your subject and the background your subj...

Страница 62: ...frame with emphasis placed on the center Suitable for photos with subjects in the center of the frame Changing the metering option The metering mode refers to the way in which a camera measures the q...

Страница 63: ...ht Fluorescent_L Select when shooting under white uorescent light Tungsten Select when taking indoor photos under incandescent bulbs or halogen lamps Custom Set Use your pre de ned settings p 63 Selec...

Страница 64: ...n customize the white balance by taking photos of a white surface such as a piece of paper This will help you to match the colors in your photo with the actual scene after checking the lighting condit...

Страница 65: ...erexposed and overexposed Use a tripod to prevent blurry photos The options may differ depending on the shooting mode You can use the ash timer and ACB only when you select Single When you select Moti...

Страница 66: ...f Select a color R Red G Green B Blue 2 Custom RGB Adjust the amount of the selected color 3 Select 4 Applying photo styles Apply different styles to your photos such as Soft Vivid or Forest Soft Vivi...

Страница 67: ...be recorded When you apply a smart lter effect while recording a video the recording speed will be set to and the recording resolution will be set to less than If you use this function you cannot set...

Страница 68: ...set the face recognition photo style and smart lter options Adjusting your photos Adjust the sharpness saturation and contrast of your photos In Shooting mode select 1 f twice Select an adjustment opt...

Страница 69: ...F 85 Viewing les on a TV or HDTV 87 Transferring les to your computer for Windows 89 Transferring les using Intelli studio 90 Transferring les by connecting the camera as a removable disk 92 Disconnec...

Страница 70: ...t are too large or those taken with cameras from other manufacturers Starting Playback mode View photos or play videos and voice memos stored in your camera Press 1 Playback The most recent le you hav...

Страница 71: ...for Videos or voice memos Photos with errors or locked photos Photos taken with cameras from other manufacturers Photos taken using the motion capture option set Photos that are too large for the ava...

Страница 72: ...POF Protected le Photo includes a registered face Available only when you use a memory card Favorite le Folder name File name Open the face list p 72 Available only when you use a memory card Delete l...

Страница 73: ...ode select 1 Select to cancel your favorite faces 1 2 1 2 3 4 5 6 Face List 2 Select a face 1 2 3 4 Edit Ranking Select 3 or to change the ranking of the face and select Icon Description Edit photos p...

Страница 74: ...as deleting multiple les or protecting selected les the camera will display all les sorted by category or only those that match the category option Viewing les by category in Smart Album View and mana...

Страница 75: ...hen you drag les in thumbnail mode indication icons may appear after thumbnails have loaded To view les in 3D view In Playback mode select 1 Drag les left or right to scroll through les 2 Drag les lef...

Страница 76: ...e Delete Select les you want to delete 2 Select to select all les on the current screen Select to cancel your selection Select 3 Yes To delete all les In Playback mode select 1 M Select 2 Delete All Y...

Страница 77: ...rge a photo rotate Zoom left to reduce a photo Scroll toward the direction you want to move Icon Description Delete the le Crop the enlarged photo it will be saved as a new le Go back to the original...

Страница 78: ...mode Starting a slide show You can apply effects and audio to your slide show This function does not work for videos or voice memos In Playback mode select 1 Set a slide show effect 2 Option Descript...

Страница 79: ...video to end and select Select 4 Yes The original video should be at least 10 seconds long The edited video will be saved as a new le Playing a video You can play a video capture an image from a vide...

Страница 80: ...ntrol playback 2 Icon Description Scan backward Pause or resume playback Stop playback Scan forward Adjust volume or mute sound Capturing an image during playback Select 1 at the point where you want...

Страница 81: ...o Use the following icons to control playback 2 Icon Description Pause or resume playback Stop playback Adjust volume or mute sound Adding a voice memo to a photo In Playback mode select a photo 1 M S...

Страница 82: ...ill be automatically resized to a lower resolution except when rotating or resizing photos Resizing photos In Playback mode select a photo 1 Select 2 an option Select to save the photo as a start imag...

Страница 83: ...color 3 Custom RGB Select 4 Applying photo styles Apply a different color tone to the photo such as Soft Vivid or Forest The edited photo will be saved as a new le but it could be resized to a lower r...

Страница 84: ...ly various lter effects to your photos to create unique images The edited photo will be saved as a new le but it could be resized to a lower resolution Miniature Vignetting Fish eye 1 Fish eye 2 In Pl...

Страница 85: ...the selected item 3 less or more Select 4 Applying a special effect Apply special effects to the photo such as color lters or noise effects The edited photo will be saved as a new le but it could be...

Страница 86: ...right edges cut off so be aware of the dimensions of your photos You cannot set the DPOF for the photos stored in the internal memory In Playback mode select 1 M Select 2 DPOF an option Option Descrip...

Страница 87: ...scription Select whether to print the photos as thumbnails Select to print photos as thumbnails Specify the size of the print Select 6 or to set the number of copies Select 7 If you specify the print...

Страница 88: ...screen select on the camera screen On some TVs digital noise may occur or part of an image may not appear Images may not appear centered on the TV screen depending on your TV settings Some shooting mo...

Страница 89: ...DTV may vary with the type of microSD TM or microSDHCTM card used A faster microSDTM or microSDHCTM card will not necessarily result in a faster HDMI transfer due to the main function of the card is t...

Страница 90: ...a 7 or Mac OS 10 4 or later to connect the camera as a removable disk Using a self assembled PC or a PC and OS that are not supported may void your warranty The programs may not work properly on 64 bi...

Страница 91: ...Windows 7 select Run iStudio exe from the AutoPlay window Transferring les using Intelli studio Intelli studio will start automatically when you connect the camera to your computer with the USB cable...

Страница 92: ...details select Help Help in the program If you install Intelli studio on your computer the program will launch more quickly To install the program select Tool Install Intelli studio on PC You cannot...

Страница 93: ...ponsible for any loss of data Icon Description 1 Open menus 2 Display les in the selected folder 3 Change to the Photo edit mode 4 Change to the Video edit mode 5 Change to the Sharing mode You can se...

Страница 94: ...he bottom right of your PC screen Click the pop up message 3 Remove the USB cable 4 The camera may not be removed safely when Intelli studio is running End the program before disconnecting the camera...

Страница 95: ...era 2 The computer recognizes the camera automatically and a removable disk icon will be displayed If you set the USB option to Select Mode select Computer from the pop up window Double click the remo...

Страница 96: ...ttings on page 96 Select an option 7 Option Description Current Photo Print the currently selected photo Skip to step 8 Selected Photos Print the photos you want All Photos Print all photos Skip to st...

Страница 97: ...the printing quality Date Set to print the date File Name Set to print the name of the le Reset Reset the print options Some options are not supported by some printers Select 8 or to scroll to a phot...

Страница 98: ...Settings menu 98 Accessing the settings menu 98 Sound 99 Display 99 Settings 100 Settings Refer to options to con gure your camera s settings...

Страница 99: ...turn to the previous screen Accessing the settings menu In Shooting or Playback mode select 1 M Select a menu 2 1 2 Volume Children Sound Beep Sound Shutter Sound Start Sound Medium 1 On 1 Off Icon De...

Страница 100: ...X Display Brightness Adjust the brightness of the screen Auto Dark Normal Bright Normal is xed in Playback mode even if Auto is selected Quick View Set the duration for reviewing a captured image bef...

Страница 101: ...r of les that can be stored in one folder is 9 999 The camera de nes le names according to the Digital rule for Camera File system DCF standard If you change the names of les intentionally the camera...

Страница 102: ...otos as you rotate the camera Off On Imprint Set whether to display the date and time on your photos when printing Off Date Date Time The date and time will be displayed on the bottom right corner of...

Страница 103: ...ter Connect your camera to a computer for transferring les Printer Connect your camera to a printer for printing les Select Mode Select a USB mode on the computer when you connect your camera to anoth...

Страница 104: ...ce 105 Cleaning your camera 105 About memory cards 106 About the battery 107 Before contacting a service center 110 Camera speci cations 113 FCC notice 117 Index 118 Appendixes Refer to error messages...

Страница 105: ...emory card is not available with your camera Insert a microSDTM or microSDHCTM memory card DCF Full Error File names do not match the DCF standard Transfer the les on the memory card to your computer...

Страница 106: ...lutions can damage the camera or cause it to malfunction Do not press on the lens cover or use a blower brush on the lens t cover Cleaning your camera Camera lens and touch screen Use a blower brush t...

Страница 107: ...9 163 320 471 211 409 594 335 637 908 510 936 1 314 762 1 373 1 931 1 626 2 575 3 090 V i d e o s Approx 13 30 Approx 23 36 Approx 15 20 Approx 29 42 Approx 35 54 Approx 67 30 Approx 78 07 Approx 138...

Страница 108: ...and repeat for 5 minutes Then turn off the camera for 1 minute 4 Repeat steps 1 to 3 Videos Approx 70 min Record videos at 1280 X 720 HQ resolution and 30 fps The gures above are measured by Samsung s...

Страница 109: ...e reconnect the cable or remove the battery and insert it again If you charge the battery when the cable is overheated or the temperature is too high the indicator light may turn orange Charging will...

Страница 110: ...ly or improperly For your safety follow these instructions for proper battery handling The battery can ignite or explode if not handled properly If you notice any deformities cracks or other abnormali...

Страница 111: ...era s lifespan or performance The ash does not work The ash option may be set to Off p 50 You cannot use the ash in the d D v or some s modes The ash res unexpectedly The ash may re due to static elec...

Страница 112: ...camera is correctly connected to the external monitor with the A V cable Make sure that your memory card contains photos Situation Suggested remedies The date and time are incorrect Set the date and t...

Страница 113: ...le and connect it again Your computer cannot play videos Depending on the video player programs video les may not play To play video les captured with your camera install and use the Intelli studio pr...

Страница 114: ...c Negative Custom RGB Smart Filter Normal Miniature Vignetting Fish eye 1 Fish eye 2 Sketch Defog Image Adjust Sharpness Contrast Saturation Image sensor Type 1 2 3 Approx 7 76 mm CCD Effective pixels...

Страница 115: ...aranteed Internal memory capacity may not match these speci cations White Balance Auto WB Daylight Cloudy Fluorescent_H Fluorescent_L Tungsten Custom Set Date Imprinting Date Time Date Off Shooting Ph...

Страница 116: ...p MP4 Video MPEG4 AVC H 264 Audio AAC Audio le WAV Image size For 1GB microSDTM Super Fine Fine Normal 4320 X 3240 122 240 353 4320 X 2880 137 267 391 4000 X 3000 142 278 409 4320 X 2432 163 320 471 3...

Страница 117: ...ns of the purchase contract This product and its electronic accessories should not be mixed with other commercial wastes for disposal Correct disposal of batteries in this product Applicable in the Eu...

Страница 118: ...llation This equipment generates uses and can radiate radio frequency energy and if not installed and used in accordance with the instructions may cause harmful interference to radio communications Ho...

Страница 119: ...7 Disconnecting the device 93 Display brightness 99 Display type 24 Dragging 21 DUAL IS mode 36 B Battery Charging 108 Life 107 Speci cations 107 Beauty Shot mode 34 Blink detection 56 Burst Auto Expo...

Страница 120: ...106 Metering Center weighted 61 Multi 61 Spot 61 Motion recognition in Playback mode 70 in Shooting mode 23 Motion timer 49 Movie mode 37 Front LCD button 26 Function description 99 G Grid lines 99 H...

Страница 121: ...art image 99 T Timer 48 Touching 21 Transferring les for Mac 94 for Windows 89 S Scene mode 33 Self portrait 40 Service center 110 Settings Accessing 98 Camera 100 Display 99 Sound 99 Shooting mode Au...

Страница 122: ...Please refer to the warranty that came with your product or visit our website http www samsungimaging com or http www samsung com for after sales service or inquiries...

Отзывы: