background image

English - 3

Viewing the Menus

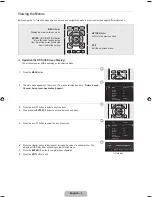
Before using the TV, follow the steps below to learn how to navigate the menu in order to select and adjust different functions.


Operation the OSD (On Screen Display)

The access step may differ depending on the selected menu. 

1. 

Press the 

MENU

 button. 

2. 

The main menu appears on the screen. The menu’s left side has icons : 

Picture, Sound, 

Channel, Setup, Input, Application, Support.

3. 

Press the ▲ or ▼ button to select one of the icons.

4. 

Then press the 

ENTER

E

 button to access the icon’s sub-menu.

5. 

Press the ▲ or ▼ button to select the icon’s submenu.

6. 

Press the ◄ or ► button to decrease or increase the value of a particular item. The 

adjustment OSD may differ depending on the selected menu.

7. 

Press the 

ENTER

E

 button to complete the confi guration. 

8. 

Press the 

EXIT

 button to exit.

Mode 

: Standard 

Backlight 

: 7

Contrast 

: 95

Brightness 

: 45

Sharpness 

: 50

Colour 

: 50

Tint (G/R) 

: G50/R50

Advanced Settings

Picture

Mode 

: Standard

Backlight 

: 7 

Contrast 

: 95

Brightness 

: 45

Sharpness 

: 50

Colour 

: 50

Tint (G/R) 

: G50/R50

Advanced Settings
Picture Options

Picture

7

 U

 Move    

L

 Adjust     

E

 Enter     

R

 Return

      ▲

Backlight

      ▼

Help icon

MENU

 Button

Display the main on-screen menu.

ENTER

E


/ DIRECTION Button

Move the cursor and select an 

item. Select the currently selected 

item. Confi rm the setting.

RETURN

 Button

Return to the previous menu.

EXIT

Exit the on-screen menu.

[QSG]BN68-01970C-L03.indd   3

2009-03-30   �� 2:17:04

Содержание UN40B6000 - 40" LCD TV

Страница 1: ...alling Batteries in the Remote Control STOP Please do not return this unit If you are having problems operating this TV Please call 1 800 SAMSUNG 1 800 726 7864 For web support please visit www samsun...

Страница 2: ...e the cables in the Holder Wire Cable so that the cables are not visible through the transparent stand Wall Mount Type Preparing before installing Wall Mount To install a wall mount from another manuf...

Страница 3: ...Press the or button to decrease or increase the value of a particular item The adjustment OSD may differ depending on the selected menu 7 Press the ENTERE button to complete the con guration 8 Press...

Страница 4: ...Analog and Digital Contact your local cable company to identify the type of cable system that exists in your particular area 5 Press the ENTERE button to select Start The TV will begin memorizing all...

Страница 5: ...R W R B G R W R W R W Y R W Y R B G R W R W R HDMI DVI PC COMPONENT VIDEO DVD Blu Ray player Cable Box Satellite receiver STB DVD Blu Ray player HD Cable Box HD Satellite receiver STB HDMI OUT Audio V...

Страница 6: ...connection Using an HDMI Cable Using a D Sub Cable HD connection Using an HDMI DVI Cable W R W R Digital Audio connection Using an Optical Cable Digital Audio System OPTICAL Analog Audio connection Us...

Страница 7: ...Instalaci n de las pilas en el mando a distancia STOP No devuelva esta unidad Si tiene problemas con el funcionamiento del televisor llame a 1 800 SAMSUNG 1 800 726 7864 Para obtener ayuda a trav s d...

Страница 8: ...bles con el soporte de cables para que stos no sean visibles a trav s del soporte transparente Tipo montaje mural Preparaci n para instalar el montaje mural Para instalar el montaje mural de otro fabr...

Страница 9: ...para seleccionar el submen del icono 6 Pulse los botones o para aumentar o reducir el valor de una opci n concreta La visualizaci n en pantalla del ajuste puede variar seg n el men seleccionado 7 Pul...

Страница 10: ...le para anal gica y para digital P ngase en contacto con su proveedor de cable para averiguar el tipo de sistema de cable existente en su zona 5 Pulse el bot n ENTERE para seleccionar Iniciar El telev...

Страница 11: ...un cable DVI AUDIO OUT DVI OUT AUDIO OUT DVI OUT o B G R W R W R W Y R W Y R B G R W R W R B G R W R W R W Y R W Y R B G R W R W R HDMI DVI PC COMPONENT VIDEO Reproductor DVD Blu ray o receptor por ca...

Страница 12: ...D Mediante un cable HDMI Mediante un cable D Sub Conexi n HD Mediante un cable HDMI DVI W R W R Conexi n de audio digital Mediante un cable ptico Sistema de audio digital OPTICAL Conexi n de audio ana...

Страница 13: ...t l commande ARR T Veuillez ne pas retourner cet appareil Si vous avez des probl mes avec ce t l viseur composez le 1 800 SAMSUNG 1 800 726 7864 Pour obtenir de l assistance en ligne visitez www samsu...

Страница 14: ...er les ls dans le porte l a n de pas les voir travers le support transparent Fixation murale Pr paration avant l installation de l ensemble de xation murale Utilisez l anneau de support 1 pour install...

Страница 15: ...la touche ou pour augmenter ou r duire la valeur d un l ment particulier Le r glage des options af ch es peut diff rer selon le menu s lectionn 7 Appuyez sur ENTERE pour terminer la con guration 8 App...

Страница 16: ...e s lectionnez la source de signal pour une diffusion analogique et num rique Communiquez avec votre c blodistributeur local pour d teminer le type de syst me de c ble de votre r gion 5 Appuyez sur EN...

Страница 17: ...ation d un c ble DVI AUDIO OUT DVI OUT AUDIO OUT DVI OUT ou B G R W R W R W Y R W Y R B G R W R W R B G R W R W R W Y R W Y R B G R W R W R HDMI DVI PC COMPONENT VIDEO DVD Lecteur Blu Ray d codeur c b...

Страница 18: ...chement HD Utilisation d un c ble HDMI DVI W R W R Branchement d un appareil audio Branchement d un PC Branchement audio num rique Utilisation d un c ble optique Syst me audio num rique OPTICAL Branch...

Страница 19: ...This page is intentionally left blank...

Страница 20: ...avez des suggestions ou des questions concernant les produits Samsung veuillez contacter le Service Consommateurs Samsung Country Customer Care Center Web Site Address CANADA 1 800 SAMSUNG 726 7864 w...

Отзывы: